Clinton CLASSIC Series User manual

CLASSIC SERIES
TREATMENT TABLES
MODELS 1010, 1020 1030 & 1013
with ADJUSTABLE BACKREST
or NON-ADJUSTABLE TOP
ASSEMBLY INSTRUCTIONS
Thank you for counting on Clinton to meet your medical
equipment needs by purchasing this fine equipment. All
Clinton equipment is designed and manufactured to pro-
vide years of dependable service because we want you as a
customer now and in the future. Below are easy to follow
instructions on how to properly assemble your equipment.
Please contact us at 800-441-9131 if you experience any
difficulty with the assembly or have questions.
INTENDED USE
Clinton treatment table, models 1010, 1020, 1030 & 1013,
are specifically designed and engineered for the use by a
single person at a time, who is attended to and observed
by trained medical personnel. Never leave anyone on the
table unattended. Person’s weight and the combination
of force exerted on the table during treatment is not to
exceed a total of 400 lbs.
Hardware Package
(4) 11/2" Truss Head Screws (4)
(8) 1" Truss Head Screws (0)
(8) 5/16" Washers (4)
(4) 5/16" Nuts (4)
(2) 21/4" Pan Head Screws (2)
(2) 3/4" Barrel Bolts (2)
(4) 11/4"
Truss Head Screws
(1030 & 1013) (4)
ASSEMBLY INSTRUCTIONS FOR CLASSIC SERIES TREATMENT TABLES
MODELS 1010, 1020, 1030 & 1013 with ADJUSTABLE BACKREST/KD & Tables with pre-attached backrest
For MODELS 1010, 1020, 1030 & 1013 with NON-ADJUSTABLE TOP & PRE-ATTACHED TOPS begin assembly with STEP 4
MAXIMUM WEIGHT CAPACITY 400 LBS
1
2
3
Place the upholstered sections on a flat surface
with the foot end on the left and fabric tag
toward the center of the table as shown. Place
the head end on right with hinge toward the center of the
table. Place frame on top with channel, teeth down, above
the head end.
Align the holes in the hinge with the holes in
the center board and fasten to center board
using 4 silver, 1" truss head screws.
Finger tighten the top's foot end to frame using
4 silver, 1" truss head screws and 5/16" washers.
Slide the foot end toward the center board and
finish tightening screws.
fabric tag teethcenter hinge
FOR MODELS WITH ADJUSTABLE BACKREST
FOR MODELS WITH ADJUSTABLE BACKREST
FOR MODELS WITH ADJUSTABLE BACKREST
IF TOP IS ATTACHED TO FRAME, SKIP TO STEP 4
KD
Quantity
Pre-Attached
Quantity
Tools Required
Phillips Screwdriver and Adjustable Wrench

FOR SAFETY PURPOSES, TAKE TIME TO CHECK ALL
SCREWS, BOLTS AND NUTS TO INSURE THAT
THEY ARE SECURELY TIGHTENED AND THAT THE
TABLE HAS BEEN PROPERLY ASSEMBLED
ACCORDING TO THESE INSTRUCTIONS.
1020 SHELF ASSEMBLY
Invert the table to an upright position on all
four legs, using caution when inverting the end
with the adjustable headrest. Apply 4 adhesive backed hook
strips to top edge of H-braces. Place the full-length shelf
on the spanner with the loop strip underside over the hook
strips on the braces.
7
8
9
5
6
4
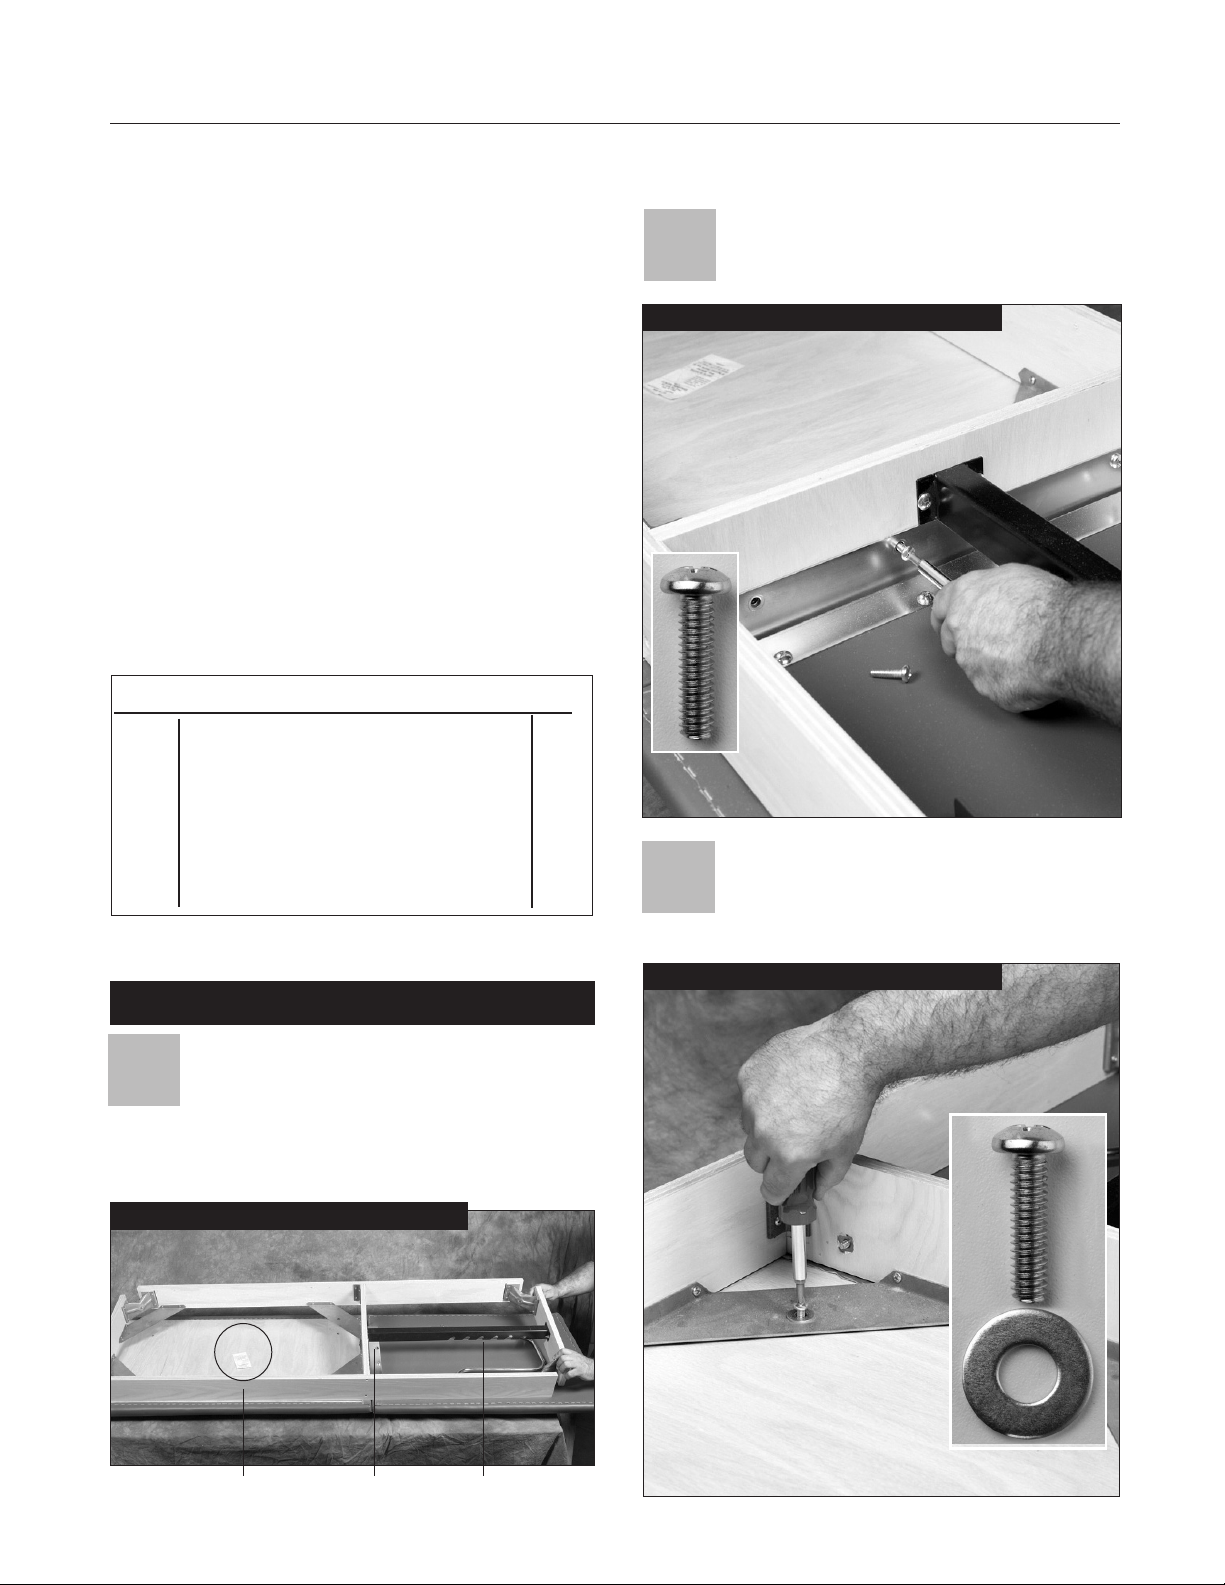
Position the H-braces with finished edge toward
top with the cut-out slot facing toward the
inside of the table and attach using the four (4)
11/2" truss head screws.
Insert the barrel bolts into the holes at each end
of the spanner. Make sure the threaded hole
in the bolt is position to accept the pan head
screw that will be inserted through the H-brace.
Insert the 21/4" pan head bolts
through each H-brace and into the
barrel bolts in the spanner. Finger
tighten until the screw catches the threads in
the barrel bolt, then secure with a screwdriver.
Return to each corner leg and finish
tightening each nut. DO NOT OVER
TIGHTEN.
Position leg in the leg brace with H- brace hole
facing inward. Attach the leg using 5/16" washer
and 5/16" nut. Finger tighten nut now, and fully
tighten after step 6 is completed. Repeat with remaining
legs.
PROCEED TO STEPS 9 & 10 ON BACK COVER
FOR MODELS 1030 & 1013
Adhesive-Backed Hook Strips

© Copyright 2014, Clinton Industries, Inc.
Clinton Industries warrants manufactured products to be free of defects in materials, workmanship or design under
normal use for five years on all mechanical products and all electrical components from the date of purchase. This
warranty does not include damage resulting from accident, abuse or misuse, alteration, or negligence of the product and
expressly excludes normal wear of parts (including but not limited to vinyl). Contact Clinton for full warranty
details. ANY ALTERATIONS TO OUR PRODUCTS VOIDS ALL WARRANTIES AND CLAIMS.
Warranty
Clinton products are built to be durable. With proper care, your Clinton equipment will provide years of
superior looks and performance. Clean table with a soft cloth and any mild cleaning agent that may be required for
sanitation. NEVER use abrasive scrubbing agents that may scratch the surfaces. Before using any cleaning agents,
try them on a small inconspicuous area to insure that they will not harm the upholstery or any
other surface.Damage from cleaning is not covered under the warranty. Do not use alcohol based
cleaning agents.
Periodically check that all fasteners are secure and operating properly.
Care & Cleaning
11
10 1030 & 1013 SHELF/DRAWER ASSEMBLY
Align pre-drilled holes and edges of the drawer
or tier shelf section. Fasten shelf by screwing the
supplied 1 1/4” black truss head screws through shelf and
into pre-inserted, threaded inserts.
1030 & 1013 SHELF/DRAWER ASSEMBLY
Using assistance, place the drawer box (with the
drawers removed) or tier shelf on the full shelf,
aligning it with the end of the shelf that has the pre-drilled
holes.
MODEL 1030
MODEL 1013
Limited Warranty
ON FRAME &
ELECTRICAL
COMPONENTS
Limited
Warranty
This manual suits for next models
4
Other Clinton Indoor Furnishing manuals


Popular Indoor Furnishing manuals by other brands


Baxton Studio
Baxton Studio Rasa 146 C Assembly instruction

Living Spaces
Living Spaces 4HM360B owner's manual

Crate&Barrel
Crate&Barrel Calypso manual

Belleze
Belleze Elenor 014-HG-31808 quick start guide

Accentrics Home
Accentrics Home Jasper DS-D668-701-2 manual

aidapt
aidapt VG840 Fixing and maintenance instructions

Mobital
Mobital Tuk Tuk Coffee Table Assembly instructions

BUSH FURNITURE
BUSH FURNITURE kathy ireland HOME KI30102 manual

Blanco
Blanco BLANCOQUADRIS 157-174 Specification sheet

Birlea
Birlea MARQUIS FABRIC Assembly instructions

SPARKLE
SPARKLE 406/9803 Assembly instructions

INOSIGN
INOSIGN PARIS 055 Assembly instruction