Clip Sonic TEC598 User manual
User manual
WWW.CLIPSONIC.COM
Reference : TEC598
Versi n : 1.3
Language : English
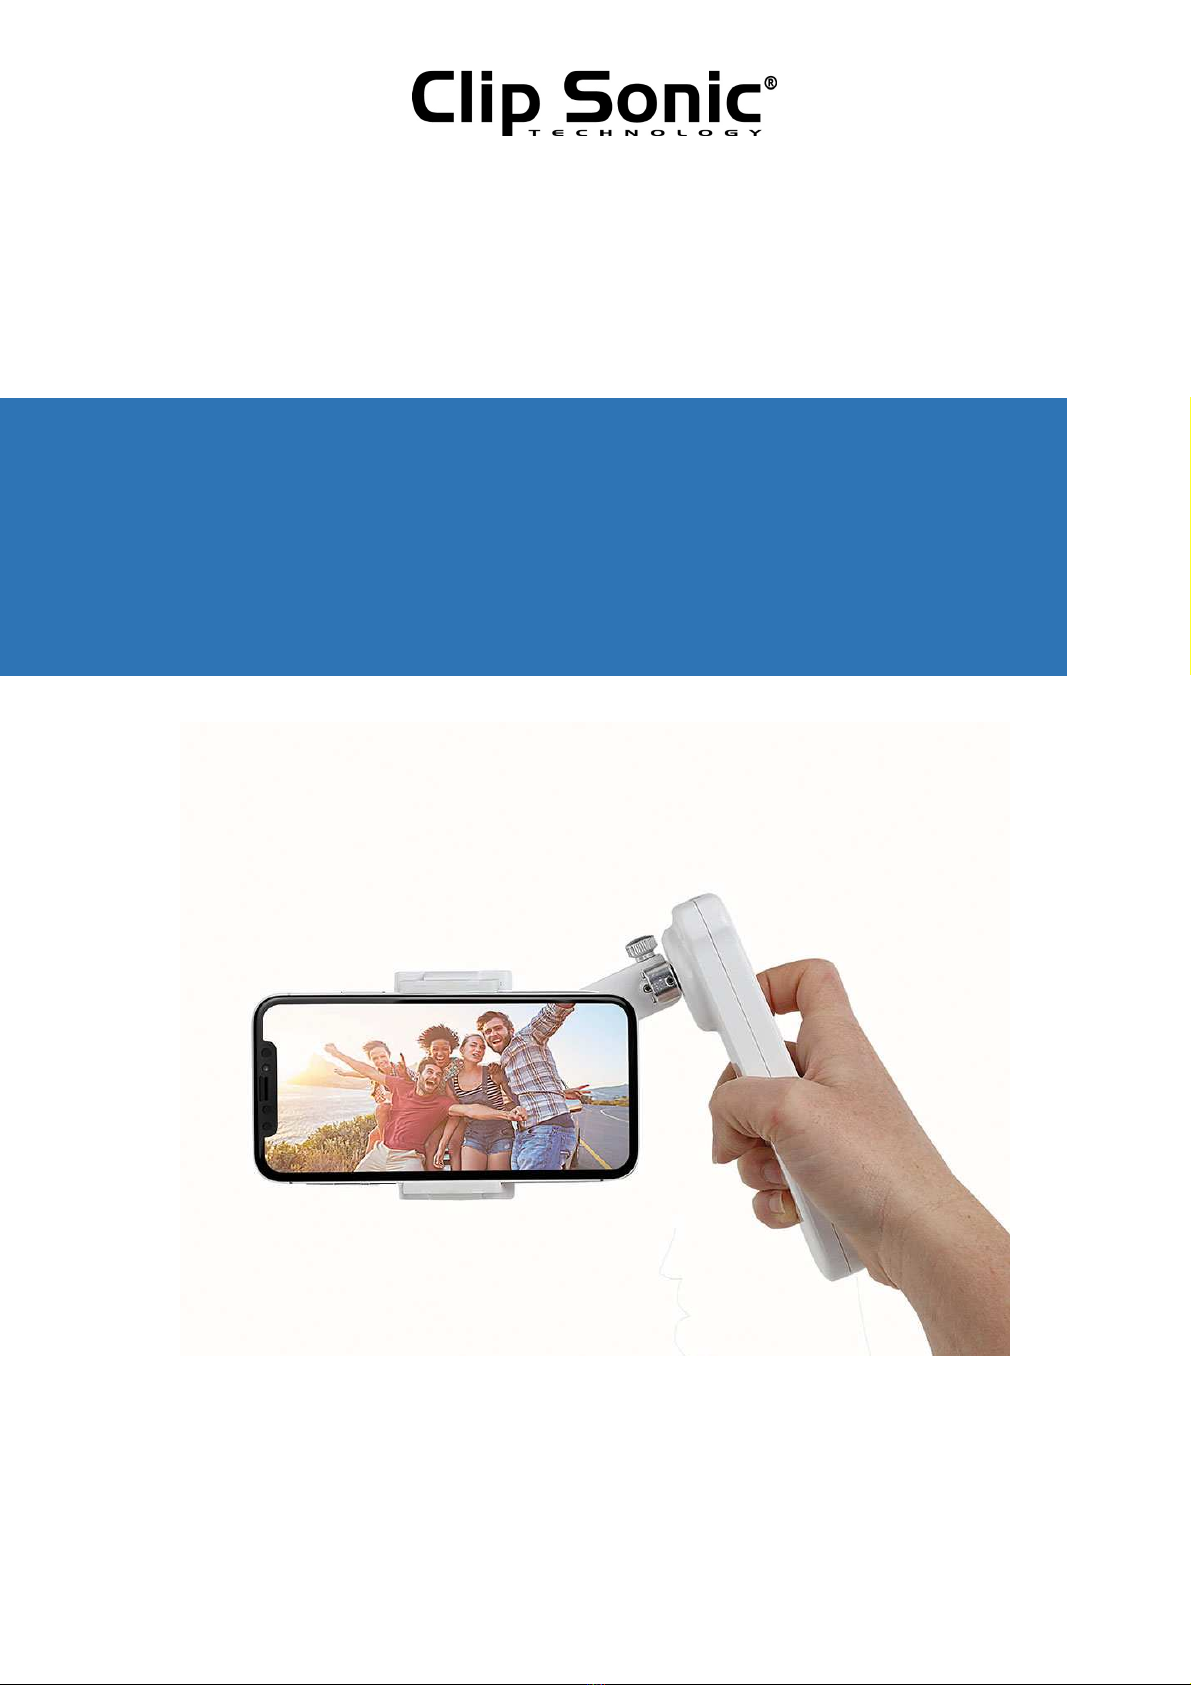
M t rized stabilizer f r
smartph ne

User manual
1
Thank y u f r buying ur CLIP SONIC pr duct.
We take great care in design, erg n mics and ease f use f ur pr ducts. We
h pe that this pr duct will give y u c mplete satisfacti n.
This instructi n manual is als available n ur website www.clips nic.c m
SAFETY INSTRUCTIONS
PLEASE, TAKE TIME TO READ WELL THE INSTRUCTIONS
FOR USE PARTICULARLY BEFORE THE FIRST USE.
1. Keep the device away fr m inflammable materials and heat s urce when
charging and d n t c ver either the device r the charger. Make sure the
charging circumstance is ventilated under safe.
2. Never leave the charging pr cess unattended.
3. Keep device away fr m water, il and ther c rr sive liquids r gases t
av id sh rt circuit that might damage the electr nic system r lead t
battery expl si n.
4. Charge the device regularly when device is n t in use f r a l ng time.
5. Turn ff device and st p charging immediately when y u find there is
burning smell, def rmati n r ther abn rmal cases ccur and handle
device pr perly t av id battery expl si n.
Disclaimer
Mis perati n f charging might lead t fire and pers nal injury r pr perty
damage. User f this device agrees t ackn wledge all risks in using the
device.
Warning
The manufacturers, wh lesalers and dealers d n t bear any legal
resp nsibility f r all accidents the users might have that are n t caused by
quality f the pr duct Please read the instructi n, especially the charging
part carefully. If y u are unsure h w t charge the device, please c nsult
y ur l cal dealer bef re use.
User manual
2
PRODUCT PARAMETERS
DETAIL OF PACKING
C mpatible Ph nes
SMART ph ne with screen size less than 5.5 inch
Pitch axis angle
range
±175 degree
H riz ntal shaft
angle
±55 degree
Pitch axis c ntr l
angle
±45 degree
(Only available f r
Bluet th
®
L w c nsumpti n. Intenati nal Bluet th 4.0 standard
Battery
1000 mAh Li
-
P
Charging time
2
-
3 h urs
Maximum P wer
<=10w
W rking Durati n
2
-
5 h urs c nstantly depending n ph ne weight
Material
PC engineering plastic
Size
150(L)X48{W)X54(MH)
Weight
189g
Indicati n
LED
Need t charge when red LED
flashes sl wly.
Ready f r aut turn ff nce red LED flashes rapidly.
Bluet th® c nnecti n is available when blue light flashes
dimly (Bluet th® versi n nly).
W rks n rmally when blue LED lights up c nstantly.
User manual
3
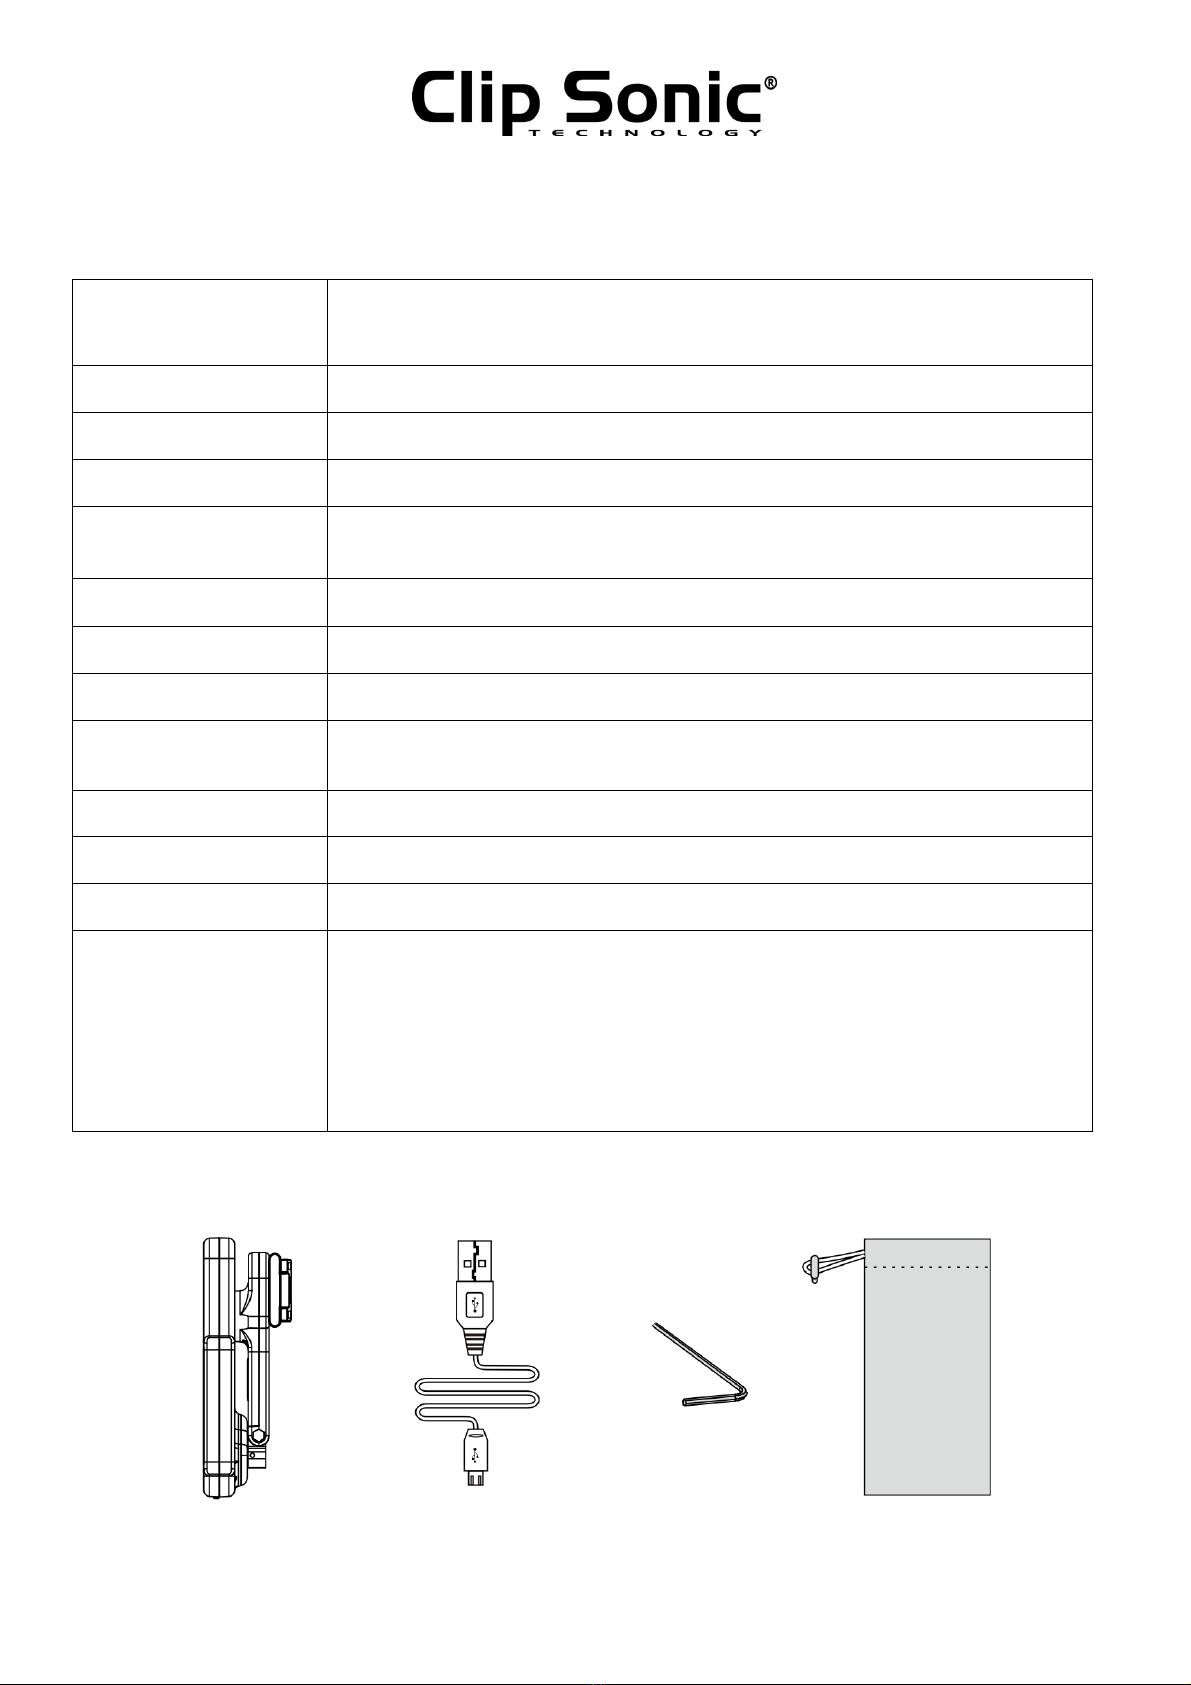
Handled stabilizer Charging c rd Hex allen wrench
Velvet bag
User manual EVA thickening pads
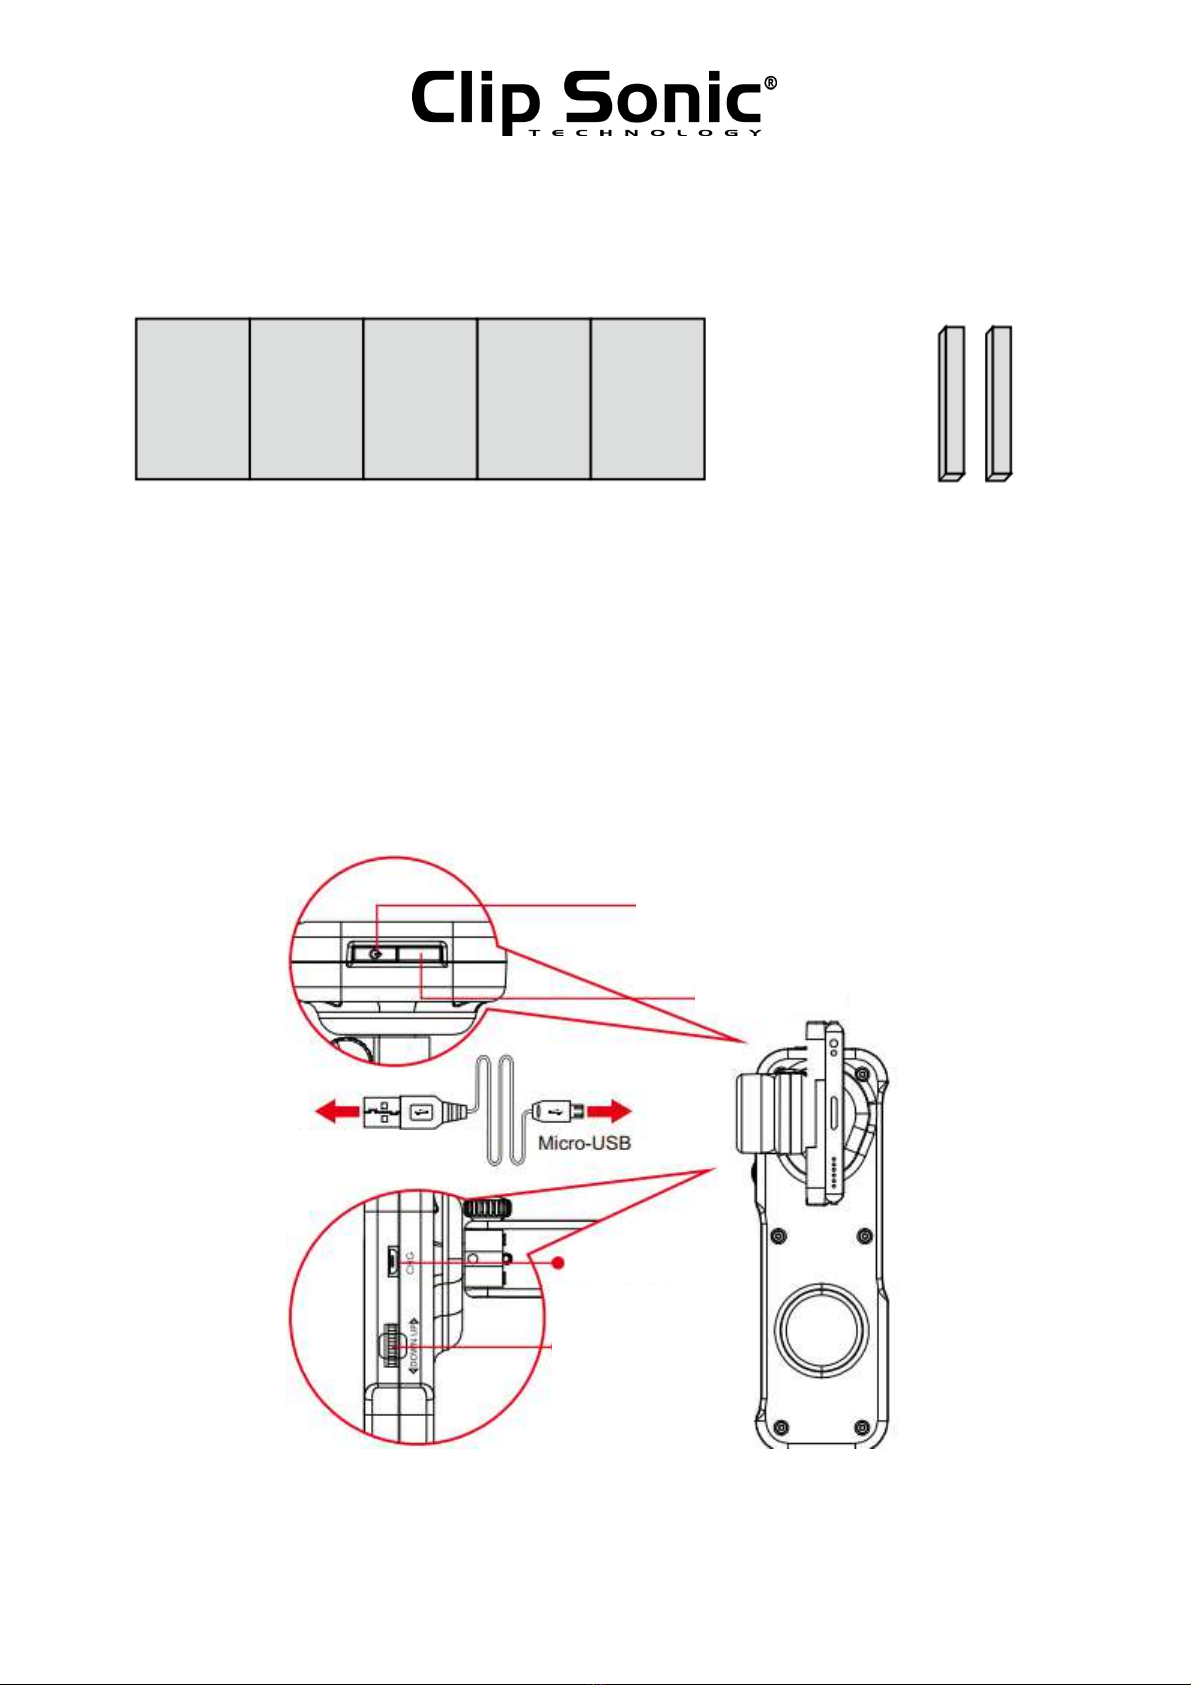
STRUCTURES OF HANDHELD STABILIZER
•
Green LED light is n when charging.
#
LED light is ff when charging is c mpleted.
P wer switch (press and
h ld f r 2 sec nds t turn
n/ ff
)
LED indicat r
5V p wer adapt r
Charging p rt
Tilt kn b (center is
ph t /vide
butt n –
Bluet th®
versi n nly)
User manual
4
ATTENTION
This stabilizer is m t r-l ck pr tective. When bumped
r bstructed, the stabilizer will aut matically p wer
ff in 10-15 sec nds.
The packaging and user manual c ntain imp rtant
inf rmati n, please keep f r future reference.
QUICK START
Attention : Please do not turn on the stabilizer before placing your smartphone
on the stabilizer.
It is very important to adjust gravity of the phone balanced on the stabilizer
before use it. The more balanced you have placed your phone the stabilizer will
be more power saving so you will be able to use it longer time.
Please turn off the stabilizer before you take off your phone from the stabilizer.
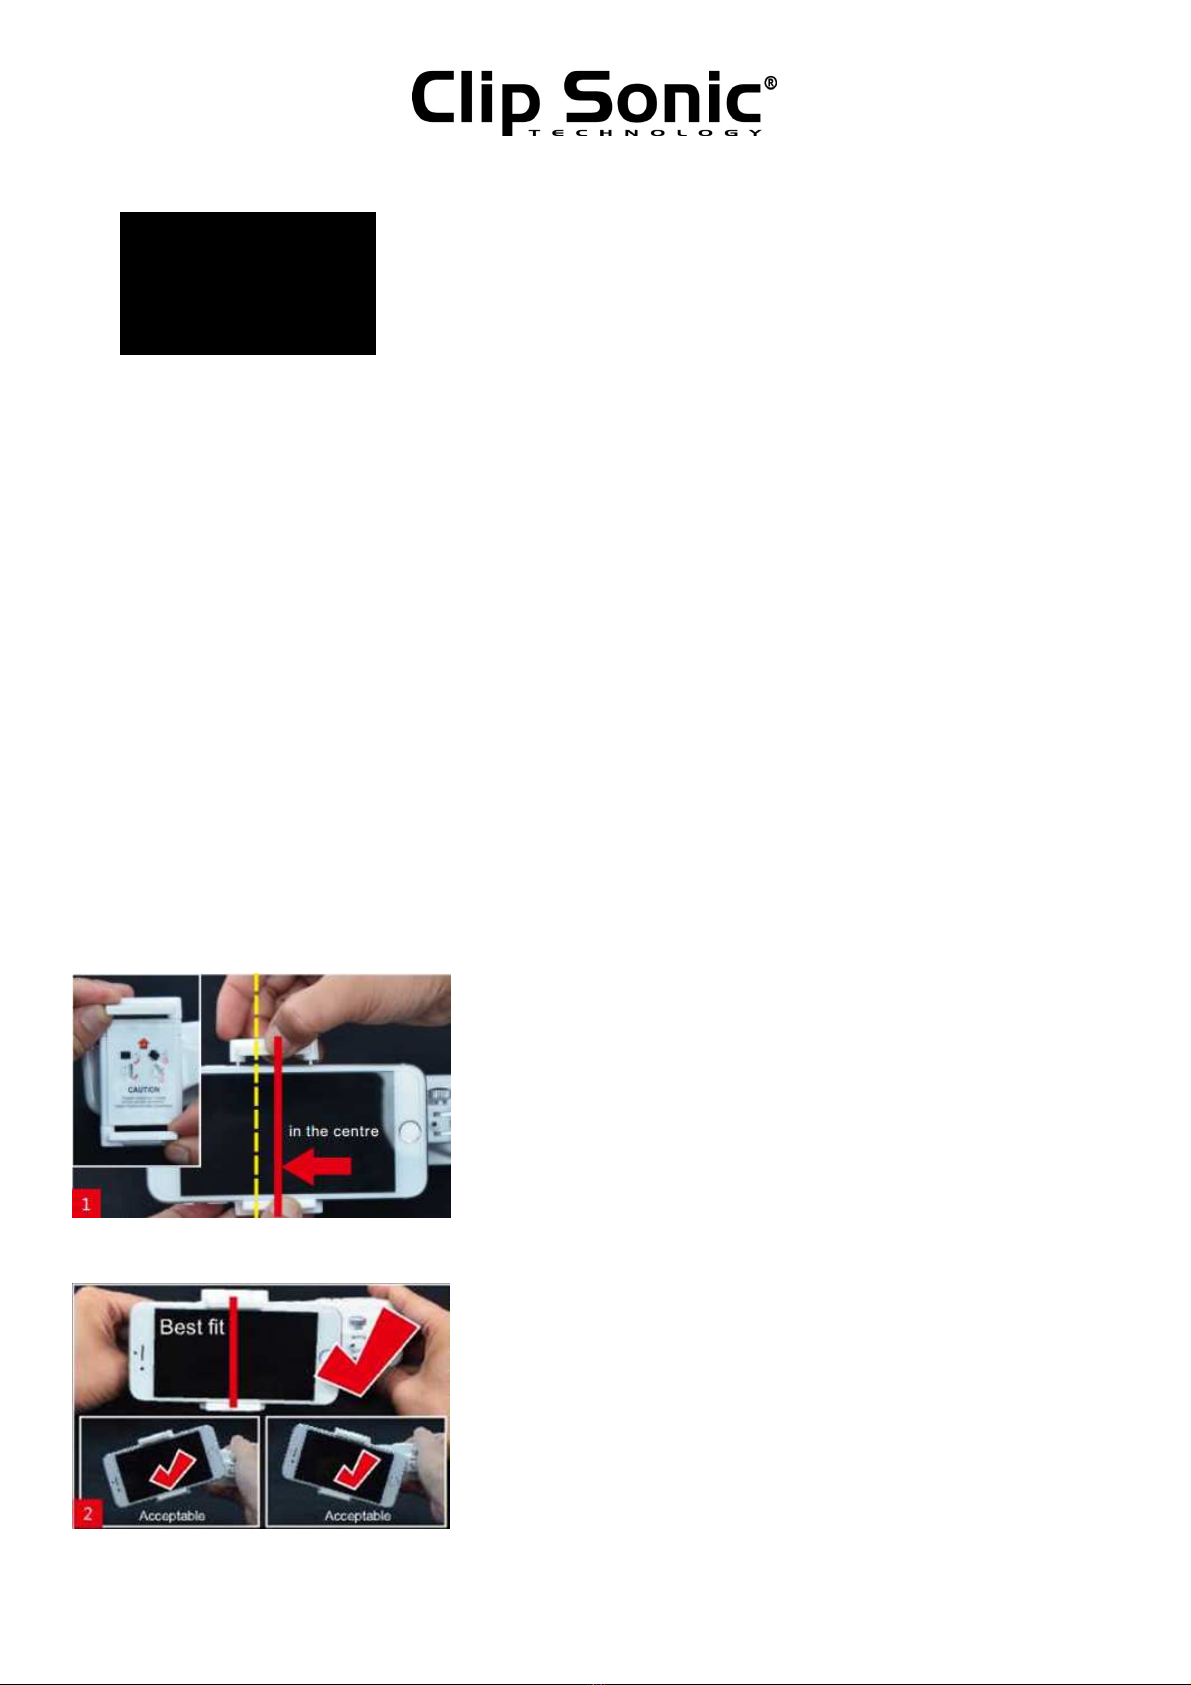
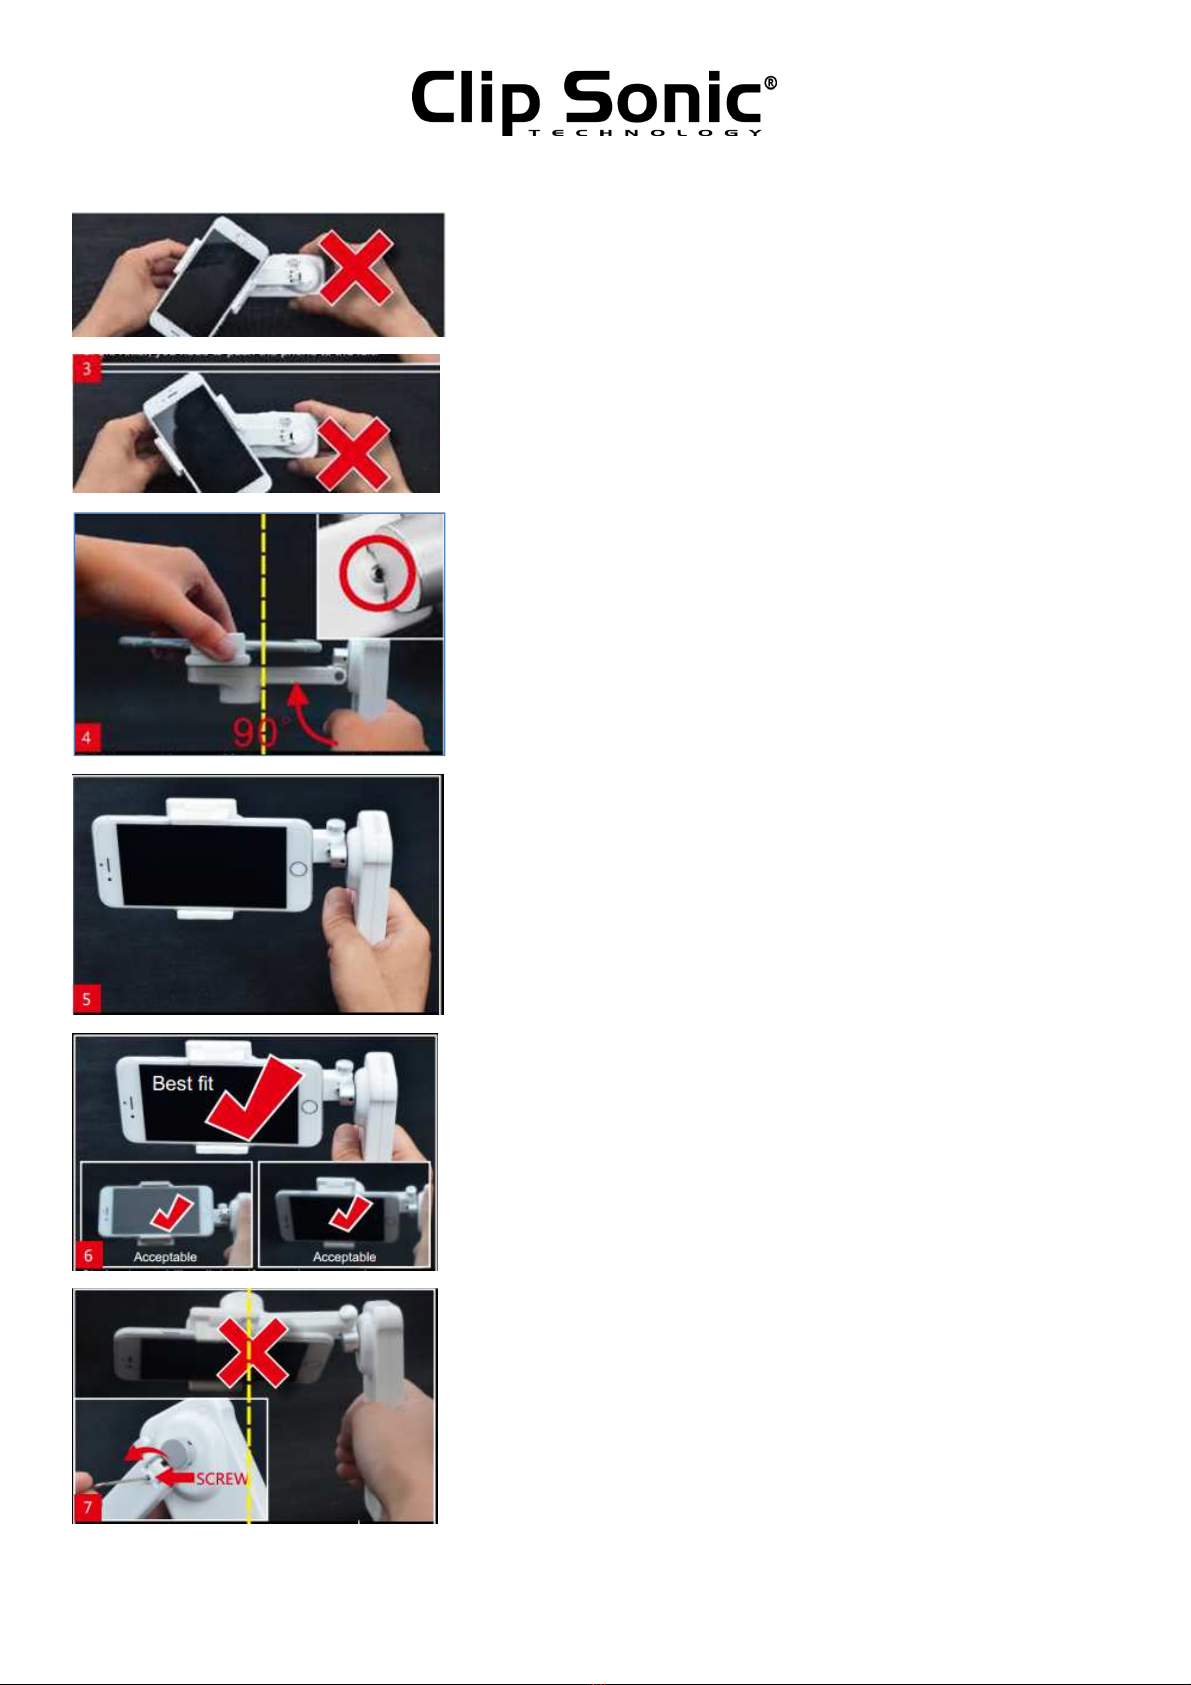
Place
the Ph ne int the ph ne
h lder. Put it n the middle. Please
p siti n the camera f the ph ne
n the left side as sh wn. If the
p wer switch f y ur ph ne is n
its side, please av id clipping n it.
H ld the stabilizer up with screen f y ur
ph ne faces y u. Shake the stabilizer lightly. If
the smartph ne remains balanced (parallel t
the r ller f the stabilizer r at least remains
less than 30°) c ngratulati ns! Y u d n t
need t adjust the gravity f the r ller.
User manual
5
If the ph ne is tilted n the right as sh wn, t
adjust gravity f the r ller, y u need t push the
ph ne n the left.
If the
ph ne is tilted n the left as sh wn, t
adjust gravity f the r ller, y u need t push
the ph ne n the right.
F ld the machine arm 90° perpendicular t
the handle f the stabilizer, until the
hexag n screw h le reaches against the
silver metal part.
H ld the
stabilizer with y ur right hand.
R tate the r ller f the stabilizer until
screen f y ur ph ne faces y u. N w
check gravity f the tilt.
Shake the stabilizer lightly. If y ur ph ne remains
balanced vertical t the r ller f the stabilizer r
at least remains less than 30 degrees t the r ller
f the stabilizer, gravity f the tilt is OK. Y u can
use y ur stabilizer n w.
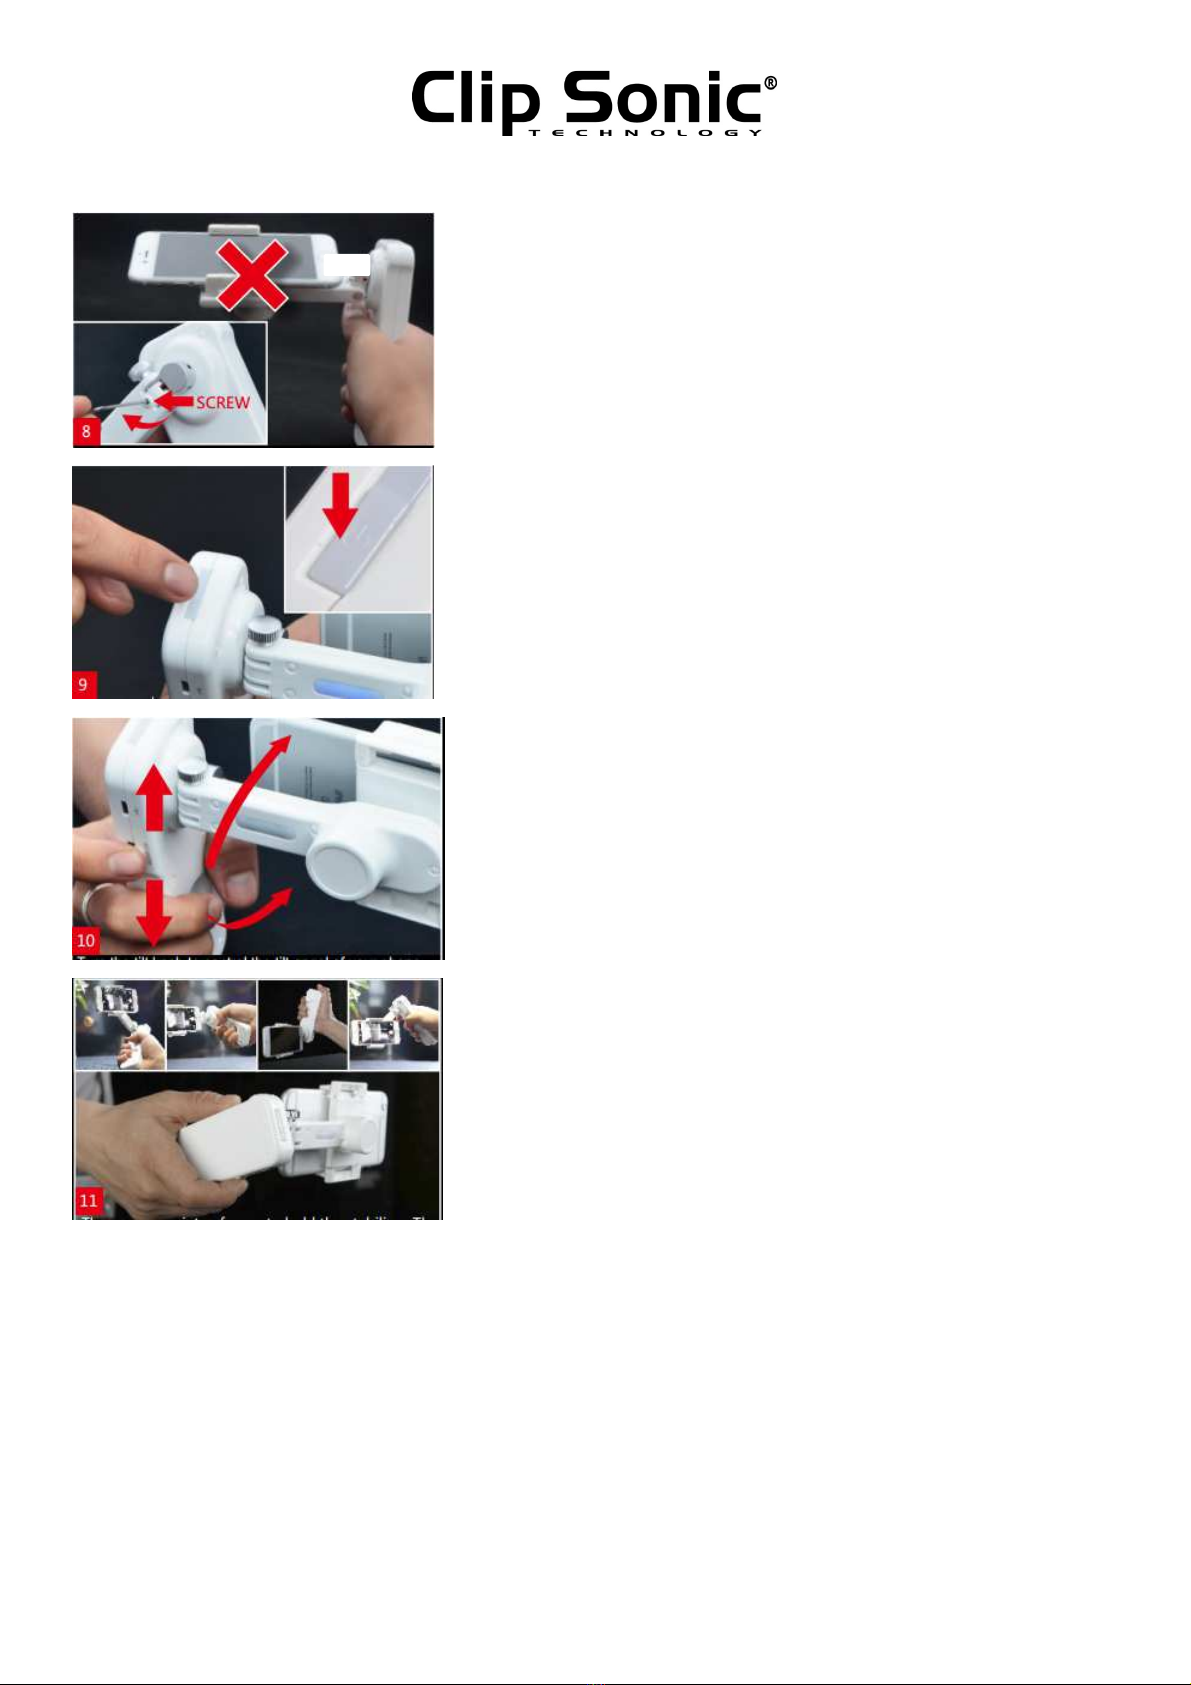
If the screen f y ur ph ne faces d wn as sh wn,
please adjust screw f the r ller ut
anticl ckwise with the screw driver packed int
the b x. The adjustment sh uld be less than a
circle.
User manual
6
BLUETOOTH® PAIRING
1) Starting up - Please activate Bluet th® in y ur ph ne after y u have
placed y ur ph ne balanced n the stabilizer.
If the screen f y ur ph ne faces up as sh wn,
please adjust screw f the r ller in cl ckwise. The
adjustment sh uld be less than a circle. And
please make sure the screw sh uld n t be l wer
than the t p f the plastic c ne r the stabilizer
will be damaged.
Press the p wer switch
f r 2 sec nds t turn
n y ur stabilizer. C ngratulati ns! Y u can
n w use y ur stabilizer. If y ur stabilizer is
Bluet th® versi n, please refer t “pairing
Bluet th®” n next page t c nnect y ur
ph ne t stabilizer.
Turn the tilt kn b t c ntr l angle f
y ur ph ne. Press center f tilt kn b t
take ph t s and vide s ( nly available
f r Bluet th® versi n)
There are a variety f ways t
h ld
the stabilizer. The sh wn cases are
rec mmended h lding ways t
achieve best sh ting effect when
y u are walking.

User manual
7
2) Power on - Press p wer butt n 2 sec nds t turn n the stabilizer. Blue
light beside the p wer butt n flashes dimly, indicating the stabilizer is
searching f r Bluet th® devices.
3) Search - N rmally, it takes the ph ne 3 sec nds t search f r available
Bluet th® devices. N w y u will find X-CAM SIGHT 2 in devices list. (F r
1st time c nnecti n, it might read as EFF...)
4) PAIR – Select X-CAM SIGHT 2 and f ll w the nscreen pr mpts t pair
y ur ph ne with X-CAM SIGHT 2. Blue LED n the stabilizer lights up
c nstantly if y ur ph ne is successfully c nnected with X-CAM SIGHT 2.
TROUBLE SHOOTING
PROBLEM CAUSE SOLUTION
The
stabilizer
is aut
p wer ff
1. Gravity f the ph ne is n t
balanced n the tilt r r ll
directi n. P r balance
leads t t large current
and triggers verl ad
pr tecti n.
2. There is bstructi n t the
stabilizer, maybe fr m y ur
ph ne r c llisi n while y u
are sh ting. Obstructi n
leads t excess resistance
and triggers r verl ad
pr tecti n.
3. Y u turn n the stabilizer
with ut the ph ne placed.
4. The handle f the stabilizer
is placed h riz ntally.
1. Adjust gravity f y ur ph ne
n the stabilizer bef re turn n the
stabilizer. Make sure y ur ph ne d es
n t tilt t the left r the right, leans t
the fr nt r the back.
2. Pr perly place y ur ph ne t the
stabilizer, make sure the ph ne will
n t t uch any part f the stabilizer
except the ph ne clipper when y u
use it. D n t bump int any
bstructi n when y u use the
stabilizer.
3. Y u sh uld pr perly place y ur
ph ne n the stabilizer bef re turn n
the stabilizer. Otherwise, the
stabilizer will activate verl ad
pr tecti n and aut matically shut ff.
4. Never place the handle f the
stabilizer h riz ntally, r the stabilizer
will activate verl ad pr tecti n and
aut matically shut ff.
User manual
8
My Ph ne
cann t
pair with
the
stabilizer
1. Y ur ph ne has been
c nnected t ther device.
1. Disc nnect y ur ph ne t ther
device first and pair it with
X-CAM
SIGHT 2
.
2. Make sure Bluet th® versi n f
y ur ph ne is 4.0 r up and
Andr id versi n f y ur ph ne is
4.3 r up.
I'm
unable t
charge
the
stabilizer
1. P wer f y ur stabilizer is
full.
2. S mething is wr ng with
y ur r. USB charging cable.
1. P wer f y ur stabilizer is
full. If y u are still unable t turn
n the stabilizer; the reas n must
be that gravity f y ur ph ne n
the stabilizer is still n t balanced.
2. Charging cable f the stabilizer is
the same with m st f the Andr id
ph nes. Please c mpare if the
plugging end is the same, y u c uld
use y ur Andr id ph ne's charging
cable.
EU DECLARATION OF CONFORMITY
We
DELTA
BP61071
67452 Mund lsheim – France
Herewith declare under ur s le resp nsibility, that the radi equipment
M t rized stabilizer f r smartph ne
TEC598 (Frequency range 2402MHz-2480MHz)
Fulfils the essential requirements f the Directive 2014/53/UE
The f ll wing standards were applied:
Radi :
EN 300 328 V1.9.1
EMC:
User manual
9
EN 301 489-1 V1.9.2
EN 301 489-17 V2.2.1
Health and Safety:
EN 60950:2005 + A1:2009 + A2:2013
EN 62479: 2010
Mund lsheim, 15/01/2018
C rrect disp sal f the unit
(Electrical and Electr nic Equipment)
(Applicable in the Eur pean Uni n and the rest f Eur pe that have ad pted separate c llecti n systems
c untries)
The Eur pean Directive 2012/19/UE n Waste Electrical and Electr nic Equipment (WEEE), requires that
ld h useh ld electrical appliances must n t be disp sed f in the n rmal h useh ld waste stream. Old
appliances must be c llected separately in rder t ptimize the rec very and recycling f the materials
they c ntain and reduce the impact n human health and the envir nment. The symb l f the cr ssed ut
dustbin is marked n all pr ducts t remind the bligati ns f separate c llecti n. C nsumers sh uld
c ntact their l cal auth rity r retailer f r inf rmati n c ncerning the c rrect disp sal f their pr duct.
•N n c ntractual illustrati n
•Pr duct inf rmati n is subject t change with ut pri r n tice.
CLIP SONIC
BP 61071
67452 Mundolsheim

User manual
10
Table of contents


