Close Parent Caboo User manual

Always carry safely…
Please take the time to read through all of the instructions before using your Caboo, we would ask you to pay special attention to the safety precautions
and warnings below, these are designed to ensure safe carrying at all times. With practice it will be second nature for you to carry your baby, but in the
meantime you can practice with a soft toy or doll in front of the mirror to build up your condence! Download the video demonstration from www.caboo.
info before you start!
Safety precautions
Make sure baby is in view at all times…regularly check your baby is secure and happy
Keep baby high up on your chest… close enough to kiss
Keep baby’s chin off their chest…at least 1cm gap and free owing air
Baby should be held comfortably close…and fully supported
Make sure baby is central…and the cross section is spread out under their bottom
Don’t overdress your baby… remember your body heat will keep them warm so dress them down a layer and never cover baby’s head or face with
an item of your own clothing.
Use common sense… don’t engage in activities which may expose you or your baby to unnecessary danger or risk… hot food or drink, handling knives
or operating machinery
WARNINGS
PLEASE ENSURE THAT TOGGLE AND CORD ARE ALWAYS UNDERNEATH YOUR BABY AND NEVER NEAR BABY’S HEAD OR NECK
TAKE CARE WHEN BENDING OR LEANING FORWARD, ALWAYS SUPPORT BABY
THIS CARRIER IS NOT SUITABLE FOR USE DURING SPORTING ACTIVITIES
YOUR BALANCE MAY BE ADVERSELY AFFECTED BY YOUR MOVEMENT AND THAT OF YOUR CHILD
Wash at 30°C tumble dry on low heat!
Special note when washing…Tie your Caboo inside a pillowcase when washing and drying to keep the rings away from the machine drum and reduce the noise.
*Close accept no responsibility for individual appliances.
IMPORTANT! KEEP FOR FUTURE REFERENCE
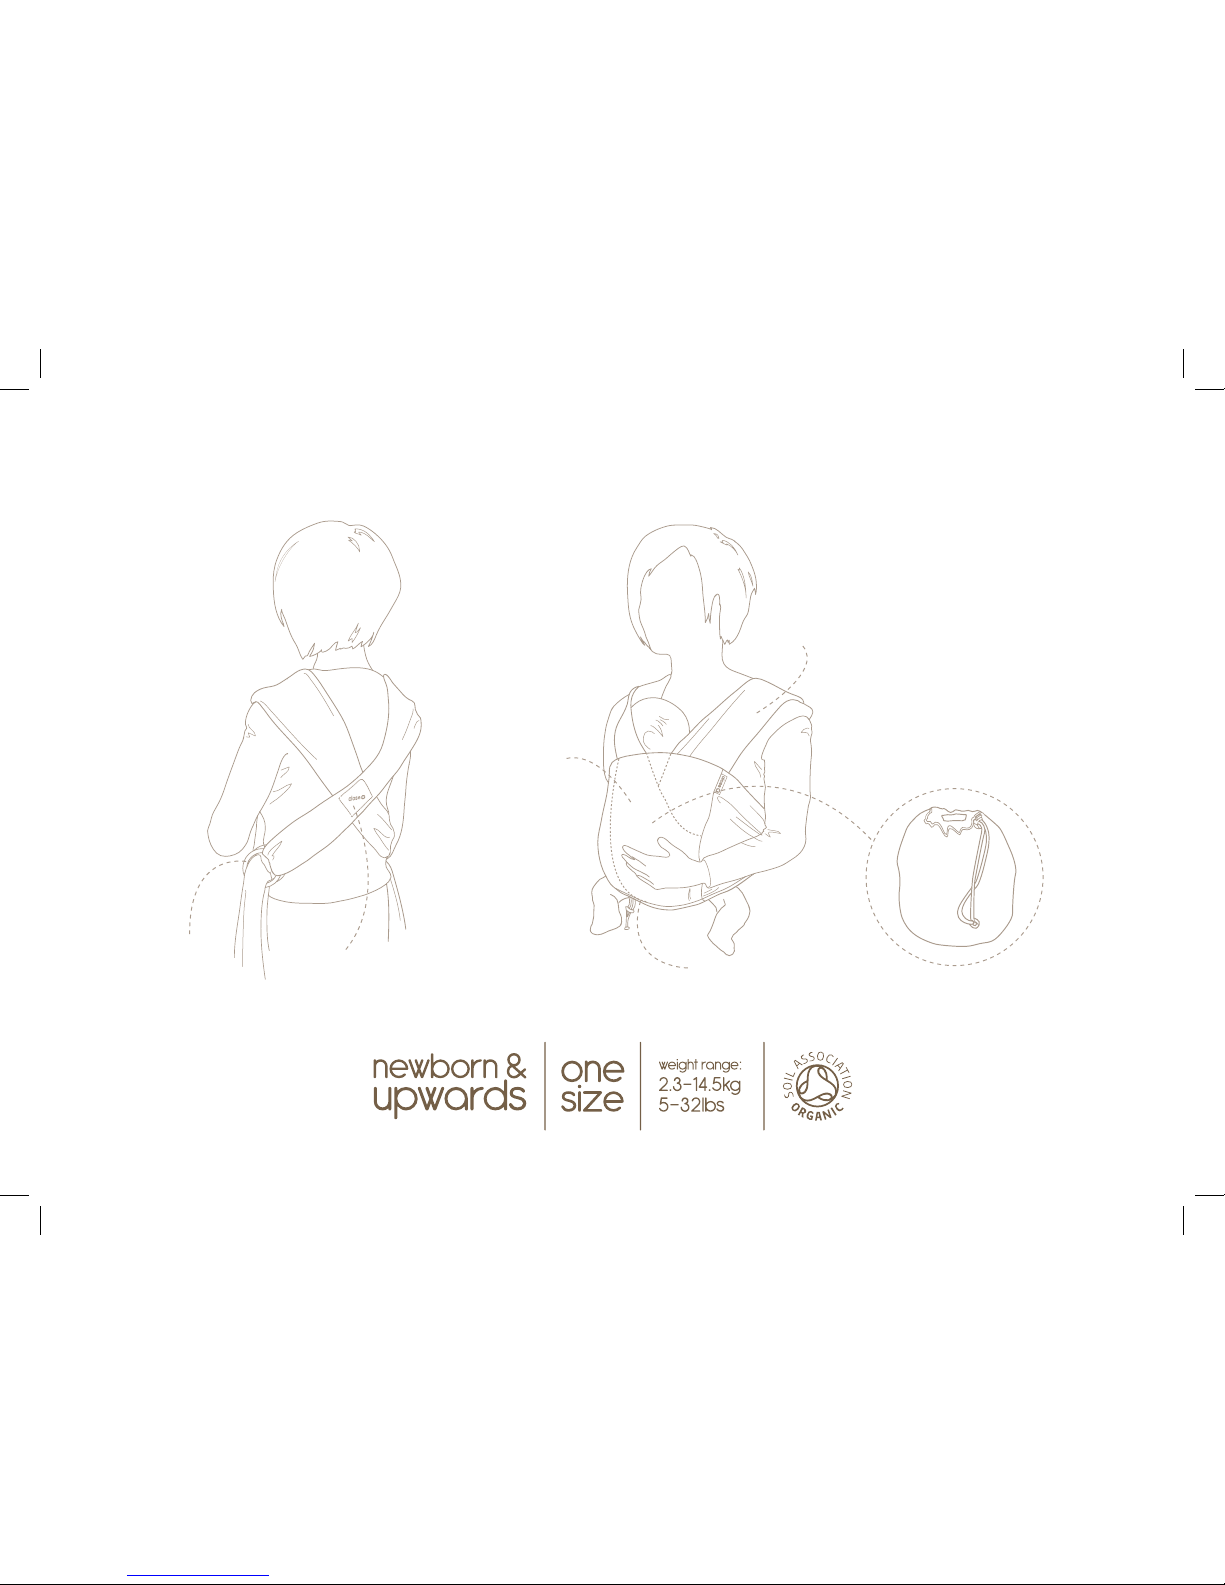
Parts of my Caboo...
rings the xed cross
inner strap
outer strap
the wrap/bag
cord and toggle

Fig A.1 - Hold the carrier out in front of you as
shown…the Close logo should be facing you
reading the right way up.
Fig A.2 - Place the carrier over your head like
a T-shirt…your arms should go out through
the sides.
Fig A.3 - Pull the carrier down at the cross or
feed it back over your shoulders ensuring that
none of the fabric is twisted…the xed cross
should be in your mid to low back.
Fig A.4 - Tighten the carrier by pulling down
and forward evenly on both straps leaving just
enough room to get your baby in...it is important
that it’s not too loose.
Fig A.5 - To check you have left enough room, simply
place your hands behind the straps as shown…you
should be able to stretch the fabric approximately 10-
12cm clear from your chest, no more. Take some time to
identify the inner strap this is the strap that runs closest to
your body, the other is referred to as your outer strap.
Fig A.6 - To loosen the fabric at any time lift
the visible front/top ring up and outwards
and pull back the fabric above the ring to
lengthen the strap.
Putting on your Caboo… A

If you need to thread the rings before use…
Then repeat the steps right to left and go straight to Fig A.3 and follow the steps from there.
Special note for breastfeeding mums…
Re-thread the rings to alternate sides when breastfeeding, (make sure baby is not in the carrier); pull the fabric of the inner strap out of the rings …take
it back across you over the top of the opposite strap and re-thread in the same rings.
Fig B.1 - Take the carrier out of the bag and
place it over your shoulders, cross section to
the back.
Fig B.3 - Then take the end of the strap and
thread it back through the front/top ring. To test
whether you have threaded them correctly pull
on the fabric behind the rings…it should stay
rmly in place.
B
Fig B.2 - Take the strap over your left shoulder
across your body and thread through both
rings.
Positions 0-3 months - Weight range 5lbs – 2.3kg+
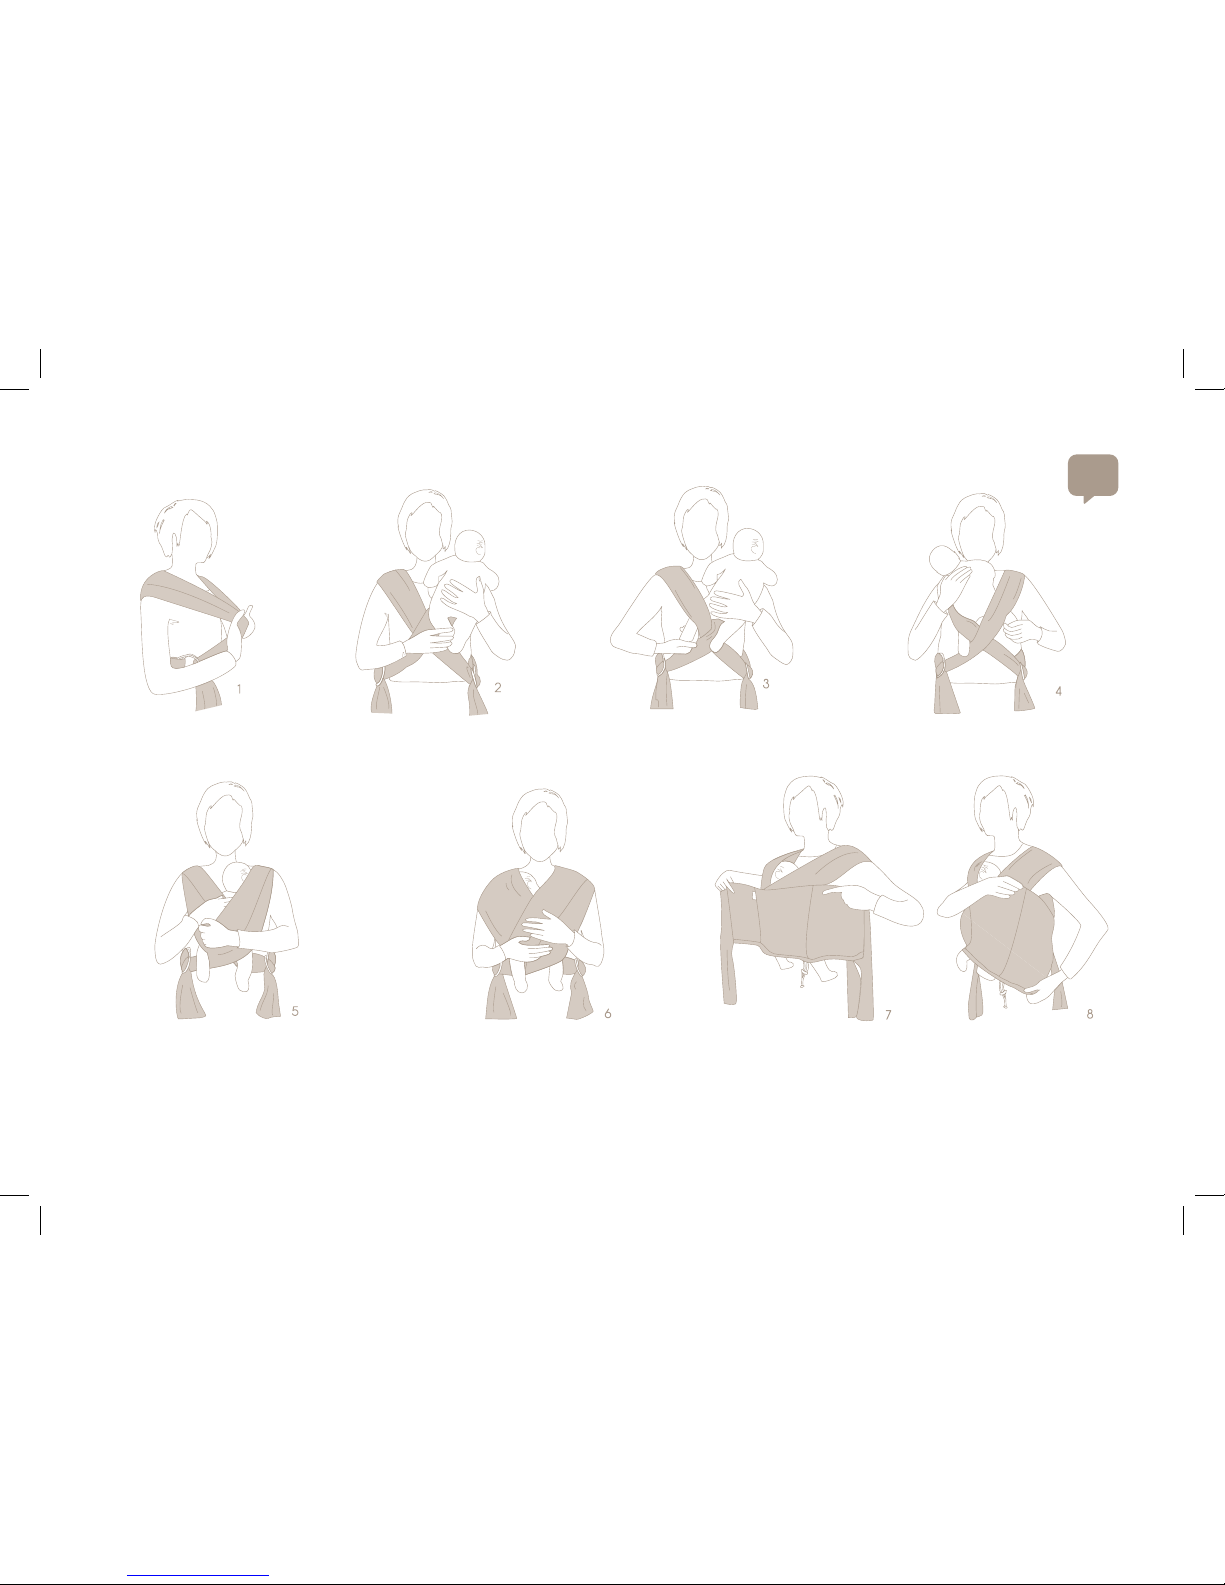
Upright position…
Fig C.1 - Always check you have left
10-12 cm space between you and
the carrier.
Fig C.2 - Pick baby up and support them
with one hand high over your shoulder
on the outer strap side.
Fig C.3 - Use your free hand to reach under the
top part of the inner strap, slide it down and
guide your baby’s leg through.
Fig C.4 - Transfer your baby to the opposite
shoulder supporting their head and collect the
other leg through the outer strap.
Fig C.5 - Lower baby’s bottom down inside the
cross created by the straps. Spread the straps
(inner strap rst) fully and evenly all across
your baby’s back and arms and all the way to
the back of baby’s knees so they sit in a frog
legged position …ie with their knees higher than
their bottom.
Fig C.6 - Lay baby’s cheek against your chest to ensure
they have free owing air… their chin should be clear of their
chest. To give your newborn the neck support they need
simply spread the fabric from one shoulder behind baby’s
head…it is good to do this with a baby of any age while they
sleep. The loose ends of the straps may be tied to the front
or behind you.
Fig C.7 - Turn the bag inside out
to make it into the wrap, then
place the wrap around you
both, with the cord and toggle
always at the bottom nearest
your baby’s legs.
Fig C.8 - Tie securely in a double knot
behind your back. Spread the mate-
rial out to bring the top edge level with
top of baby’s shoulders, and tighten
the toggle under your baby’s bottom
to secure the wrap and support your
baby.
C
Table of contents
Other Close Parent Baby Carrier manuals


