CMOSTEK CMT2110A User manual

AN103
Rev 1.0 | Page 1 / 23
www.cmostek.com
Introduction
CMT2110A/2210A One-Way RF Link Development Kits (Development Kits) are a set of the hardware and
software tools designed to help the users to easily evaluate the performance and demonstrate the features of
products CMT2110A and CMT2210A. These two devices are part of the CMOSTEK Microelectronics Co., Ltd.
(CMOSTEK) NextGenRFTM family, which include a complete line of transmitters, receivers and transceivers. The
CMT2110A is an ultra low-cost, highly flexible, high performance, single-chip OOK transmitter for various 240 to
480 MHz wireless applications. The CMT2210A is an ultra low-cost, highly flexible, high performance, single-chip
OOK receiver for various 300 to 480 MHz wireless applications. These two devices are optimized for the low
system cost, low power consumption, battery-powered one-way RF link application with their highly integrated
and low power design.
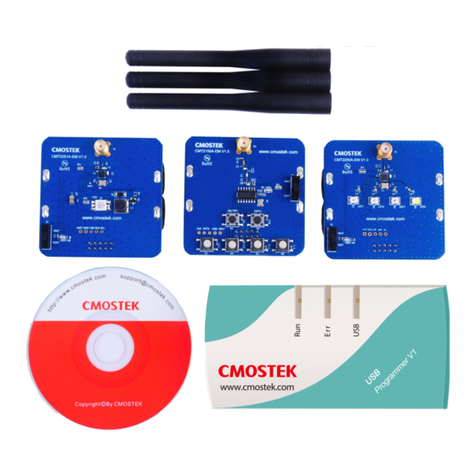
The Development Kits contain the components of two evaluation boards named RF-EB, a Tx evaluation module
named CMT2110A-EM, an Rx evaluation module named CMT2210A-EM, a USB Programmer and a PC
application named RFPDK (RF Products Development Kit). The package of the Development Kits is shown in
Figure 1.
Figure 1. CMT2110A/2210A One-Way RF Link Development Kits
AN103
CMT2110A/2210AOne-Way RF Link Development Kits User’s Guide
Copyright © By CMOSTEK

AN103
Rev 1.0 | Page 2 / 23
www.cmostek.com
Table of Contents
1. Development Kits Contents........................................................................................................................4
2. Application Schemes ..................................................................................................................................6
2.1 Evaluation Scheme................................................................................................................................6
2.2 Configuration Scheme ...........................................................................................................................6
3. CMT2110A-EM..............................................................................................................................................8
4. CMT2210A-EM..............................................................................................................................................9
5. RF-EB..........................................................................................................................................................10
5.1 Main Components................................................................................................................................10
5.2 LCD Functional Icons...........................................................................................................................11
6. USB Programmer.......................................................................................................................................13
6.1 EM-Connector......................................................................................................................................13
6.2 LED Indicators .....................................................................................................................................13
6.3 USB Socket..........................................................................................................................................14
7. RFPDK ........................................................................................................................................................15
7.1 Installation Steps..................................................................................................................................15
7.2 Starting the RFPDK .............................................................................................................................15
7.3 Device Control Panel...........................................................................................................................17
7.3.1 Basic Mode and Advanced Mode............................................................................................. 17
7.3.2 Configuration List and Chip Parameters .................................................................................. 17
7.3.3 List, Export and Burn................................................................................................................ 17
7.3.4 Status and Notice ..................................................................................................................... 18
7.4 Burn Log ..............................................................................................................................................18
7.5 Read Device ........................................................................................................................................19
8. Frequently Asked Questions....................................................................................................................20
9. Document Change List .............................................................................................................................21
10.Appendix: CMT2110A-EM and CMT2210A-EM Schematics ..................................................................22
11.Contact Information ..................................................................................................................................23

AN103
Rev 1.0 | Page 3 / 23
www.cmostek.com
Abbreviations
Abbreviations used in this document are described below.
AN Application Notes PC Personal Computer
API Application Programming Interface PER Packet Error Rate
BOM Bill of Materials RF Radio Frequency
CDROM Compact Disk Read Only Memory RFPDK RF Products Development Kit
EB Evaluation Board Rx Receiving, Receiver
EM Evaluation Module(s) Tx Transmission, Transmitter
Err Error SR Symbol Rate
OOK On-Off Keying USB Universal Serial Bus
PA Power Amplifier

AN103
Rev 1.0 | Page 4 / 23
www.cmostek.com
1. Development Kits Contents
The Development Kits contain the following components:
2 x RF-EB V1.0 evaluation boards
2 x CMT2110A-EM V1.0 Tx module
2 x CMT2210A-EM V1.0 Rx module
1 x USB Programmer V1
1 x CDROM with RFPDK installer and documents
1 x USB Cable
6 x AA Batteries
4 x Antennas
Figure 2. Development Kits Contents

AN103
Rev 1.0 | Page 5 / 23
www.cmostek.com
RF-EB
General purpose
evaluation board for the
CMOSTEK RF products. It can be used to evaluate
and demonstrate the main features of CMT2110A,
CMT2201A and other RF products.
CMT2110A-EM
The CMT2110A-EM is the Tx evaluation module.
The user can use it to evaluate the CMT2110A
performance and features.
CMT2210A-EM
The CMT2210A-EM is the Rx evaluation module.
The user can use it to evaluate the CMT2210A
performance and features.
RFPDK
CMOSTEK provides the PC application that allows
the users to configure all the product features to
CMOSTEK NextGenRFTM products in the most
intuitional way. The installation pack can be found on
the CDROM of the CMT2110A/2210A One-Way RF
Link Development Kits.
USB Programmer
It transmits data between the EM and the PC via two
interfaces: USB to PC and serial port to EM. The
protocols of the serial port differ for different parts
(chips). The USB programmer automatically
identifies the part on the EM once it is connected,
and then uses the desired protocol to communicate
to the part.

AN103
Rev 1.0 | Page 6 / 23
www.cmostek.com
2. Application Schemes
The Development Kits can be used in 2 different application schemes.
Evaluation Scheme: Main product features can be configured and evaluated/demonstrated in this
scheme.
Configuration Scheme: All product features of can be configured in this scheme.
2.1 Evaluation Scheme
The necessary components of the evaluation scheme are:
Two RF-EBs
CMT2110A-EM
CMT2210A-EM
Main product features can be evaluated and demonstrated in this scheme. Follow the step-by-step instructions to
start working in the Evaluation Scheme.
1. Turn off the RF-EB power switch (SW1, see Figure 6 in Page 10). It is always good practice to plug in or out
the evaluation modules after the RF-EB is powered off.
2. Switch the Power Mode Jumper (J7, see Figure 6 in Page 10) to the USB or BAT side to select the available
power supply source.
3. Plug the evaluation modules into both RF-EBs respectively. Please note that there are 2 sets of evaluation
modules and antennas, the user should pair them properly according to their frequency labeled on them.
4. Turn on the power switch (SW1) of the RF-EB. The LED indicator for the power supply indication will be light
up to show to “ON” status of the RF-EB.
5. Start to configure the evaluation modules according to the instructions displayed on the LCD and then
evaluate the main features/performance.
2.2 Configuration Scheme
The necessary components of the configuration scheme are:
RFPDK
USB Programmer
CMT2110A-EM or CMT2210-EM
This scheme allows the user to freely customize all product features and program them into the chips. Once the
programming is done successfully, the evaluation module is ready to be integrated into the user’s own application
systems. Moreover, the users can program chip configurations to their self-designed CMT2110A/2210A modules
as long as the programming interface is reserved.

AN103
Rev 1.0 | Page 7 / 23
www.cmostek.com
Figure 3. Configuration Setups
Follow the step-by-step instructions to start working in the Configuration Scheme.
1. Setup the configuration scheme as Figure 3.
2. Install the USB Programmer driver. The driver will be installed automatically on the computer. It should be
noticed that if the RFPDK is already installed on the computer, make sure that the RFPDK is not running
when the user is installing the USB Programmer driver.
3. Install the RFPDK to the computer. Refer to Section 7.1 for the detail procedure for the installation.
4. Start Configuring CMT2110A/2210A on the RFPDK and the USB Programmer. Once the configuration is
done, the user can use the evaluation modules in the actual RF system.
Please refer to the “Chapter 7. RFPDK” for the RFPDK usage guidelines and refer to the documents “AN102
CMT2110A Configuration Guideline”, “AN108 CMT2210A Configuration Guideline” for more details.

AN103
Rev 1.0 | Page 8 / 23
www.cmostek.com
3. CMT2110A-EM
The CMT2110A-EM is a Tx evaluation module with CMT2110A, the necessary external components and the
matching network. The EM-Connector on the back side of the module allows the connection to the RF-EB or USB
Programmer. The definitions of the EM-Connector pins are listed in Table 1.
Pin Signal Name
1 NC
2 GND
3 NC
4 VDD
5 CLK
6 NC
7 DATA
8 NC
9 NC
10 NC
Figure 4. Top View of CMT2110A-EM Table 1. CMT2110A-EM EM-Connector Pin Definition
The module can be used in the following schemes (see Chapter 2 for details)
1. Work with RF-EB in Evaluation Scheme
2. Work with USB Programmer and RFPDK in Configuration Scheme
The evaluation module contained in this Development Kits is designed with the matching network at 433.92 MHz.
For application with different frequencies, the matching network might need to be changed.
See “Chapter 10 Appendix: CMT2110A-EM and CMT2210A-EM Schematics” for the CMT2110A-EM Schematic.

AN103
Rev 1.0 | Page 9 / 23
www.cmostek.com
4. CMT2210A-EM
The CMT2210A-EM is an Rx evaluation module with CMT2210A, the necessary external components and the
matching network. The EM-Connector on the back side of the module allows the connection to the RF-EB or USB
Programmer. The definitions of the EM-Connector pins are listed in Table 2.
Pin Signal Name
1 CSB
2 GND
3 NC
4 VDD
5 SCL
6 nRSTO
7 SDA
8 NC
9 DOUT
10 CLKO
Figure 5. Top View of CMT2210A-EM Table 2. CMT2210A-EM EM-Connector Pin Definition
The module can be used in the following schemes (see Chapter 2 for details)
1. Work with RF-EB in Evaluation Scheme
2. Work with USB Programmer and RFPDK in Configuration Scheme
The evaluation module contained in this Development Kits is designed with the matching network at 433.92 MHz.
For application with different frequencies, the matching network might need to be changed.
See “Chapter 10 Appendix: CMT2110A-EM and CMT2210A-EM Schematics” for the CMT2210A-EM Schematic.

AN103
Rev 1.0 | Page 10 / 23
www.cmostek.com
5. RF-EB
The RF-EB is an evaluation board for demonstrating the main features of CMOSTEK NextGenRFTM products and
allowing the user to develop their own applications. The module can be used with the evaluation modules in
Evaluation Scheme (see Chapter 2 for details).
The main components are shown in Figure 6 below:
Figure 6. Top View of RF-EB
5.1 Main Components
1. EM-Connector –The EM-Connector is 10-pin, 2.54 mm female connector which connects the RF-EB to the
evaluation modules.
2. LED – There are 3 LEDs available to indicate the working status of the RF-EB.
LED1 indicates that the RF-EB received 1 frame successfully when working with CMOSTEK Rx
products.
LED2 indicates that the RF-EB transmitted 1 frame out successfully when working with CMOSTEK Tx
products.
LED3 is reserved for future use.

AN103
Rev 1.0 | Page 11 / 23
www.cmostek.com
3. Power Mode Jumper – The power mode jumper (J7) determines the power supply source of the RF-EB.
The board can be supplied by the USB (J7 switched to the USB side) or the batteries (J7 switched to the
BAT side).
4. Power Switch – The power switch (SW1) allows the user to turn the RF-EB power on or off. It is
recommended that the user shall power off the RF-EB before plugging in or out the CMT2110A-EM.
5. USB Socket – A USB (type B) socket is used on the RF-EB. A USB cable is provided in the Development
Kits for the user to connect the RF-EB to the PC. The USB connection is for power supply only, not for data
communication.
6. LCD – A 128*64 pixels LCD is available on the RF-EB to display the information for the configuration and
demonstration in the Evaluation Scheme.
7. Buttons –There are 5 buttons (S1-S5) on the RF-EB next to the LCD for the user to complete the evaluation
modules configuration and demonstration following the step-by-step instructions shown on the LCD.
5.2 LCD Functional Icons
The Functional icons are displayed on the LCD to guide the user to go through the configuration process. The
functions are shown in the table below.
Table 3. LCD Functional Icons Descriptions
Functional Icon Descriptions
Cursor pointer, the cursor pointer only points to the items which are configurable.
Move cursor pointer up and down.
Reset all configurations and return to the initial page.
Go back to the previous page.
Go forward to the next page.
Increase value or select the next option.
Decrease value or select the previous option.
Select to complete configuration and ready to start Tx/Rx.
Start transmitting. The pre-defined frame is transmitted repeatedly until the TxOff is
selected. This is only available when working with CMT2110A-EM.
Stop transmitting. This is only available when working with CMT2110A-EM.
Start receiving until the RxOff is selected. This is only available when working with
CMT2210A-EM.
Stop receiving. This is only available when working with CMT2210A-EM.
The user should notice the following points:
1. The RF-EB supports frequencies of 315 MHz and 433.92 MHz, when the frequency is changed from one to the
other, the matching network of the evaluation modules should be changed accordingly.
2. To allow successfully transmission between the Tx and the Rx, the frame format of the Rx evaluation module
must be set identical to that of the Tx evaluation module, see Table 4 for the frame format definition.

AN103
Rev 1.0 | Page 12 / 23
www.cmostek.com
Table 4. Frame Structure
Field Number of Bytes Descriptions Default Value
ID 1 This is the synchronization ID. The content is from 0 to 9.
5
Length 1 This indicates the length of the payload to be transmitted
or received. The content is from 1 to 32. 10
Payload Indicated by
Length The data to be transmitted or received. The content is
0x00 0x01 0x02 … (Length - 2) (Length - 1). -
Note:
Example: if ID = 8, n = 10, the frame content is: 0x08 0x0A 0x00 0x01 … 0x08 0x09.
3. The Packet Error Rate (PER) can be impacted by:
The matching network of the Tx and Rx evaluation module.
The symbol rate. The Rx and the Tx symbol rate must be identical.
The number of bytes contained in the frame. The shorter the frame is, the lower PER is achieved.

AN103
Rev 1.0 | Page 13 / 23
www.cmostek.com
6. USB Programmer
The USB Programmer is the programming tool for the user to program the configuration into the CMOSTEK
NextGenRFTM products with the RFPDK. The evaluation modules should be connected to the PC through the
USB Programmer. There are 3 LEDs on the USB Programmer to indicate its working status.
6.1 EM-Connector
The EM-Connector on the USB Programmer is 10-pin, 2.54 mm female connector as shown below.
2
4
6
8
10 9
7
5
3
1
Figure 7. EM-Connector
Table 5. Pin Descriptions of EM-Connector
Pin Number Pin Functions
CMT2110A CMT2210A
1 Reserved CSB
2 GND GND
3 Reserved Reserved
4 VDD VDD
5 CLK SCL
6 Reserved Reserved
7 DATA SDA
8 Reserved Reserved
9 Reserved Reserved
10 Reserved Reserved
6.2 LED Indicators
The USB Programmer has 3 LED indicators to indicate 3 working status of the programmer, which are shown in
Figure 8. See Table 6 for the descriptions of the LEDs.

AN103
Rev 1.0 | Page 14 / 23
www.cmostek.com
Figure 8. LED Indicators on the USB Programmer
Table 6. LED Indicators on the USB Programmer
Name Descriptions Color
Run Flashes when there are valid connections between the PC and USB
Programmer. Turned on when the evaluation modules is being programmed. Green
Err Turned on for 5 seconds when the programming has failed. Red
USB Turned on when the USB is correctly connected to the PC. Green
6.3 USB Socket
The USB Programmer contains a type-B USB socket. A type-A to type-B USB cable is provided in the
Development Kits for the user to connect the USB Programmer to the PC. The USB socket has two functions:
Obtain power from the PC to supply the USB Programmer.
Communicate to the RFPDK installed on the PC.
Figure 9. USB Socket

AN103
Rev 1.0 | Page 15 / 23
www.cmostek.com
7. RFPDK
RFPDK (RF Products Development Kit) is a member of the CMT2110A/2210A One-Way RF Link Development
Kits supporting the development and manufacturing with CMOSTEK NextGenRFTM products. It is a PC
application runs on Windows 2000, XP, 7 and 8. It works with the USB Programmer to configure the CMOSTEK
NextGenRFTM products.
7.1 Installation Steps
Important Note: Before installing this software, local administration rights must be obtained from your network
administrator.
Double click the RFPDK setup icon in the CDROM to install the RFPDK onto the computer.
Figure 10. RFPDK Setup Icon
7.2 Starting the RFPDK
The RFPDK can be started by double-clicking the RFPDK icon on the PC Desktop, as shown in Figure 11 below.
For Windows 2000, XP and 7, the user can also start the RFPDK from the Microsoft Windows®Start button by
clicking Start All Programs CMOSTEK RFPDK CMOSTEK RFPDK V1.01.
Figure 11. Starting RFPDK from PC Desktop
Once the program has started, the device selection panel of the RFPDK appears as shown in Figure 12. The user
can use the two tabs at the top of the panel to choose the product family: either devices operating in the 2.4 GHz
frequency band or the sub-1 GHz frequency band. Under each tab, all the products belong to the family are listed
in the middle of the panel. The products can be filtered by the buttons of All, Transmitters, Receivers and
Transceivers. The main features of the products, including Device, Function, Band, Package, Modem and
Symbol Rate, are shown to assist the device selection.
If an evaluation module is connected to the PC through the USB Programmer, the device part number, USB
Programmer hardware version and firmware revision will appear in the “List of connected device”.
The rest part of this chapter takes configuring the CMT2110-EM with the RFPDK as an example unless otherwise
noted.

AN103
Rev 1.0 | Page 16 / 23
www.cmostek.com
Figure 12. Device Selection Panel
Select the proper device, and then click “Next”, the Device Control Panel appears as below.
Figure 13. Device Control Panel

AN103
Rev 1.0 | Page 17 / 23
www.cmostek.com
7.3 Device Control Panel
7.3.1 Basic Mode and Advanced Mode
The RFPDK has two configuration modes: Basic Mode and Advanced Mode.
Basic Mode
A few fundamental settings of the selected device are available for the users to easily get started with their
design.
Advanced Mode
All settings of the selected device are available for the users to configure the device more flexibly.
The details of each feature/setting are described in “AN102 CMT2110A Configuration Guideline” and “AN108
CMT2210A Configuration Guideline”.
In both Basic and Advanced modes, default configurations can be loaded for direct use, or as a starting point to
further customize the chip in the differentiating RF systems.
7.3.2 Configuration List and Chip Parameters
The control panel contains a Configuration List area and a Chip Parameters area.
Configuration List
It lets the users to select predefined chip configuration from the list, including the default configurations
provided by CMOSTEK or the customized configurations save by the user. For the non-default
configurations, the user can add notes to the “List Type” column by double-clicking the cell, as shown in the
below figure.
Figure 14. Add Note to User-saved Configurations
Chip Parameters
This area contains the parameters to configure the device.
7.3.3 List, Export and Burn
Saving the configurations, generating the EEPROM image file for manufacturing and programming the
configuration to the device can be done by pressing the List, Export and Burn buttons on the panel, respectively.
List
The users can click the List button to save a new configuration to the “Configuration List”.

AN103
Rev 1.0 | Page 18 / 23
www.cmostek.com
Export
The user can click the Export button to export the current configurations to an EEPROM image file suffixed
by “.exp”. The file can be loaded by the manufacturing programmer in mass production phase to program
the CMOSTEK NextGenRFTM products.
Burn
Once all the parameters are properly set and all the hardware are correctly connected, the user can click the
Burn button to program the configuration to the chip. A message will pop out to confirm whether the
programming is done successfully or not. If the programming is failed, the users should double check the
setup and try again.
7.3.4 Status and Notice
Status information and Notice information is shown at the bottom of the Control Panel.
Status
It indicates whether the USB Programmer and the device are properly connected to the PC or not. Table 7
shows the details.
Table 7. Status Information in Control Panel
Status Descriptions
USB: Connected The USB Programmer is properly connected to the PC.
USB: Unconnected The USB Programmer is unconnected or improperly connected to the PC.
Device: CMT2110A The device is properly connected to the USB Programmer.
Device: Unknown The device is unconnected or improperly connected to the USB Programmer, or the
device is connected but the USB Programmer is in “Unconnected” status.
Device: CMT2110A The device plugged in is different from that selected in the Device Selection Panel.
The part number of the plugged device will be displayed. The Burn button is
disabled in this case.
Notice
It indicates the process and the results of the Burn action, as shown in Table 8 below:
Table 8. Notice Information in Control Panel
Notice Descriptions
Notice: Burning parameters to the device, please wait… The RFPDK is executing the Burn action.
Notice: Burning is done successfully. The Burn action is completed successfully.
Notice: Burning failed. Please check the setup and try again. The Burn action is failed and stopped. The
users should check the setup and try again.
7.4 Burn Log
After each burning, the log information of the burning is recorded automatically by the RFPDK into the Burn Log.
The maximum number of recorded lines is limited to 1000. The old information is over-written by the new ones.
The user can open the Burn Log by selecting Operation Open Log. A Burn Log example is shown below:

AN103
Rev 1.0 | Page 19 / 23
www.cmostek.com
Figure 15. Burn Log
The user can save the Burn Log to a text file by pressing the Save button. This text file is one of the necessary
materials to send back to CMOSTEK when the user asks for any technical support.
7.5 Read Device
When the device, the USB Programmer and the PC (RFPDK) are properly connected, the Read Device function
can be used to read out and upload the EEPROM contents from the device to the PC. The user can use this
function by selecting Operation Read Device. After that, a Save-as window pops out so that the user can save
the read-out contents into a text file suffixed by “.exp”.

AN103
Rev 1.0 | Page 20 / 23
www.cmostek.com
8. Frequently Asked Questions
Q1. Why do I not see any response from the PC when I plug the USB cable of the USB Programmer to the PC?
A1. Please try the following steps to resolve the problem:
1. Make sure the USB port is functioning well.
2. Make sure the USB connection is solid by checking if the “USB” LED on the USB Programmer is on.
3. Try another USB port on the PC.
If the problem still exists, please contact CMOSTEK for further support.
Q2. I plugged out the USB cable while the USB Programmer is running. After that, why can I not use any USB
device on the PC anymore?
A2. It is commonly seen that such unexpected error might happen to the USB system if the user plugs out the
USB device during any data communication. CMOSTEK recommends the user to close the RFPDK before
plugging out the USB Programmer, and then reboot the PC to resolve this problem.
Q3. Can I install the RFPDK on a PC on which I don’t have administration right?
A3. CMOSTEK recommends the user to obtain the administration right before installing the RFPDK.
Q4. Can the RFDPK and the USB Programmer support all CMOSTEK RF products?
A4. The current version of RFPDK and USB Programmer supports the existing RF products. In the future,
CMOSTEK will update the RFPDK and USB Programmer firmware to support the new products. The user can
visit www.cmostek.com for the latest version of the RFPDK and contact CMOSTEK to upgrade your USB
Programmer.
Q5. Why can I not install the USB Programmer driver on the PC?
A5. Please try the following steps to resolve this problem:
1) Make sure the USB port is functioning well.
2) Plug out the USB cable, close the RFPDK application, and try to plug in the USB cable again.
If the problem still exists, please contact CMOSTEK for further support.
This manual suits for next models
1
Table of contents
Other CMOSTEK Microcontroller manuals
Popular Microcontroller manuals by other brands
Cypress
Cypress CY8CKIT-046 quick start guide
Xilinx
Xilinx LogiCORE MicroBlaze Product guide

Eurotech
Eurotech ANTARES user manual
GigaDevice Semiconductor
GigaDevice Semiconductor GD32450Z-EVAL user guide
Texas Instruments
Texas Instruments TIRIS RI-STU-MRD1 Reference manual
Epson
Epson S1C17W12 Technical manual
Intel
Intel Stratix 10 Configuration user guide
Atmel
Atmel AT89STK-03 Hardware user's guide
NEC
NEC mPD780852 Series Preliminary user's manual

Intel
Intel Agilex user guide
Cypress Semiconductor
Cypress Semiconductor GX3 EEPROM Programming & user guide
Freescale Semiconductor
Freescale Semiconductor i.MX51 EVK Reference manual
