CMR Electrical ACCENT Connex Mini TX User manual

CMR ACCENT Transmitter and Receivers Quick Guide Copyright 2018 Page 1
CMR ACCENT QUICK GUIDE

CMR ACCENT Transmitter and Receivers Quick Guide Copyright 2018 Page 2
************************
CMR ACCENT wireless HD video sets use the Amimon Connex Mini transmitter and Amimon
Connex Mini receivers (1600 ft. LOS range), or Amimon Fusion receivers (3300 ft. LOS range),
for robust wireless HD video transmission up to 1080P(60) and zero latency. The sets are
HDMI input and output and do not transmit audio. Up to 4 receivers can be simultaneously
connected with no loss of performance.
They are essentially Plug and Play operation. Just connect an HDMI source to the transmitter,
and an HDMI display or video switcher, etc. to the receiver, and power up the units. The sets
will automatically select an available channel for operation.
This quick guide provides information about powering the sets, and an explanation of the
status LEDs, and physical features.
More information about the operation of the transmitters and receivers is provided in the
Amimon guides included with sets.
Also, the Amimon Connex Family Manual has very complete technical information and can be
found on-line with a simple google search of ‘connex family manual’, or go to
http://www.connexhd.com/wp-content/uploads/2017/09/Connex_Family_Manual-en.pdf
Just remember that Amimon developed the Connex/Mini sets for the unmanned (drone)
market, and Amimon information uses the terminology ‘air unit’ for transmitter, and ‘ground
unit’ for receiver.
call at 919-876-6020.
************************

CMR ACCENT Transmitter and Receivers Quick Guide Copyright 2018 Page 3
Power
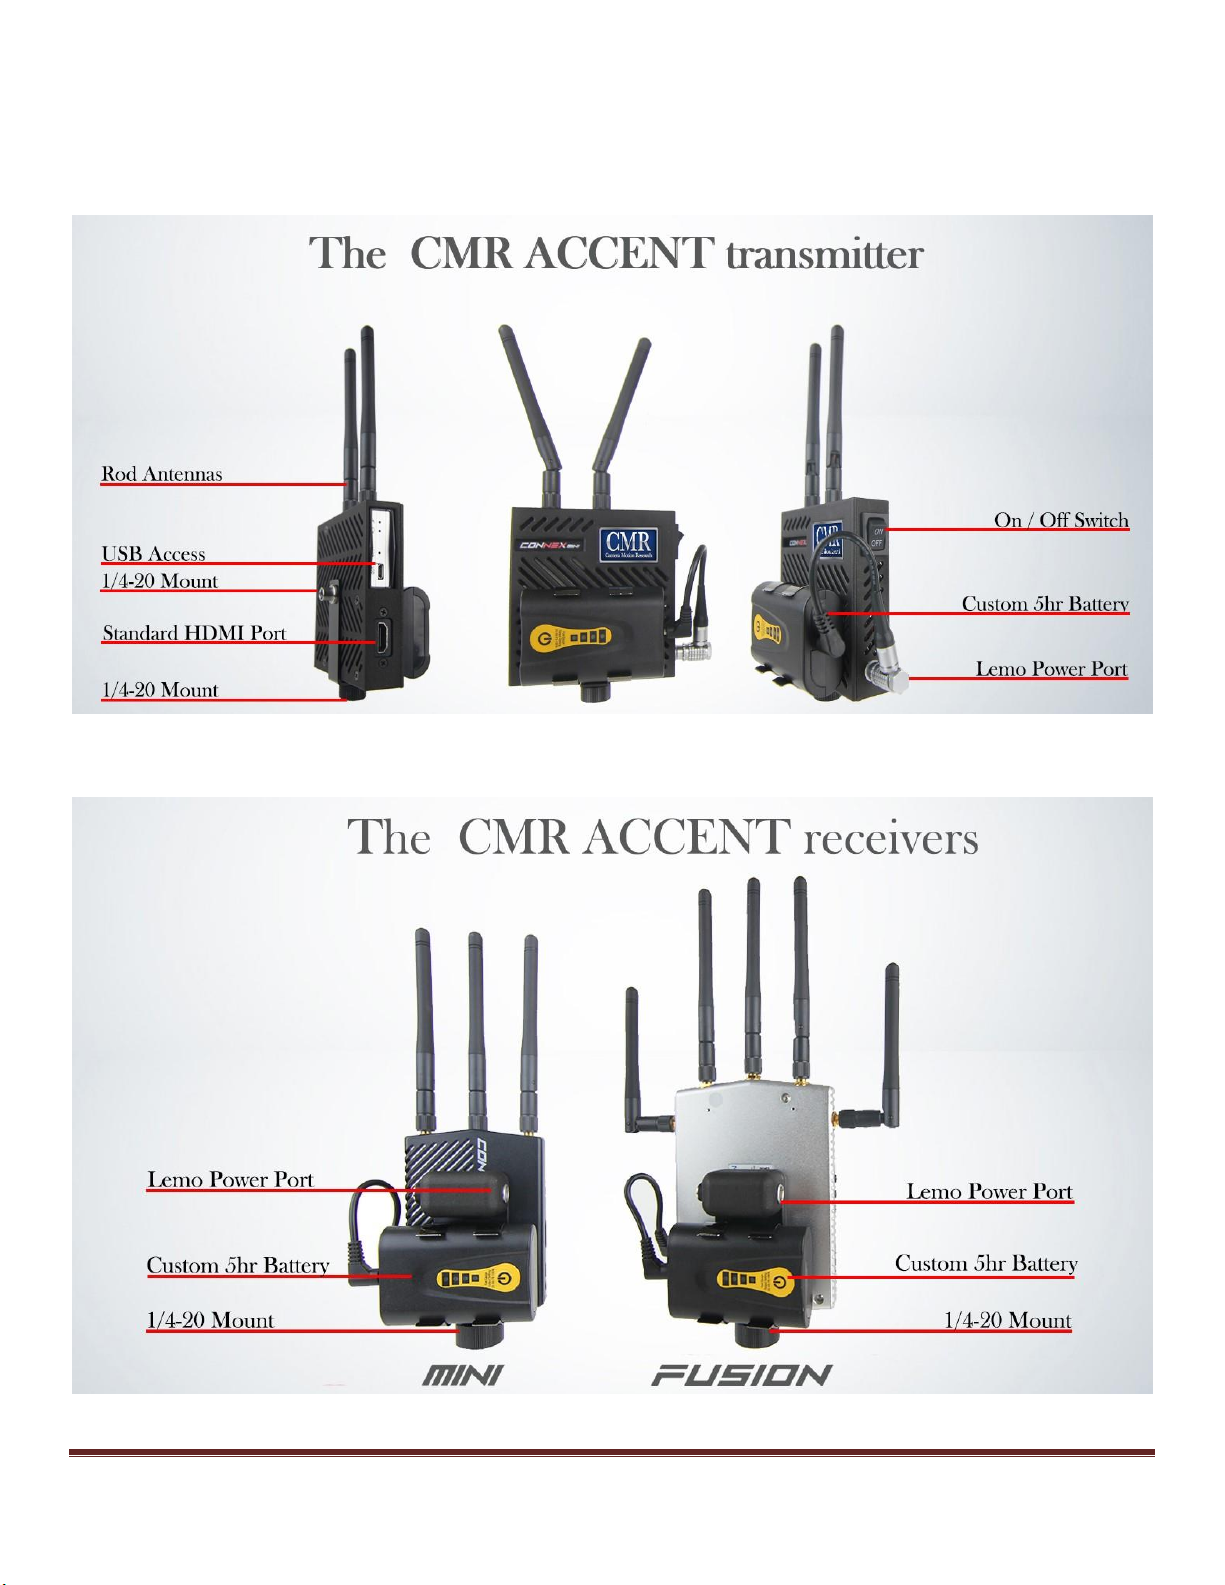
The ACCENT transmitter (Connex Mini TX), and the ACCENT receivers (Connex Mini RX or Fusion RX) can be powered
with the BA8B lithium batteries, or with a Lemo connector power source . Power consumption for either the
transmitter or receivers is typically less than 5 watts.
BA8B Lithium Batteries
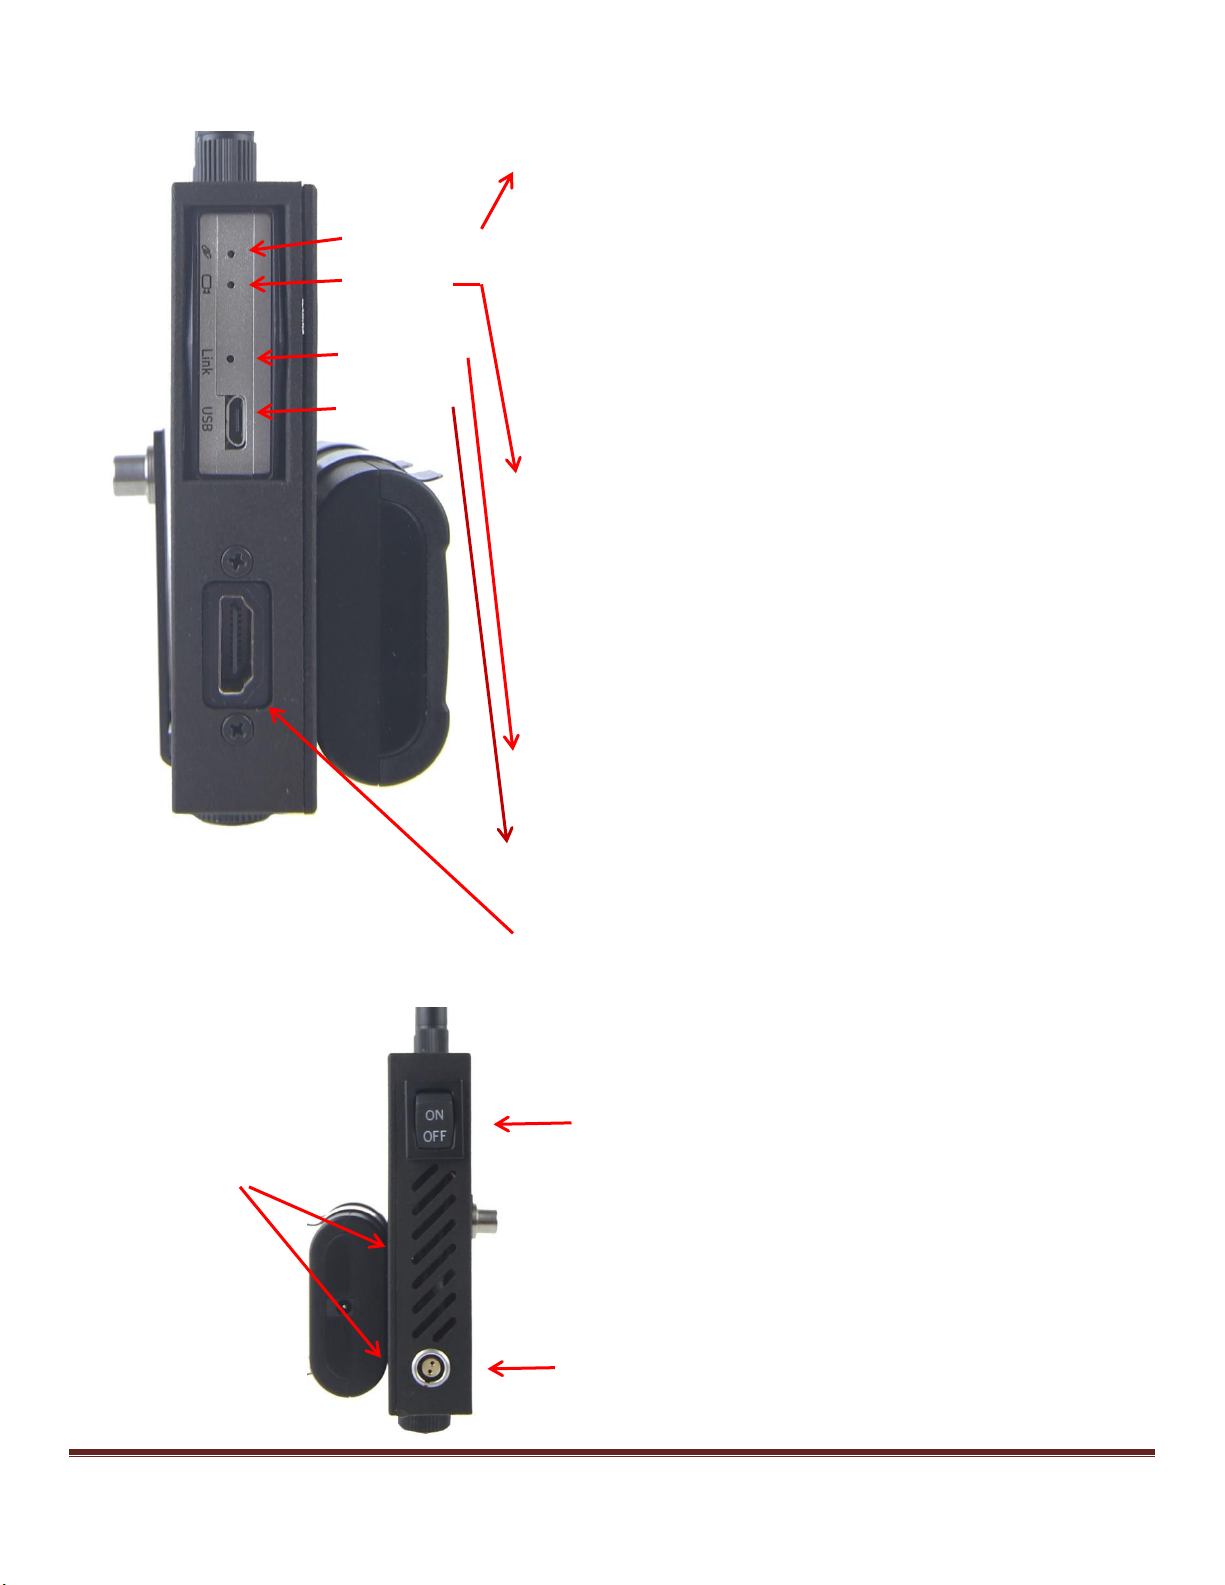
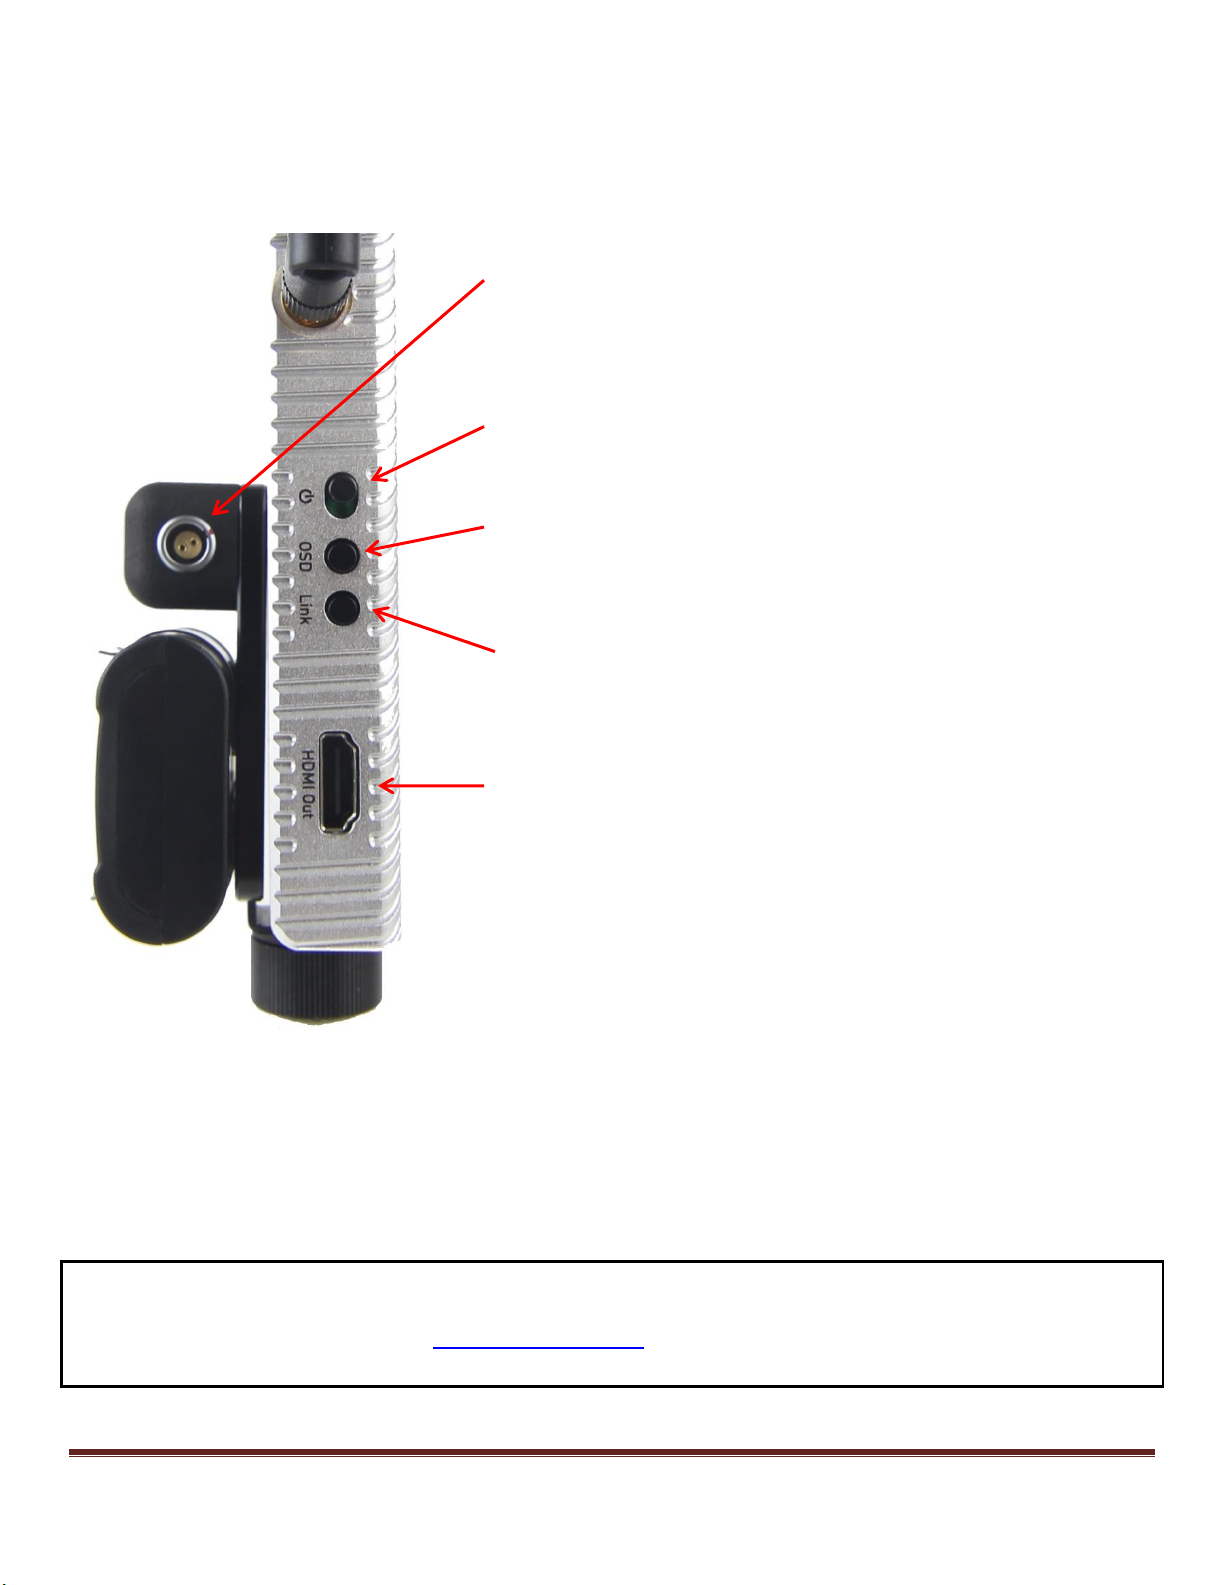
On the transmitter, connect the included short right angle Lemo cable to the Lemo power input, and the barrel
connector to the battery.
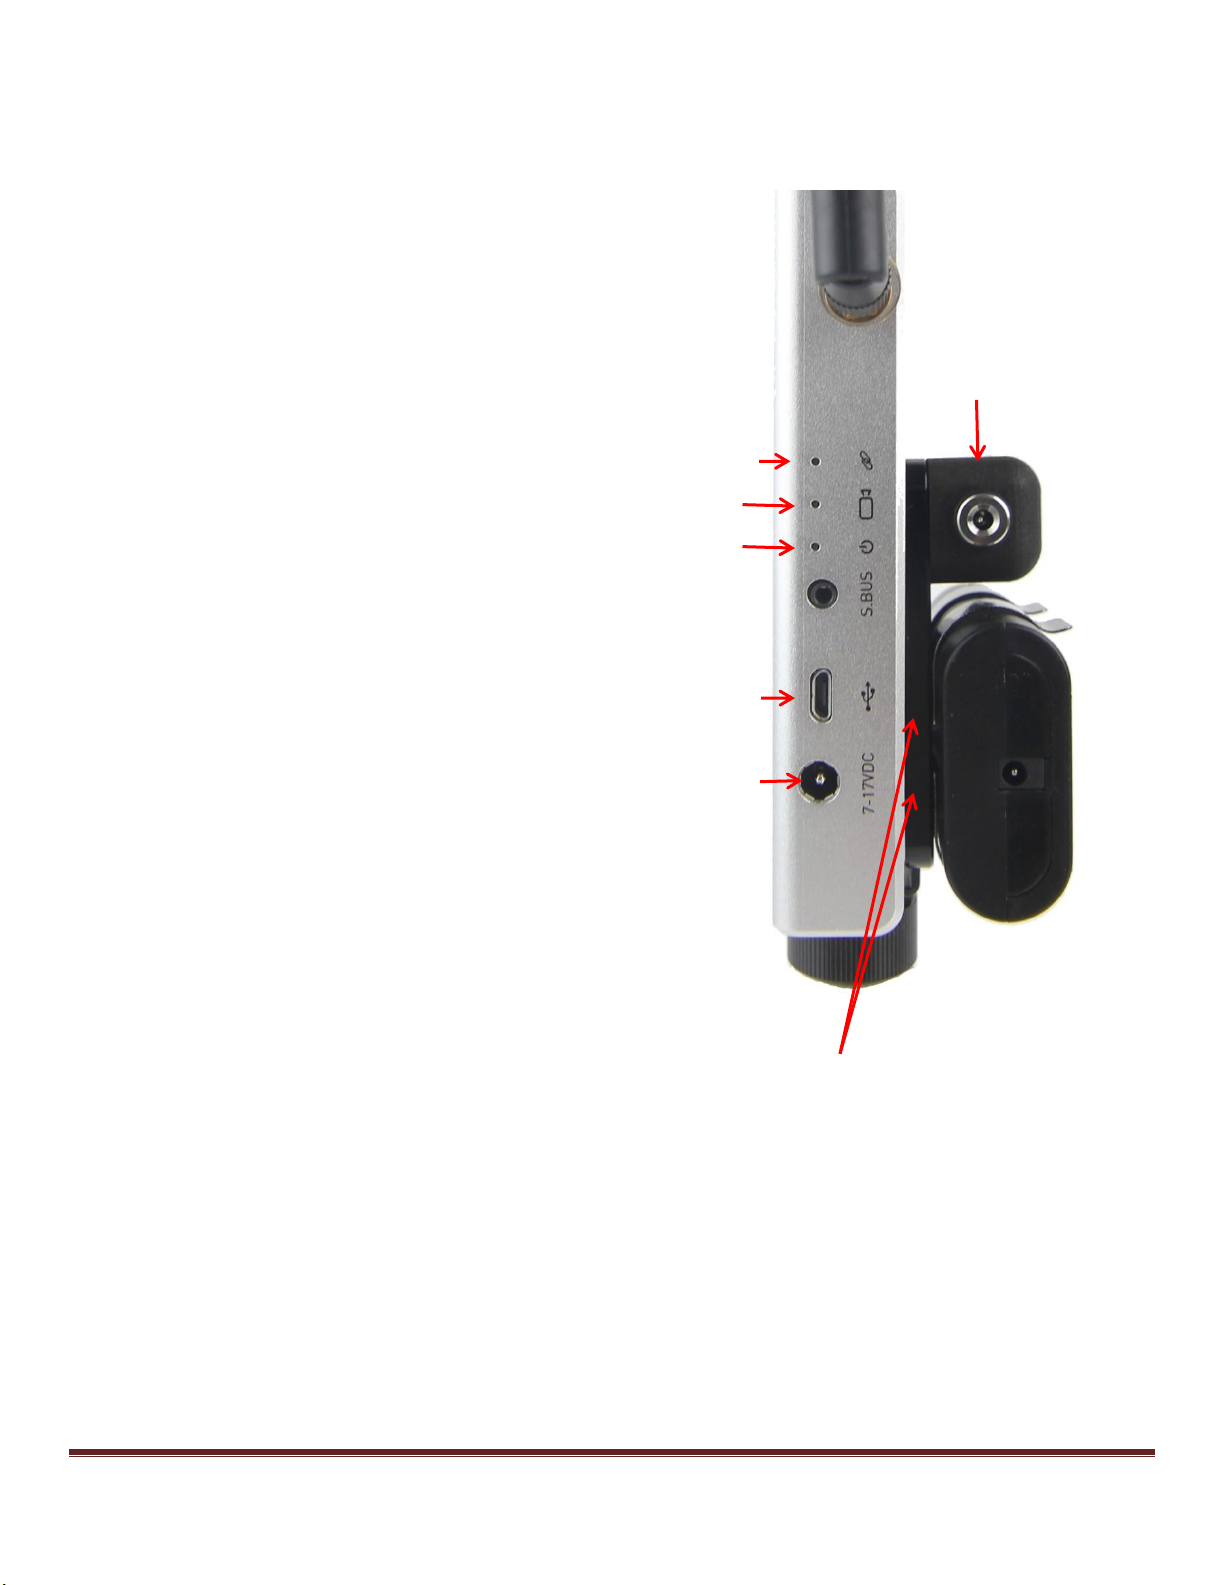
For the receivers, connect the included power cable between the receiver power port (large barrel connector) and the
BA8B battery (small barrel connector).
The BA8B battery has a pushbutton that must be pressed and held for a few seconds to turn it on. When turned on it
has 4 LED lights that indicate battery charge. When not using either the transmitter or receiver, the battery should be
turned off by pressing and holding the button for a few seconds until the battery charge LEDs go off.
Note: The battery must be turned off when being charged. Watch for the walking lights to confirm charging
is taking place. Charging time is about 3 hours.
Lemo Power
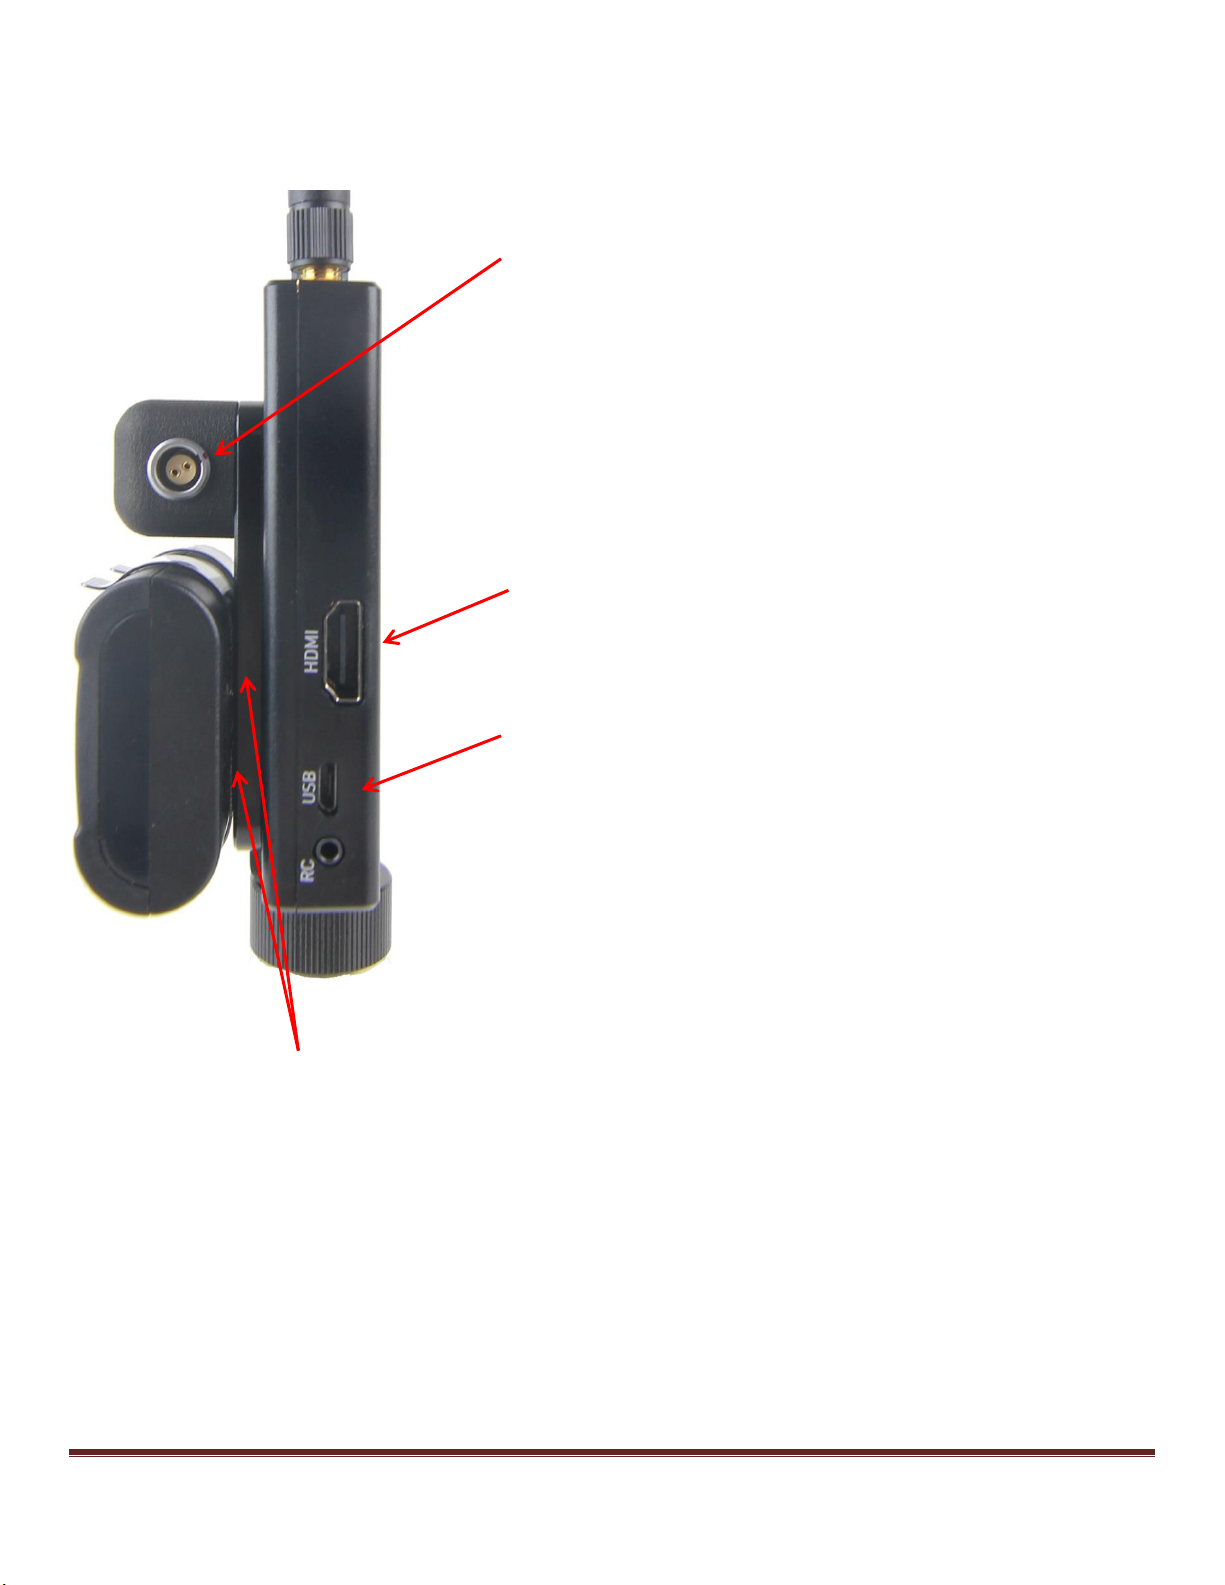
For the transmitter, connect the external power source to the Lemo connector.
For the receivers, connect the external power source to the Lemo adapter and connect the included barrel
cable between the receiver power input connector and the other side of the Lemo adapter.
If using external Lemo power it is important to make sure the connector is providing voltage of the correct polarity.
Pin 1, the red dot pin is NEGATIVE. Incorrect voltage polarity can damage TX or RX units under certain conditions
when HDMI or USB cables are connected.
Testing LEMO power polarity
The correct polarity of the Lemo connector source can be verified without worrying about damaging the Connex Mini
transmitter or receiver if the following procedure is used:
1) Unplug any HDMI or USB cables to the ACCENT transmitter or receiver.
2) Plug in the Lemo power source and look for any LED indicator on the Connex Mini transmitter or Connex Mini
receiver or Fusion receiver to come on or start blinking. If any LED comes on or starts blinking the Lemo power polarity
is correct. If no LED lights are on or blinking within a few seconds, then the polarity of the Lemo power cable is incorrect
and cannot be used.
Voltage Ratings
Transmitter: 8-26 vdc
Mini Receiver: 8-26 vdc
Fusion Receiver : 7-17 vdc (note reduced max voltage on Fusion receiver)

CMR ACCENT Transmitter and Receivers Quick Guide Copyright 2018 Page 4
Transmitter LEDs, Link Button, Micro USB port
Network LED
Solid A link has been established to the receiver, meaning that video is
being transmitted to it (all of the receivers are powered on and in
range).
Blinks Quickly Registration is in progress, or the transmitter has gone
out of range of a receiver and is searching for it.
Blinks Slowly The transmitter is establishing a link with a receiver.
Blinks Very Slowly The transmitter is searching for an available
frequency on which to transmit.
Video LED
Solid The video signal from the camera is locked, meaning that it is
being correctly received by the transmitter from the camera. (This does
not necessarily indicate that a link exists.)
Blinks Slowly The video from the camera is not locked, meaning that
the transmitter is not receiving the video from the camera.
Blinks Quickly
The camera is transmitting a video resolution that is not supported by
the transmitter.
Link Button –Used to link new RX to TX (recessed, use a toothpick to
depress for about 3-5 seconds to start linking process)
Micro USB port –Used for software update or connection to the
Connex Management application
Standard (type A) HDMI Input Connector
Transmitter Power Switch and Lemo power Connector
Network LED
Video LED
Link Button
Micro USB
port
Power Switch
Lemo Power Connector
Battery spring clips can be
removed.
(save the screws for future
use)

CMR ACCENT Transmitter and Receivers Quick Guide Copyright 2018 Page 5
Mini Receiver LEDs, OSD Button, Registration Button, Power Connector
Network LED
Solid A link has been established to the receiver.
Blinks Quickly Registration is in progress, or the receiver
Has gone out of range.
Blinks Slowly The transmitter is establishing a link with the
receiver.
Video LED
Solid The video signal from the camera is locked (i.e., the
signal is being received from the transmitter).
Blinks Slowly The video signal from the camera is not
locked.
On Screen Display Button –Normally turned off to hide the on
screen display information (typically used for drone work) that
overlays the video image top and bottom.
Registration Button –Used when linking a new receiver
to the transmitter. Follow screen instructions and press
briefly when instructed.
Power Connector –Note the Mini Receiver does not
have a power switch.
Network LED
Video LED
On Screen
display button
Power
Connector
Registration
Button
Lemo Adapter

CMR ACCENT Transmitter and Receivers Quick Guide Copyright 2018 Page 6
Mini Receiver HDMI output, Micro USB port
LEMO Power Connector (RED Dot Pin is Negative)
Use the included barrel power cable to connect power between
the other side of the Lemo adapter (small barrel plug) to the
receiver power input (large barrel plug).
Standard (type A) HDMI Output Connector
Micro USB port –Used for software update
Battery spring clips can be removed.
(save the screws for future use)

CMR ACCENT Transmitter and Receivers Quick Guide Copyright 2018 Page 7
Fusion Receiver LEDs, OSD Button, Registration Button, Power Connector
Network LED
On (Blue) A link has been established to the Air Unit, meaning that
the Ground Unit is receiving video transmission from the Air Unit. The
Network LED displays one of three colors to indicate the strength of
the signal received by the receiver:
· Red: Poor
· Green: Fair
· Blue: Excellent
Off No paired devices.
Blinks Quickly
The receiver is pairing with an transmitter, or the transmitter
has gone out of range of the receiver.
Blinks Slowly The receiver is searching for a transmitter
Video LED
Solid The video signal from the camera is locked (i.e., the signal is
being received from the transmitter).
Blinks Slowly
The video signal from the camera is not locked, or the
camera is transmitting a video resolution.
Power LED
On (White) The receiver is powered On and the
unit’s On/Off switch is on.
Off No power is being supplied to the receiver.
Blinks Quickly Indicates a system error.
Micro USB port –Used for software update
Power Connector : 7-17 v
Network LED
Video LED
Power LED
Micro USB
Power Connector
Lemo Adapter
Battery spring clips can be removed.
(save the screws for future use)

CMR ACCENT Transmitter and Receivers Quick Guide Copyright 2018 Page 8
Fusion Receiver, Power Switch, OSD Button, Link Button, HDMI input
LEMO Power Connector (RED Dot Pin is Negative)
Use the included barrel power cable to connect power between the
other side of the Lemo adapter (small barrel plug) to the receiver
power input (large barrel plug)
Power Switch
On Screen Display Button –Normally turned off to hide the on
screen display information (typically used for drone work) that
overlays the video image top and bottom.
Link Button -- Used to link new RX to TX. Follow screen instructions
and press briefly when instructed.
Standard (type A) HDMI Output Connector
Warranty
The Connex transmitters and receivers and CMR components are covered by a 1 year limited warranty. For warranty
return information please email CMR at sales@camotionllc.com, or call us at 919-876-6020.
This manual suits for next models
2
Table of contents