CNA Group ALPHA60BK User manual

INSTALLATION
AND
USER’S MANUAL
COOKER
HOOD
ALPHA60BK
ALPHA60WH
ALPHA70BK
ALPHA70WH
ALPHA90BK
ALPHA90WH
After sales nº: 08448001128 uksupport@cnagroup.uk

TABLE OF CONTENTS
1. Introduction 3
2. Saf ety prec aution 3
3. Intended us e 4
4. Parts supplied 4
5. Installation 4-6
6. Operati on 6
7. Mai ntenance 6
8. Trou bles hooting 7
9. Technical data 7
10. Environmental protection 7
1. INTRODUCTION
Thank you for choosing this cooker h ood.
This installation and user’s manual is designed to provide you
with all required instructions r elated to the installation, us e and
mai ntenance of the applianc e. In order to op er ate the applianc e
correctly and safety, please read this installation and user ’s
manual car efully bef ore installation and usage.
Keep t his installation and us er’s manual for future use. Should
this appliance be passed on to a third party, then this installation
and user’s m anual must be included.
No liability will be acc epted for damage resulting from i m pr o per
use or non-compliance with thes e instructions.
2. SAFETY PRECAUTION
.Important! Al ways switc h off the el ectricity supply
at the m ai ns d uring inst allation and maintenance such
as for light bulb r eplacement
General
The cooker hood is suitable for domestic use onl y.
Children
• Pl ease dis p os e if t he pack aging mat erial c ar efully.
Packa gi ng material can be dangerous to children. Danger of
suffocation!
• Children should be supervised to ensure that they do
not play with the appliance.
Installation
• The cooker hood must be installed in accordance with the
installation instructions and all measurements must
be followed.
• All installation work must be carried out by a competent
person or qualified el ectrician.
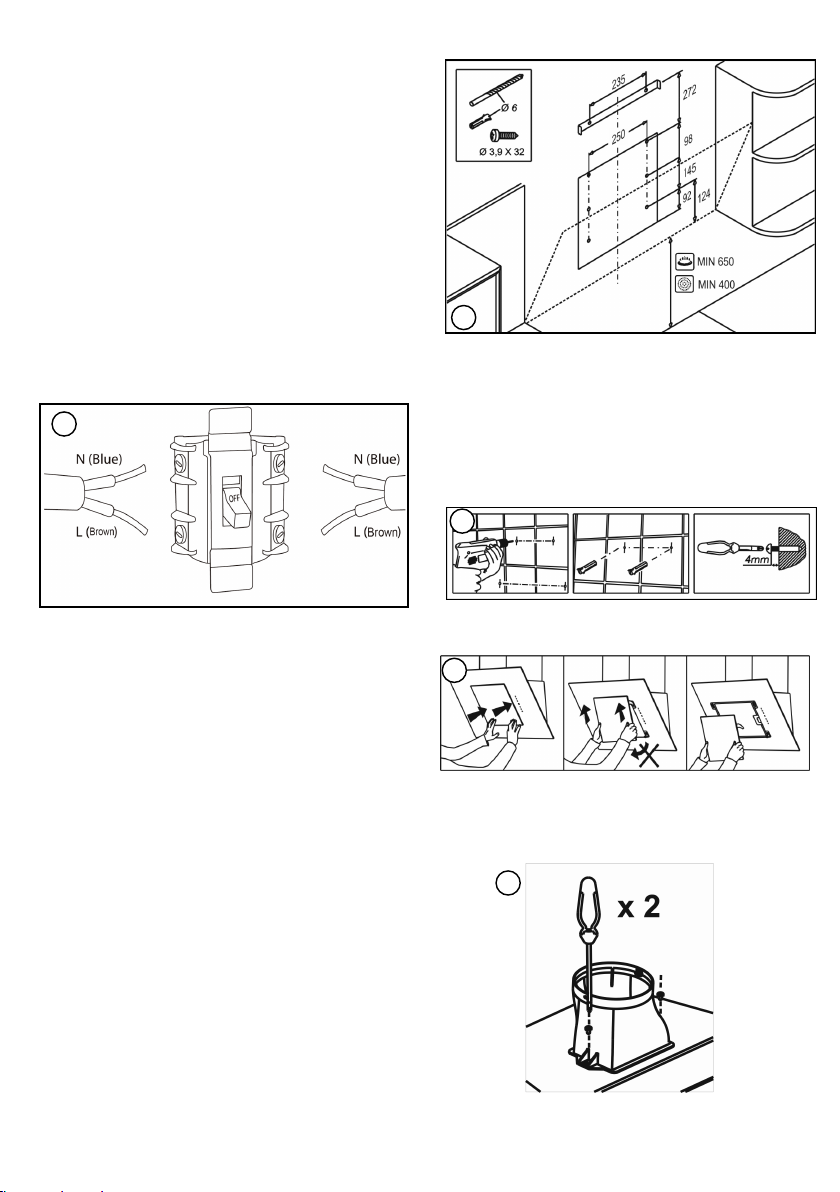
• When ins t alli ng the cooker hood, make sur e that the
following recommended distances betweenthe top of cooker
and the lowest part of the cooker hood ar e obs erved:
→Gas cookers: 65cm
→Electric cookers: 40cm
→Coal or oil cookers: 80cm
• Do not i nstall above a cooker with a high level grill.
• Make sure the ducting has no bends sharp er than 90
degrees as this will reduce the efficiency of the cooker hood.
• Pay attention to the sharp edges inside the c ooker hood
during i nstal lation.
Electrical safety
• Regularly check the power cord for damage. If the
supply cord is damaged, it m ust be replaced by the
manufactur er, its service agent or similarly qualified persons
in or der to avoid a hazard.
• The appliance must be placed in such a way, that the power
supply is accessibl e at all times.
• Before connecting the appliance to the power supply, check
that the power supply voltage and current rating corresponds
with the power supply detai ls shown on the appliance rating
label.
• Never us e a damaged appliance! Disconnect the appliance
from the wall outlet and contact your supplier if it is damaged.
• Danger of electric shock! Do not attempt to rep a i r the
appliance yourself. In case of malfunction, repairs ar e to be
conducted by qualified personnel only.
• To avoid damagi ng the cord, do not squeeze, bend or chaf e
it on sharp edges. Keep it away from hot surfaces and open
flames as well.
• Lay out the cor d in such a way that no unintentional pulling
or tripping over it is possible.
• Do not open the appliance casing under any circumstances.
Do not insert any foreign objects into the ins ide of the casing.
• Never use accessories which are not recommended by the
manufacturer. They could pos e a safety risk to the user and
might damage the appliance. Only use original parts and
accessories.
• Keep the appliance away from any hot surfaces and open
flames. Always operate the appliance on a level, stable,
clean and dry surface. Protect the appliance against heat,
dust, direct s unlight, moisture, dripping and splashing water.
• Do not place heavy obj ects on top of the appliance. Do not
place objects with open flames, e.g. candles, on top of or
beside the appliance. Do not place objects filled with water,
e.g. vases on or near the appliance.
• This appliance is not intended for use by persons (including
c hi l dr e n) w it h r e duc e d p hy si c a l, s e ns o r y, o r m ent a
l capabilities, or by those who lack experience and knowledge,
unless they have been given supervision and instr uction
concerning the use of the appliance by a person responsible
for their safety.
Gas safety
• Always put lids on pots and pans when cooking on a gas
cooker.
Operation
Danger of fire!
• Do not flambé under the cooker hood.
• Do not leave frying pans unattended during
use because overheat ed fats or oils might catch fire.
• Nev er leave naked flames under the cooker hood.
• Onlyfry underneath the cooker hood when you ar e
in the kitchen.
• Do not use the cooker hood without the
grease filters, or if the filters ar e excessively gr easy!
Caution! Accessible parts may become hot when
used with cook ing appliances.
Exhaust operation
Danger!
• During exhaust operation, the cooker hood removes air from
a room. If other fire sources that requir e the surroundi ng air
for combustion are being operated in the same room, (e.g.
gas, oil or coal heaters), the oxygen they require is taken
away. Thus flames could be suffocated and gas could leak
out or the fumes could be drawn back into the room.
• In or der to guarantee a saf e operation, there should be non-
clos abl e openings in doors, windows or in an air intake wall
box to ensure a fresh supply of combustion air. This
will prevent the combustion fumes from being drawn back
into the room.

No.
Part
Qty.
1
Cooker hood
1
2
Upper and lower chimney
1+1
3
Bracket
1+1
4
Collar
1
• When assessing the measures necessary, always take the
entire ventilation system of the house into consideration. In
case of doubt, ask your local chimney sweeper for help.
• Never secure the cooker hood to a ventilation duct, or
a room or exhaust gas chimney! Do not let the air that
is removed from the room be drawn into a duct where
warm air is circulating. The extracted air should only be
drawn outdoors through a separate ventilatingduct that is
only for the extractor hood.
• When in extraction mode, air in the room is being removed
by the cooker hood. Please make surethat proper ventilation
measures are being observed. The cooker hood removes
odours from room but not steam.
• There shall be adequate ventilation of the room when the
range hood is used at the same time as appliances burning
gas or other fuels (not applicable to appliances that
only discharge the air back into the room).
• The air must not be discharged into a flue that is used for
removing fumes from appliances burning gas or other fuels
(not applicable to appliances that only discharge the air back
into the room).
Cleaning
• There is a fire risk if cleaning is not carried out in accordance
with the instructions.
• Pay attention to the sharp edges inside the cooker hood,
especially during cleaning.
• Always disc onnec t t he power supply prior to c leaning
the cooker hood. If the switched fused connection unit is
difficult to reach, shut off the power supply by using the
corresponding circuit breaker at the distribution board.
• Keep the cooker hood clean. Fat deposits could catch on fire
when exposed to high temperatures.
3. INTENDED USE
• Your c o o ke r h oo d c an b e o p er at e d i n r ec irc ulate d -
air operation or in exhaust operation.
• Recirculated - air: Kitchen fumes are removed and af t er
purification are fed back into the room through the upper air
outlet openings. The purification takes place via the grease
filters.
4. PARTS SUPPLIED
5. INSTALLATION
Important! We recommend that two people carry out the
installation. Pay attention to the procedure described in the
assembly instructions.
Preparation
• Exhaust operation: The wall breakthrough (core
drill hole, min. 155mm) must be carried out by a
professional prior to installing the extractor hood.
Pay attention to the length of the exhaust hose when planning
the wall breakthrough. The exhaust hose must reach the
outer edge of the wall without any kinks.
Important! If the exhaust hose leads through an outer wall,
the air outlet on the outside must be equipped with a cover
that has self-opening slits (not supplied). This can be installed
by the company that performs the wall breakthrough.
If open fireplaces are operated in the same room, ask your
local chimney sweeper about the local regulations prior to
installation.
If you are renting, then approval must be obtained from the
owner of the property.
• Attention! In order for the cooker hood to reach
optimal performance, mount it over the middle of the cooking
area.
• Plan the power connection prior to installation so t hat
a disturbing cable will not be visible afterwards.
• The following accessories are required to mount the
cooker hood (not included with the delivery):
→Exhaust duct
→Power drill
→Screwdriver
→Water level
→Cable detector
Electrical connection
• All fittings must be installed by a qualified electrician in
accordance with current IEE Wiring Regulations (BS7671)
and local building regulations.

• Important! Always switch off the electricity supply at
the m ai ns during instal lation and mai ntenance. We
recommend that the fuse is withdrawn or circuit breaker
switched off a the distribution board whilst work is in
progress.
• Prior to drilling holes to secure it to the w all, make sure that
no cables or pipes will become damaged (electric, gas,
wat er, etc.; test the areas in question with a cabl e det ector).
• This unit is do uble insulat ed and must not be earthed. If
there are any incoming earth cabl es, they must be joined
and well ins ulated with good quality insulation tape. This is
to ens ur e earth conti nuity throughout your property.
• Means for disconnection must be incorporated in the fixed
wiring in accordance with the wiring rules. To achieve this
ins tall appropriate switched fused connection unit.
Note! A switched fused connection unit having a contact
separation of at least 3mm in all poles should be connected in
fixed wiring.
•Connect the incoming positive and neutral cables to the
terminals of the switched f us ed connection unit (f i g. 1 ). E ns u r e
connections are tight
Measurement diagram
• Using bracket (3) as a templat es, mark and drill 6 holes in
the wall (fig3). Inset the wall plugs (8) (fig.3 ).
• Inset 2 long screws(7) to the middle two holes ("*"
mark dimens ion holes). Do not fully insert the screws (7) ; let
them protrude out of the wall by about 4mm (fig.3 )
• Hang the cooker hood (1) and fit the 2 upper hol es to the
2 screws; Inset 2 long screws (7) through the cooker hood
into the lower 2 holes & wall plugs (8); Screw and tighten
the cooker hood (1) onto the wall.
Protective packaging
• The stainless steel surfaces of your new cooker hood are
cover ed with foil to protect them from scratches during
transport and the corners of the glass plat es hav e pr otective
caps on them.
Remov e the pr otective f oil and caps just befor e permane ntly
securing the cooker hood.
• Also, remove styrofoam and protective wrapping from the
motor, ins ide the appliance.
Installation with vent kit (not supplied)
• To use the exhaust operation, a wall br eakthrough is
required with a diameter of at least 155mm. We recommend
that you let a specialist (electrician) perform the wall
breakthrough (core drill hole).
• The shorter the vent kit is and the less bends it has, the
more efficient the cooker hood will be.
• Official reg ul ations may vary from region to region. In
cas e of doubt, we recommend asking your local chimney
sweeper for advice.
• If you have an outlet to the outside, your cooker hood can
be connected by means of an extraction duct (enamel,
aluminum, f lexible pipe or inf lammable material with
an interior diameter of 150mm).
• The cooker hood should be placed at a distance of
40~80cm above the cooking place for best effect.
• To fix the i nner screws t o the wall, th e central glass panel
must be dis as sembled. Follow the instructions below step by
step.
• Attach the collar (4) to the cooker hood (1). Secur e with 2
short screws (9) (fig. 6).
2
1
6
5
3

Regularly
Use a soft cloth moistened with hand-war m mildly s oapy
water or household cleaning det ergent. Never use metal
pads, chemical, abrasiv e material or stiff brush to clean
the appliance.
Monthl y
Metallic anti-grease filter: The filter collects grease,
smoke and dust so the filter is directly affecting the
efficiency of the cooker hood. If not cleaned, the grease
residue (potential flammable) will saturate on the filter.
Clean it w ith household cleaning detergent.
Important: Clean the filter every month to
prevent risk of fir e.
Installation without exhaust duct
• If you do not have an outlet to the outside, the exhaust pipe
is not req uired and the installation is similar to the one shown i n
the Installation with exhaust duct section.
6. OPERATION
• Switch on the appliance at the switched fused
connection unit. The appliance is ready for operation.
Functions
TOUCH CONTROL PANEL This panel is located on the front
part of the h ood and includes:-Filter cleani ng alert indicator/swit ch
(ref. 1).Activated re gularly to alert of the need to clean filters and
deacti-vated wit h a single press.-Butt on f or setting the timer of the
mot or (ref. 2). The extractor will o per ate f or 5 minutes at t he current
speed and 5 minutes at e ach of the lower speeds u ntil coming to a
complet e stop.-Butt on f or th e light (ref. 3).Allows the light to be
regulated by pressing and holding down.-On/off butt on of t he
mot or (ref. 4).-3/4 position motor control switch (1st, 2nd, an d 3rd
speed) (Ref. 5).
• Mount bracket (3) on the wall. Secur e with the remai ning
2 sets of long screws (7) and wall plugs (8)(fig. 7).
• Attach the vent kit. In the example on figure 8, an exhaust
pipe of hardened PVC has been used. Optionally, the airtight
connection of the vent kit can be i mproved with duct tape (fig.
8).
Note: Som etimes, sponge tape c ov ers the hol es. If
the h oles are loc ated behind the sponge tape, simply
ins ert the screw thr ough the sp onge tape.
7. MAINTENANCE
• Before cleaning, switch the appliance off and disconnect
the cooker hood from power supply.
• Clean the appliance in the following int ervals:
Risk of injury! The chimney skirts may hav e s ome
sharp ed ges .
Note: Remember not to fix the screw too tight, so that
hei ght adjus tment can be done easily later.
10 11
Light bulb replacement
• Slide the upper chimney (2) into the lower chi mney (2).
then pull the upper chimney upwards (fig 9) . Adjust the
height
of the chi mney to approximatly the requir ed height. Fix the
upper chi mney (2) on the br acket (3), and secur e on both
sides with the 2 short screws (10) (fig. 10).
• Check tight fit of all parts.
Bridging larger distances
• Bridging larger distances to the outdoors can be achiev ed
by installing an external motor inside the exhaus t duct. To do
this, consult an el ectrician.
The lighting system fitted tothe hood is just a supportive
light. In any case, it can not substitute for the
main lighting in t he kitchen.
• Switch the appliance off and disconnect the power supply.
• In or der to replace light b ul bs, both metallic anti-
grease filters should be detached first.
• Press the locks and pull the filters downward.
• Screw the light bulb from the holder and replace by new
light bulb of the same type, max. 50W (GU-10).
• Replace the metallic anti-grease filters and make sure
they lock in place.
7
8
9
10

Fault
Cause
Solution
The appliance is not
hung properly on the
brackets.
Tak e down the
appli anc e and check it
is properly fixed.
The fan blade is
damaged.
Excessive
vibration.
The fan motor is not
fixed tightly.
The fan blade is
jam med.
Light on, but fan
does not wor k.
The motor is
damaged.
Switch off the
appli anc e. Repair to be
carried out by qualified
service personnel only.
Lig ht bulb broken.
Replace with a bulb
with correct rating.
Bot h light and
fan do not work.
Power connection
loose.
Check pow er supply.
Distanc e betwe en
the ap plianc e a nd
the cooking place too
large.
Readjust the distance
to:
Gas cookers: 70cm
Electric cookers: 66cm
Coal/oil cookers : 80cm
Suction
perform ance
not good.
Met allic anti-gr ease
filter is dirty.
Clean filters (see
Mai ntenance ch apt er).
8. TROUBLESHOOTING 10. ENVIRONMENTAL PROTECTION
Waste electrical products shoul d n ot be dis posed of with
household waste. Pl eas e recycle where facilities exist.
Check with your Local A ut hority or ret ailer for recycling
advice.
9. TECHNICAL DA T A
Power sup ply : 220-240V~ 50Hz
Power consumption –Fan : 240W
Power consumption –Luminary : 2 x 50W Max
Power consumption – Total : 340W
Protection cl ass : II
Lig ht bulb : Max. 50W (GU-10)
60811425.26.05.2011

Your 2on Year Guarantee
Your appliance carries a 24 months parts and labour warranty. To fulfil the conditions of your guarantee,
the appliance must be correctly installed and operated, in accordance with the instructions, and only be
used for normal domestic purposes.
Please note that the guarantee and service availability only apply to the United Kingdom.
Customer Service
In case of difficulty please call the Customer Service Helpline on our helpline number.
After sales nº: 08448001128
When calling customer service, please ensure you have the model and serial number to hand.
Please keep your receipt or invoice in a safe place as they will be required as proof of date of purchase.
Please retain this sheet for your information
This manual suits for next models
5
Table of contents
Other CNA Group Ventilation Hood manuals
Popular Ventilation Hood manuals by other brands

Nordmende
Nordmende CHBD604IX user manual

FALMEC
FALMEC ALBA 760 Instruction booklet

Forte
Forte KEIRA Installation, operating and maintenance instructions

ROBLIN
ROBLIN ALTIMA 77 SANS MOTEUR Dimensions

VentAHood
VentAHood EUROLINE installation instructions

Air King
Air King Series 150 installation instructions