CnM 8 Channel H.264 User manual


CONTENTS
1 INTRODUCTION ...........................................................................................................................................2
1.1MAIN FEATURES .................................................................................................................................2
1.2 PRODUCT FEATURES.................................................................................................................2
1.2.1 PARAMETER .............................................................................................................................2
1.2.2 BASIC WORKING PARAMETER...............................................................................................4
1.3 ENTIRONMENT ADAPTABILITY ........................................................................................................4
2. DEVICE OPERATION MANUAL ..................................................................................................................5
2.1 REMOTE KEY INSTRUCTION............................................................................................................5
2.1.1 REMOTE CONTROL..................................................................................................................5
2.1.2 MOUSE OPERATION ................................................................................................................6
2.1.3 MENU TREE...............................................................................................................................7
2.2 SYSTEM OPERATION ........................................................................................................................8
2.2.1 USER LOGIN..............................................................................................................................8
2.2.2 GUI OPERATION .......................................................................................................................9
RECORD SEARCH ...................................................................................................................9
BACKUP ..................................................................................................................................11
RECORD MODE......................................................................................................................11
HDD MANAGEMENT ..............................................................................................................12
BASIC SETUP .........................................................................................................................13
SYSTEM LANGUAGE SETUP ................................................................................................13
DATE / TIME SETUP...............................................................................................................14
PASSWORD ............................................................................................................................14
DISPLAY SETUP.....................................................................................................................15
VIDEO / AUDIO SETUP ..........................................................................................................16
ADVANCED SETUP ................................................................................................................17
ALARM SETUP........................................................................................................................17
SYSTEM INFO.........................................................................................................................18
MOTION DETECT ...................................................................................................................19
MOBILE ...................................................................................................................................20
SYSTEM MAINTAIN ................................................................................................................20
PTZ SETUP .............................................................................................................................21
NETWORK SETUP..................................................................................................................22
3. INTERNET EXPLORER OPERATION.......................................................................................................25
3.1 FEATURES ........................................................................................................................................25
3.2 USER LOGIN .....................................................................................................................................25
3.3 OPERATION INTERFACE.................................................................................................................27
3.3.1 LIVE ..........................................................................................................................................27
3.3.2 REPLAY....................................................................................................................................28
3.3.3 SETUP......................................................................................................................................30
4. DVR INSTALLATION GUIDELINES...........................................................................................................34
4.1 PRODUCT OVERVIEW .....................................................................................................................34
4.2 HDD INSTALLATION.........................................................................................................................37
5. FREQUENTLY ASKED QUESTIONS ........................................................................................................38
6. COPYRIGHT ..............................................................................................................................................42
7. WARRANTY ...............................................................................................................................................42
8. SUPPORT ..................................................................................................................................................42
1

1 INTRODUCTION
1.1 MAIN FEATURES
This 8 channel Digital Video Recorder (DVR), has local recording and playback as well as supporting:
triple code remote network surveillance, data backup, parameter setting and motion detection.
1.2 PRODUCT FEATURES
H.264 compression
Two USB interfaces, USB2.0 for data backup, USB1.1 for mouse operation.
3.5” SATA HDD.
Special file system for security.
Translucent GUI, notes for selected menu items
Optimized eight channel simultaneous playback
Double level user management
Supports live view, parameter setting and copy playback video via network.
1.2.1 PARAMETERS
Item Device Parameter Specification
Language Chinese/English
GUI Graphic menu (OSD Menu)
System
Password User password, administrator password
Video In
8ch composite video input 1.0Vp-p,
impedance75Ω,BNC
Video Out
2ch composite video output 1.0Vp-p,
impedance75Ω,BNC
Video Display 1/4/9 channel
Video
Video Standard
PAL,25f/s,CCIR 625line,50scene
NTSC,30f/s,CCIR 525line,60scene
2

Audio Input 8ch audio input,impedance 600Ω,RCA
Audio
Audio Output 1ch audio output,impedance 600Ω,RCA
Basic electricity output Linear electricity
Record style Audio video recorded simultaneously
Audio compression ADPCM
Picture compression H.264
Picture resolution CIF / HD1 / D1
Streaming style ISO14496-10
Audio style ADPCM
Video code rate
CIF: 384~768 Kbps (optional)
HD1: 512~1024Kbps (optional)
D1: 512~1024Kbps(optional)
Audio codec rate 32KB/s
Picture Processing
and Storage
Data storage SATA HDD storage (optional)
Alarm Alarm input 8 Alarm input
Alarm output 1 Alarm output
Serial interface Support 1 RS232
Serial interface Support 1 RS485
Connector
Network interface RJ45,10M/100M
Software Upgrade Support USB firmware upgrade
Voltage input AC : 110~240V
Voltage output DC : 19V@3A
Power 6W without HDD
Others
Working temperature -10----50℃
3

1.2.2 BASIC WORKING PARAMETERS
Item Parameter Description
Voltage Input 19V DC 19V
Voltage Output for Camera 12V(+/-0.2)12V,2A
Video Impedance Input 75Ω75Ωeach channel
Video Output 1Vp-p 1Vp-p CVBS signal
SATA HDD One SATA with all capability
Working temperature -10----50℃Under normal conditions
1.3 ENTIRONMENT ADAPTABILITY
For the safety when using the DVR and to prolong the life of the device, please pay attention on following:
1) When installing device, please comply all the electric product safety criteria
2) Power and ground:
Do not touch the power socket, adapter or DVR with a wet hand.
Do not drop liquid on the DVR.
Do not put any object on the DVR.
Please use a soft dry cloth to clean the DVR; do not use chemical agents.
The Device will have voltage before startup if the power line is connected to power source.
Unplug the power chord from power source if the device will not be used for a long time.
4

2. DEVICE OPERATION MANUAL
Note: The enter key on the remote control has the same functionality as a click of the left mouse button.
2.1 REMOTE KEY INSTRUCTION
2.1.1 REMOTE CONTROL
Handheld Remote Controller Key Functions:
【0-9】keys: During setup, number keys are used to input values. For viewing
channels 1, 2, 3, 4, 5, 6, 7 and 8 use 1, 2, 3, 4, 5, 6, 7 and 8 on
numeric keypad respectively.
,: Up, Down directional keys: Move selection up and down in setup
menu.
,: Left, Right directional keys: Move cursor left or right in setup menu.
【QUAD】: Switch to 4 Channel mode.
【FWD】: Fast forward the video while in playback. press【PLAY】to return to
normal speed.
【REV】: Reverse the video while playback, press REW to switch, press
【PLAY】to return to normal speed.
【POWER ON】: Reset the DVR to Power on and Power off mode. (Standby and Start Up).
【LOGIN/LOCK】: If security is enabled in the setup, use the LOGIN/LOCK key to Login to the DVR and
enter the setup menu. Login by entering the User ID into “User ID select” and Password into the
“Password” input boxes. To exit setup and operation use the lock function.
Note: It is important to remember the password because there is no facility to reset the password.
【OSD】: Press OSD for main menu.
【PTZ】: PTZ control,press this key to enter into PTZ control interface when in single live view.
【EXIT】: Exit to the preview or return to the last menu.
【RECORD】: Start manual record.
【STOP】: Stop manual record.
【ASSISTANT】: (For future use).
5

2.1.2 MOUSE OPERATION
You can use mouse to operate the menu as well as using the IR remote controller. (It operates in the
same way as the Windows Operating System does). Please insert the mouse into USB 1.1.
Enter into main menu: Click the right mouse button on the live view.
Exit the present menu: It will not save the settings if clicking the right key to exit.
Click right button
Exit the playback interface: Click the right key to exit during playback.
Click the left button to enter into the setting interface.
Click the left button to zoom the window on live view and playback video. Double
clicking the left button will exit to the live view and playback multi-window interface.
1. Volume adjustment, color adjustment setting. This is for setting the single channel
volume adjustment and color adjustment. If it is multi-window, please use the left
button to select a single window.
2. The control shown when clicking the left button for volume adjustment and color
adjustment is as follow:
a. There is a box to show the volume on the volume adjustment interface. Move
the mouse to the corresponding position and click the left button. The right side
of box will show the volume, click “x” to exit.
b. Color adjustment is the similar in operation to volume adjustment.
When there are many options in the option frame, click the left button to see a pull-down
menu.
Click left button
Clicking the left button on the playback interface allows the following operations >>
Forward function, << Rew function, >>I Slow play function, I> Frame play function,>
Play function, X Exit function.
Click left button
1. In the input frame, clicking the left button to activate the keyboard. Numbers, symbols
and alphabetical characters can all be input by clicking the mouse.
2. When inputting numbers, click the right key, the number soft keyboard will pop up
first, and then use the left key to select the corresponding numerical value. Also click the
left key to exit the number keyboard.
6

Mouse move
1. Press the left button to move the mouse, this can adjust the parameter on the volume,
color interface. And the corresponding parameter will be displayed at the same time.
2. In the Motion Detection setting interface, you can use the left button to drag the frame
to set the motion detection area.
2.1.3 MENU TREE
You can control all the functionality of the DVR using the operating menu. The following tree diagram
shows the menu structure and more details about menu options will be shown in next chapter.
7

2.2 SYSTEM OPERATION
2.2.1 USER LOGIN
1. START-UP
Connect the DC19V/3A Power Adapter to the DVR. When the DVR has started, the 【POW】LED will be
on and 9 images will be displayed on the screen. If you have setup Power UP recording or Timed
Recording, the system will record automatically and the corresponding LED will be on.
Remark:
1) If there is no HDD in device, or the device didn’t read the HDD, or the HDD couldn’t be formatted it will
display a【H】in the video preview interface.
2) You must format the HDD in the DVR before first using. The steps to do this are: Main Menu > HDD
Management > Format. After formatting, the system will restart.
2. SYSTEM LOGIN
You can login from the USER LOGIN window as follows. Input the device ID and user password via
the numeric keyboard. You can access the main menu by pressing【Apply】if the password is
enabled.
Note: The Default Device ID is: 00000, User Password is 000000 and Admin Password is 020818.
For your convenience and system safety, you can setup the User Password and change the Device ID in
the Setup. Administrators have complete authority, while operators have limited authority to only watch
and playback.
Device ID: You just need to enter the device ID as the right frame.
Password: enter the admin password or user password.
8

2.2.2 GUI OPERATION
The main menu includes “SEARCH”, ”RECORD”, ”HDD”, ”BASIC”, “ADVANCE” and “Exit”.
Remark: To change the settings of sub menu items, you must press “APPLY”. It will not save the settings
if you exit without saving. This DVR has a special feature: Explanation and information will be showed
automatically when you move the cursor over a Menu option.
1. RECORD SEARCH
Move the cursor to 【RECORD SEARCH】(Icon highlighted when selected), press 【Enter】t o enter into
the setting interface.
There are three methods of searching records.
Method 1: Playback by Date
Date input: You can adjust the date and time to check, press 【Enter】or input the number directly to
adjust the year, month, date. Then input the time in the next box, and click “play” to see the recorded
video.
Method 2: Playback by Recording Status:
Input the date, click 【search】and you can see the recording status on this date.
9

Instruction:
MONTH: Will show the recording status in this month. Green means normal recording, Red means alarm
recording, Blue means no recording. Clicking any date in this frame will search the recording status of that
day, the search results will be shown below in the date frame..
DATE: Will show the recording status in this day, you can playback the recorded files in any period by
clicking the corresponding period.
Method 3: playback by file list:
Input the search date, click “SEARCH” and you can see the recording status. Click an exact day and then
click “detail file” and then you can see the “detail file” listed.
CHANNEL: There are CH1, CH2, CH3, CH4, CH5, CH6, CH7, CH8 and All, giving a total of 9 options.
Press 【Enter】to change the channel to be displayed.
TYPE: These are All, Normal and Alarm, total of 3 options. Press 【Enter】and the content will be
displayed in a list.
Instruction:
1. 【FILE LIST】,“CH” the corresponding channel the recorded file belongs too. “SIZE” is the displaying
size of this file(Unit:MB)“TYPE” is the displaying type of the recording file : there are two types:
Normal and Alarm. Pressing “BACKUP” button will export the selected files to USB storage;
2. After moving the cursor up and down and selecting the files, press【APPLY】to enter into playback
interface. If all channels have recording files, it will playback all windows at the same time;
3. If setup is “on” in the 【RECORD TIME】 in 【BASIC SETUP】,it will show the date/time when playing
back recorded file;If setup is “off” it will not display time.
4. During playback,press 【SLOW】 to play slowly;press 【FORWARD】 or 【REVERSE】 to speed
up forward or reverse play; press【PAUSE/STEP】to pause and play frame by frame; press【Exit】
to exit from playback and return to the former menu.
5. When playback of a file has finished, it will return to the file list.
10
2. BACKUP
You can use USB to backup recordings too, by inserting a USB device into the USB2.0 port before
backing up files. USB OTG (On-The-Go) is also supported.
You can select the recording to be backed-up by using the direction keys, pressing【Enter】confirms the
selected file (There will be a tick “√” at the end of any selected recorded files), press【Enter】again the
“√” will disappear which means the selection has been cancelled. You can start to export the selected
recording files by pressing【BACKUP】, as follows:
Instruction:
1.When the available space on the backup device is less than the size of the recording file, the system
will prompt “Space not enough”.
2.You can remove USB device directly when backup has finished.
3. RECORD MODE
Move the cursor to 【RECORD】(Icon highlighted when selected). Press 【Enter】to enter the setting
menu. Press 【Confirm】and enter the setup menu option. You can use direction keys and cursor to
change the options.
11

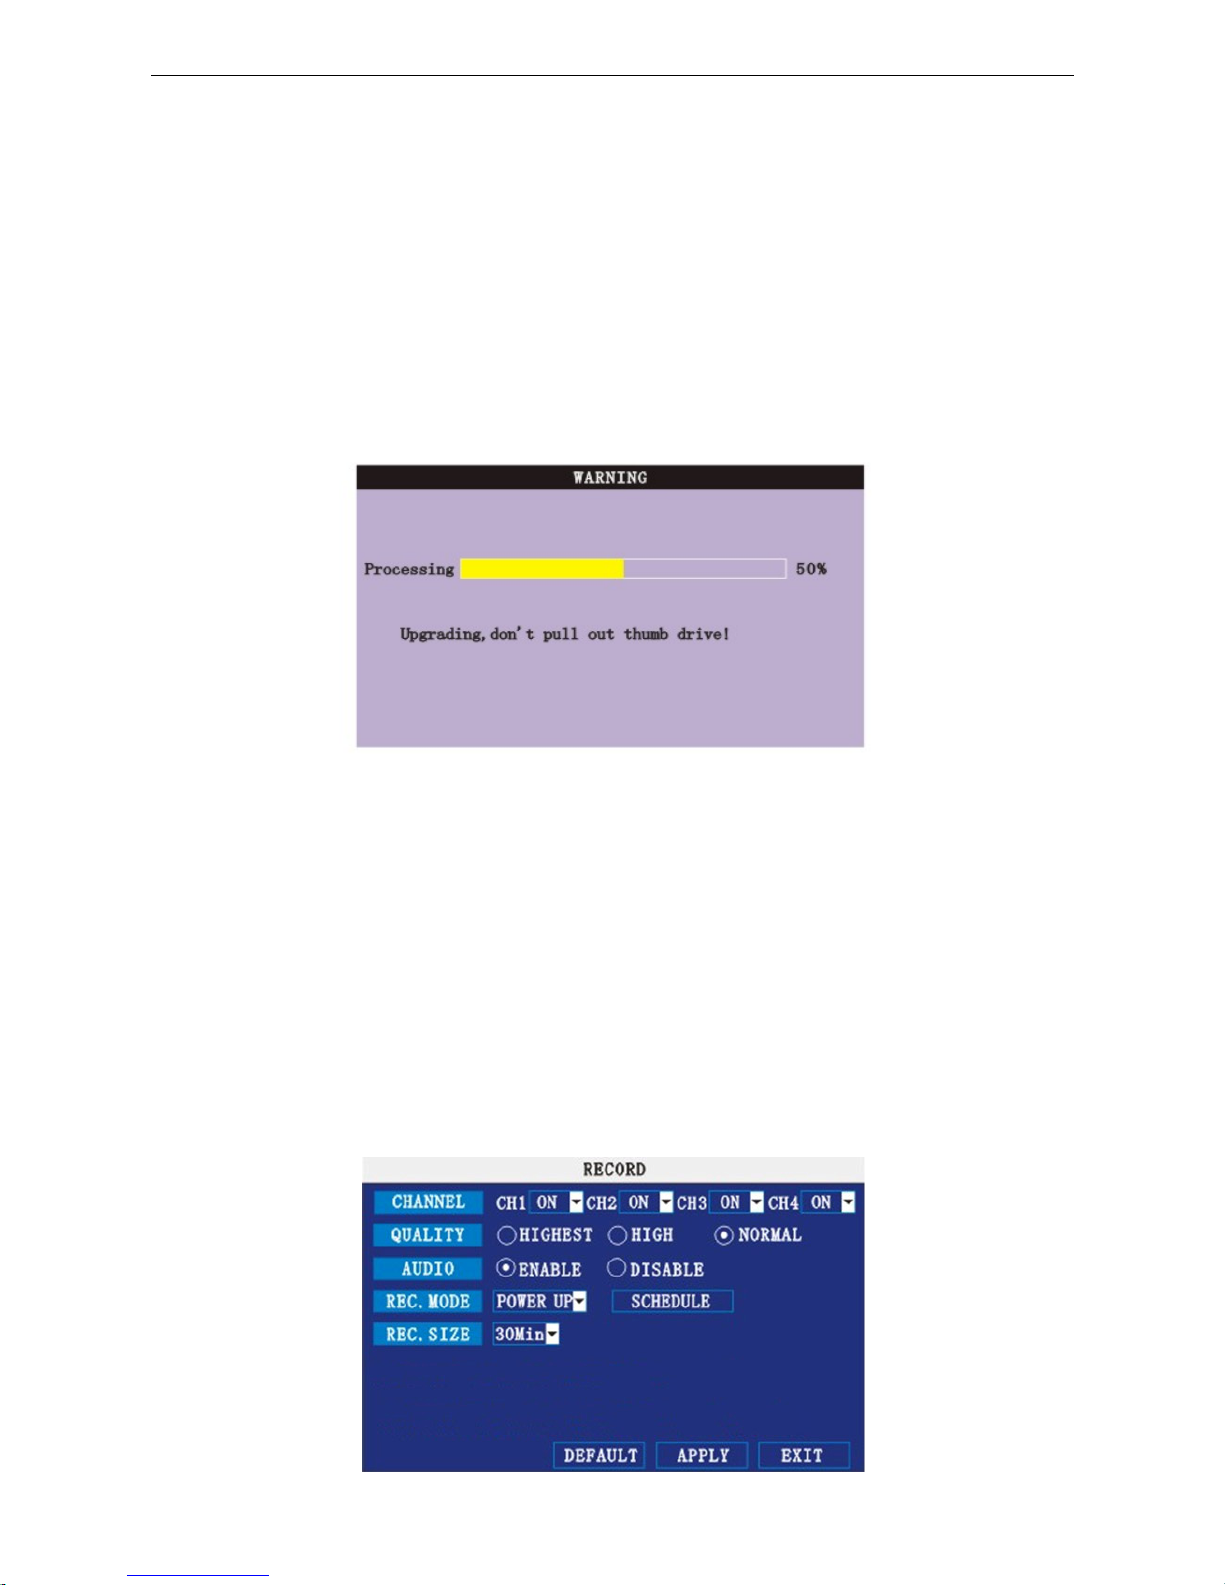
CHANNEL: ON: Means the channel is enabled for recording.
QUALITY: There are three options: HIGHEST, HIGH and NORMAL, corresponding to HIGHEST, HIGH
and NORMAL data stream standards.
AUDIO: ON: Means audio recording for all channels is enabled, OFF: Means audio recording is disabled.
REC.MODE:
POWER UP: Means the device will start recording when it starts up.
TIME: Recording as scheduled; you can tailor the setup schedule as follows.
CHANNEL: You can select all channels or just one channel(Blue means selected)
DAILY: There are three modes: ALARM, NORMAL and NO REC. If you select one mode, the whole day
will be recorded in that mode. You can cancel recordings by pressing the 【Enter】button; grounding
means do not recording. Different colors mean different record modes: Red means alarm record, Green
means normal record and Blue means no record.
RECORD SIZE: There are 15min, 30min, 45min, 60min options; to record using the mode selected.
Scroll to APPLY and press ENTER to save the new settings.
4. HDD (Hard Disk Drive) MANAGEMENT.
Move the cursor to 【HDD】(Icon highlighted when selected), press【Enter】to enter into the setting
interface, and you can use direction keys or cursor to change the options.
12
HDD STATUS: There are three settings available, normal, un-format, No HDD. If the HDD cannot run
normally(including un-format and no HDD), there will be a 【H】displayed on video live view.
OVERWRITE: ENABLE: when HDD space is less than 4GB, the earliest recording files will be deleted,
files will stop being deleted when the space available has increased to 10GB;
DISABLE:when HDD space is less than 500MB the system will stop recording, and a prompt will display
in live view: “please shutdown and replace HDD”.
FORMAT: Move cursor to select device and press 【APPLY】to start formatting.
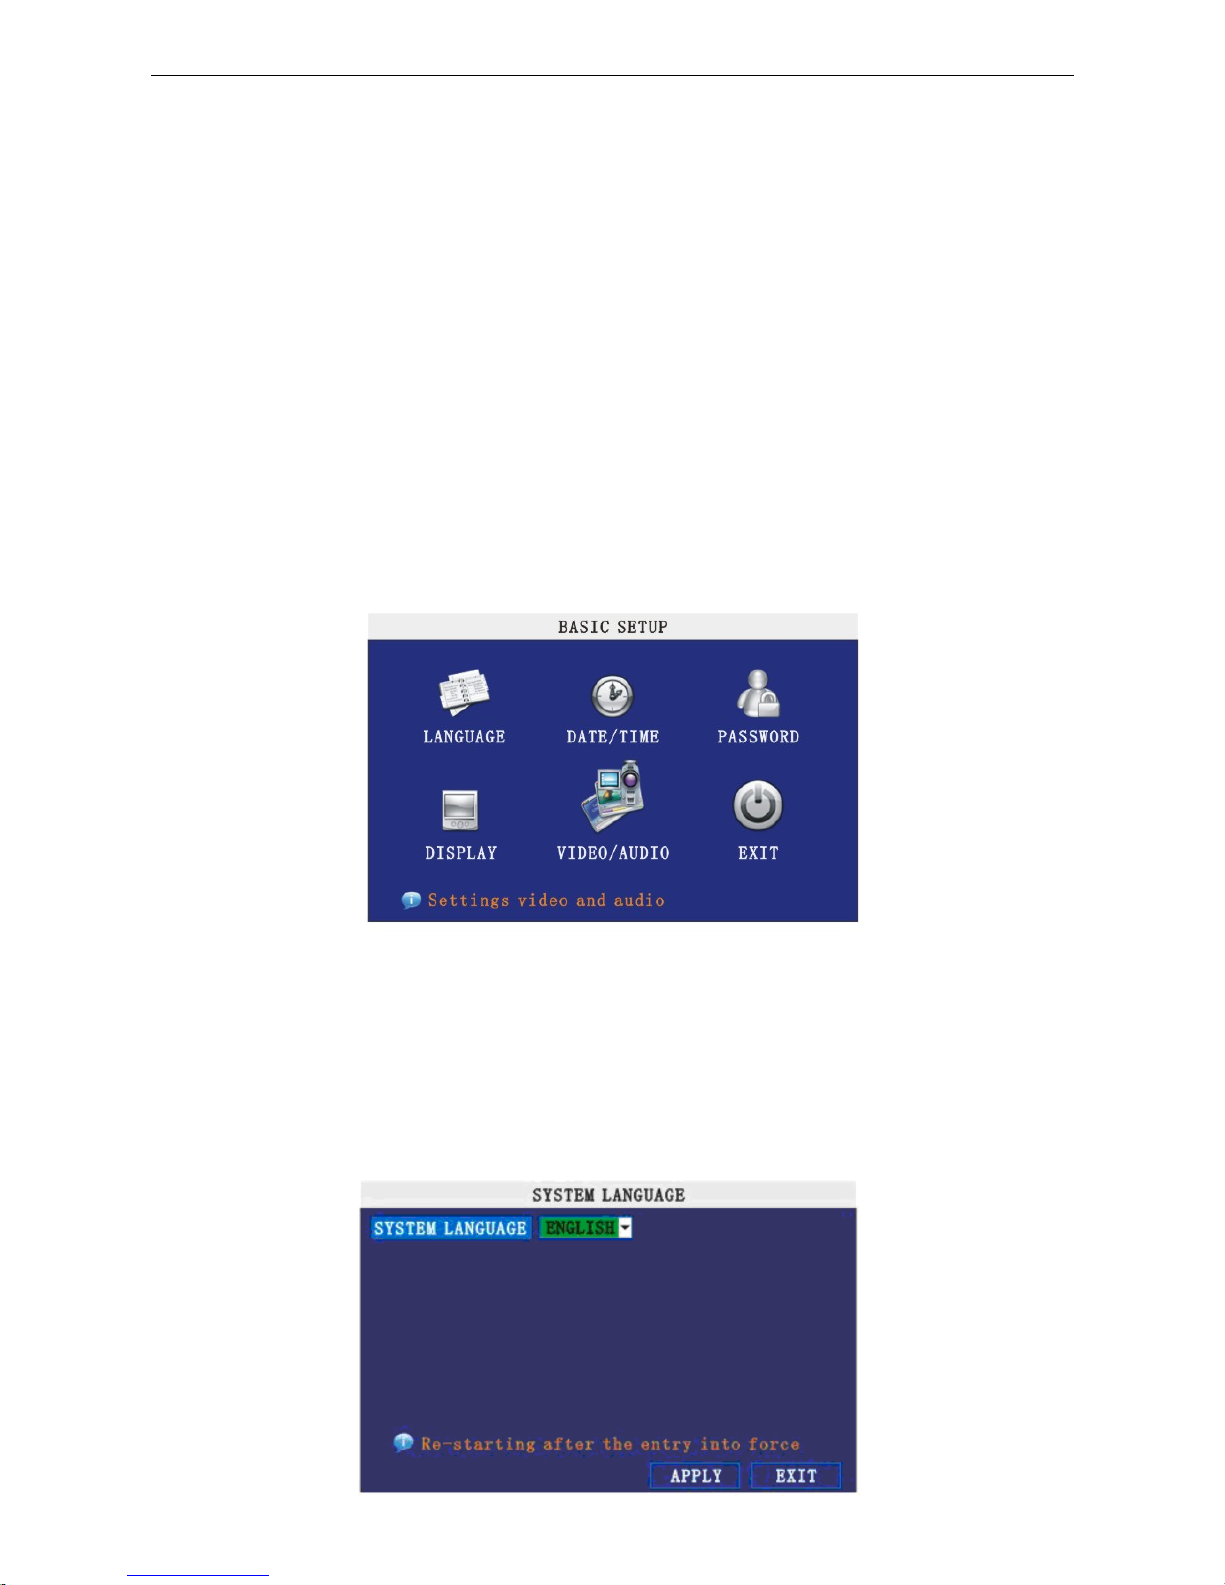
5. BASIC SETUP
Move cursor to select “BASIC SETUP”, then press 【ENTER】or click the left mouse button to enter into
the system language setup interface.
Basic setup includes system Language, Date/Time, Password security, Display, Video/Audio and Exit.
6. SYSTEM LANGUAGE SETUP
Move the cursor to select “Language” and press 【ENTER】or click the left mouse button to enter into the
system language setup interface.
13

System language is optional, including Chinese and English. You can choose the language you want.
Note: The device will restart when you finish system language setup.
7. DATE/TIME SETUP
Move cursor to select “Date/Time” and press 【ENTER】or click the left mouse button to enter into the
Date/Time setup interface.
DATE: Setup system date via numeric key.
DATE FORMAT: Press ENTER to switch the date patterns: there are YY-MM-DD and MM/DD/YY for
your selection.
TIME: Setup system time via numeric key.
TIME FORMAT: Press ENTER to switch the time patterns; there are 12 HOURS and 24 HOURS for your
selection.
Note: You must press 【APPLY】to save after you modify the time and date, modification will not be
saved if you exit without saving.
DST: For future use.
8. PASSWORD
Move the cursor to 【PASSWORD】(Icon highlighted when selected), press 【Enter】to enter into the
setting interface.
14

DEVICE ID: Press number key to setup the ID
PASSWORD: Press 【APPLY】to start or close the user password. If it shows “ENABLE”, you have to
input the password when logging in, otherwise, you can access main menu directly.
USER PASSWORD: Press number key to setup.
ADMIN PASSWORD: Press number key to setup.
NETWORK PW CLEAN: Select and apply will initialize the IE browser password .
9. DISPLAY SETUP
Move the cursor to 【BASIC SETUP】(Icon highlighted when selected), press 【Enter】to enter into the
setting interface.
NAME: Press 【Enter】to enter into the setting interface.
POSITION: Name location is optional. You can press 【Enter】to switch from bottom left, top left, bottom
right, top right and OFF.
COLOR: Press 【Enter】to enter into setting interface as follow:
15

Press 【Enter】or 【+】【-】key or directly drag the bar to setup colors, including chroma, brightness,
contrast and saturation, press 【APPLY】to save the parameters once the setup is completed.
PREVIEW: ON: Means the channel is allowed to view the live mode, OFF means not.
PREVIEW TIME: ON: Means insert clock in live view, OFF means no clock.
RECORD TIME: ON: Means insert clock in record file, OFF means no clock.
10. VIDEO/AUDIO SETUP
Move the cursor to 【VIDEO/AUDIO SETUP】(Icon highlighted when selected),press【Enter】to enter
into setting interface.
VGA RESOLUTION: 1024*768,800*600
CAMERA SYSTEM: Press 【Enter】to select camera system: PAL or NTSC .
VOLUME SETUP: Move cursor to 【VOLUME SETUP】,then press 【Enter】to access volume setup
interface, press 【+】【-】or number keys or directly drag the cursor to adjust the volume.
16
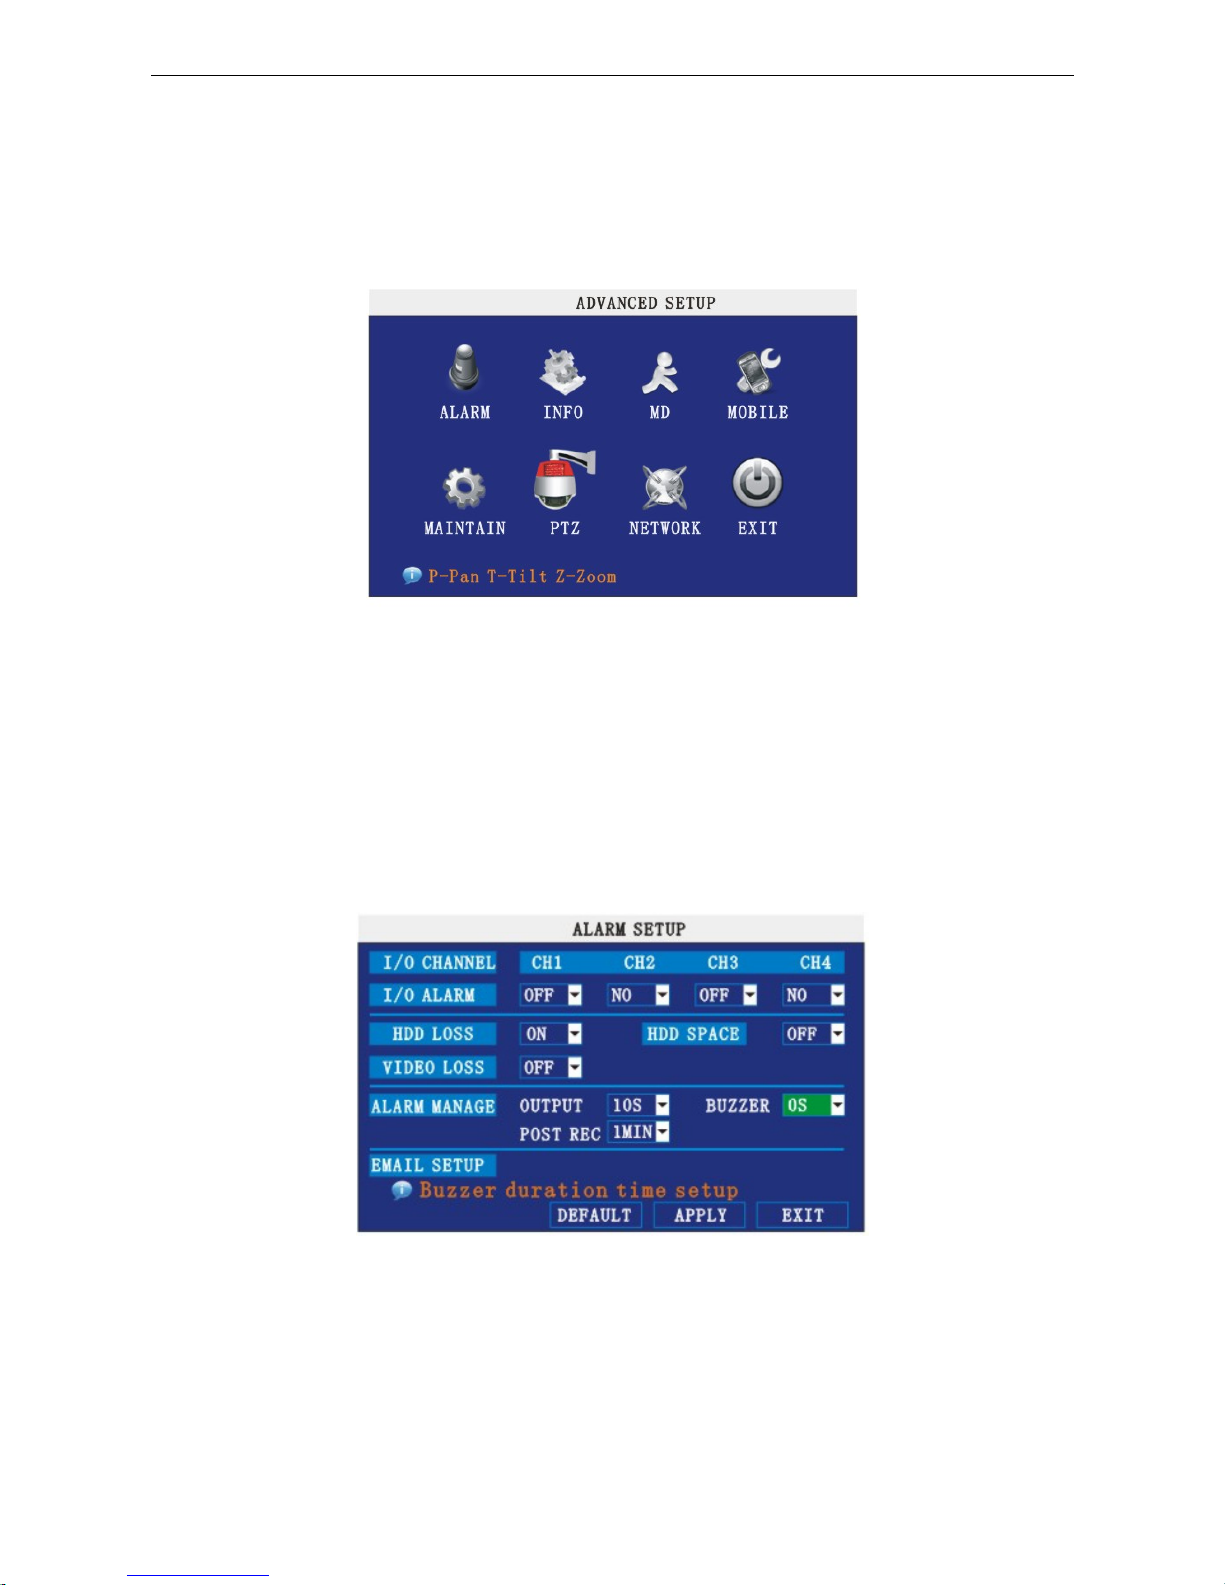
11. ADVANCE SETUP
Move the cursor to 【ADVANCE SETUP】(Icon highlighted when selected), press 【Enter】to enter into
Advanced Setup. Picture is below:
Advanced Functions include Alarm settings, System information, Motion detection, Mobile phone
monitoring, System maintenance, PTZ and Network settings.
12. ALARM SETUP
Move the cursor to 【ALARM SETUP】(Icon highlighted when selected), press 【Enter】to access the
settings interface.
I/O CHANNEL: Each channel corresponds to an I/O status, which means when an alarm is triggered, it
will activate the corresponding channel to start alarm recording.
N.O: indicates I / O input level from high to low.
N.C: indicates I / O input level from low to high.
17

HDD LOSS: ON: Means it will trigger an alarm if there is no HDD, and a 【H】will be displayed on the left
bottom of channel 1 in the live view.
HDD SPACE: ON: If the space is less than 500MB, a remark will appear in live view:Not enough space,
please change HDD after shutdown.
VIDEO LOSS: ON: When one channel has no video input, it will display “video loss” in live view.
ALARM MANAGE:
Includes three options: Alarm Output, Buzzer and Post REC Output. When an alarm is triggered, the
alarm output time will be: 0 second, 10 seconds, 20 seconds, 40 seconds and 60 seconds.
BUZZER:Buzzer calling time setup when alarm is triggered: 0 second,10 seconds,20 seconds,40
seconds and 60 seconds.
POST REC.:Post recording time setup: 30 seconds, 1 minute, 2 minutes and 5 minutes.
PRE REC:Pre-recording time is fixed as10 seconds.
13. SYSTEM INFO
Move the cursor to the 【SYSTEM INFO】(Icon highlighted when selected), press 【Enter】to access
the setting interface. This interface includes: firmware version, MAC address and serial number.
18

14. MOTION DETECT
Move the cursor to 【MOTION DETECT】(Icon highlighted when selected), press 【Enter】to access
the setting interface.
STATUS: Each channel has a corresponding channel switch, press 【Enter】to turn on or turn off the
motion detection for each channel.
SENSITIVITY: Each channel has corresponding sensitivity setting; including four standards: higher, high,
medium and low, press 【Enter】to switch between them.
MD AREA: Each channel has a corresponding regional motion detecting setting, move the cursor to the
corresponding【setting】and press【Enter】to enter the regional setting interface, red area mean motion
detection is activated in that area, transparent block means motion detection is not activated in that area.
Press the direction key on the remote control to move the cursor along the small pane. The position of the
cursor is indicated by green frame. Press 【Enter】to select or cancel motion detection in this small pane.
When setup is finished, press 【Exit】to go back to MD setup interface and settings will be saved
automatically.
Note: For Remote Control Operation: press【Menu】key to select or cancel full screen. For Mouse
operation: click the left mouse button and drag the frame to setup the region for motion detection.
19
Table of contents
Popular DVR manuals by other brands


Home electric
Home electric T Series User's installation and operation manual

Navitel
Navitel M800 DUAL user manual

Epcom
Epcom EV-1004 Technical manual

KGuard Security
KGuard Security HD Series user manual

Panasonic
Panasonic WJ-HD616/1000 brochure

Brickhouse Security
Brickhouse Security Black Box Micro user guide