CO/Tech ig2400s User manual

ENGLISH
SVENSKANORSKSUOMI
DEUTSCH
Important!
Read the entire instruction manual carefully
and make sure that you fully understand
it before you use the equipment. Keep the
manual for future reference.
Viktig information:
Läs hela bruksanvisningen noggrant och
försäkra dig om att du har förstått den innan
du använder utrustningen. Spara manualen
för framtida bruk.
Viktig informasjon:
Les disse anvisningene nøye og forsikre deg
om at du forstår dem før du tar produktet i bruk.
Ta vare på anvisningene for seinere bruk.
Tärkeää tietoa:
Lue nämä ohjeet huolellisesti ja varmista
että olet ymmärtänyt ne, ennen kuin alat
käyttää laitetta. Säilytä ohjeet myöhempää
tarvetta varten.
Wichtiger Hinweis:
Vor Inbetriebnahme die komplette
Bedienungsanleitung durchlesen und
aufbewahren.
Art.no Model
40-8889 IG2400S
Ver. 20130724
Original instructions
Bruksanvisning i original
Original bruksanvisning
Alkuperäinen käyttöohje
Original Bedienungsanleitung
Inverter Generator
Inverterelverk
Inverter
Invertterigeneraattori
Invertergenerator

2
ENGLISH
Inverter Generator
Art.no 40-8889 Model IG2400S
Please read theentire instruction manual before using theproduct and save it for future reference. Wereserve
theright for any errors in text or images and any necessary changes made to technical data. Ifyou have any
questions regarding technical problems please contact our Customer Services.
Contents
Safety ............................................................................................................................. 3
Key to warning symbols................................................................................................................................. 4
Intended application...................................................................................................................................... 4
Product description ........................................................................................................ 4
Operating instructions.................................................................................................... 6
Preparations .................................................................................................................................................. 6
Starting the engine........................................................................................................................................ 6
Economy mode ...............................................................................................................................................7
Switching the engine off................................................................................................................................ 8
Connecting electrical devices ......................................................................................... 8
Using the 230 V AC sockets............................................................................................................................ 8
12 V DC socket for charging batteries ............................................................................................................ 8
Care and maintenance .................................................................................................... 9
Maintenance schedule................................................................................................................................... 9
Engine oil....................................................................................................................................................... 9
Air filter.........................................................................................................................................................10
Spark plug ....................................................................................................................................................10
Emptying the fuel tank.................................................................................................................................. 11
Checking the fuel line ................................................................................................................................... 11
Checking the choke....................................................................................................................................... 11
Checking the cooling system ........................................................................................................................ 11
Checking the starting system ....................................................................................................................... 11
Cleaning the generator ................................................................................................................................. 11
Transportation ..............................................................................................................................................12
Storage ..........................................................................................................................12
Disposal.........................................................................................................................12
Specifications ................................................................................................................13
Generator......................................................................................................................................................13
Engine...........................................................................................................................................................13
Other.............................................................................................................................................................13

3
ENGLISH
Safety
When in operation, theexhaust from thegenerator contains poisonous carbon monoxide gas. Carbonmonoxide
is both odourless and colourless and may be present even if you do not see or smell gas. Breathing this
poisonous gas can lead to headaches, dizziness, drowsiness, loss of consciousness and eventually death.
• The generator must only be used outdoors in non-confined areas.
• Keep adequate clearance around thegenerator to allow for proper ventilation. Donotcover.
The generator may emit highly flammable and explosive fuel fumes which can cause severe burns or even death.
Anearby naked flame can lead to anexplosion even if not directly in contact with thefuel.
• Do not operate thegenerator near anakedflame.
• Do not smoke near thegenerator.
• Always operate thegenerator on adry, firm and level surface.
• Always switch thegenerator off before refuelling it. Letthegenerator cool down for at least 2 minutes before
removing thefuel tank cap. Loosenthecap slowly to relieve pressure in thefueltank.
• Do not fill thefuel tank to thetop, thefuel could expand during operation. Alwayswipe up any spilt fuel
before starting thegenerator.
• Always empty thefuel tank before storing or transporting thegenerator.
• Before transporting, close thefuel cut-off valve and disconnect thespark pluglead.
The generator produces powerful, potentially lethal voltage.
• Only electrical devices should be plugged into this generator, either directly or with anextension lead.
Neverconnect thegenerator to abuilding’s electrical system without thehelp of aqualified electrician.
Connecting thegenerator in thewrong way can create feedback into themains network resulting in
anelectrocution hazard. Theconnections must comply to all local wiring regulations and codes of practice.
• Do not connect thegenerator to any other power source such as another generator or inverter.
• Use aresidual current device (RCD) in highly conductive areas such as on metal platforms orroofs.
• Do not use thegenerator in wet conditions or wet environments.
• Do not operate thegenerator near water such as pools, beaches or jetties.
• Do not touch bare wires or electrical sockets.
• Do not allow children or non-qualified persons to operate thegenerator.
The generator becomes extremely hot during use. Temperatures near theexhaust can exceed 65 °C.
• Do not touch hot surfaces. Observe all thewarnings on thegenerator denoting hot surfaces.
• Allow thegenerator to cool after use before touching theengine or other areas that have become hot
during operation.
Misuse of this generator can damage it or shorten itslife.
• Use thegenerator only for its intended purpose.
• Make sure thegenerator is on alevel surface.
• Allow thegenerator to run for several minutes before connecting any electrical devices.
• Promptly turn off and disconnect any malfunctioning electrical devices.
• Do not exceed thecapacity of thegenerator by connecting electrical devices requiring acombined power
in excess of thewattage capacity of thegenerator.
• Do not turn on electrical devices until after they are connected to thegenerator.
• Turn off all connected electrical devices before switching thegenerator off.
• The generator is fitted with anearth terminal connected to theframe, engine chassis and theearth pins of
thesocket outlets. Consult anelectrician regarding thewiring regulations applicable for your intended use
of thegenerator.
4
ENGLISH
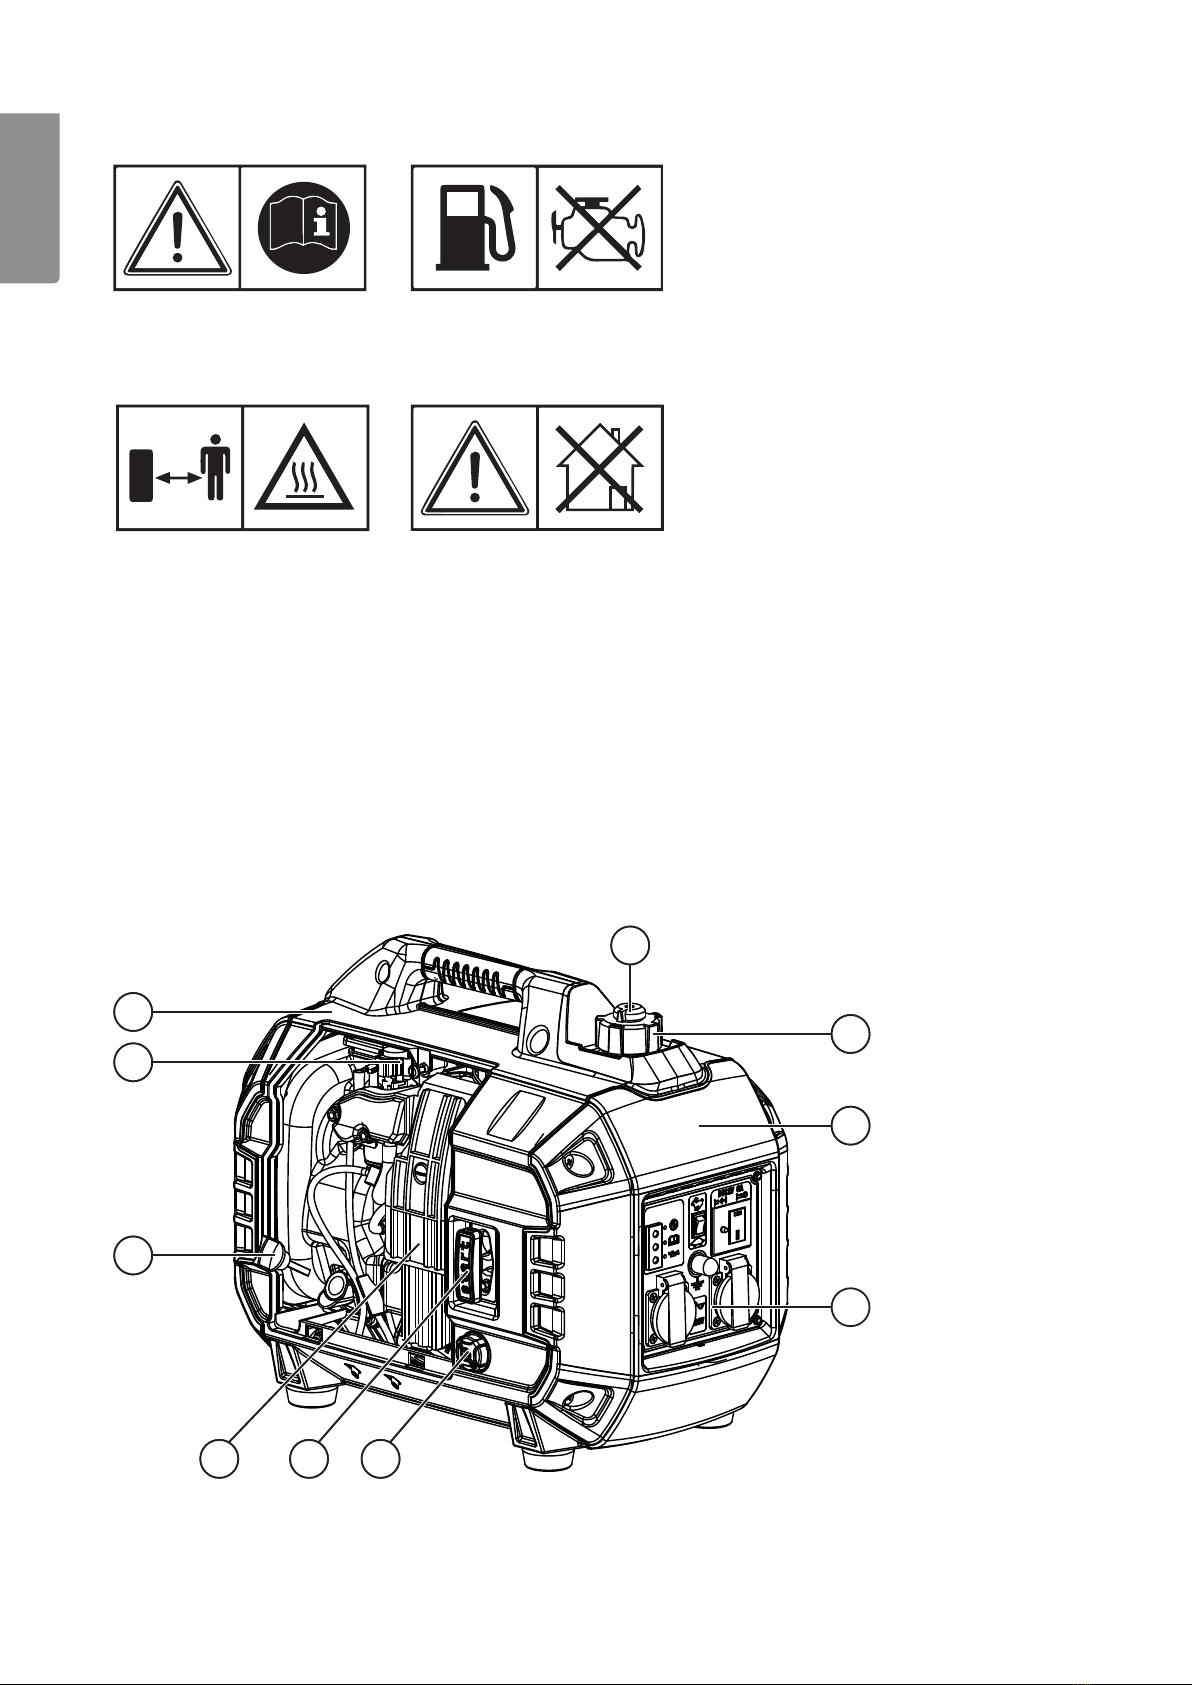
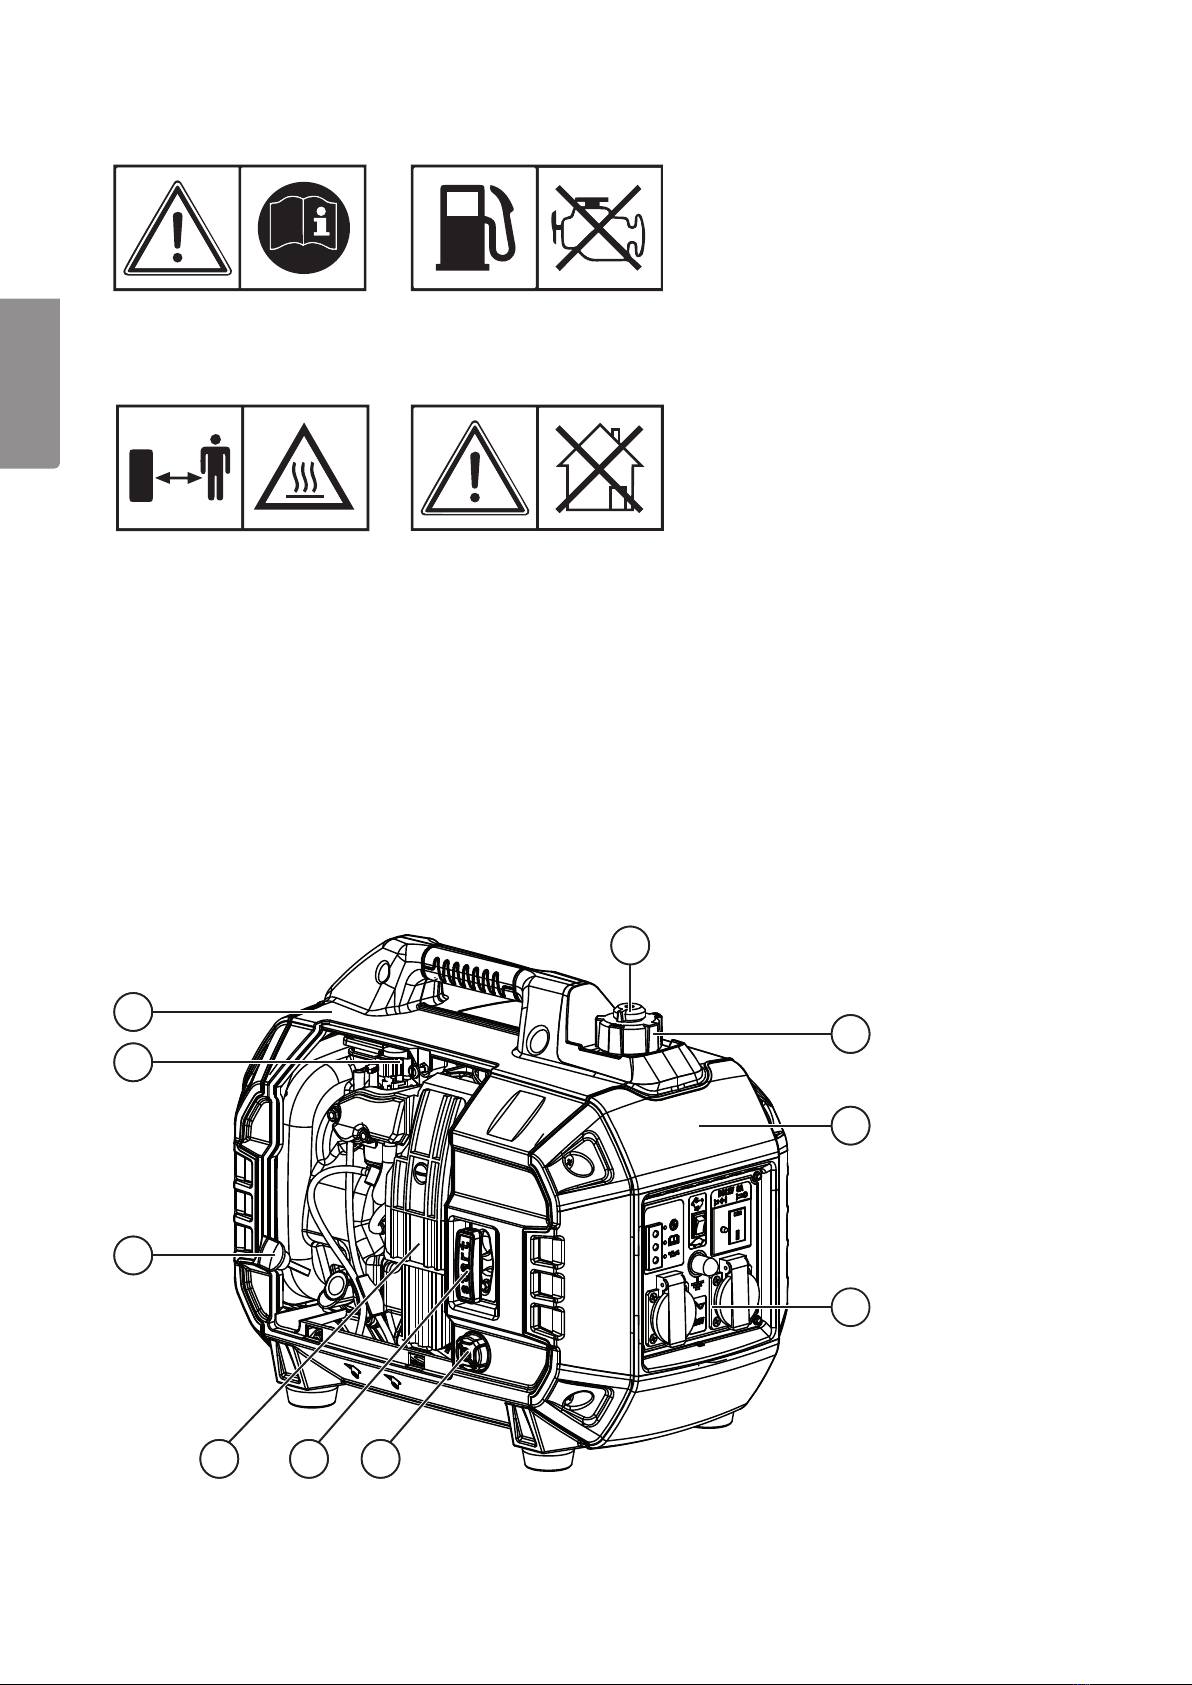
Key to warning symbols
Warning: Readtheentire
instruction manual before
use.
Switch theengine off and allow it to
cool before refuelling. Neverrefuel
whilst theengine is running.
Hot surfaces, thesilencer
becomes very hot.
Keepflammable materials
away from thegenerator.
The generator must not be
used indoors or in closed
areas, ensure that theworking
area is well-ventilated.
Intended application
The generator is intended to be used with: normal electrical appliances such as lights and power tools,
and also TV sets and computers. Donot connect electrical appliances that use more than 1800W.
Henceforth, connected electrical appliances will be referred to as theapplied load.
Product description
104
102 101103
108
109
105
106
107
10
5
ENGLISH
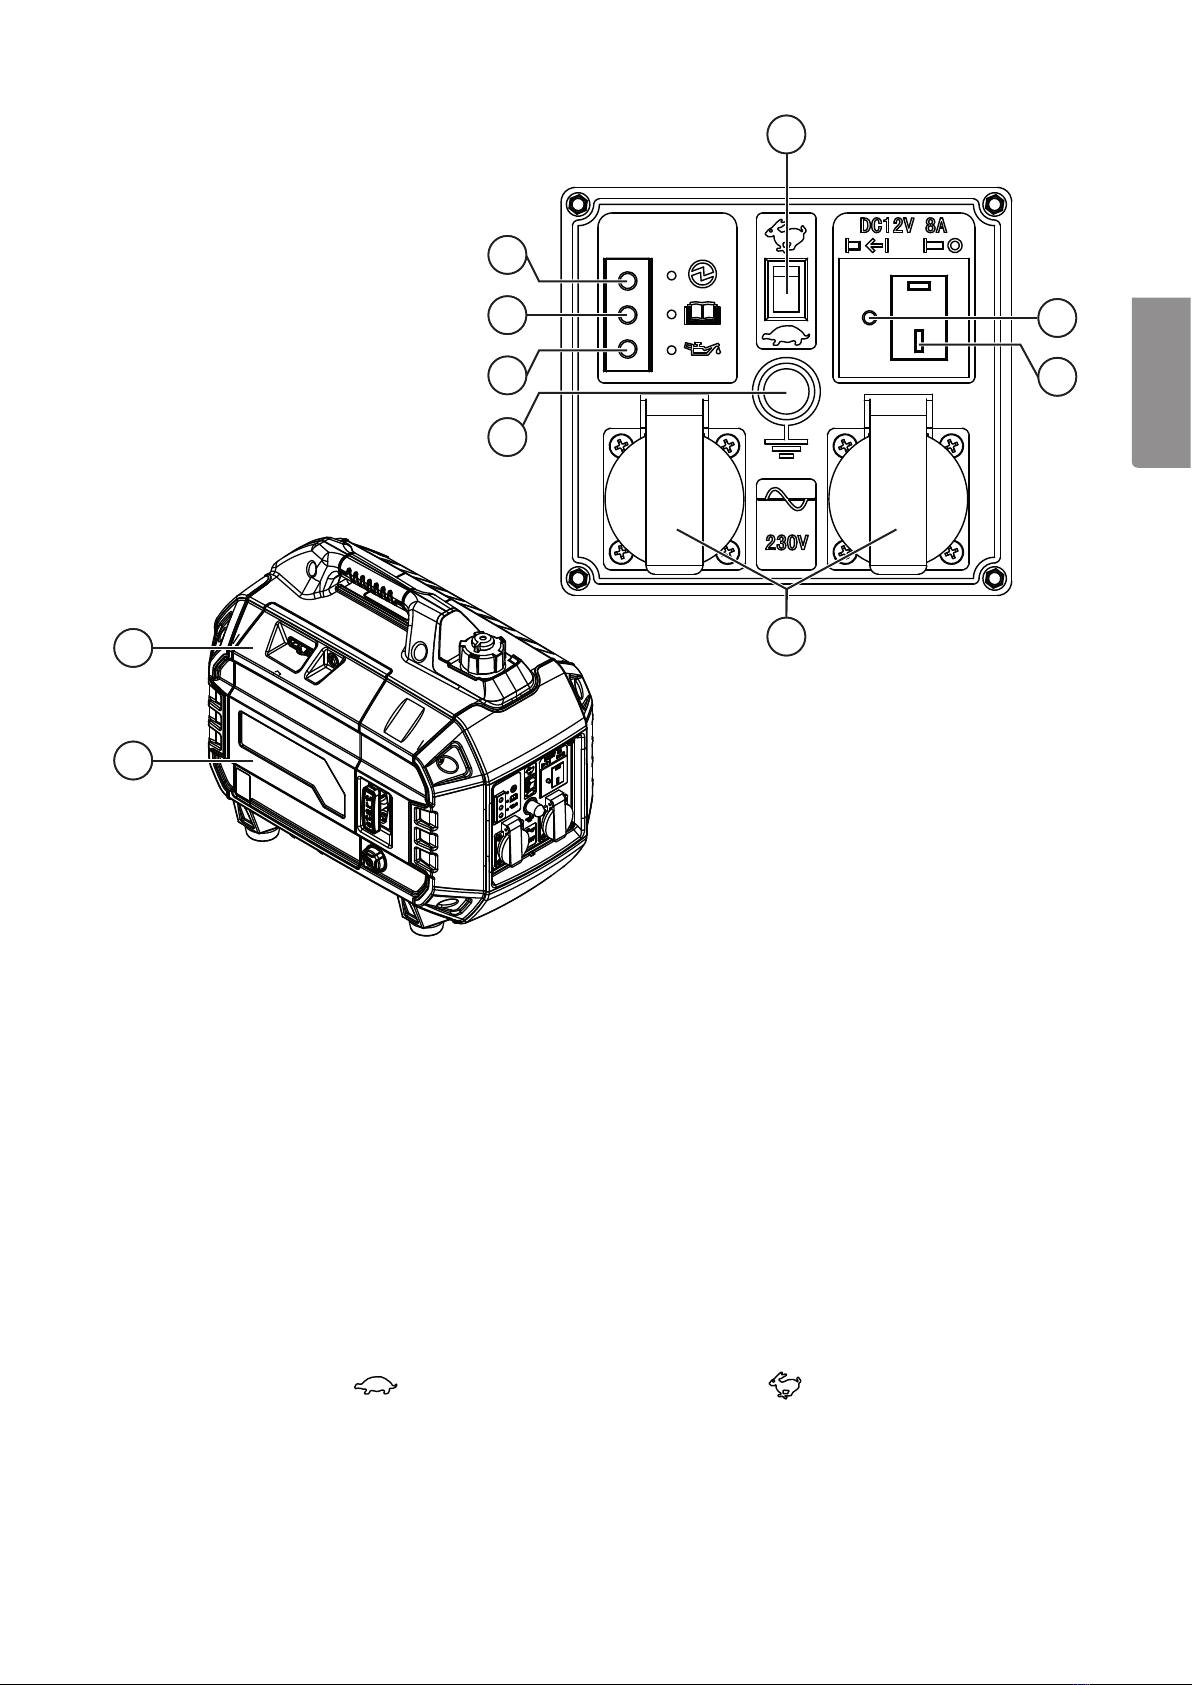
1. Engine on/off switch I ON/0 OFF in combination with thefuel cut-offvalve
2. Starter handle
3. Air filter (under themaintenance cover)
4. Oil filler cap/dipstick (under themaintenance cover)
5. Spark plug cap (under therear maintenance cover)
6. Upper cover with handle
7. Fuel tank air ventknob
8. Fuelcap
9. Frontcover
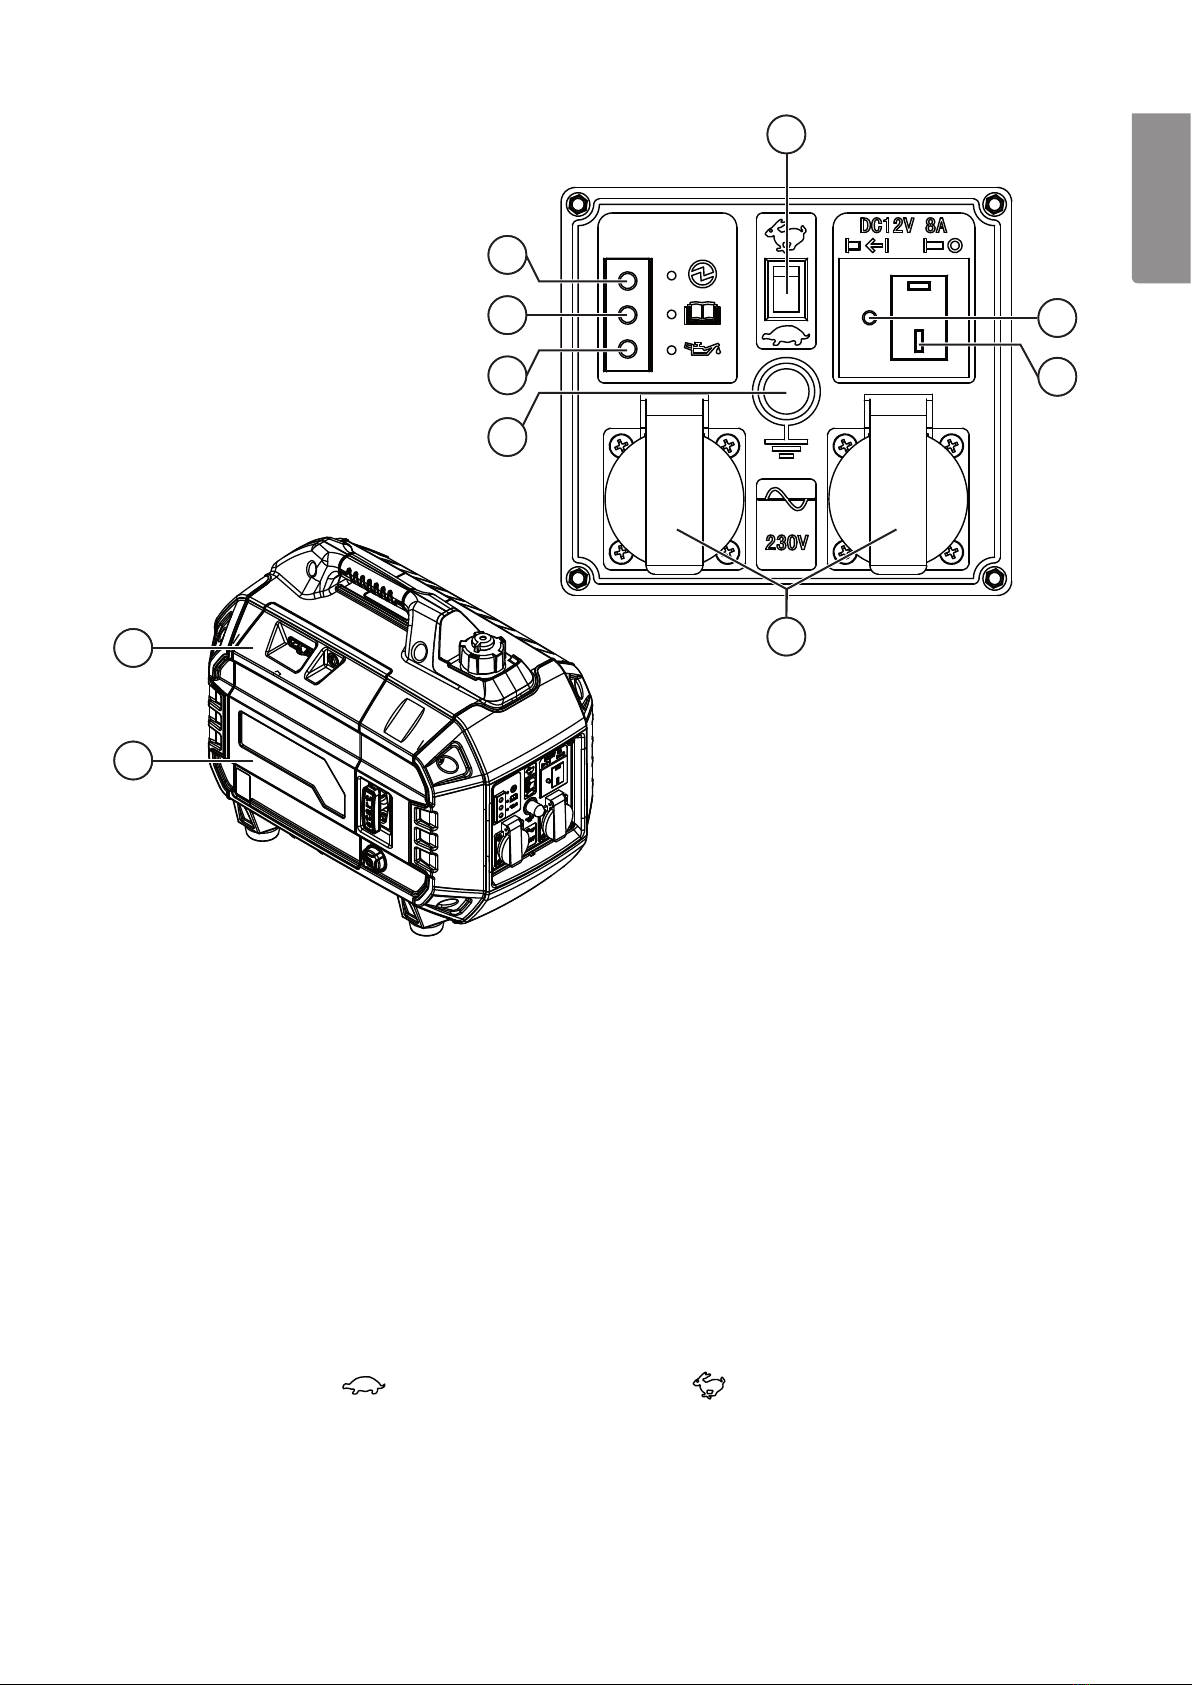
10. Control panel
11. Earth rod connection
12. Low oil indicator
13. Overload indicator
14. Output indicator
15. Mode selector switch: – Economy mode (low idle speed), – Normal mode
16. DC socket overload protection circuit breaker
17. 12 V DC socket
18. 230 V AC socket
19. The choke is closed when moved to theright and open when moved to theleft
20. Maintenance cover
1014
1015
1018
1013
1019
1020
1016
1012 1017
1011
6
ENGLISH
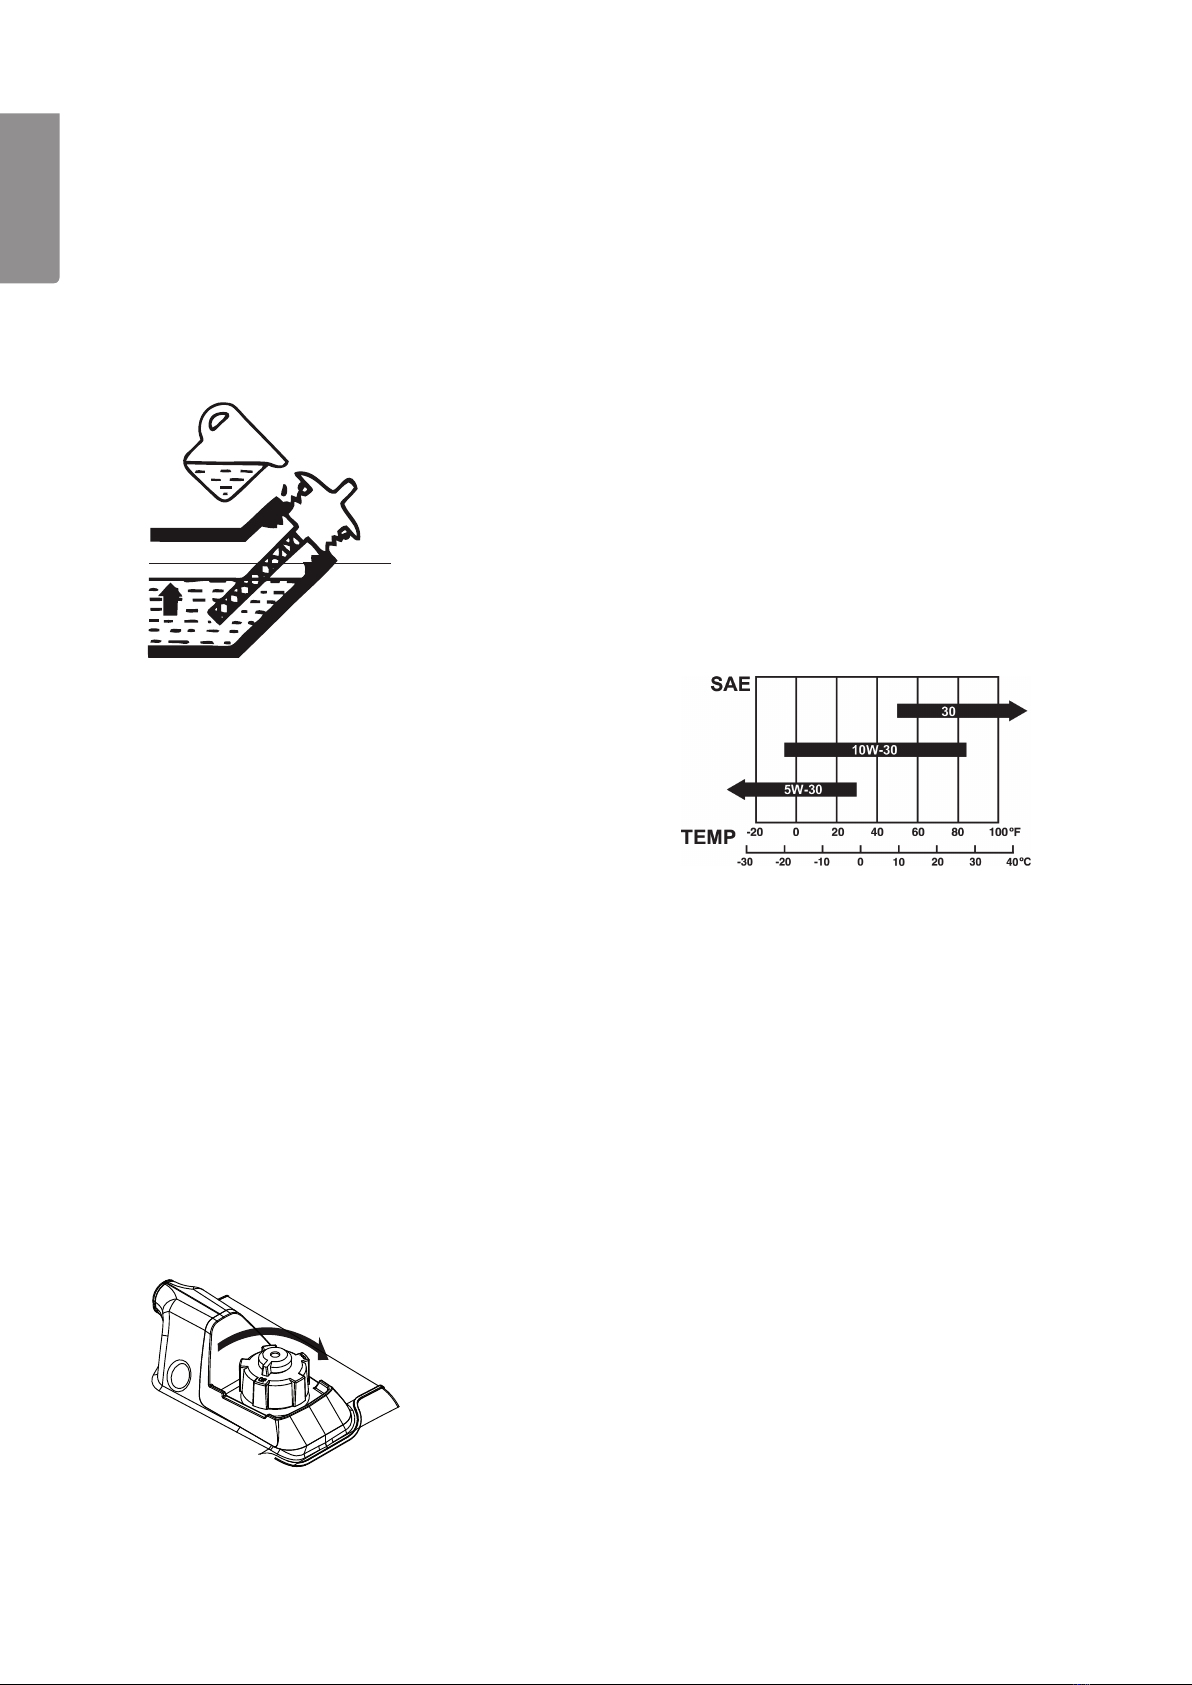
5. If theoil level is low add more oil. SAE 10W-30 engine oilfor
4-stroke engines is recommended for normal use (-5–25 C°).
Theoil should have anAPI service class rating of at leastSJ.
Refuelling
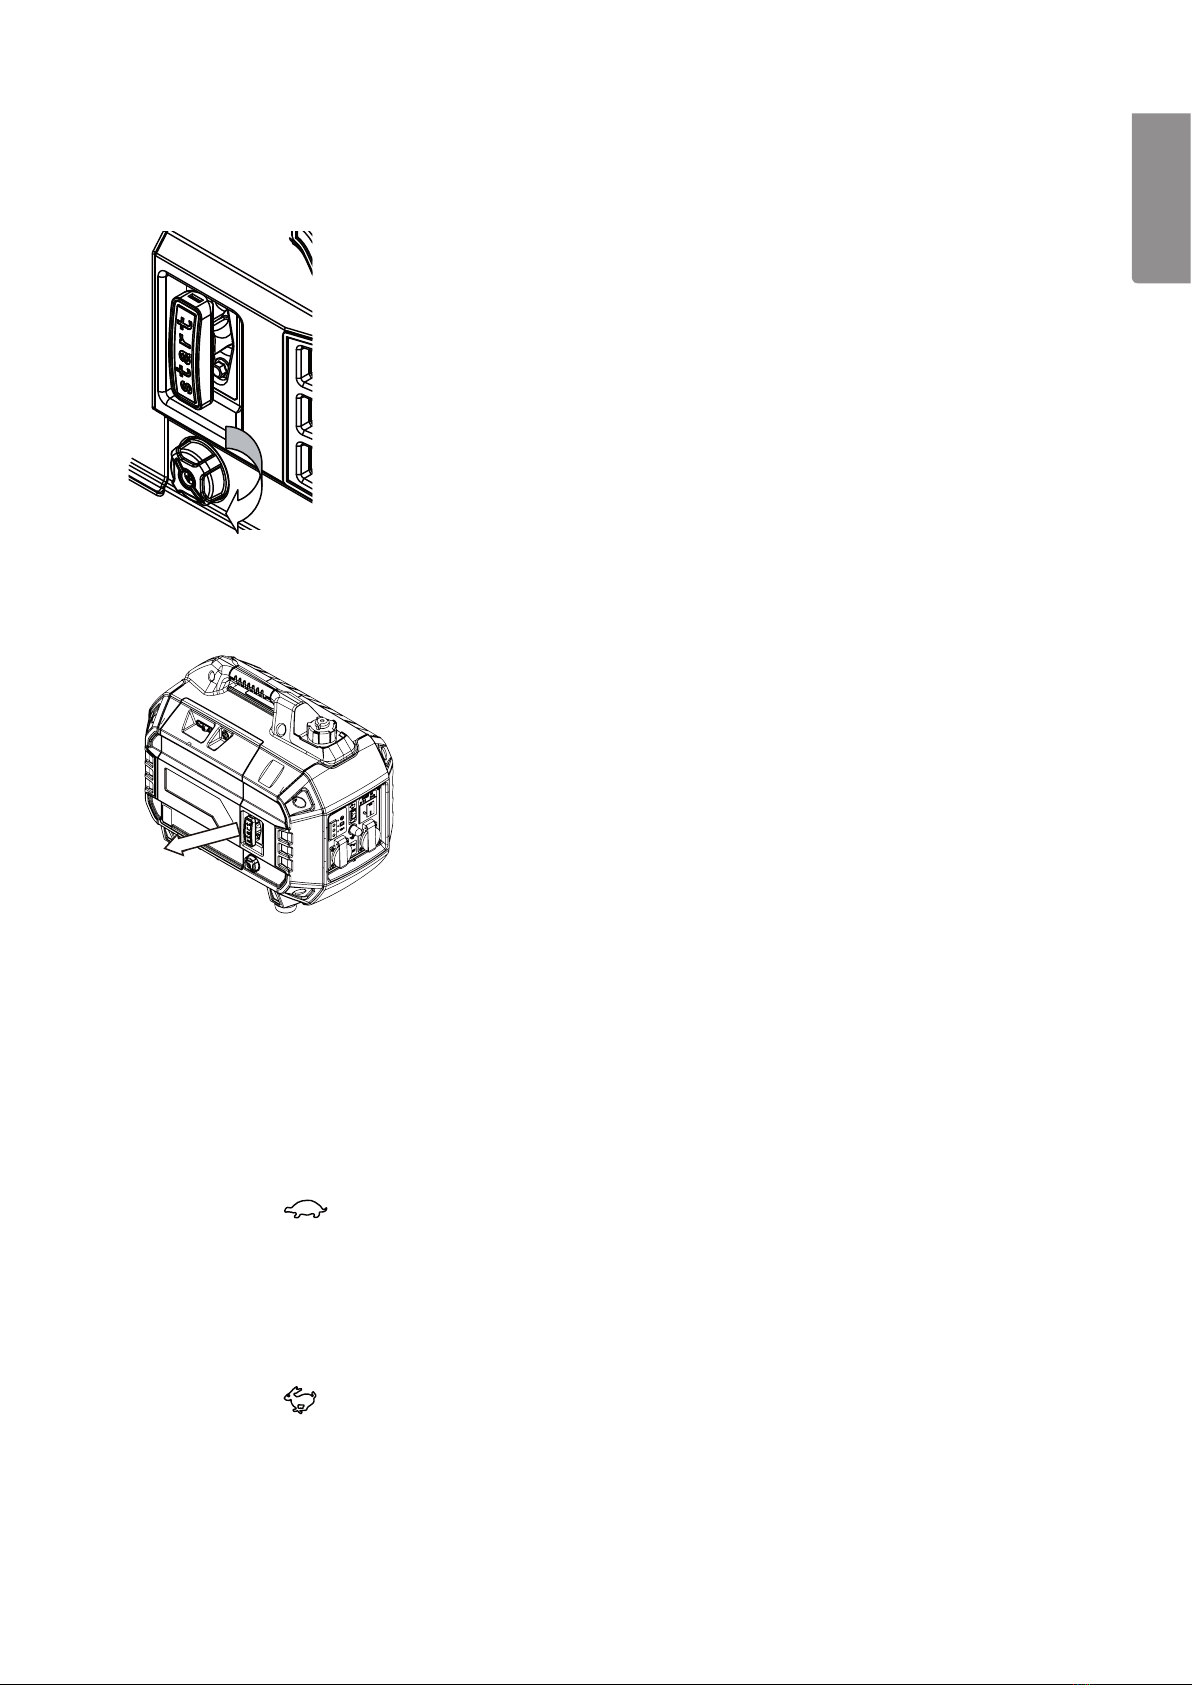
1. Makesure that thegenerator is flat and level and in awell-ventilated place. Unscrew thefuel cap (8).
2. Onlyuse fresh, clean petrol with anoctane rating of at least 95 and containing no more than 10 % ethanol.
Theuse of fuel with acontent of ethanol higher than 10 % could lead to engine damage which is not
covered by theguarantee.
3. Screwthefuel cap back on, close theair vent (7) if thegenerator is not to be used straight away.
4. Wipeup any fuel spills immediately.
Starting the engine
The generator should be placed on afirm, flat surface with good ventilation and at least 3 feet awayfrom
building walls and ceilings. Note:Thegenerator’s engine cooling air inlet vents are located on theunderside
of thegenerator. Thegenerator must not be placed on any soft material which could block theair inlets and
cause theengine to overheat.
1. Make sure that all appliances connected to thegenerator are turned off.
2. Open thefuel cap air vent (7) by turning it clockwise toON.
Operating instructions
Preparations
Check the oil level before switching the generator on
1. Removethescrews fastening themaintenance cover (20) (the big cover next to thestarter handle).
2. Make sure that thegenerator is on aflat and level surface. Removetheoil filler cap (4) and wipe thedipstick clean.
3. Fully insert thedipstick into thefiller neck without screwing thecap back on.
4. Remove thedipstick and read theoil level. Thereis aminimum level mark about 1 cm up from thebottom
of thedipstick. Thedipstick hole is also theoil filler neck. Theoil level should be between themark on
thedipstick and thebottom of thefiller bottom of thethread on theoil filler neck.
Upperlimit
7
ENGLISH
3. Choke
To start acold engine, close thechoke by moving thechoke control (19) to theright.
Torestart awarm engine, thechoke is not needed and should be in theopen position.
4. Set theengine switch (1) to I ON, this will also open thefuel cut-offvalve.
5. Slowly pull thestarter handle (2) until aslight resistance is felt. Thenpull thehandle briskly in thedirection
of thearrow to start theengine. DoNOT let go of thestarter handle as soon as theengine starts so that it
snaps back against thegenerator. Letit recoil gently to prevent any damage to thestarter.
6. The choke will not be needed if theengine is warm. Iftheengine is cold and thechoke has been used,
run theengine for about aminute and then set thechoke control (19) to thehalf-open position.
Afterafurther 30 seconds operation, open thechoke completely.
7. Allow theengine to run for acouple of minutes to ensure that it is running smoothly before connecting
the applied load or before switching to economy mode.
Economy mode
The generator has aselectable economy mode which reduces fuel consumption by lowering theengine idling
speed to alower level than normal when theapplied load is reduced or turned off. Theengine speed will increase
again automatically if theapplied load increases. Activate theeconomy mode by setting themode selector
switch(14) to OFF
( ).
Do not select theeconomy mode if theapplied load requires ahigh start-up power or high running power,
the engine might not be able to reach enough speed resulting in voltage fluctuations which might damage
the applied load.
Do not select theeconomy mode for applied loads that require only intermittent operation, momentary power,
or loads which will be turned on and off quickly. Inthese cases thenormal mode should be used and themode
selector set to ON ( ).

8
ENGLISH
Switching the engine off
To stop theengine in anemergency: set theengine switch to 0OFF.
Stopping theengine normally:
1. Turn off all applied load devices.
2. Set theengine switch (1) to the0 OFF position.
3. Close thefuel tank air vent (7).
Connecting electrical devices
Before making any connections, first inspect theelectrical device and any cables for damage. Allcables and
connectors must be approved for outdoor use.
If anapplied load begins to act abnormally or stops suddenly:
• Switch it off and disconnect it from thegenerator immediately.
• Investigate thecause of theproblem.
• Make sure that therated power of theapplied load does not exceed themaximum power of thegenerator.
Do not exceed thegenerator’s rated power of 1800 W (continuous operation).
Using the 230 V AC sockets
1. Start theengine and make sure that thegreen output indicator light (14) comeson.
2. Plug theapplied load into theAC socket/s.
Bear in mind that most devices require more than their rated wattage for start-up than during normal operation.
Overload
1. If thegenerator is overloaded, if theapplied load is short-circuited or if thegenerator is overheated, thered
overload indicator light (13) will comeon.
2. Approximately 5 seconds later, thecurrent to thesocket outlets will be cut off. Thered overload indicator
light will stayon.
3. The green output indicator light (14) will goout.
4. Switch theengine off and investigate thecause of theproblem.
5. Then engine must be restarted to reset thegenerator.
12 V DC socket for charging batteries
The 12 V outlet is only intended for charging lead-acid batteries such as car batteries >60 Ah. TheDC output
current and voltage are not regulated and will vary depending on thespeed of theengine and whether ornot
the economy mode is activated. Themaximum charging current is 8.3A.
Note: Battery charging must be supervised and discontinued manually otherwise there is arisk of thebattery
fluid boiling and damaging thebattery. Whilstabattery is being charged it will emit anexplosive oxyhydrogen
gas mixture. Batteries should be charged in well-ventilated areas, and well away from sources of ignition.
Formore efficient car battery charging, we recommend that a230 V AC car battery charger is connected to
the 230 V AC outlet of thegenerator.
Note: Donot connect lead-acid batteries with capacities less than 60Ah.
The 12 V outlet is unregulated, i.e. theoutput voltage depends on thespeed of theengine and theloadon
the generator. Iftheeconomy mode is selected and no applied load is connected to the230 V AC socket,
the charging current is 1/3 of therated current (approx. 2.7 A). The12 V socket is equipped with acircuit
breaker (16) which trips if thesocket is overloaded. Ifthis happens, disconnect thebattery and investigate
the cause. Resetthecircuit breaker by pushing thebutton in.
Warning:
First connect thebattery charging lead to theDC socket of thegenerator and then to thebattery.

9
ENGLISH
Care and maintenance
Good maintenance is essential for safe, economical and trouble-free operation and along service-life.
Maintenance schedule
Caution!
Never service thegenerator whilst theengine is running. Switchthegenerator off and let itcool.
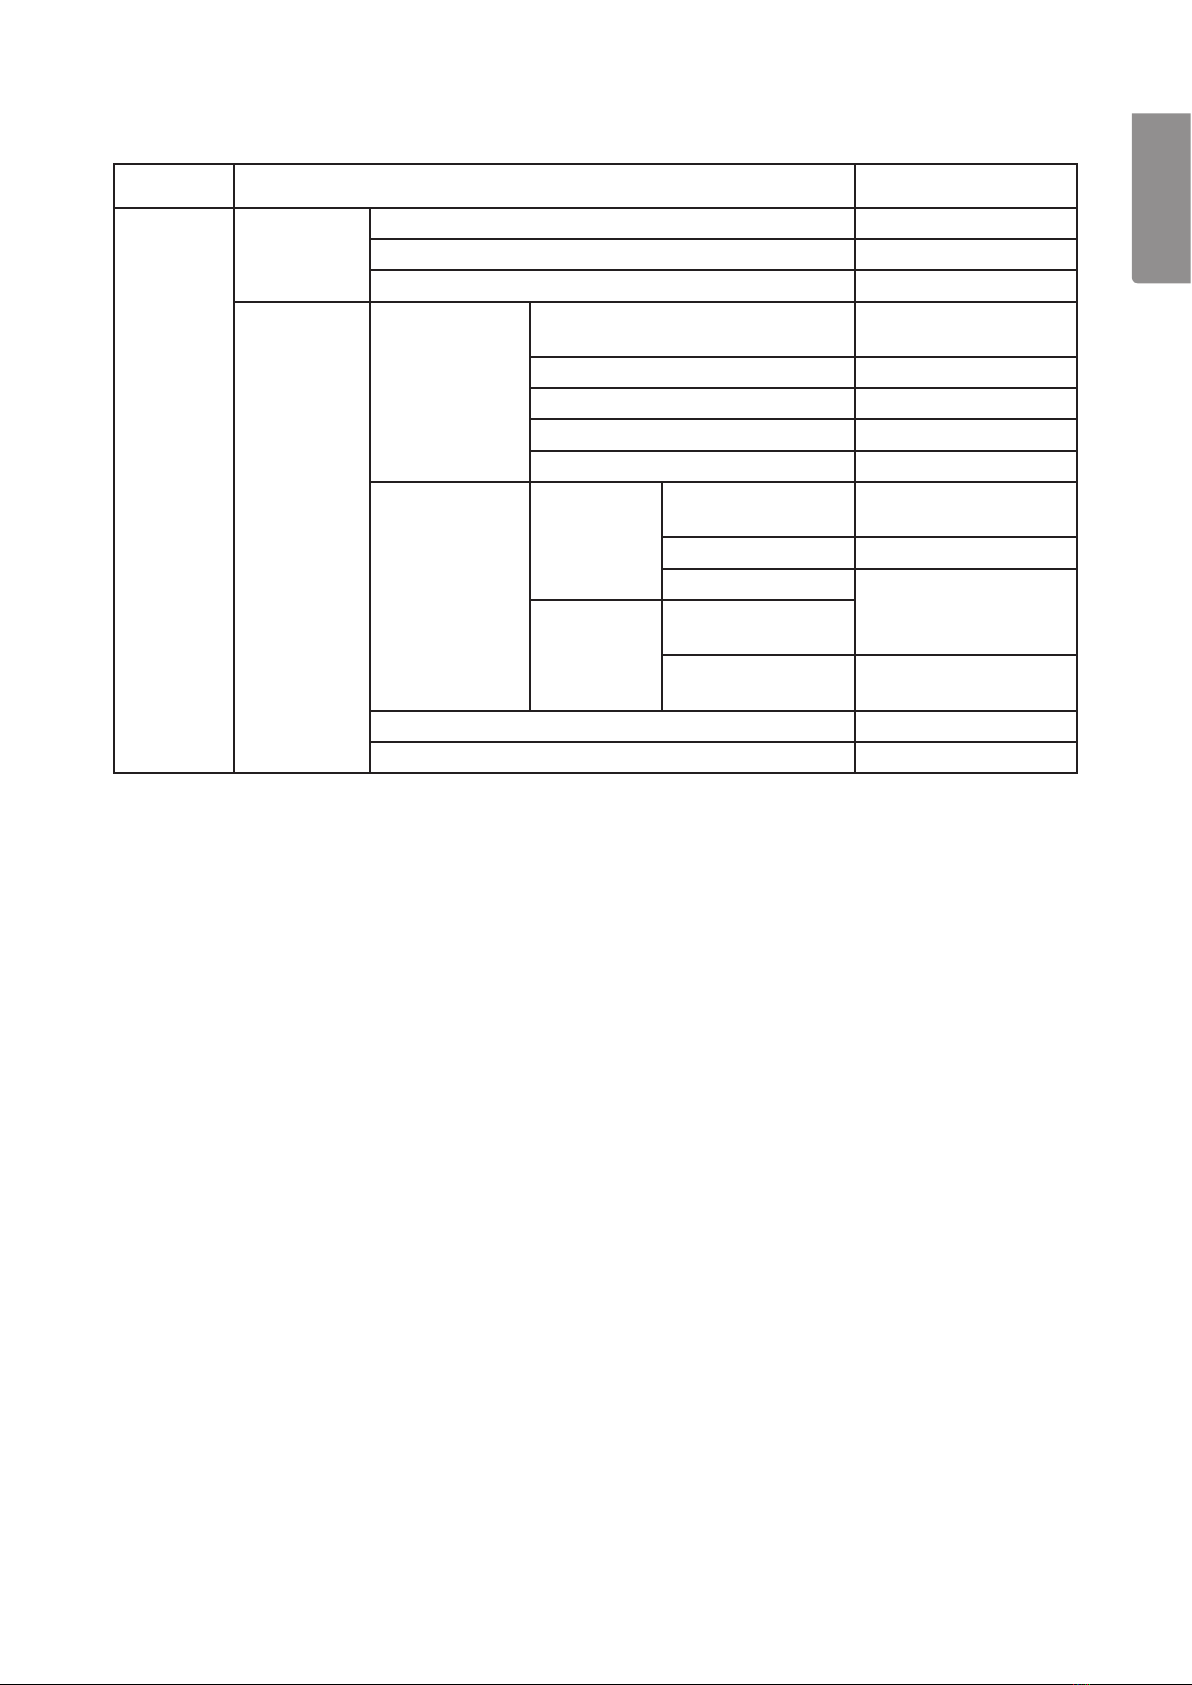
Check Action Before
everyuse
After 1
month or
20hours
Every 3
months or
50hours
Every 6
months or
100hours
Every 12
months or
300hours
Sparkplug
Check, adjust gap
and replace if
necessary
•
Engine oil Checklevel •
Replace • •
Air filter Clean and replace
if necessary •*
Valve clearance Check and adjust
when engine iscold •
Have checked
and adjusted
by qualified
tradesman
Fuelline Check for cracks
andleaks •
Carburettor Checkchoke
operation •
Cooling system
Check thatthe
ventilation openings
areclear
•
Starting system Check starter cord
forwear •
Fittings and
fasteners
Tighten all screws
andnuts •
*Ifthegeneratorisinadustyenvironment,theltershouldbecleanedmoreoften.
Engine oil
If theoil level is too low, thegenerator shuts off automatically to prevent damage. Checktheoil level prior to
every use to ensure that there is enough.
Engine oil gradually loses thelubricating, cooling and cleaning properties it has when it is new and therefore
needs to be changed periodically.

10
ENGLISH
Changing the oil
Change theoil whilst theengine is warm as theoil drains out easier. Becareful – theengine oil might behot.
The engine oil is drained out and added via theoil filler neck where thedipstick is located.
1. Switch theengine off and close thefuel tank air vent (7) in order to prevent fuelleaks.
2. Undo themaintenance cover screw and remove thecover (20).
3. Place asuitable waste oil container on theground in frontof
the oil filler opening.
4. Unscrew theoil filler cap/dipstick (4) and tilt thegenerator.
5. Drain theoil into thecontainer.
6. Make sure that thegenerator is on aneven, level surface.
7. Using afunnel, fill theoil tank up to thetop of theoil
filler neck with new SAE 10W-30 oil. Itis important that
the generator is level to ensure thecorrect amount ofoil.
8. Refit theoil filler cap and themaintenance cover.
Note: Usedengine oil is adamaging source of environmental pollution. Donot pour used engine oil down your
drain or sink. Placeit in aleak proof container and dispose of it in anenvironmentally-friendly way. Ifyouare
unsure how to proceed, contact your local authority.
Air filter
Regular air filter service will ensure that there is sufficient air flowing into thecarburettor. Checkregularly to make
sure that thefilter is not clogged with dirt ordust.
1. Make sure that theengine is switched off.
2. Undo themaintenance cover screw and remove thecover (20).
Upperlimit
3. Remove theretaining screw from theair filter cover. Removeboth themain filter (A) and thepre-filter (B) and
then wipe theinside of thefilter housing clean.
4. If thefilters are dirty, wash them in asolution of warm water and mild detergent. Squeeze thefilters and let
them air-dry before refitting them.
5. Fit both filters back into thefilter housing and screw theair filter cover and themaintenance cover backon.
Spark plug
If thespark plug is in good condition it should not be cracked or pitted or coated in heavy deposits.
Checking thesparkplug:
1. Switch theengine off and let itcool.
2. Remove thespark plug cover on therear of thegenerator.
3. Remove thespark plug cap from thesparkplug.
4. Use aspark plug spanner (supplied) to remove thesparkplug.
5. Inspect thespark plug. Ifit is in poor condition, with acracked or chipped insulator or eroded electrodes,
it should be replaced. Thecorrect type of plug is listed under Specifications. Checkthespark pluggap
and adjust it if necessary.
6. If you are going to use thesame spark plug again, clean it using awire brush before refitting it.
7. Refit thespark plug cap securely onto thesparkplug.
A
B

11
ENGLISH
Emptying the fuel tank
Prior to long-term storage, thefuel tank of thegenerator should be drained of petrol. Petrolis perishable and
can, if it is left standing in thefuel tank for along time, cause starting problems due to deposits clogging
thecarburettor. Warning: Emptythefuel tank in awell-ventilated area, outdoors and be aware of thefire hazard.
1. Set theengine switch/fuel cut-off valve (1) to 0OFF.
2. Undo themaintenance cover screw and remove thecover.
3. The fuel line has ajoint in it (C) where it can be split. Pinchtogether one of thehose clips and disconnect one
side of thejoint. Holdtheend of fuel line away from thegenerator and drain thefuel into asuitable container.
4. Raise thegenerator up so that it is higher than thefuel collection container.
5. Open theengine switch/fuel cut-off valve (1) and let all thepetrol runout.
6. Reconnect theends of thefuel line together.
7. Open thedrain plug (D) under thecarburettor and drain thefuel through thehose into asuitable container.
Note: Donot store fuel from one season to thenext as thefuel could become tooold.
Checking the fuel line
Undo themaintenance cover screw and remove thecover. Checkall thefuel hoses for leaks, visible cracks or
other damage. Notall of thefuel hoses are visible when themaintenance cover has been removed. Itis possible
to remove theblack cover over theelectrical connections which is held in place by 4 screws. Indications of
afuel leak are thesmell of petrol and drops underneath thegenerator.
Checking the choke
Undo themaintenance cover screw and remove thecover. Makesure that thechoke control is intact and can
be moved all theway to theright (closed) and left (open).
Checking the cooling system
Check that theventilation openings are clear. Theventilation openings supplying theair to theengine cooling
system are located in several places on thegenerator, even on thebottom. Theengine will overheat if anyof
the ventilation openings is blocked.
Checking the starting system
Undo themaintenance cover screw and remove thecover. Pullout thestarter handle and inspect thestarter
cord for wear and other damage. Allowthestarter cord to recoil slowly.
Cleaning the generator
Always store thegenerator in acool anddry environment. Theexterior of thegenerator can be cleaned with one
or acombination of thefollowing:
• A dampcloth
• A softbrush
• A vacuum cleaner
• Compressed air
D
C

12
ENGLISH
Transportation
Note: Donot place anything on top of thegenerator whilst it is still hot from recent use.
Before transporting or storing thegenerator for extended periods:
• Empty thefueltank.
• Remove thespark plug cap from thesparkplug.
• Keep theventilation openings clear.
• Store thegenerator in acool anddry environment.
Storage
Long-term storage of thegenerator will require some additional preventative measures to guard against
deterioration and ensure that it works well when it is usedagain.
1. Let thegenerator cool down. Drainthefuel tank of any remaining petrol, refer to Emptying thefueltank.
2. Unscrew thespark plug and pour atablespoonful of engine oil (10W-30 in thesummer and 5W-30in
the winter) into thespark plughole.
3. Check theengine oil level and top-up theoil tank if necessary.
4. Pull thestarter handle afew times to distribute theoil in thecylinder, then refit thesparkplug.
DoNOT reconnect thespark plugcap.
5. Pull thestarter handle afew times until you feel aslight resistance, then slowly allow thestarter cord to recoil.
6. Clean theexterior of thegenerator.
7. Store thegenerator indoors, in adry and well-ventilated room. Donot cover thegenerator with aplastic
sheet or dust cover. Non-porous covers will trap moisture around thegenerator and assist corrosion.
Warning:
If you choose to store thegenerator with fuel in thetank, consider thefollowing advice:
• Store thegenerator indoors in awell-ventilated area away from any type of boiler of heater with pilot lights
which could ignite petrol fumes. Alsoavoid any area containing spark-producing electric motors or where
power tools are operated.
• Avoid storing thegenerator in areas with high humidity, because that promotes corrosion.
• Leave theengine switch/fuel cut-off valve in the0 OFF position.
• Place thegenerator on afirm level surface. Tilting can cause thefuel to leakout.
When removing thegenerator from storage:
• Check thegenerator as described in section Preparations. Refuelwith fresh petrol.
Disposal
This product should be disposed of in accordance with local regulations.
Ifyou are unsure how to proceed, contact your local authority.
13
ENGLISH
Troubleshooting guide
Trouble Possible cause Action
The eng-
ine does
notstart.
Low engine
output.
The engine
runs
erratically.
Insufficient
compression.
Loose sparkplug. Tighten.
Loose cylinder headbolt. Tighten.
Damaged cylinder head gasket. Replace gasket.
Sufficient
compression.
Fuel system
problem: no
fuel supplied
to combustion
chamber.
Starter handle pulled too slowly. Pull starter handle
more sharply.
Foreign matter intank. Clean thetank.
Clogged fuelline. Clean thefuelline.
Fuel tankempty. Addfuel.
Fuel cut-off valve or air vent closed. Open.
Electrical system
problem: fuel
supplied to
combustion
chamber.
Insufficient
spark.
Spark plug dirty
orwet. Clean.
Faulty sparkplug. Change sparkplug.
Faulty magnet. Contact our
customer services.
Sparkokay.
Carburettor
set upwrong.
Starter handle
pulled too slowly.
Pull starter handle
more sharply.
Wrong type of fuelused. Check.
Overloading. Check theratedpower.
Specifications
Model IG2400S
Generator
Output voltage 230 VAC
Rated power 1.8kW
Max power 2.0kW
DC output 12 V DC, max 8.3A
Engine
Model 160F
Type 1-cylinder, 4-stroke, OHC air-cooled petrol engine
Displacement 113cc
Engine oil SAE 10W-30
Oil capacity 0.5 litres
Spark plug NGK CR7HSA (0.6–0.7 mm gap)
Other
Fuel Petrol min. 90RON.
Fuel tank capacity 4.5l
Sound power (LwA) 90 dB(A)
Starting system Magnapull
Dimensions 510×302×410 (L×W×H )
Weight 22kg
Operating time approx. 5hours

14
SVENSKA
Inverterelverk
Art.nr 40-8889 Modell IG2400S
Läs igenom hela bruksanvisningen före användning och spara den sedan för framtida bruk.
Vi reserverar oss för ev. text- och bildfel samt ändringar av tekniska data.
Vid tekniska problem eller andra frågor, kontakta vår kundtjänst (se adressuppgifter på baksidan).
Innehållsförteckning
Säkerhet ........................................................................................................................15
Förklaring till varningssymbolerna...............................................................................................................16
Avsedd användning ......................................................................................................................................16
Produktbeskrivning .......................................................................................................16
Användning....................................................................................................................18
Förberedelser ...............................................................................................................................................18
Starta motorn................................................................................................................................................18
Lågeffektsläge..............................................................................................................................................19
Stäng av motorn .......................................................................................................................................... 20
Anslutning av strömförbrukare..................................................................................... 20
Användning av 230 V AC-utgång.................................................................................................................. 20
12 V DC-uttag för batteriladdning ................................................................................................................ 20
Skötsel och underhåll....................................................................................................21
Underhållsschema........................................................................................................................................21
Motorolja......................................................................................................................................................21
Luftfilter....................................................................................................................................................... 22
Tändstift ...................................................................................................................................................... 22
Tömning av bränsletank .............................................................................................................................. 22
Kontroll av bränsleledning .......................................................................................................................... 23
Kontroll av chokereglagets funktion............................................................................................................ 23
Kontroll av kylsystem .................................................................................................................................. 23
Kontroll av startsystem................................................................................................................................ 23
Rengöring av elverket.................................................................................................................................. 23
Transport ..................................................................................................................................................... 23
Förvaring....................................................................................................................... 24
Felsökningsschema ...................................................................................................... 24
Avfallshantering ........................................................................................................... 25
Specifikationer ............................................................................................................. 25
Generator..................................................................................................................................................... 25
Motor........................................................................................................................................................... 25
Övrigt........................................................................................................................................................... 25

15
SVENSKA
Säkerhet
Elverk avger giftig koloxid under drift. Dennagas är både lukt- och färglös, så även om du varken känner lukten
av eller ser gas så kan den finnas idin omgivning. Inandning av denna gas kan leda till huvudvärk, yrsel,
dåsighet eller dödsfall.
• Elverket får endast användas utomhus och får inte byggas in.
• Se till att avståndet till andra föremål är tillräckligt så att ventilationen är god runt elverket. Fårej övertäckas.
Elverket kan avge brännbara och explosiva bränsleångor som kan orsaka allvarliga brännskador eller dödsfall.
Enöppen låga inärheten kan orsaka explosion även om den inte kommer idirekt kontakt medgasen.
• Använd inte elverket nära öppenlåga.
• Rök inte inärheten av elverket.
• Placera elverket på etttorrt, fast och jämnt underlag.
• Stäng alltid av elverket före påfyllning av bränsle. Låtelverket svalna iminst 2 minuter innan du skruvar av
locket till bränsletanken. Skruvalångsamt för att minska trycket ibränsletanken.
• Fyll inte för mycket ibränsletanken eftersom bränslet kan expandera under drift. Torkaalltid bort eventuellt
spillt bränsle innan du startar elverket.
• Töm alltid bränsletanken före förvaring eller transport av elverket.
• Före transport: stäng bränslekranen och koppla bort tändkabeln från tändstiftet.
Elverket alstrar hög spänning som kan orsaka dödsfall.
• Elverket får endast användas till elektriska apparater anslutna antingen direkt eller med enförlängningssladd.
Anslutaldrig elverket till det elektriska systemet ien byggnad utan hjälp av enkvalificerad elektriker.
Utförsanslutningen på fel sätt kan du råka ut för bakström till elnätet, vilket kan leda till skador eller dödsfall.
Anslutningarna måste följa lokala föreskrifter ochlagar.
• Koppla inte ihop elverket med någon annan strömkälla, t.ex. annat elverk eller växelriktare.
• Använd jordfelsbrytare på platser där strömmen leds lätt, som t.ex. plåttak eller vid stålarbeten.
• Använd inte elverket iregn eller ifuktiga utrymmen.
• Använd inte elverket nära vatten, t.ex. strand, brygga, pool.
• Rör aldrig skadade kablar eller eluttag.
• Elverket får inte användas av barn eller andra personer utan nödvändig kunskap.
Elverket blir mycket hett under drift. Temperaturer iavgasrörets närhet kan överstiga 65 °C.
• Rör aldrig de heta ytorna. Varuppmärksam på varningsskyltarna på elverket som utmärker dessaytor.
• Låt elverket svalna innan du rör motorn eller ytor som blir heta underdrift.
Felaktig användning av elverket kan leda till skador eller förkorta dess livslängd.
• Använd elverket endast för avsett ändamål.
• Se till att elverket stårplant.
• Låt elverket vara igång iflera minuter innan du ansluter några elektriska apparater.
• Stäng omedelbart av och koppla ifrån elektriska apparater som inte fungerar.
• Överskrid inte elverkets kapacitet genom att ansluta fler apparater än elverket klarar.
• Slå inte på elektriska apparater innan de är anslutna till elverket.
• Stäng av alla anslutna elektriska apparater innan du stänger av elverket.
• Elverket är utrustat med enjordanslutning som är kopplad till elverkets ram, motorchassi och uttagets jord.
Rådfråga enelektriker om vilka föreskrifter som gäller för inkoppling vid ert speciella ändamål.
16
SVENSKA
Förklaring till varningssymbolerna
Varning! Läsigenom hela
bruksanvisningen före
användning.
Stäng av och låt motorn svalna
före påfyllning av bränsle.
Tankaaldrig med motorn igång.
Varning för heta ytor, ljud-
dämparen blir mycket varm.
Hållavstånd till brännbara
föremål.
Elverket får inte användas
inomhus eller islutet utrymme,
se till att det finns tillräckligt
med ventilation.
Avsedd användning
Elverket är avsett för att användas till: normala elektriska apparater, t.ex. belysning och elverktyg, och dessutom
TV-apparater och datorer. Anslutinga elektriska apparater som förbrukar mer än 1800 W. Ifortsättningen av
manualen benämns anslutna elektriska produkter som strömförbrukare.
Produktbeskrivning
104
102 101103
108
109
105
106
107
10
17
SVENSKA
1. Motorbrytare I ON/0 OFF ikombination med bensinkran
2. Starthandtag
3. Luftfilter (under serviceluckan)
4. Oljesticka/påfyllning (under serviceluckan)
5. Tändstiftshatt (under lilla serviceluckan på baksidan)
6. Överdel med handtag
7. Urluftningsventil till bränsletank
8. Bränslelock
9. Frontkåpa
10. Kontrollpanel
11. Anslutning för jordspett
12. Varningslampa för låg oljenivå
13. Varningslampa för överbelastning
14. Indikatorlampa som visar att generatorn fungerar
15. Effektlägesomkopplare: – lågeffektsläge (extra lågt tomgångsvarv), – normaldrift
16. Automatsäkring för DC-utgång
17. DC-utgång 12 VDC
18. 230 V AC-uttag
19. Choke, chokespjället är stängt till höger och öppet till vänster
20. Servicelucka
1014
1015
1018
1013
1019
1020
1016
1012 1017
1011

18
SVENSKA
Användning
Förberedelser
Kontrollera oljenivån före start
1. Skruvaur skruven som håller fast serviceluckan (20) (stora luckan vid starthandtaget).
2. Se till att elverket står plant och horisontellt. Skruvaloss oljestickan (4) och torka avden.
3. Sätt ner oljestickan ihålet utan att gänga ner den.
4. Dra upp oljestickan och avläs oljenivån. Oljestickan har ettstreck ca 1 cm från undersidan, det är den lägsta
tillåtna nivån för motoroljan. Håletför oljestickan är också påfyllning för motoroljan. Oljenivån ska vara mellan
strecket och påfyllningshålet.
Max. oljenivå
5. Fyll på olja vid behov. SAE 10W-30-olja för 4-taktsmotorer
rekommenderas för normal användning (-5–25 C°).
Oljanbör lägst ha klassningen API services klassificering SJ.
Fyll på bränsle
1. Se till att elverket står plant och horisontellt på enplats med god ventilation. Skruvaloss bränslelocket (8).
2. Fyll endast med ren bensin, minst 95 oktan med högst 10 % inblandning av etanol. Högreinblandningsgrad
än 10 % kan leda till motorskador som ej täcks av garantin.
3. Skruva fast bränslelocket, stäng luftningsventilen (7) om inte elverket ska användas direkt.
4. Torka omedelbart upp ev. spill.
Starta motorn
Elverket ska placeras på hårt och plant underlag med god luftcirkulation med minst 1 meters avstånd till vägg
och tak. Obs!Elverket har luftintag för motorns kylluft på undersidan, elverket får inte placeras på något mjukt
material som kan täcka för luftintaget och leda till överhettning av motorn.
1. Se till att alla anslutna strömförbrukare är avstängda.
2. Öppna luftningsventilen (7) på tanklocket genom att vrida den medurs tillON.

19
SVENSKA
3. Choke
Vid start av kall motor: stäng choken genom att föra chokereglaget (19) åthöger.
Vidstart av varm motor: choken behövs inte, chokereglaget ska stå till vänster iöppetläge.
4. Ställ motorbrytaren (1) iläge I ON, detta öppnar även bensinkranen.
5. Dra långsamt istarthandtaget (2) tills du möter motstånd. Dradå snabbt rakt utåt ipilens riktning för att
starta motorn. SläppINTE starthandtaget när motorn startar utan håll idet och släpp tillbaka det försiktigt,
annars kan startapparaten skadas.
6. Choken behövs inte vid start av motorn om den har varit igång nyligen. Ommotorn är kall och choken används,
gör så här: när motorn har startat och varit igång ica enminut, ställ chokereglaget (19) ihalvöppet läge.
Efterytterligare enhalvminuts drift, öppna choken helt.
7. Låt elverket vara igång ettpar minuter så att motorn går helt rent innan du ansluter någon elförbrukare eller
innan du aktiverar lågeffektsläget.
Lågeffektsläge
Elverket har ettinkopplingsbart lågeffektsläge som minskar bränsleförbrukningen genom att sänka tomgångs-
varvtalet till enlägre nivå än normalt när belastningen minskar eller när enansluten strömförbrukare stängs av.
Motorvarvet ökas automatiskt igen vid belastning. Aktivera lågeffektsläge genom att ställa omkopplaren (15)
iläge OFF ( ).
Använd inte lågeffektsläget om strömförbrukare som har hög märkeffekt eller kräver hög effekt vid startär
anslutna, motorn kommer då inte att gå upp till rätt varvtal och det kan leda till spänningsvariationer som kan
skada ansluten strömförbrukare.
Använd inte lågeffektsläget till strömförbrukare som endast har intermittent drift ikorta perioder eller till ström-
förbrukare som startas och stoppas snabbt. Stängdå av lågeffektsläget och använd normalläget ON ( ).

20
SVENSKA
Stäng av motorn
Nödstoppa motorn: ställ motorbrytaren iläge 0OFF.
Normal avstängning:
1. Stäng av alla anslutna strömförbrukare.
2. Ställ motorbrytaren (1) iläge 0OFF.
3. Stäng luftningsventilen (7).
Anslutning av strömförbrukare
Kontrollera före anslutning att elkabeln och strömförbrukaren är hela och oskadade. Ansluten elkabel och dess
kontakter måste vara godkända för utomhusbruk.
Om den anslutna strömförbrukaren reagerar konstigt, går sakta eller plötsligt stängs av:
• Stäng direkt av strömförbrukaren och dra ur stickproppen.
• Undersök orsaken till problemet.
• Kontrollera om den anslutna strömförbrukarens märkeffekt överstiger elverkets maxeffekt.
Överskrid inte märkeffekten 1800 W kontinuerligt.
Användning av 230 V AC-utgång
1. Starta motorn och kontrollera att den gröna generatorlampan (14) tänds.
2. Anslut strömförbrukarna.
Tänk på att de flesta strömförbrukare kräver högre effekt vid start än underdrift.
Överbelastning
1. Om generatorn överbelastas, om ansluten strömförbrukare är kortsluten eller om generatorn överhettas
tänds den röda varningslampan (13) för överbelastning.
2. Efter ca 5 sekunder bryts strömmen till uttagen. Denröda varningslampan fortsätter attlysa.
3. Den gröna generatorlampan (14) slocknar.
4. Stäng av motorn och undersök orsaken till problemet.
5. För återställning måste motorn startas om.
12 V DC-uttag för batteriladdning
12 V-utgången är enbart avsedd för laddning av blyackumulatorer typ bilbatteri > 60 Ah. Laddningsströmmen
och spänningen varierar beroende på motorns varvtal samt belastning och om lågeffektsläget är aktiverat
eller inte. Maxladdström 8,3A.
Obs! Batteriladdningen måste övervakas och avbrytas manuellt, annars riskerar man att batteriet kokaroch
blir förstört. Vidladdning avger batteriet explosiv knallgas, ladda därför endast ivälventilerade utrymmen där
ingen risk för antändning finns. Föreffektivare batteriladdning rekommenderas en230 V AC-laddare ansluten
till 230 V AC-uttaget på elverket.
Obs! Anslutinte blyackumulatorer med kapacitet lägre än 60Ah.
12 V-utgången är oreglerad, d.v.s. spänningen varierar beroende på motorns varvtal och belastning.
Omlågeffektsläget är aktiverat och ingen strömförbrukare är ansluten till 230 V AC-uttagen är laddningsströmmen
1/3 av märkströmmen (ca 2,7 A).
12 V-uttaget är utrustat med enautomatsäkring (16) som löserut
vid överbelastning. Omdetta sker, koppla ifrån batteriet och undersök orsaken. Återställ genomatt
trycka in automatsäkringen.
Varning!
Anslut först laddningskabeln till DC-uttaget och sedan till batteripolerna.
Table of contents
Languages:
Other CO/Tech Inverter manuals


Popular Inverter manuals by other brands


Chicago Electric
Chicago Electric 92464 Assembly and operating instructions

Toshiba
Toshiba G7 quick start guide

Viridian
Viridian CSI3600 Quick installation guide

CPS
CPS SCA Series Installation and operation manual

Orbit
Orbit AC/DC-1200 Series User's guide and technical reference manual

WINAICO
WINAICO WSP Series installation manual