CO/Tech DB7655 User manual

ENGLISH
SVENSKA
NORSKSUOMI
Important!
Read the entire instruction manual carefully
and make sure that you fully understand
it before you use the equipment. Keep the
manual for future reference.
Viktig information:
Läs hela bruksanvisningen noggrant och
försäkra dig om att du har förstått den innan
du använder utrustningen. Spara manualen
för framtida bruk.
Viktig informasjon:
Les disse anvisningene nøye og forsikre deg
om at du forstår dem før du tar produktet i bruk.
Ta vare på anvisningene for seinere bruk.
Tärkeää tietoa:
Lue nämä ohjeet huolellisesti ja varmista
että olet ymmärtänyt ne, ennen kuin alat
käyttää laitetta. Säilytä ohjeet myöhempää
tarvetta varten.
Art.no Model
31-4777 DB7655
Two-stage snow blower
Tvåstegs snöslunga
To-trinns snøfreser
Kaksivaiheinen lumilinko
Ver. 20130523
Original instructions
Bruksanvisning i original
Original bruksanvisning
Alkuperäinen käyttöohje

2

3
ENGLISH
4.8 kW Two-stage snow blower
Art.no: 31-4777 Model DB7655
Please read theentire instruction manual before using theproduct and save it for future reference.
We reserve theright for any errors in text or images and any necessary changes made to technical data.
If you have any questions regarding technical problems please contact our customer services.
Safety
Read the entire instruction manual before use.
Use ear defenders.
Wear eye protection.
Danger – rotating feed screw.
Danger – rotating fan blades.
Beware of flying objects. Make sure on-lookers are kept at a safe distance.
Never touch any of the machine’s moving parts until they have stopped completely, the machine
has been turned off and the ignition key has been removed.
Never insert your hands into the discharge chute.
Keep unauthorised persons a safe distance away from the machine.
Danger - Petrol is highly flammable. Let the machine cool for at least 2 minutes before refueling.
Never start the machine indoors or in a poorly ventilated area. The engine’s exhaust contains
deadly carbon monoxide.
Danger – risk for electric shock (machines with electric start). Never start the machine from the
mains (230V) under rainy conditions.
Disposal of this product should be in accordance with local regulations. If you are unsure how to
proceed, contact your local authority.

4
ENGLISH
General safety precautions
• Read carefully through theinstructions and inform yourself about all controls and functions and how to
correctly use thesnow blower.
• Never let children or others who do not have theadequate knowledge of these instructions use
thesnowblower. Localordinances can have restrictions regarding theuser’s age.
• Never use themachine in thevicinity of others, especially children or animals.
• Remember theuser/driver is always ultimately responsible for accidents caused by use of theproduct.
• Be careful of falling or slipping while thesnow blower is in reverse.
• Never use thesnow blower whilst under theinfluence of drugs, alcohol or medicine. Donot use theproduct
if you are tired or sick.
• This product may only be repaired by qualified staff and only using original parts.
• Never use accessories not approved for use by themanufacturer or theretailer where theproduct was purchased.
Safety precautions during use
• Make sure to keep hands and feet away from rotating parts. Avoidthedischarge chute.
• Certain engine parts will become very hot during use. Riskfor burn injuries.
• The snow blower cannot be used for any other purpose than for removing snow.
• Be careful when using on gravel paths, pavement and roads. Beattentive for possible hazards and
nearbytraffic. Avoidsteep inclines.
• Never point thedischarge chute towards public roads or traffic.
• Stop theengine immediately if you have struck aforeign object. Inspectthemachine carefully after
suchanincident. Donot reuse thesnow blower until any possible damage has been repaired.
• If thesnow blower begins to vibrate abnormally, turn off theengine immediately and find thecause.
Vibrationsare normally asign of problems.
• Existing safety features may not be disconnected or made inoperative.
• Never use thesnow blower in thevicinity of fences, cars, windows, inclines, etc. without properly
adjustingthedischarge chute.
• Always keep children away from areas to be cleared of snow.
• Never overload theblower by driving it too fast.
• Be very careful when reversing. Alwayslook behind you for possible obstacles.
• Never point thechute towards onlookers. Neverlet anyone stand in front of thesnow blower.
• Never use thesnow blower in conditions of inadequate visibility or improper lighting.
• Make sure you are steadily balanced and have afirm grip on thehandles while using thesnow blower.
• Use only theincluded cleaning tool to clean out thechute and impeller housing. Neveruse your hands.
• Never use thesnow blower on theroof.
Contents
• Snow blower
• Chute
• Spark plug spanner
• 2 ignition/safety keys
• 2 shear pins with locking nuts
• Instruction manual

5
ENGLISH
1
2
3 4 5 6 7
8
9
10
11
12
13
14
15
16
17
18
19
21
22
23
20
Controls and functions
1. Headlight
2. Drive control handle
3. Chute angle control
4. Gear lever (6 forward gears and 2 reverse gears)
5. Headlight switch
6. Feed screw control handle
7. Chute direction crank
8. Chute
9. Clean-out tool
10. Impeller housing
11. Feed screw
12. Shave blade
13. Skid shoe supports (one on each side)
14. Choke
15. Primer
16. Ignition key
17. Throttle
18. Oil fill/dipstick
19. Fuel cap
20. Electric start button (230 V)
21. Electric starter socket
22. Starter handle
23. Oil drain hole

6
ENGLISH
Installation
Upper and lower handle assemblies
1. Unscrew the4 large plastic nuts, washers and bolts from thelower handle.
2. Raise theupper handle assembly and align it with thelower handle assembly.
3. Screw together theassemblies.
Chute direction crank
The crank comes in two parts and is bolted together with theincluded sleeve.
1. Thread thetwo ends into thesleeve.
2. Align theends’ bolt holes with theones in thesleeve and assemble.
3. Securely fit thelocking
nutsintoplace but do not
overtighten.
4. Fasten thecrank’s support
bracket into theupper handle
assembly’s left side by threading
it into thehole. Tighten thenuts
and washers.
5. Thread thecrank into thebottom
bracket and fasten it using
thesplit pin.
Mounting the discharge chute
1. Remove theretaining bolt at thebottom of thechute’s base.
2. Insert thechute into its base. 3. Re-insert theretaining bolt and
tighten thenut securely.

7
ENGLISH
Operation
Oil level checks and refills
Note: The snow blower comes without engine oil. Oilmust be filled before using thesnow blower.
Engineoil capacity is 600 ml.
• Use SAE 5W-30 grade 4-stroke petrol engine oil, service
category SG, SF.
• Unscrew thedipstick and fill up with engine oil so that
thelevel is within therecommended mark on thedipstick.
Donot overfill!
• Do not screw thedipstick cap into place when measuring.
Holdit flush against thefilling hole to measure.
IMPORTANT:
The oil should be changed after thefirst 5 hours of use.
Pre-operational precautions
• Make sure that thearea being cleared is free from loose and foreign objects.
• Make sure that thecontrols are easily manoeuvrable and that they return to their original position when released.
• Disengage all controls before starting theengine.
• Pre-plan thearea to be cleared in order to avoid personal or property damage by flying objects.
• Never use thesnow blower without proper clothing. Useappropriate footwear with solid traction especially
in slippery conditions.
• Under no circumstances may maintenance and service be performed when theengine is on (if not otherwise
directed by theinstruction manual).
• Always you safety glasses or avisor when operating, servicing or carrying out maintenance.
• Always use an earthed extension lead approved for outdoor use when using the230 V electric starter.
• Adjust theheight of theimpeller housing so that there is enough free clearance when driving over
gravelsurfaces, etc.
• Let thesnow blower adjust to outdoor temperatures before using.
Refuelling precautions
Note: The engine has a dummyplug that on other models is used for engine
oil control and filling. Onthis model theplug does not have afunction.
Note: Petrol is highly flammable.
• Use only 95 or 98 octane unleaded petrol.
• Store thefuel in acontainer that is suitable for petrol.
• Always fill thecontainer outdoors and do not smoke while filling.
• Do not overfill! Thefuel level should not exceed the maximum fuel
level indicator (see fig.).
• Fill with fuel before starting theengine. Neveropen thefuel cap for
filling when theengine is running or when warm.
• Replace thefuel cap securely and wipe off any excess fuel.
8
ENGLISH
Manual start
Note: Check theoil and fuel levels before starting. Makesure thedrive control and feed screw are disengaged.
1. Insert theignition key
completelyinto theignition.
Thekey must not be turned,
butmake sure it is fullyinserted.
2. Set thethrottle control to
fullthrottle.
3. Make sure thechoke is set to
cold start mode. If theengine
is warm, set thechoke to
theopposite position.
4. Press theprimer about 3–5 times. Coverthevent hole in thecentre of theprimer bladder when pushing. Incold
weather conditions theengine may need to be primed again. Iftheengine is warm, press theprimer once.
5. Slowly pull thestarter handle until you feel some resistance. Use aquick and powerful motion when
pulling thehandle to start. Donot release thehandle but keep it in position and then slowly return it to
itsoriginalposition.
6. Once theengine has been started and is warm, slowly turn thechoke control to its starting position.
7. If theengine should stall, restart it with thechoke set in themiddle position for ashort time. Oncetheengine
is stable, slowly return thechoke to its original position.
Electric start
1. Connect themains lead to a230 V earthed wall socket.
5. Press theprimer about 3–5 times. Coverthevent hole in thecentre of theprimer bladder when pushing. Incold
weather conditions theengine may need to be primed again. Iftheengine is warm, press theprimer once.
6. Depress thestart button (20). Release it once theengine has started. Thestarter motor is equipped with an
overload switch which will trigger if thestarter motor becomes overheated. Thestarter motor must then be
allowed to cool before attempting arestart.
7. Once theengine has been started and is warm, slowly turn thechoke control to its starting position.
8. If theengine should stall, restart it with thechoke set in themiddle position for ashort time. Oncetheengine
is stable, slowly return thechoke to its original position.
9. Unplug themains lead from thepower point first and then from thesnow blower.
2. Insert theignition key
completelyinto theignition.
Thekey must not be turned,
butmake sure it is fullyinserted.
3. Set thethrottle control to
fullthrottle.
4. Make sure thechoke is set to
cold start mode. Donot use
thechoke if theengine is warm.

9
ENGLISH
Safety checks
Note:
Check that thefeed screws are in proper order thefirst time you use thesnow blower and also before every
new season. Theremust be some amount of free play in drive control wire (6).
1. Start thesnow blower and squeeze thedrive control handle. Letthefeed screws run for about 10 sec.
Repeatthis procedure several times.
2. Release thedrive control and inspect thefeed screws from thefront. Makesure that thefeed screws are
completely still and show no tendency of rotating.
3. If thefeed screws are rotating or show atendency to rotate while thecontrol handle is disengaged, turn off
theengine and adjust thewire tension.
Skid shoe adjustment
• Normal use: Adjust theskid shoes to about ½ to 1 cm below theshave blade.
• Hard packed snow: Adjust theskid shoes slightly higher (in order to lower theshave blade).
• Gravel or uneven surfaces: Adjust theskid shoes lower (in order to raise theshave blade).
Operation
1. Plan thearea of operation and where thesnow is to be removed before starting.
2. Start theengine and set thethrottle to full.
3. Let theengine warm up for afew minutes to reach full power before beginning snow removal.
4. Set theshift lever to an appropriate gear for theexisting conditions. Secondgear in thedrive position is
meant for normal conditions appropriate for most snow removal situations.
5. Use theswitch to turn on theheadlight when necessary (5).
6. Squeeze thedrive feed screw control (6) to begin snow removal.
7. Squeeze thedrive control handle (2) to start it into drive.
Note: Never move theshift lever while thesnow blower is in motion and always release thedrive handle
when changing gears.
8. Completing work: Let theengine idle afew minutes before stopping it. Letthesnow blower and feed
screw stand still in order to let most of themoisture and snow dry off.
9. With theengine still running, pull thestarter cable 3–4 times to prevent it from freezing in position.
Aputtering noise will be heard. This is normal and it will in no way damage themachine or thestarter motor.
Turning off the engine
1. Pull thethrottle back completely.
2. Remove theignition key.
3. Carefully clean theentire snow machine and move thecontrols back and forth to prevent them freezing
intopostion.
Care and maintenance
Note: Turn off theengine, remove theignition key and remove thespark plug cable from thespark plug before
servicing, cleaning or maintenance.
Lubrication
• Regularly lubricate theshift lever and other moving parts with afew drops of motor oil and/or spray
(e.g. 5–56, WD 40). Donot over-lubricate!
• Use atype of universal grease suitable for cars and machinery on thescrew end of thechute
directionalcrank. Donot over-lubricate!
10
ENGLISH
25
24
28
29
26
27
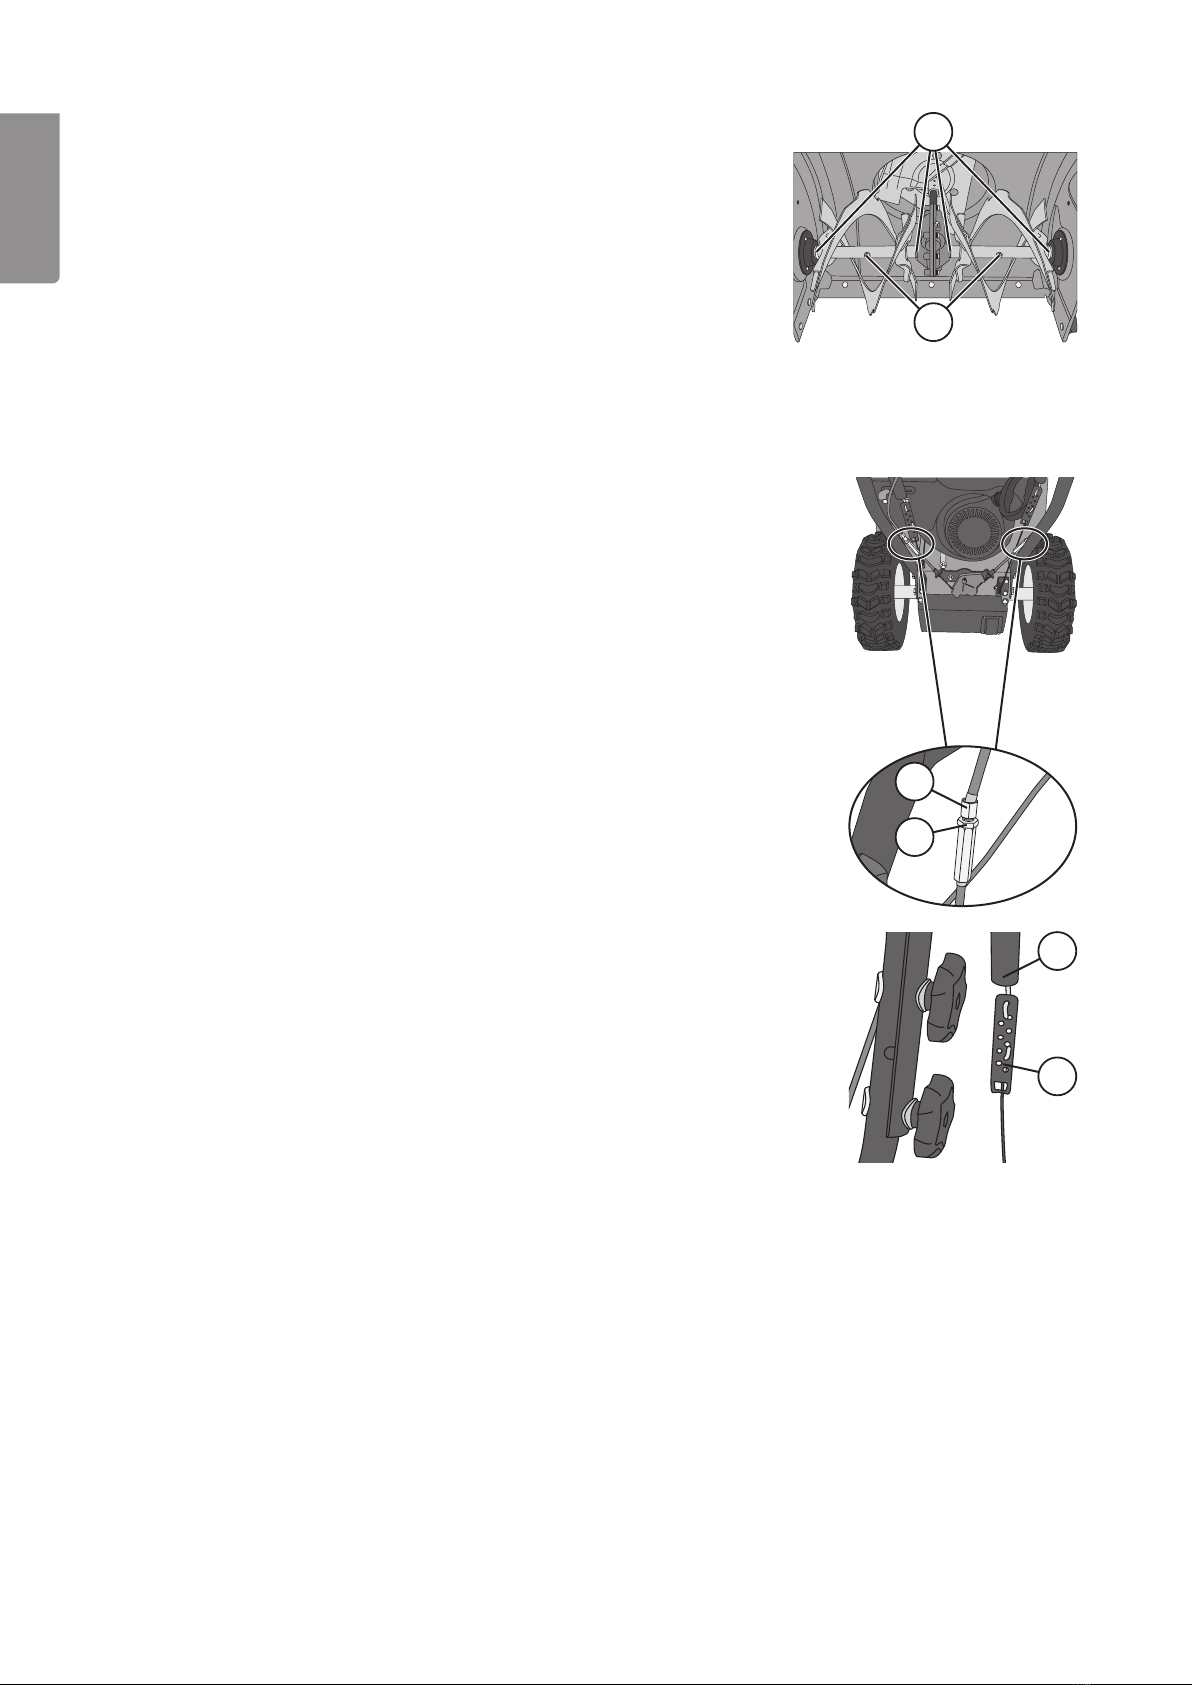
Servicing and lubricating the feed screw
• The feed screw is equipped with shear pins (24) that are meant to
shear if thefeed screw strikes hard compacted ice or other foreign
objects. Thesnow blower is supplied with extra shear pins so that they
can be replaced when needed.
Note: Never substitute theshear pins with ordinary bolts. Thiscan
seriously damage thesnow blower if thefeed screw becomes stuck
and immovable.
• Unscrew theshear pins once per season and spray inside theshaft
with lubricant. Alsolubricate thescrew shafts’ flange bearings (25).
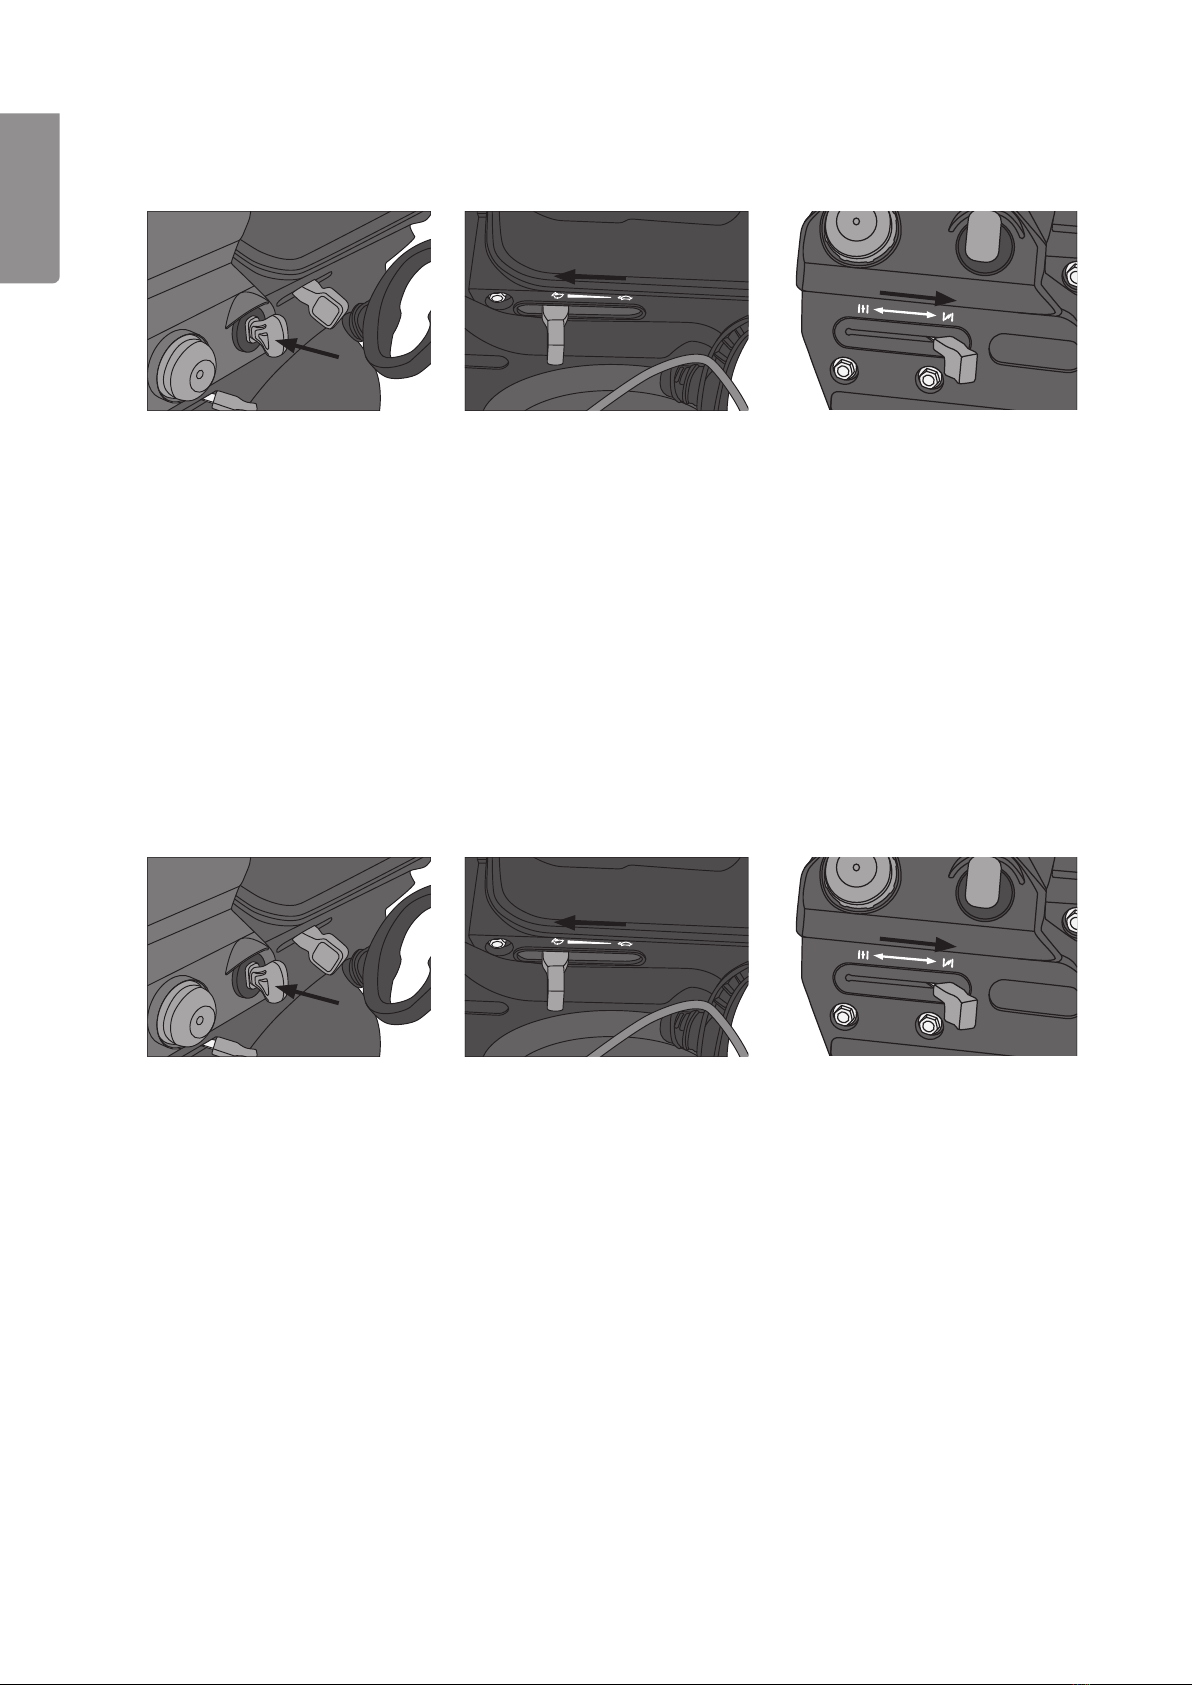
Transmission, feed screw and clutch control adjustments
Testing and adjusting the transmission
Follow these procedures:
1. With the engine off, move the shift lever to the highest gear (6th).
Releasethedrive control lever. The blower should now be in neutral and
freelymoveable in both directions.
2. Squeeze the drive control. The blower should now be unable to be
movedforward.
3. Release the drive control and the blower should be freely moveable again.
4. Move the shift lever to one end (reverse 2nd gear) and then to the other
(6thgear). You should feel no resistance in the lever and the blower should
befreely movable regardless of which gear it is in.
Adjusting the shift lever wire
The shift lever has two wires, one for each direction. Make sure that all the gears
work and that the shift lever can be easily moved to its end points (6th gear and
reverse 2nd gear). Use the adjusting nut (26) and screw (27) on one of the wires to
adjust when necessary. Releasing tension in one wire should cause the other one
to become taut.
Feed screw
Adjusting the feed screw control wire:
1. Pull up the dust boot (28) over the wire bracket (29).
2. Pull up on the bottom wire to increase wire slack in the upper wire enabling
you to remove the hook.
3. Turn the bracket over and begin working the s-hook loose from the bracket.
4. Pull the wire taut and insert the hook down a notch on the bracket.
5. Start the engine, check performance and adjust if necessary.
Note: If the feed screws do not turn when engaged then the amount of free
play in the wire is too great. Move the s-hook to a hole further down the bracket
ifneeded.
Clutch
Adjusting the clutch wire:
1. If the blower has a tendency to move backwards or forwards without having the clutch engaged, then
the wire is too taut. Adjust the wire so that there is some free play in it using the same procedure used for
adjusting the feed screw control wire described above.
2. If the blower does not move backwards or forwards with the clutch engaged, then the wire is too loose.
Tighten by moving the s-hook down a notch on the bracket as described above.
3. Test the clutch and adjust accordingly.

11
ENGLISH
0.6–0.8 mm
Cleaning and other inspection areas
• Use thecleaning tool (9) to remove snow or ice clogged in thechute or around thefeed screw, when
necessary. Neveruse your hands!
• Inspect regularly to make sure that all bolts, nuts and screws are tight and that there is no visible damage.
• The augur blades and skid shoes will become worn with time and should be replaced. Useonly original
parts or parts approved by theretailer.
• Regularly check thefuel system for any visible signs of leakage at thetank, fuel cap or fuel lines.
• Never attempt to tamper with or modify theproduct in any way.
Engine service intervals
After thefirst
5 hours.
At every use or after
every 5 hours.
At every season or
after every 25 hours.
At every season or
after every 50 hours.
Check theoil level. •
Change oil. • •
Check spark plug. •
Clear area
aroundmuffler.
•
Changing oil
Note: Check theoil level every time thesnow blower is used.
1. Empty thefuel tank when theengine is cold. Dothework outside and collect thefuel in an appropriate
container. Ifthefuel is not to be reused, deposit it at themost appropriate recycling centre. Theblower must
be tipped backwards to remove all oil and there is arisk for fuel spillage if thetank is full.
2. Place an appropriate container to collect theoil from thedrain plug (23).
3. Unscrew theplug, tip theblower backwards and empty of all oil.
4. Screw theplug back on. Refill with oil as described in chapter Oil level checks and refills.
Spark plug
Note: Let theengine cool before unscrewing and removing thespark plug. Boththespark plug and muffler
become very hot after use. Check thespark plug before every season. Changewhen necessary.
1. Remove thecotter pin at thescrew end of thechute control directional
crank (refer to theimage shown in Mounting thechute directional crank)
and push thecrank back for easier access.
2. Remove thespark plug cable from thespark plug. Donot pull thecable
but rather grip thespark plug cap and wiggle it back and forth to
loosenit.
3. Use aspark plug spanner to remove it from its socket.
4. Check theelectrodes for any visible damage and clean with asteel
brush when necessary.
5. Make sure that theelectrode gap is between 0.6–0.8 mm. Specialtools
for gapping are available for purchase seperately.
6. Try to screw thespark plug partway in by hand to make sure
thethreads catch correctly. Tightenusing aspark plug spanner.
7. Washers on thenew spark plug must be compressed during
installation. Tightena½ turn extra after thespark plug is securely in
place to compress thewasher and create aproper seal.
8. Turn a¼ turn extra if you are using theexisting spark plug.
Handy hint: Thread asmall piece of PVC hose over thespark plug tip to
make it easier to insert and thread into the socket.

12
ENGLISH
Replacing the shave blade
• Unscrew theshave blade’s (12) 3 screws and remove theblade.
• Mount thenew blade. Make sure that all thebolt heads are on top, inside theimpeller housing (10).
• Use only original parts or parts approved by theretailer.
Changing the skid shoes
• Unscrew theskid shoes’ (13) 2 screws and remove them.
• Mount thenew shoes. Make sure that all thebolt heads are on theinside of theimpeller housing (10).
• Use only original parts or parts approved by theretailer.
Long-term storage procedures (over a month)
• Empty thefuel tank when theengine is cold. Dothework outside and collect thefuel in an appropriate
container. Ifthefuel is not to be reused, deposit it at themost appropriate recycling centre.
• Start theengine and let it run until it is out of fuel.
• Store thesnow blower in awell ventilated area, never inside and in astorage facility not subject to flames
orsparks.
Disposal
When it is time to dispose of this product, do so in accordance with local regulations.
Ifyou are unsure how to proceed, contact your local authority.
Specifications
Type Two-stage
Clearing capacity 600 mm
Max snow depth approximately 500 mm
Discharge range approximately 8 m
Engine 1-cylinder, 4-stroke petrol engine 196 cc, 4.8 kW
Fuel tank capacity 2 l
Gears 6 forward, 2 reverse
Chute 180º swivel
Discharge angle 70º adjustable
Propulsion Self-propelled
Pneumatic rubber tyres, diam 330 mm
Sound pressure level 86 dB(A), uncertainty K=1.5 dB(A)
Sound power level 102 dB(A) , uncertainty K=1.5 dB(A)
Vibration value 9.0 m/s² , uncertainty K=1.5 m/s²
Weight 83 kg
Automatic engine cut-off during insufficient oil conditions
Headlight

13
ENGLISH
Troubleshooting guide
Problem Possible cause Solution
The engine
does not start.
1. No fuel or thefuel is too old.
2. Clogged fuel lines.
3. Ignition key not fully inserted.
4. Spark plug cable not
properlyconnected.
5. Defective spark plug.
6. Engine not adequately primed.
7. Engine is flooded (over-priming).
8. Throttle set to idle.
1. Empty thetank and refill with new fuel.
2. Clean or replace thefuel lines.
3. Insert thekey completely.
4. Securely attach thespark plug wire.
5. Clean theplug and check theelectrode gap or
change plugs.
6. Press theprimer about 3–5 times.
7. Wait at least 10 min. before arestart attempt.
8. Set thethrottle control to full throttle.
The engine
runs irregularly.
1. The engine runs on choke even
when warm.
2. Blocked fuel lines or old petrol.
3. Sediment and/or water in
thefuelsystem.
4. The carburettor is maladjusted.
1. Reset thechoke back into place.
2. Clean or replace thefuel lines. Emptythetank
and refill with new fuel.
3. Empty thetank and carburettor and refill with
newfuel.
4. Contact an authorised service centre.
The engine is
underpowered.
1. Spark plug cable loose.
2. Fuel cap’s vents blocked.
1. Fasten thespark plug cable securely to theplug.
2. Clean thefuel cap and make sure ventilation
holes are free.
The engine is
overheated.
The carburettor is maladjusted. Contact an authorised service centre.
Abnormal
vibrations
occur.
Loose parts or damaged feed
screw.
Turn off theengine and disconnect thespark plug
wire. Tightenall bolts. Checkthefeed screw and
replace any damaged parts. Iftheproblem persists,
contact your authorised service centre.
The blower’s
transmission
doesn’t work.
The wire is maladjusted.
The drive belt is loose or damaged.
Adjust thewire according to theinstructions listed
under thesection Adjusting thedrive control wire and
shift lever described above.
Contact your authorised service centre to have
thedrive belt checked.
The feed screw
continues
to rotate
despite being
disengaged.
The wire is maladjusted. Adjust thewire according to theinstructions listed
under thesection Adjusting thefeed screw control
wire described above.
No snow exits
thechute.
1. The chute is clogged and/
or there is aforeign object
obstructing thefeed screw’s
rotation.
2. The shear pins have sheared off.
3. The feed screw control wire is
maladjusted or thedrive belt
needs changing.
1. Turn off theengine and disconnect thespark
plug wire. Cleanthechute and thearea around
thefeed screw.
2. Replace theshear bolts with new ones.
3. Adjust thewire according to theinstructions listed
under theAdjusting thefeed screw control wire
section above. Contact your authorised service
centre to have thedrive belt checked.

14
SVENSKA
Tvåstegs snöslunga 4,8 kW
Art.nr 31-4777 Modell DB7655
Läs igenom hela bruksanvisningen före användning och spara den sedan för framtida bruk.
Vi reserverar oss för ev. text- och bildfel samt ändringar av tekniska data.
Vid tekniska problem eller andra frågor, kontakta vår kundtjänst (se adressuppgifter på baksidan).
Säkerhet
Läs igenom hela bruksanvisningen före användning.
Använd hörselskydd.
Använd skyddsglasögon.
Fara – roterande snöskruv.
Fara – roterande fläkt.
Se upp för utflygande föremål. Se till att åskådare befinner sig på behörigt avstånd.
Rör aldrig maskinens roterande delar förrän de har stannat helt, maskinen har slagits av och tänd-
nyckeln har tagits ur.
Stoppa inte ner händerna i utkastet.
Håll obehöriga på säkert avstånd från maskinen.
Fara – bensin är mycket brandfarligt. Låt maskinen svalna minst 2 minuter innan bränsle fylls på.
Starta aldrig maskinen inomhus eller i dåligt ventilerade utrymmen. Motorns avgaser innehåller
livsfarlig kolmonoxid.
Fara – risk för elektrisk stöt (för maskin med elstart). Vid regn, starta inte maskinen med hjälp
av230 V.
När du ska göra dig av med produkten ska detta ske enligt lokala föreskrifter.
Är du osäker på hur du ska gå tillväga, kontakta din kommun.

15
SVENSKA
Allmänna säkerhetsföreskrifter
• Läs noga igenom instruktionerna och lär dig alla reglage samt korrekt användning av snöslungan.
• Låt aldrig barn eller personer som inte har tillräcklig kännedom om dessa instruktioner använda snöslungan.
Lokalaföreskrifter kan ha restriktioner gällande användarens ålder.
• Använd aldrig maskinen inärheten av andra, särskilt barn eller djur.
• Kom ihåg att användaren/föraren alltid är ansvarig för olyckor som orsakats av produkten.
• Var försiktig så att du inte faller eller halkar, speciellt när snöslungan backas.
• Använd aldrig snöslungan om du är påverkad av alkohol eller mediciner. Användden inte heller om du är
trött eller sjuk.
• Produkten får bara repareras av kompetent personal och endast med originalreservdelar.
• Använd endast tillbehör som är godkända av tillverkaren eller av den återförsäljare där produkten inköptes.
Säkerhetsföreskrifter under användning
• Håll händer och fötter borta från roterande delar. Undvikalltid utkastets öppning.
• Vissa motordelar blir mycket varma vid användning. Riskför brännskador.
• Snöslungan får inte användas till att slunga någonting annat än snö.
• Var försiktig vid användning på grusgångar, trottoarer och vägar. Varuppmärksam på eventuella faror och trafik.
Undvikbranta sluttningar.
• Rikta aldrig utkastet mot allmän väg eller trafik.
• Slå av motorn omedelbart om snöslungan träffar ettfrämmande föremål. Inspekteradärefter snöslungan
noggrant. Användinte snöslungan förrän eventuella skador reparerats.
• Om snöslungan börjar vibrera onormalt, slå genast av motorn och kontrollera orsaken. Vibrationerär normalt
etttecken på problem.
• Befintliga säkerhetsanordningar får inte kopplas bort eller sättas ur funktion.
• Använd aldrig snöslungan inärheten av inhängnader, bilar, fönsterrutor, sluttningar etc. utan korrekt inställt utkast.
• Håll alltid barn borta från det område som ska snöröjas.
• Överbelasta inte snöslungan genom att köra den för fort.
• Var försiktig vid backning. Tittabakåt efter eventuella hinder.
• Rikta aldrig utkastet mot åskådare. Låtaldrig någon stå framför snöslungan.
• Använd aldrig snöslungan utan god sikt eller utan tillfredsställande belysning.
• Se till att ha god balans och håll stadigt ihandtagen när du använder snöslungan.
• Använd endast det medföljande redskapet för att rengöra utkast och skovelhus. Användaldrig händerna.
• Använd aldrig snöslungan på tak.
Förpackningen innehåller
• Snöslunga
• Utkast
• Tändstiftsnyckel
• 2 tänd-/säkerhetsnycklar
• 2 brytpinnar med låsmuttrar
• Bruksanvisning

16
SVENSKA
1
2
3 4 5 6 7
8
9
10
11
12
13
14
15
16
17
18
19
21
22
23
20
Reglage och funktioner
1. Strålkastare
2. Kopplingshandtag till drivning
3. Reglage för riktskärm
4. Växelreglage (6 växlar framåt och 2 bakåt)
5. Strömbrytare till strålkastaren
6. Kopplingshandtag till inmatningsskruv
7. Vev till utkast
8. Utkast
9. Verktyg för rengöring
10. Skovelhus
11. Inmatningsskruv
12. Skrapskär
13. Släpsko (en på vardera sidan)
14. Chokereglage
15. Primer
16. Tändnyckel
17. Gasreglage
18. Oljepåfyllning/oljesticka
19. Tanklock
20. Startknapp vid start med 230 V
21. Anslutning för elkabel
22. Starthandtag
23. Skruv för oljeavtappning

17
SVENSKA
Montering
Övre och undre handtag
1. Skruva bort de 4 stora plastmuttrarna, brickorna och bultarna från
detundre handtaget.
2. Lyft upp det övre handtaget och placera det utanpå det undre.
3. Skruva ihop handtagen.
Vev till utkast
Veven levereras delad och ska skruvas ihop med den medföljande hylsan.
1. Skjut in vevens två delar ihylsan.
2. Passa in vevens gängade hål mot hålen ihylsan och skruva iskruvarna helt.
3. Skruva på låsmuttrarna och
draåt men överdra inte.
4. Sätt fast veven isitt övre fäste
genom att skjuta in den övre
vevhållarens fästbult ihålet på
det övre handtagets vänstra
sida. Draåt med muttrar
ochbrickor.
5. Skjut in veven isitt nedre fäste
och lås med saxsprinten.
Montera utkastet
1. Ta bort fästbulten längst ner på utkastets chassi.
2. Skjut in utkastet isitt fäste. 3. Montera fästbulten med mutter
och dra åt.

18
SVENSKA
Användning
Oljepåfyllning och nivåkontroll
Obs! Snöslunganlevereras utan olja. Oljamåste fyllas innan slungan används. Motornrymmer ca 600 ml.
• Använd SAE 5W-30 för 4-takts bensinmotorer,
kvalitetsklass SG, SF.
• Skruva ur oljestickan och fyll på så att oljenivån
ligger inom det markerade området på oljestickan.
Överfyllinte!
• Skruva inte ner oljestickan vid nivåkontroll. Hållden
mot påfyllningshålet för att få rätt nivå.
VIKTIGT!
Byt olja första gången när motorn har gått 5 timmar.
Förberedelser
• Kontrollera att det område som ska snöröjas är fritt från främmande föremål.
• Kontrollera att alla reglage går lätt och att de återgår till ursprungsläget när de släpps.
• Frikoppla alla reglage innan motorn startas.
• Planera iförväg var snön ska kastas för att undvika att personer eller egendom skadas av främmande föremål.
• Använd aldrig snöslungan utan att vara rätt klädd. Användlämpliga skor med bra fäste vid halt underlag.
• Under inga omständigheter får underhåll, justeringar och service göras när motorn är igång (om inte
bruksanvisningen anger annat).
• Bär alltid skyddsglasögon eller visir vid användning, underhåll och service av snöslungan.
• Använd endast enjordad skarvkabel godkänd för utomhusbruk när maskinen ska startas med hjälp av 230 V.
• Justera höjden på inmatningshuset så att det går fritt vid grusgångar o.d.
• Låt snöslungan anpassa sig till utomhustemperaturen innan snöröjningen påbörjas.
Påfyllning av bränsle
Obs! Motornhar enplugg som på enannan modell av snöslunga
användssom oljesticka/oljepåfyllning. Pådenna modell har inte pluggen
någon funktion.
Obs! Bensinär mycket brandfarligt!
• Använd 95 eller 98 oktan blyfri bensin.
• Förvara bränslet ien behållare som är avsedd för bensin.
• Fyll endast på bensin utomhus och rök inte under påfyllningen.
• Överfyll inte. Bränslenivån bör ligga i nivå med nivåmätaren (se bild).
• Fyll på bränsle innan motorn startas. Öppnaaldrig tanklocket för att
fylla på bränsle när motorn är igång eller fortfarande är varm.
• Stäng tanklocket ordentligt och torka upp eventuellt utspilld bensin.

19
SVENSKA
Manuell start
Obs! Kontrolleraolje- och bränslenivåerna innan snöslungan startas. Kontrolleraatt kopplingshandtagen för
drivning och inmatningsskruv är uppsläppta.
1. Tryck in tändnyckeln helt
itändlåset. Vridinte nyckeln,
den ska bara tryckas in.
2. Ställ gasreglaget på fullgas. 3. Ställ chokereglaget ikallstartsläge.
Ommotorn är varm, ställ choken
helt åt motsatt håll.
4. Tryck in primerblåsan 3–5 gånger. Hållför lufthålet uppe på blåsan när du trycker. Vidkall väderlek kan
motorn behöva primas engång till. Ommotorn är varm, tryck in blåsan engång.
5. Dra sakta istarthandtaget tills du känner motstånd. Drasedan snabbt och kraftfullt ihandtaget för att starta.
Släppinte handtaget utan håll kvar och för sakta tillbaka handtaget till utgångsläget.
6. När motorn startat och efterhand värms upp, för sakta tillbaka chokereglaget till utgångsläget.
7. Om motorn stannar, starta om och låt den gå med chokereglaget imittenläge enkort stund.
För sedan sakta tillbaka chokereglaget till utgångsläget.
Elektrisk start
1. Anslut snöslungans elkabel till ett230 V jordat vägguttag.
5. Tryck in primerblåsan 3–5 gånger. Hållför lufthålet uppe på blåsan när du trycker. Vidkall väderlek kan
motorn behöva primas engång till. Ommotorn är varm, tryck in blåsan engång.
6. Tryck in startknappen (20). Släppknappen när motorn startar. Startmotornär försedd med ettskydd mot
överbelastning som löser ut om startmotorn blir för varm. Startmotornmåste då svalna innan den kan
användas igen.
7. När motorn startat och efterhand värms upp, för sakta tillbaka chokereglaget till utgångsläget.
8. Om motorn stannar, starta om och låt den gå med chokereglaget imittenläge enkort stund.
För sedan sakta tillbaka chokereglaget till utgångsläget.
9. Koppla bort elkabeln från eluttaget och sedan från snöslungan.
2. Tryck in tändnyckeln helt
itändlåset. Vridinte nyckeln,
den ska bara tryckas in.
3. Ställ gasreglaget på fullgas. 4. Ställ chokereglaget
ikallstartsläge. Användinte
choke om motorn är varm.

20
SVENSKA
Säkerhetskontroll
Obs!
Kontrollera inmatningsskruvens funktion första gången snöslungan startas och inför varje ny säsong.
Det måste finnas ettlitet spel ivajern som går från kopplingshandtaget (6).
1. Starta slungan och tryck ner kopplingshandtaget. Låtinmatningsskruven arbeta ica 10 sekunder.
Upprepadetta några gånger.
2. Släpp upp kopplingshandtaget och ställ dig framför slungan. Kontrolleraatt inmatningsskruven står
heltstilla och inte visar några tendenser till att rotera.
3. Om inmatningsskruven roterar eller visar tendenser till att rotera trots att kopplingshandtaget inte trycks ner,
slå av motorn och justera vajern.
Justering av släpskor
• Normal användning: Justera släpskorna ½ till 1 cm lägre än skrapskäret.
• Hårt packad snö: Justera släpskorna något högre (för att sänka skrapskäret).
• Grus eller ojämnt underlag: Justera släpskorna något lägre (för att höja skrapskäret).
Körning
1. Planera körningen och var snön ska kastas innan du börjar.
2. Starta motorn och ställ gasreglaget nära fullgas.
3. Låt motorn värma upp någon minut för att uppnå full effekt innan snöröjningen påbörjas.
4. Sätt växelreglaget på enför rådande förhållanden lämplig växel. 2:ans växel framåt är vid normala
förhållanden mest lämplig vid snöröjning.
5. Tänd vid behov strålkastaren med strömbrytaren (5).
6. Tryck ner kopplingshandtaget för inmatningsskruven (6) för att påbörja snöröjningen.
7. Tryck ner kopplingshandtaget för drivningen (2), snöslungan rör sig framåt.
Obs! Röraldrig växelreglaget när slungan är irörelse, släpp upp kopplingshandtaget för drivningen
innanväxling.
8. När arbetet är avslutat: Låt motorn gå några minuter på tomgång efter användning. Låtslungan och
inmatningsskruven stå stilla under tiden för att fukt och snö på motorn ska torka upp.
9. Med motorn igång, dra ut starthandtaget snabbt 3–4 gånger för att undvika fastfrysning. Ettsmattrande ljud
hörs, detta är helt normalt och skadar inte slungan eller startmekanismen.
Slå av motorn
1. Skjut tillbaka gasreglaget helt.
2. Dra ut tändnyckeln.
3. Rengör noggrant hela slungan och rör alla reglage fram och åter några gånger för att undvika fastfrysning.
Skötsel och underhåll
Obs! Stängav motorn, ta ur tändnyckeln och ta bort tändkabeln från tändstiftet innan någon service, rengöring
eller underhåll utförs på maskinen.
Smörjning
• Smörj regelbundet växelreglaget och övriga rörliga delar med några droppar motorolja och/eller spray
(typ5–56, WD 40). Användinte för mycket!
• Använd ettuniversalfett lämpat för bilar och maskiner till snäckdrevet längst ner på veven som kontrollerar
utkastet. Användinte för mycket!
Table of contents
Languages:
Other CO/Tech Snow Blower manuals


