Cobb Accessport User manual

P. 1

P. 1
PRODUCT INTRODUCTION
Congratulations on the purchase of a new Accessport hand-held
programmer. This quick start guide explains how to install the Accessport
on your vehicle. Refer to the Accessport user manual located online at
www.cobbtuning.com/subaru-ap. Check the website for more information
about features, capabilities and additional instructions.
The Accessport can:
• Reprogram the factory engine control unit (ECU) with improved tuning
parameters through the on-board diagnostic (OBD-II) port
• Monitor vehicle sensor data
• Read and clear engine diagnostic trouble codes (DTCs)
• Measure 0-60 and 1⁄4 mile times
• Monitor current and average fuel economy
Accessport Buttons:
In-Box Contents:
Accessport USB CableOBD-II Cable
ACCESSPORT INSTALLATION
2002 WRX Initialization
Connector (BLUE)
If applicable
2003-2005 WRX Initialization
Connector (WHITE)
If applicable
Please visit www.cobbtuning.com/apmanager to download Accessport
Manager for your computer operating system as well as get access to the
latest COBB Tuning O-The-Shelf maps for your Accessport.
If you have issues transferring maps or updating the Accessport while using
USB 3.0 ports, please try using a USB 2.0 hub adapter. For any questions, please
P. 2
ACCESSPORT INSTALLATION
IMPORTANT!
For installation purposes, it is important to ensure that the
vehicle’s battery has adequate power for both the Accessport and the ECU.
Because of this, it is recommended that all in-car electronics and vehicle lights
are turned o during the installation process to reduce drain on the vehicle’s
battery. For improved safety during installation, a car battery charger can be
connected to the vehicle during the installation process
Getting Started:
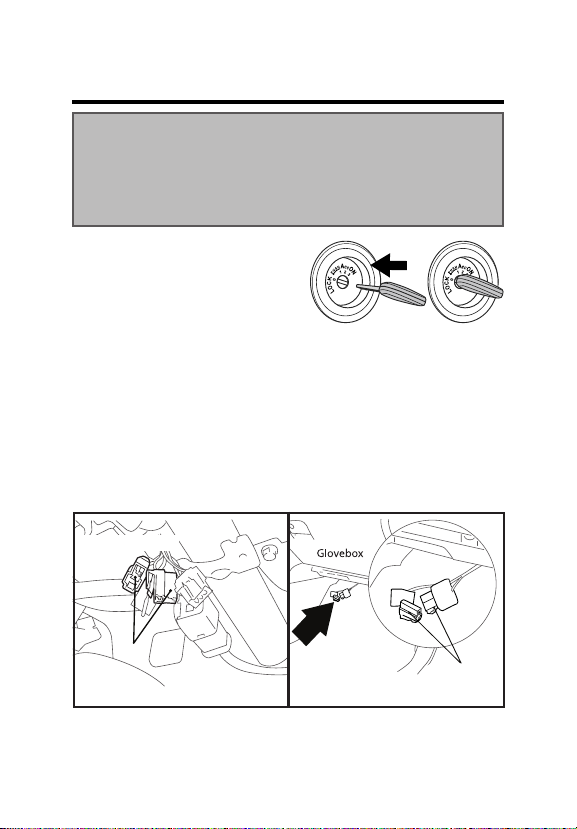
1. You will need the Accessport and
OBD-II cable to perform the installation.
Insert the key into the vehicle’s ignition
and leave it in the OFF position.
2. For Subaru models utilizing a SUB-001 or SUB-002 (not required on
SUB-003) Accessport, locate the green Test Mode connectors under the
driver’s side dash to the left of the steering column (see diagram). With the
connectors located, enable Test Mode by plugging the two connectors into
each other. To ensure Test Mode was successfully enabled, turn the key to
the ON position but do not start the engine. You may hear the radiator fans
cycling on/o as well as the fuel pump cycling and the ‘Check Engine’ light
should blink. THIS IS A NORMAL FUNCTION OF TEST MODE. OnceTest Mode
is veried, turn the key back to the OFF position and continue.
NOTE: The Test Mode connectors must be connected whenever changing
a base map.
Driver’s Side Door
Steering
Column
[STI, WRX & Forester test mode connectors] [Legacy & Outback test mode connectors]
CONNECT
CONNECT

P. 3
3. On 2002-2005 WRX models identify the correct Initialization Connector
for your vehicle (2002 WRX = BLUE, 2003-2005 WRX = WHITE). Attach
the Initialization Connector to the corresponding connector under the
driver’s side dash. This connector will be located near the green Test Mode
connectors and will be translucent white in color. Do not proceed until
this step is complete.
5. Plug the OBD-II cable into the OBD-II port under the dash of vehicle.
Then connect the small end of the OBD-II cable to the 10 pin port on the
bottom of the Accessport.
4. Locate the vehicle’s female OBD-II port under the driver’s side dash.
2002 WRX Initialization
Connector (BLUE)
2003-2005 WRX Initialization
Connector (WHITE)
[STI, WRX & Forester OBD-II Port]
[Legacy & Outback OBD-II Port]

P. 4
Vehicle Identication:
The Accessport will attempt to automatically determine the target vehicle
for installation.
If the Accessport successfully identies the vehicle:
Verify that the identied vehicle is correct and press OK to conrm.
If an error occurs:
Please reference the Troubleshooting section of the Accessport User Manual for
additional information. The Accessport User Manual can be found online at
www.cobbtuning.com/subaru-ap
WARNING!
Do not disturb the Accessport or OBD-II cable while installation is taking
place. Failure to do so may result in incomplete ECU reprogramming
which will render the vehicle inoperable.
6. Make sure the clasp on the OBD-II cable rmly engages the tab on the
10 pin port. NOTE: Your Accessport may only have 9 pins. This is by design.
7. Turn the key to the ON position, turn o AC/heater fans and headlights,
and make sure all doors are shut.
NOTE: The engine
should not be running.
7. Select Install to proceed with installation.

P. 5
Map Selection:
After the Accessport identies the vehicle, it will present a list of maps for
that vehicle. The map selected will become the base map for the vehicle.
To ensure the best performance, select the map that most closely matches
the modication level of the vehicle. Select a map and press OK to view
detailed information about that map. After conrming that the selected
map is correct, press OK again to proceed, or press CANCEL to return to the
map selection list.
Save Stock ECU Program Data:
After conrming the installation map, the Accessport will download the
current stock ECU program data from the vehicle. The Accessport saves
this data for use during the Uninstall process to ensure that the vehicle
is completely returned to stock. The download process will take a few
minutes to complete.
Install Accessport Programming:
With the stock ECU data saved, the Accessport will proceed with installation
to the vehicle. At this point the Accessport reprograms the vehicle’s ECU
with new program data and calibration parameters from the selected map
le. This process will take several minutes to complete.
Installation Complete:
The last installation process the Accessport goes though is clearing
trouble codes. When this step is complete turn o the ignition and wait for
approximately 10 seconds. After that is done your screen should now display
“Installation Complete”.You may now unplug the Accessport from the vehicle.
The Accessport does not need to be plugged in to the vehicle again until a
map change is necessary, however, it can remain plugged in to use the
Performance testing, Live Data monitoring and Data Logging features. Please
note that the Accessport is designed to work with only one vehicle at a time.
Once the Accessport is installed, it cannot be used with another vehicle until
it is uninstalled from the original vehicle.

P. 6
MAP & FIRMWARE MANAGEMENT
What Is A Map?
The Accessport reprograms the tuning parameters inside the factory
engine control unit (ECU) using map les, which contain specially written
instructions for the Accessport to follow during the reprogramming
process. A given map le contains programming information to properly
calibrate the ECU for a specic set of modications to a vehicle. In addition
to calibrating for specic modications, maps are also programmed for
dierent uses, such as improved performance, higher fuel eciency,
alternate fuel grades, anti-abuse (valet) and anti theft. Through the use of
the Accessport and dierent map les, the ECU can be reprogrammed to
accommodate the user’s immediate need.
Downloading and Installing the Accessport Manager Software:
The Accessport Manager Software can be found at
www.cobbtuning.
com/apmanager
. Please follow all on-screen instructions during the
installation process.
Acquiring And Loading New Accessport Maps:
The Accessport ships with a number of pre-installed maps that are up-to-
date at the time of shipping. However, it is possible that newer revisions
of maps have been made available, or that the Accessport did not come
pre-installed with a map that is appropriate for the target vehicle. To load a
new or updated map to the Accessport, simply download and the map le
to an easy to remember location (My Documents, Desktop, etc.). Then, drag
and drop the map le in to AP Manager to transfer it to your Accessport.
Continue this process for all desired maps.
How do I update the software on my Accessport?
Designed with user friendliness in mind, Accessport Manager will
automatically communicate with COBB’s servers to nd and download
the latest Accessport application and rmware packages. Simply plug
in the Accessport, using the provided USB cable, and launch
Accessport
Manager. All rmware details are handled for you. Just sit back and wait
for completion.

P. 7
© 2013 COBB Tuning Products, LLC. All rights reserved. Accessport, Accesstuner, COBB
Tuning and the COBB logo are trademarks of COBB Tuning Products, LLC. All other company
and product names mentioned are trademarks of their respective companies. Mention of
third-party brands or products does not constitute an endorsement or recommendation of
COBB Tuning from said companies.
Phone: 866.922.3059 | Fax: 512.997.6400
2311 W. Rundberg Ln. Suite 500 Austin, TX 78758
www.cobbtuning.com | facebook.com/cobbtuning
Other manuals for Accessport
4
Table of contents
Other Cobb Motherboard manuals


