Cobra DPS1400 User manual

DPS1400
HD 3-in 1
Flatbed Scanner
All manuals and user guides at all-guides.com
all-guides.com

Preface 1..........................................................
Safety Precautions..........................................1
Package Contents...........................................1
CONTENTS
Parts Guide....................................................3
Slide and Negative holder loading method.........4
Operation Guide..............................................6
Product Specification....................................1 4
Declaration...................................................1 4
All manuals and user guides at all-guides.com

1.Preface
2.Safety Precautions
The following are included in this package:
3.Package Contents
2
Thank you for purchasing the HD 3-in1 Flatbed Scanner
Please read this user's manual carefully before using this product.
Please retain this manual for future reference.
1
USB Cable TV cable
Power adapter User’s Manual
Brush
Negative
Slide
3½" X5"
Clean cloth
Do not disassemble this unit.
Do not touch inner part of the scanner.
Do not clean the scanner with alcohol, gasoline, diluent and
other organic solvents.
Do not use in dusty or damp environments.
Please use film of standard size.
Cleaning:Please make sure the scanner is clean before using
so as to produce a clean image.
The USB cord or adapter should be unplugged when the unit is
left unused for a long period of time.
DPS1 400
HD 3-i n 1
Flat bed Sca nner
All manuals and user guides at all-guides.com

4.Parts Guide
43
(1).Photo positioning holder(3.5"X5",4"X6",5"X7"and name
card)
(2). Film holder(Positive、Negative)
(3). LCD color display screen
(4). USB interface
(5). TV-OUT interface
(6). SD card slot(up to 32GB)
(7). Film or Photo option
(8). Power button
(9). Left/Right button,MENU button,ENTER button
(10).SCAN button
(11).Film scan mode indicator light
(12)indicator light. Picture scan mode
5.Slide and Negative holder loading method
a.Hold the slide toward the light. Face
the right side of the slide towards
yourself.
b.Open the slide holder, then place
slides into recessed area in the
holder.Make sure the open logo is
facing forward towards you(film can
also be loaded as a strip into the
slide holder, see below picture)
c.Close the slide holder and press the
edges so that it locks in place
d. Insert the slide holder into the slot
on the right side of the film scanner
as shown.
ENTER
MENU
SCAN
Film
Photo
TV OUT
1
2
3
456
7
8
9
10
11
12
All manuals and user guides at all-guides.com

65
Loading Negatives
a.Hold the negative toward the light.
Face the right side of the negative
yourselftowards
b. Open the negative holder, make
sure the open logo is facing forwards
towards you.Place negative into
recessed area in the holder.
c.Close the negative holder and press
the edges so that it locks in place
d. Insert the negative holder into the
slot on the right side of the film
scanner as shown.
ENTER
MENU
SCAN
Film
Photo
TV OUT
:Handle film with care to avoid scrades or finger prints.It is
recommended to use compressed cotton to remove any dust
on the films.
!
(4R) (5R)(3R)
Please place the positioning sheet into the corresponding fixed
holes,then scan picture or name card.
6.Operation Guide
(1).Introduction of Negative Mode Main Menu
①
②
③ Capture
④ Playback
Film
Resolution
⑤Format
⑥USB MSDC
⑦Language
!
11 2 3 4 5 6 7
All manuals and user guides at all-guides.com

87
① Effect
②
③ Capture
④ Resolution
Format
⑤Playback
⑥USB MSDC
⑦Language
Photo siz e
(2).Introduction of Picture Mode Main Menu
(3).
Capture Picture
a. Turn the power button . Press SCAN and ENTER to
capture the current image in the flatbed.
on
1 2 3 4 5 678
8
ENTER
ENTER
SCAN
Right key flips the image vertically.
Left key mirrors the image.
MENU
ENTER
or
Mirror
Flip
EV 0.0 EV 0.0
EV 0.0 EV 0.0
Press MENU back to the main menu. to go
Press ENTER to set exposure compensation
All manuals and user guides at all-guides.com
all-guides.com

10
9
Using Film or Photo option side the button
mode: Left for Film and right for Photo
to the corresponding
b.In Photo mode, press
the choice of color ,B&W.
until ,then press ENTER into
(5).Playing scanned pictures
Under the film or photos main menu mode,press ,
until ,then press ENTER into autoplay scanned picture mode,
press ENTER again to suspend automatic play.
!
(4).Operation Guide
a.In main menu, press ,until ENTER . You
can now chose negative、slide、B&W
,then press
Enter
Enter
Exit
Enter
Enter
Enter
1
2
3
Home
Enter
4
5
6
The current picture rotates 90 digree clockwisely
The current picture rotates 90 digree counter clockwise
Deleting the current picture from memory card
Save the current edited picture
Exit the submenu edit mode,back
Exit the submenu edit mode,back to scan
Home
All manuals and user guides at all-guides.com

12
11
(6)、Resolution options are located in the main menu.Press
until , press ENTER into image resolution choice, press
to choose 5M or 10M.
Enter
Enter
or
or
ENTER
ENTER
(7).Setting Language
Under main menu mode,press
chose language, then press and , one of following 8
language can be set:English、Franch、German、Italian、
Spanish、T-Chinese、S-Chinese、Japanese.
,until . Press to
(8)、Format
In the main menu mode,press key reach to ,press
ENTER into format interface:
,
or Enter
left
or
right
Enter
*Note:"FULL"icon on screen means the memory is full.Upload the image files to a computer
then format the memory.
and
and
All manuals and user guides at all-guides.com

14
13
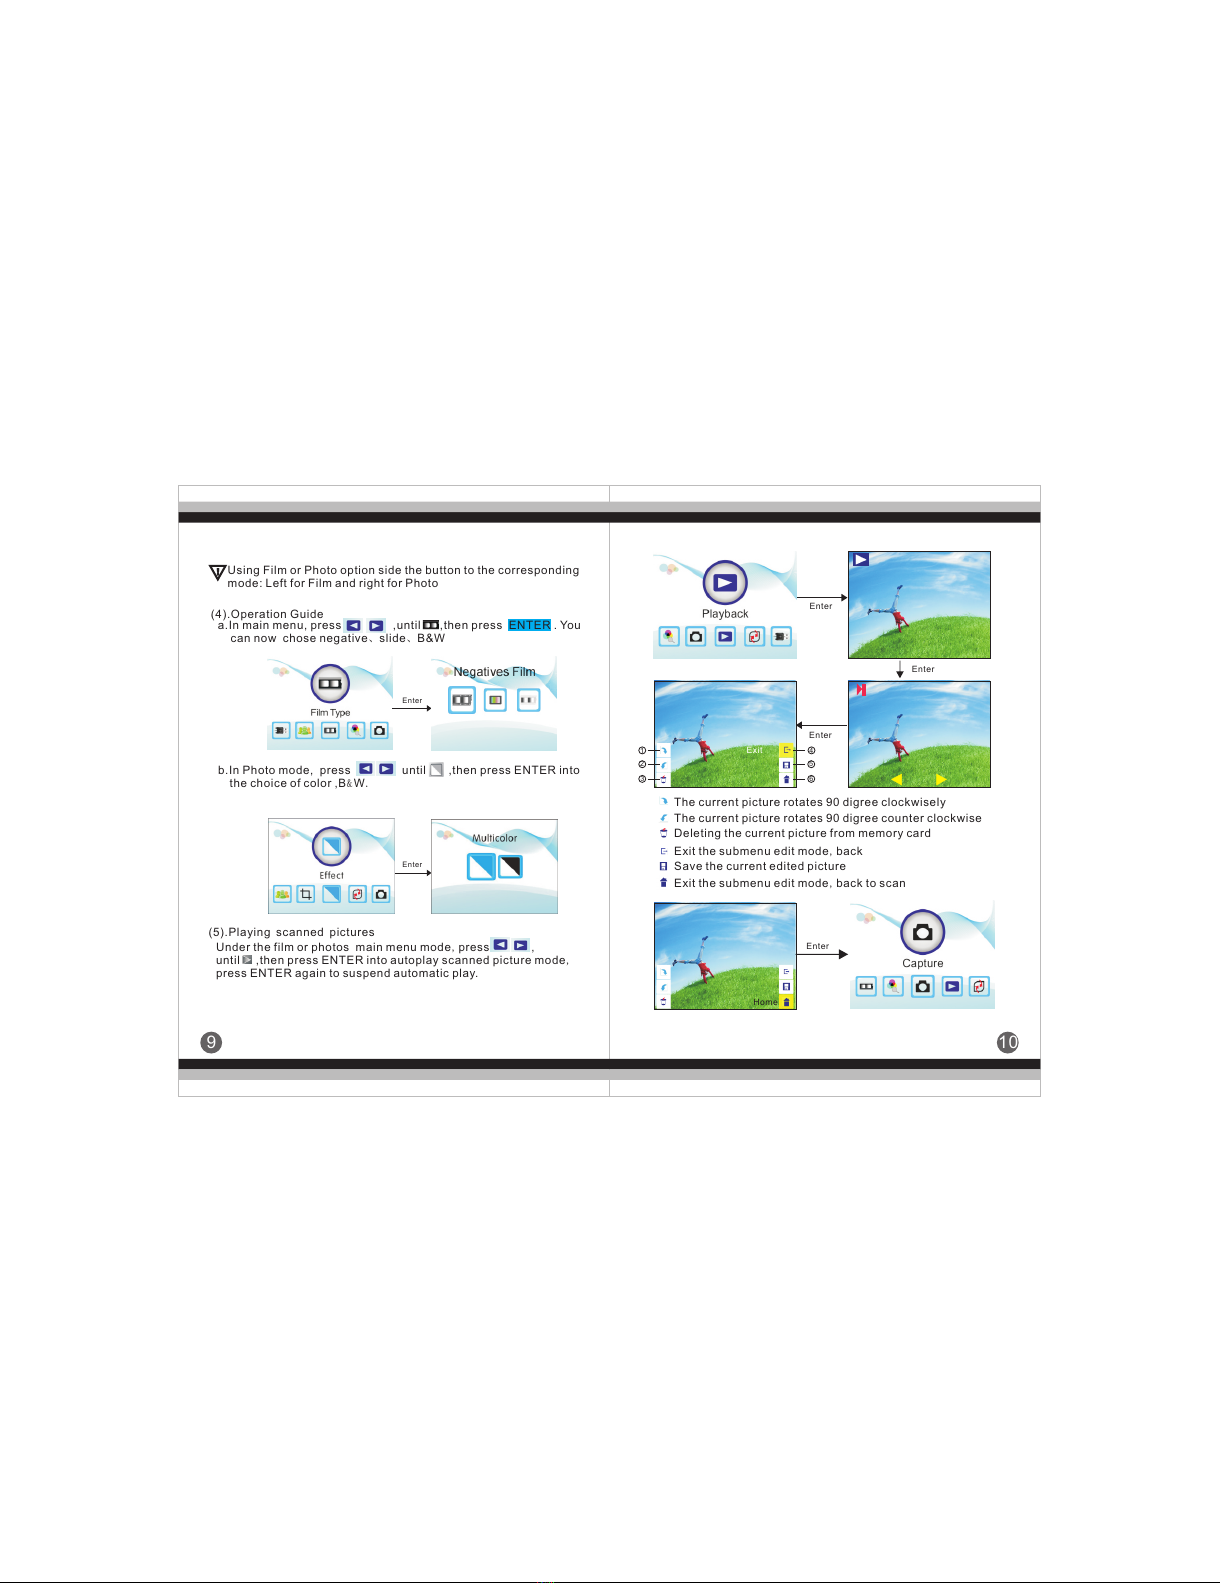
(9)、USB MSDC options are in the main menu.
until ,press ENTER into USB MSDC,you can view and edit the
scanned picture in the computer after successful connecting.
Press ,
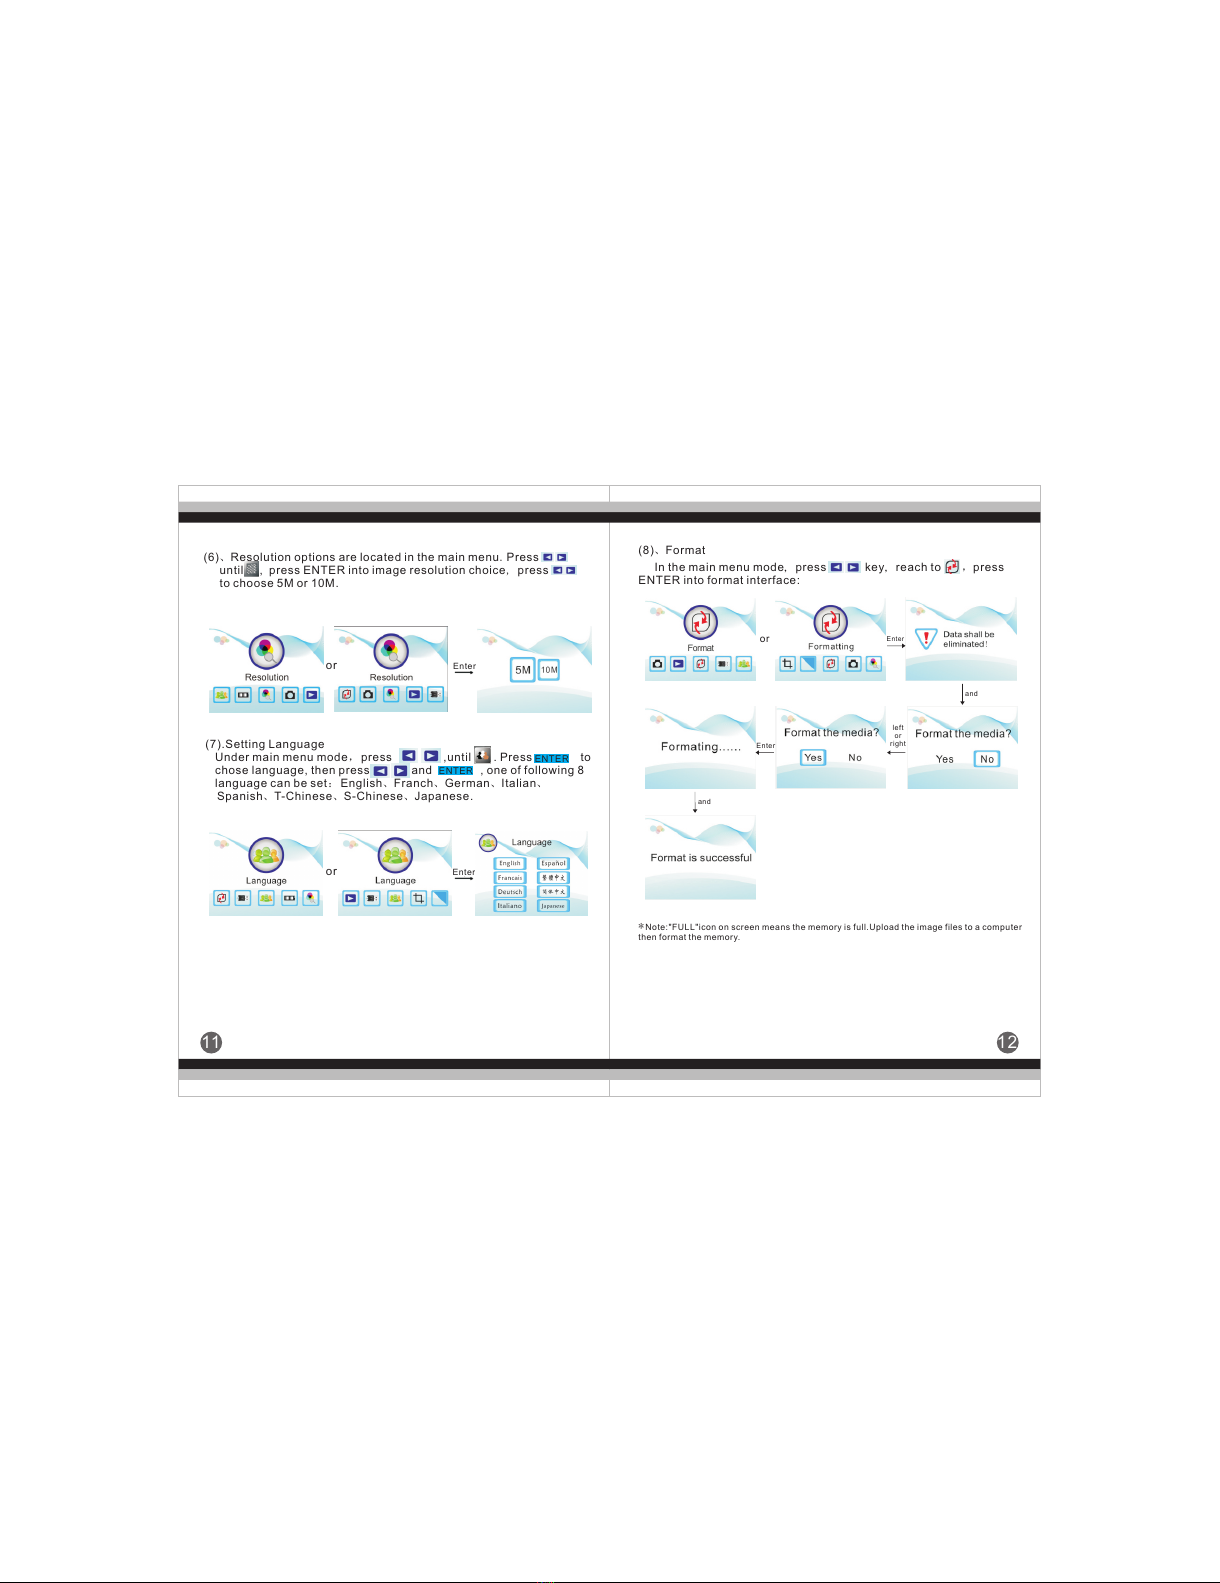
(10)、How to choose picture size under the main menu mode
Under the main menu mode,press ,
ENTER into cutting mode,you can choose correspoding size
to cut picture:5R(5"*7),4R(4"*6),3R(3.5"*5)and name card.
until ,press
Enter
Enter
or
7.Product Specification
Film scanner/ USB MSDC/Photo Scanner
Function
Interface
Image Sensor
USB2.0
5.0 Mega pixels (2592*1944)
1/3.2” CMOS sensor
Display Color 2.4〞TFT LCD
Exposure Control Automatic / Manual (-2.0 EV~ +2.0EV)
Resolution 5.0 Mega pixels/10Mega pixels
(interpolation)
Scan Quality(reference) 1800Dpi & 3600 Dpi(interpolation)
Picture aspect ratio 3:2
Scan Method Single pass
Film type 35mm Film、Monochrome、Slide
Picture Effects B&W,Slides,Negatives
Light Source LED Back light
File format Picture:JPEG
TV-OUT type NTSC/PAL
External memory card SD card up to 32GB
Power Supply DC 5V Adapter/ USB Port
Language S-Chinese / T-Chinese / English /
French /German / Italian / Spanish /
Japanese
Support system Windows XP/vista/Windows7/
Mac10.7.3
Product Size L245mm×W220mm×H140mm
Weight 1300g
Please note products spec is subject to improvement .
Any changes of product will not make additional specify.
8.Declaration
All manuals and user guides at all-guides.com
Other manuals for DPS1400
1
Table of contents
Other Cobra Scanner manuals