manuals.online logo
Brands
  1. Home
  2. •
  3. Brands
  4. •
  5. Coby
  6. •
  7. Portable TV
  8. •
  9. Coby TF-TV700 User manual

Coby TF-TV700 User manual

14
10. Accessories List
AC Adaptor
Remote Control
AV Cable RCA Jack
Car Cord
Car Stand (Optional)
Instruction Manual
Exterior Antenna Jack
Fixed Screws PWA3*14)
Name Quantity
1 piece
1 piece
1 piece
1 piece
1 piece
1 piece
1 piece
4 pieces
1 piece
Battery Compartment(Optional)
Instruction Manual
Portable 7 COLOR TFT LCD TELEVISION SET
AV/TV POWER
MUTE
CH+
TUNE VOL+VOL-
2
4
9
CH-
PIC SETUP
Dear Customer:
Thank you for purchasing this product.
Please read this manual carefully before connecting, operating or
adjusting this product in order to ensure the best efficiency and
safety of this product. Please keep the manual for future reference.
13
9. General Troubleshooting
Problem Reasons
No picture & sound
No picture
No sound
Poor reception
Dark or blurred picture
Unclear or unstable picture
Picture moves up &
down, blurs or folds over
No color
Improper connection of AC adaptor or car adaptor.
The batteries are run down or installed incorrectly..
Antenna is not properly attached. Relocate the TV to a place
where reception is better.
Sound volume is too low. The signal is too weak.
TV antenna is not adjusted properly or reception is too weak.
The brightness & contrast are too low.
TV antenna is not properly adjusted or reception is too weak.
TV antenna is not adjusted correctly. The reception is too
weak or compromised by buildings or nearby mountains.
Color is not set correctly.
Sound on some channels
but not all
Adjust FINE function up or down in the MENU until sound
is clear.
This troubleshooting guideis provided tohelp you ifyou experience any
problems with thisTV. If youare still having difficulty, please contact
Technical Support,Monday-Friday 8:00 AM-11:00 PM EST,
Saturday and Sunday9:00 AM-11:00 PM EST.
Youcan also reachus online at[email protected].
1-800-681-2629 or 718-416-3197
12
,,
1 Description: Portable 7 TFT LCD Color TV Set
2 TV System: NTSC3.58 System
3 AV System: NTSC3.58 / PAL4.43 System
4 Audio System: M
5 Display device: Color TFT-LCD
6 Display Screen Size: 7 inches
7 Video Input: 1Vp-p
8 Audio Output: 250mW (MAX)
9 Power Consumption: 11w
10 Resolution: 1440 (H)*234 (V)
11 Dots Distance: 0.107(H) X 0.372(V)mm
12 Visible Range: 154.08(H) X87.05(V)mm
13 Power Source: AC adaptor or car adaptor (normal: DC 12V)
14 Measurement: 195 (L) X 135 (W) X 30(D) mm
15 Weight: Approx. 490g
16 Connection terminals:
. Antenna Jack
. AV Input Jack
. Headphone Jack
. External Power Source Input Jack
8. General Specification: Table of ContentsTable of Contents
1. User Safety Instructions
2. General Parts
3. Connection
8. General Specification
9. General Troubleshooting
10. Accessories List
7. Basic Characteristics and Functions
(2)
(3-4)
(5)
(11)
(12)
(13 )
(14)
(10)
6. Stand Fixture
4. Operation Instructions (6-9)
(10)
5. Battery Installation
7. Basic Characteristics and Functions
1. TV System: NTSC3.58 System
2. AV System: NTSC3.58 / PAL4.43 System
3. Full Menu on-Screen Display
4. AUTO Search TV channel programming
5. GAME/DVD AV Equipment Connection Port
6. Brightness, Contrast & Color Adjustment
7. Stand By Mode
8. Detachable TV Battery Compartment Stand
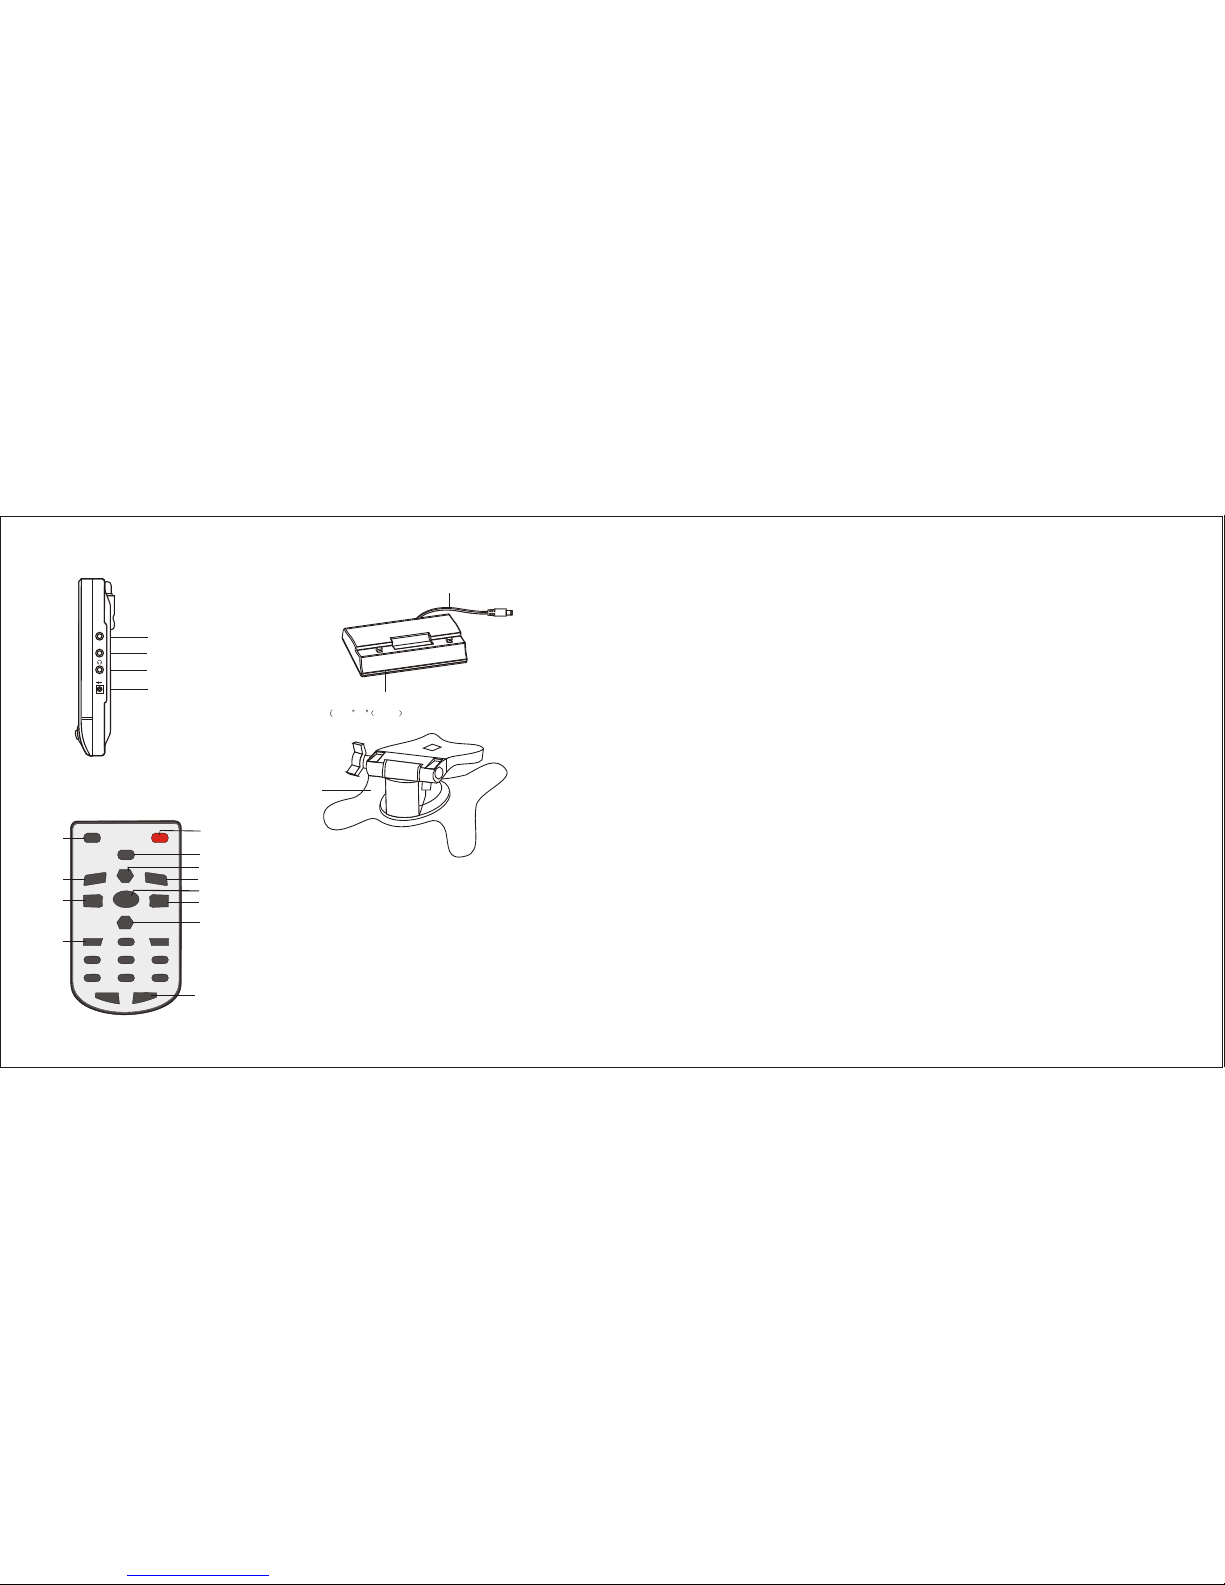
9. Headphone Jack
10. Chinses/English/Japanese OSD language options
11
1) Read these instructions carefully.
2) Keep these instructions for future reference.
3) Heed all warnings.
4) Follow all instructions.
5) Do not expose to water or moisture.
6) Clean only with a dry cloth.
7) Keep objects away from ventilation openings. Do not block any ventilation openings at
any time.
8) Do not install near any heat sources such as stoves, computer towers, amplifiers or any
apparatus that produce heat.
9) Do not force the power plug in the wall outlet. Apolarized plug as two blades with one
wider than the other. The wide blade is provided for your safety. If the provided plug does
not fit into your outlet, consult an electrician for replacement of the obselete outlet.
10) Place the power cord so that it is protected from being walked on, pinched by objects, torn
and exposed to liquids, especially at plugs, convenience receptacles, and the point where
they exit from the product.
11) Only use attachments/accessories specified by the manufacturer. Use of attachments/accessories
not recommended by the product manufacturer may cause hazards.
12) Use only with a cart, stand, tripod, bracket, or table specified by the manufacturer, or sold
with the apparatus. When a cart is used, use caution when moving the cart/apparatus
combination to avoid injury from tip-over.
13) Unplug the apparatus during lightning storms or when unused for long periods of time.
14) Do not use this apparatus near water, and no objects filled with liquids, such as vases,
shall be placed on the apparatus.
15) Refer all servicing to authorized service personnel.
For recycling or disposal information about this product,
please contact your local authorities or the Electronics
Industries Alliance: www.eiae.org
1. Safety Instructions
10
5. Battery Installation( Optional):
Open and remove thebattery door located on
the bottom of the battery compartment stand.
Insert 10 “AA” (UM-3) batteries into the battery
compartment (see right picture). Be sure the
polarity(+and-) matches the markings inside.
Close the battery door, and connect the power
cord ofthe battery compartment to the power
source input jack of the unit.
Metal washer
Knob1
Knob2
3-1
3-2
3-3
12. Stand Holder(Plastic)
11.Rotary Telescopic
Antenna
1. Volume Down Control
2. Volume Up Control
3. AV/TV Switch
4. Stand By Button
5. Menu Button
6. Channel Up Button
7. Channel Down Button
8. Remote Control Sensor
9. Power/Standby Indicator
10. Built In Speakers
2. General Part
FRONT VIEW
MENU
VOL- VOL+ CH-CH+AV/TV
3
NOTE:
Do not mix new batterieswith old or used ones.
Only use the batteries ofthe same type and brand.
Remove the batteries when notin use for a long period of time.
Do not connect theAC adaptor to the batterycompartment while the power cordfrom the
battery compartment is connected tothe unit.
6. Stand Fixture(Optional)
- Loosen the metal washer on the top of
the stand, but do not separate it from
the stand (see picture 3-1).
- Insert the metal washer with the stand
into the slot on the back of the unit,
and slide the stand up to a suitable
height (see picture 3-2).
- Tighten Knob 1 (see picture 3-3) to
fasten the stand to the unit. Adjust the
angle of the unit, and then tighten
Knob 2 (see picture 3-3) to lock it in
place.
9
17. Detachable Battery Compartment Stand
18. Power Cord to DC 12V INPUT
19. Car Stand
AV/TVAV/TV POWERPOWER
MUTEMUTE
CH+CH+
TUNETUNE VOL+VOL+VOL-VOL-
112233
66
55
44
778899
00-/--
CH-CH-
1. AV/TV Switch
3.
4.
5. Mute
2. Volume Down Control
Number Selector
Stand By button
Button
6. Channel Up Control
Mode
Volume Up Control
Channel Down Control
Single/Two/Three Digits Selector
11. Picture Button
12. Set Up Button
7. Tune
8.
9.
10.
(2). Remote Control
5
4
7
8
9
10
6
1
2
3
PICPIC SETUPSETUP
11 12
4
3. AV/TV button
Use the AV/TV button to switch between watching VID EO and TV. Switch to
VIDEO. when usingan external video source such as a DVD orVCR. Switch to
TV towatch TV through the antenna or cable TV.
4. MUTE button
Press the MUTEbutton one time,there is mutesignal on thescreen, press again,
the volume willresume.
5. VOLup / VOL downbutton
Use the VOLup and VOLdown buttons toadjust the volumeof the unit.The
volume range is0-63. VOLup and VOLdown buttons arealso used toadjust
features in theMENU.
6. CH up/ CHdown button
Use the CHup and CHdown buttons togo from channelto channel.Also use the
CH up andCH down buttonsto navigate theMENU functions.
7. NUMERICAL button(0-9)
Numerical button 0-9 isused for selectingprogram number ,button 0-9 has the
function of poweron when theTV is in waiting status.
8. -/-- button
If you want to select two-figure or there-figure program number , you need to
press -/-- button, after -/--shows on thescreen,you canuse the numericalbutton
to input thedesired program number.
NOTE:
If some channels do not have sound use the FINE feature to fine-tune the ch annel.
If sound does not appear please refer to the Troubleshooting section.
- AUTO
Use this feature to program all available channels. Use the CH up or CH down
button to highlight the AUTO feature. Then, press VOL up or VOL down to initiate
this feature. Allow the unit to search all possible channels.
10 X AA UM-3 SIZE batteries are not included)
SIDE VIEW
13. Antenna Jack
14. AV IN Jack
15. Headphone Jack
16. Power Source Input Jack
ANT.
AV IN
DC IN-12V
++
--
ANT.
AV IN
8
- BAND
This feature simply displays what type of frequency is currently displayed (UHF, VHF, etc).
The BAND function can not be adjusted.
- FINE
The FINE feature controls the fine tuning of each channel. Use the VOL up and VOL down but-
tons to fine tune each frequency for better sound and picture.
-
SIGNAL
The unit can work with both cable TV and an antenna. Simply adjust this feature to either ANT
for use with an antenna or CATV for use with cable TV.
The unit can receive up to 80 channels with the antenna setting (ANT) and 136 cha nnels with
cable TV(CATV) setting.
- PROG
This function shows the current channel displayed. Use the VOL up
or VOL down buttons to scroll through the channels.
- SKIP
This function allows you to add or delete any channel. If you would
like to delete a channelsimply navigate to the desired channel with
the PROG button and press the VOL up or VOL down button until
this function reads ON .
If you would like to add a channel simply press the VOL up or VOL
down button until the SKIP feature reads OFF .
PRESET
PROG 120
SKIP OFF
BAND VHF-L
FINE
SIGNAL CATV
AUTO
2-5
Press MENU button of the unit or the TUNE button on the remote
until the PRESET screen appears (see picture 2-5).
Press CH up or CH down to scroll through these options.
Press VOL up or VOL down to adjust the desired option.
- PRESET
5
ANT.
AV IN
DC IN-12V
++
--
Antenna
Red
YELLOW
AUDIO INPUT
VIDEO INPUT
AC Adaptor
Headphone
(not included)
AC Adaptor
Detachable Battery Compartment Stand
10 X AA UM-3 SIZE batteries are not included)10 X AA UM-3 SIZE batteries are not included)
Power Cord to
DC 12V Input
(Options)
(Options)
(1-2)(1-1)
3. Connection
,,
,,
2
3
4
1
. Connection of the External AV Equipment
Plug the AV cable into the AV IN jack(14) . (Press AV/TV button(1) to enable the con-
nection of external audio and video equipment).
. Use of Headphone
- Connect the Headphone to at (15) for private listening.
- The speakers will not operate when headphones are connected.
CAUTION : Listening at high power for too long could damage your ears.
. Connection to the Power Source
(1) Connect one round end of attached AC adaptor to the power source
input jack (16 ) and the other end to the wall outlet at the suitable voltage .(1-1)
(2) Connect the detachable battery compartment stand power cord to the power source
input jack (16).
. Connection of the Antenna (See picture 1-1)
Plug the antenna into the ANT jack (13).
NOTE: The unit can receive CATV/ANTsignals from the ANT jack input.
(See picture 1-1)
(See picture 1-1)
or car adaptor
(See picture 1-2)
DC IN-12V
++
--
67
4. The operation of the TV set and remote control
1. The POWER button
After plugging the unit in the power light(9) should be red, press the POWER
button of the unit or the remote to turn the unit on and off.
PICTURE FUNCTION PRESET
2. MENU /PIC/SETUP/TUNE button
The MENU button of the unit controls the following three on-screen functions:
1) PICTURE: To adjust brightness, contrast,etc.
2) FUNCTION: To adjust system ,language, and clock functions.
3) PRESET: To adjust auto search, add/delete, fine tuning, etc.
2-2
- PICTURE
Press MENU button of the unit once or the PIC button on the remote to enter.
The PICTURE screen will show the following content
(see picture 2-3).
Press CH up or CH down to scroll through these options.
Press VOL up or VOL down to adjust each option.
PICTURE
BRIGHT 32
CONTRAST 32
COLOR 32
TINT 00
2-3
- BRIGHT
Press VOL up to make picture brighter and VOL
down to make picture darker.
- CONTRAST
Press VOLup to increase contrast and VOL down
to decrease contrast.
- COLOR
PressVOLup orVOL down to adjust color levels.
- TINT
Press VOL up or VOL down to adjust tint levels.
Press the MENU button to scroll through these three on-screen options.
Press MENU button of the unit again or the SETUP button on the remote until
FUNCTION screen appears (see picture 2-4).
Press CH up or CH down to scroll through these options.
Press VOL up or VOL down to adjust each option.
- FUNCTION
- SYSTEM
System has been disabled for this unit.
- LANGUAGE
The unit support OSD language in Chinese /English/Japanese.
FUNCTION
SYSTEM SYS1
/ENG/ ENG
CLOCK --:--
2-4
- CLOCK
VOL up is used for setting hour, Press VOLup one time, the time will add one
hour. VOL down is used for setting minutes. Press VOL down one time and the
Clock will add one minute.

Other Coby Portable TV manuals

Coby TFTV992 User manual

Coby

Coby TFTV992 User manual

Coby TF-TV505 User manual

Coby

Coby TF-TV505 User manual

Coby TFTV791 - 7" Tft LCD Tv User manual

Coby

Coby TFTV791 - 7" Tft LCD Tv User manual

Coby TFTV791 - 7" Tft LCD Tv User manual

Coby

Coby TFTV791 - 7" Tft LCD Tv User manual

Coby TF-TV705 User manual

Coby

Coby TF-TV705 User manual

Coby CX-TV1 User manual

Coby

Coby CX-TV1 User manual

Coby CTV-555 User manual

Coby

Coby CTV-555 User manual

Coby TF-TV891 User manual

Coby

Coby TF-TV891 User manual

Coby TV-DVD1260 User manual

Coby

Coby TV-DVD1260 User manual

Coby TF-TV251 User manual

Coby

Coby TF-TV251 User manual

Popular Portable TV manuals by other brands

Delstar DV 5400 user manual

Delstar

Delstar DV 5400 user manual

Audiovox FPE709 owner's manual

Audiovox

Audiovox FPE709 owner's manual

Axion AXN-8701 Specifications

Axion

Axion AXN-8701 Specifications

Naxa NT-401 instruction manual

Naxa

Naxa NT-401 instruction manual

LENCO TFT-1028 user manual

LENCO

LENCO TFT-1028 user manual

GPX TL909 user guide

GPX

GPX TL909 user guide

Eviant T10 Series instruction manual

Eviant

Eviant T10 Series instruction manual

Envizen HR701 user manual

Envizen

Envizen HR701 user manual

Naxa NT-1400 operating guide

Naxa

Naxa NT-1400 operating guide

Archos 704 user manual

Archos

Archos 704 user manual

Trevi DTV 2509M user guide

Trevi

Trevi DTV 2509M user guide

Majestic TVD 935 manual

Majestic

Majestic TVD 935 manual

SWEEX 7 INCH DVB-T TV 16:9 manual

SWEEX

SWEEX 7 INCH DVB-T TV 16:9 manual

Pyle PLTV9553 user manual

Pyle

Pyle PLTV9553 user manual

I-View iView 780PTV user manual

I-View

I-View iView 780PTV user manual

manuals.online logo
manuals.online logoBrands
  • About & Mission
  • Contact us
  • Privacy Policy
  • Terms and Conditions

Copyright 2025 Manuals.Online. All Rights Reserved.