manuals.online logo
Brands
  1. Home
  2. •
  3. Brands
  4. •
  5. cocoweb
  6. •
  7. Accessories For Musical Instruments
  8. •
  9. cocoweb GPLEDV-22D-BP4 User manual

cocoweb GPLEDV-22D-BP4 User manual

Make sure the light toggle switch is in the OFF position before plugging in the piano lamp to the Battery Pack. Use the
toggle switch on the lighting xture or a properly installed wall switch to toggle the piano lamp ON and OFF. Plugging and
unplugging the lamp can drastically reduce the life of the Lamp and may cause it to malfunction.
Congratulations on purchasing your new quality lighting xture from Cocoweb.com, Inc. If you have any questions about
these instructions or are missing any parts, please call us at 888-783-0378 or visit our website at www.cocoweb.com.
PACKAGE CONTENTS:
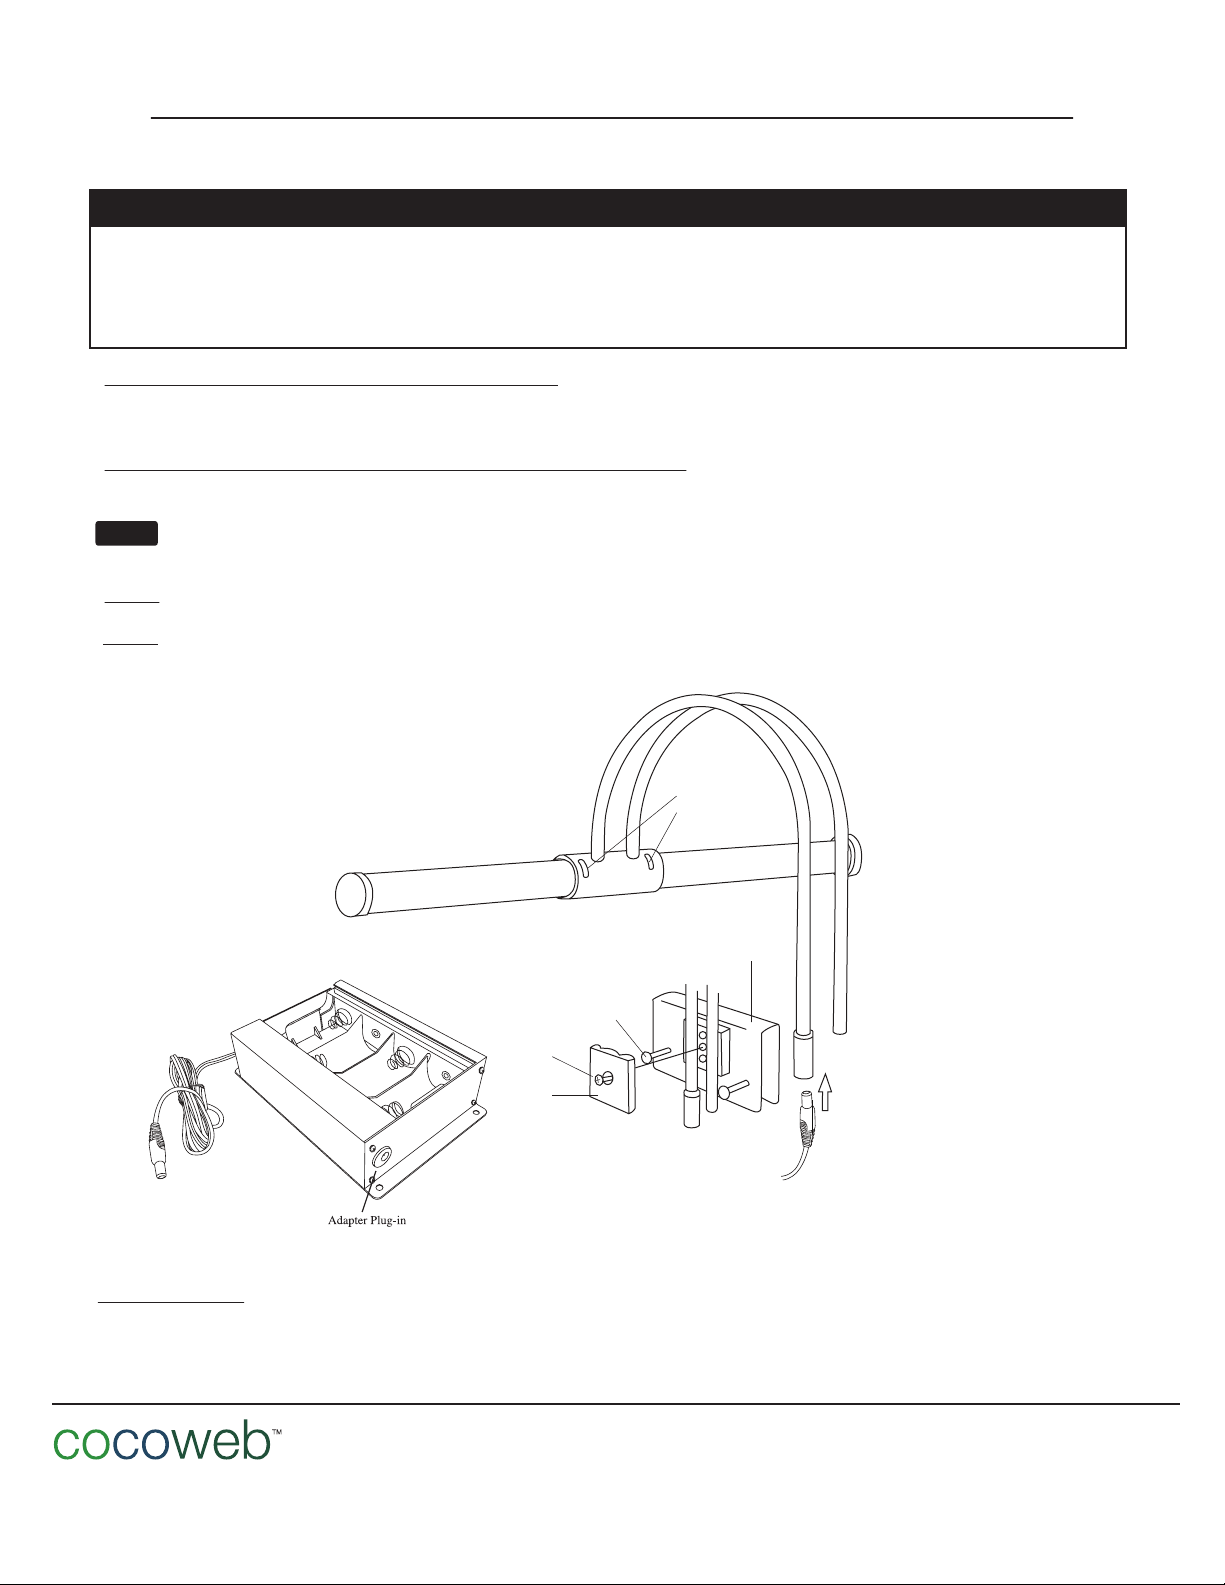
• 22-inch LED Clip-on Grand Piano Lamp
• 6V .4A DC Power Adapter
• Mounting Clamp Assembly
• 4 Battery Pack & Remote
COCOWEB LIMITED WARRANTY:
Cocoweb.com, Inc. warrants its lamps to be made of rst class materials, free from defects of material or workmanship
under normal use and to perform the service for which they are intended in a reliable and ecient manner when properly
installed, for a period of two years from the date of purchase. During the warranty period, Cocoweb.com, Inc. will, at its
choice, repair or replace any part or parts which prove to be defective if returned to Cocoweb.com, Inc.. NOTE:
Modication of piano lamp in any way will void the warranty.
LED ARRAY REPLACEMENT:
The LED array is rated to last 50,000 hours. Should the LED bulbs cease to function in the warranty period, Cocoweb will
replace the LED array free of charge. Cocoweb may at its choice, send a replacement LED array or request for the whole
lamp to be shipped to a Cocoweb location or authorized dealer. Shipping and handling charges may be incurred. After the
2 year warranty period, you may purchase a replacement LED array by contacting Cocoweb customer service.
CARE INSTRUCTIONS:
DO NOT use abrasive or chemical cleaners to clean the piano lamp as it may damage the nish. Use only warm water, then
wipe dry with a clean soft cloth.
TROUBLESHOOTING AND REPAIR:
Should the lamp stop working properly and/or one of the following problems occur: (1) The lamp fails to turn on (2) The
lamp ickers (3) The lamp dims to an unusual level, turn the lamp off using the toggle switch, recheck all connections and
then turn the lamp back on. If the problem persists, discontinue use of lamp and contact Cocoweb customer service.
IMPORTANT SAFETY INSTRUCTIONS:
• Do not place near any extreme heat or in direct sunlight.
• Place on an even and secure surface.
• Use only the supplied power adapter and dimming controller.
• Do not use with damaged electrical cords.
• Keep the lamp dry and clean.
• Never overload electrical circuits as it may cause electrical shock or re.
• For use in indoor dry rooms only. Not suitable for damp rooms.
• Do not look directly into the light source.
SPECIFICATIONS:
• Fits 3/8” - 1 1/2” piano boards
• 22” swivelable shade
• Pre-installed natural light LED array
• Light array contains 12 evenly spaced
LED nodes
• Toggle on/off switch located on the
lamp shade
• LED lifespan: 50,000 hours
• Color temperature: 2700 K
• Power Usage: Less than 10 watts
• 40 Hour Battery Life
• UV and Infrared-free LED technology
• Wireless Remote for Dimming
Rev. 2 (03/17)
WARNING
Danger of suocation
Keep children away from packaging
cocoweb.com
The information in this document is subject to change without notice.
COPYRIGHT ©COCOWEB.COM, INC. 2017
COCOWEB.COM, INC.
13715 Alton Pkwy
Irvine, CA 92618
Phone: 1-888-783-0378
22” BATTERY OPERATED LED GRAND PIANO LAMP (GPLEDV-22D-BP4)
USER MANUAL
cocoweb.com
The information in this document is subject to change without notice.
COPYRIGHT ©COCOWEB.COM, INC. 2017
COCOWEB.COM, INC.
13715 Alton Pkwy
Irvine, CA 92618
Phone: 1-888-783-0378
22” BATTERY OPERATED LED GRAND PIANO LAMP (GPLEDV-22D-BP4)
USER MANUAL
Make sure the light toggle switch is in the OFF position before plugging in the piano lamp to the Battery Pack. Use the
toggle switch on the lighting xture or a properly installed wall switch to toggle the piano lamp ON and OFF. Plugging and
unplugging the lamp can drastically reduce the life of the Lamp and may cause it to malfunction.
WARNING
STEP 1: ATTACH MOUNTING CLAMP TO THE LAMP ARM
1. Remove the screw and cover from the mounting clamp
2. Insert the lamp arms into the mounting clamp assembly and replace the cover and screw.
STEP 2: MOUNT THE LAMP ONTO THE PIANO BOARD OR MUSIC STAND
1. Loosen the two thumbscrews.
2. Mount the mounting clamp onto a piano board or music stand
Note You may have to manually adjust the opening of the mounting clamp if you have a thinner/thicker piano board.
3. Tighten the two thumbscrews making sure the lamp is securely tted to the piano board or music stand.
LIGHT CONTROLS
1. The ON/OFF toggle switch is pre-installed on the lamp shade. Simply toggle the switch to the right to turn the lamp on.
2. The light level can be brightened and dimmed by pressing the + & - , buttons on the remote.
The piano lamp can be toggled on/off using remote or toggle switch. If the light is not working, make sure both are toggled
on
STEP 3: Plug in the Battery Pack to the bottom of the lamp.
STEP 4: Insert 4 D Batteries into the Battery Pack.
Thumb Screw
Cover
Screw
Mounting Clamp
Rotation
Adjustment
Screw
Piano Lamp
Plug-in
22” BATTERY OPERATED LED GRAND PIANO LAMP (GPLEDV-22D-BP4)
USER MANUAL
1
2
3
6
REMOTE FUNCTIONS
POWER BUTTON :Turn the light ON/OFF.
BRIGHTNESS UP : Press and hold to slowly increase the brightness up to 100%
BRIGHTNESS DOWN : Press and hold to slowly reduce the brightness down to 10%.
ONE HOUR TIMER :The piano lamp will increase or decrease in brightness by 30%, depending on
current setting, then will gradually change back to default level, and automatically turn off after 1 hour.
TWO HOUR TIMER :The piano lamp will increase or decrease in brightness by 30%, depending on
current setting, then will gradually change back to default level, and automatically turn off after 2 hours.
THREE HOUR TIMER : The piano lamp will increase or decrease in brightness by 30%, depending on
current setting, then will gradually change back to default level, and automatically turn off after 3 hours.
SIX HOUR TIMER :The piano lamp will increase or decrease in brightness by 30%, depending on
current setting, then will gradually change back to default level, and automatically turn off after 6 hours.
For best operation, use this remote within 30 feet of the receiver. The remote will automatically go into a sleep
mode after 8 seconds of inactivity. Press the POWER button or the + / - key to deactivate sleep mode.
IMPORTANT
CONNECTING YOUR REMOTE TO THE PIANO LAMP
Step 1 : Remove the cover on the back of the remote and install the included 12V battery.
Step 2 :Press and hold the learn button on the remote (located next to the battery slot).
*If step 2 is not nished within 30 seconds, the learning process will not be successful, and must be restarted by removing the
batteries in the piano lamp.
cocoweb.com
The information in this document is subject to change without notice.
COPYRIGHT ©COCOWEB.COM, INC. 2017
COCOWEB.COM, INC.
13715 Alton Pkwy
Irvine, CA 92618
Phone: 1-888-783-0378
Once the piano lamp has learned the ID code the light will power off momentarily and then ash three times. This will
indicate the remote has been successfully paired.

Popular Accessories For Musical Instruments manuals by other brands

FuzzDog L'il Louie manual

FuzzDog

FuzzDog L'il Louie manual

KLIQ UBERTUNER-MAX Series user manual

KLIQ

KLIQ UBERTUNER-MAX Series user manual

Solo Music Gear Hollow Body Assembly manual

Solo Music Gear

Solo Music Gear Hollow Body Assembly manual

Roland V-Drums MDS-25 owner's manual

Roland

Roland V-Drums MDS-25 owner's manual

Free The Tone LB-2 owner's manual

Free The Tone

Free The Tone LB-2 owner's manual

EMG 45-TW Installation information

EMG

EMG 45-TW Installation information

Duncan Vintage for Jazzmaster SJM-1 Wiring diagram

Duncan

Duncan Vintage for Jazzmaster SJM-1 Wiring diagram

Rocktile 00047081 quick guide

Rocktile

Rocktile 00047081 quick guide

Fishman SONITONE installation guide

Fishman

Fishman SONITONE installation guide

Duncan JB Jr. SJBJ-1 Wiring diagram

Duncan

Duncan JB Jr. SJBJ-1 Wiring diagram

James May Engineering Ultra Tonic Pickup installation instructions

James May Engineering

James May Engineering Ultra Tonic Pickup installation instructions

kepma AcoustiFex 2 manual

kepma

kepma AcoustiFex 2 manual

Suzuki MRT- 01 manual

Suzuki

Suzuki MRT- 01 manual

EMG X Series Installation information

EMG

EMG X Series Installation information

K&K Sound Pure Archtop product manual

K&K Sound

K&K Sound Pure Archtop product manual

EMG X Series Installation information

EMG

EMG X Series Installation information

Konig & Meyer 12384 manual

Konig & Meyer

Konig & Meyer 12384 manual

EMG EXG Installation information

EMG

EMG EXG Installation information

manuals.online logo
manuals.online logoBrands
  • About & Mission
  • Contact us
  • Privacy Policy
  • Terms and Conditions

Copyright 2025 Manuals.Online. All Rights Reserved.