Coffee crafters Valenta 15 User manual

Valenta 15
15-lb. Commercial Fluid Bed Coffee Roaster Manual
708 S. Clearwater Loop Ste 105
Post Falls, ID 83854
www.coffeecrafters.com
Phone (509)228-6916
Copyright © 2024 Coffee Crafters LLC All Rights Reserved
Rev
3
Coffee
Crafters
-
|

2
Rev
1
Coffee Crafters
-
|
Contents
Introduction ................................................................................................................................................................ 4
About Us ......................................................................................................................................................... 4
Our Mission .................................................................................................................................................... 4
Our Vision ....................................................................................................................................................... 4
Valenta 15 Model Complete Roasting & Bean Cooling System Specifications ............................................... 5
Warranty And Guarantee............................................................................................................................................ 6
Valenta 15 Model Warranty ........................................................................................................................... 6
What Is Not Covered by The Warranty ........................................................................................................... 6
Assembly And Installation ................................................................................................................................................... 8
Assembly Introduction .................................................................................................................................... 8
Hardware Packages ........................................................................................................................................ 8
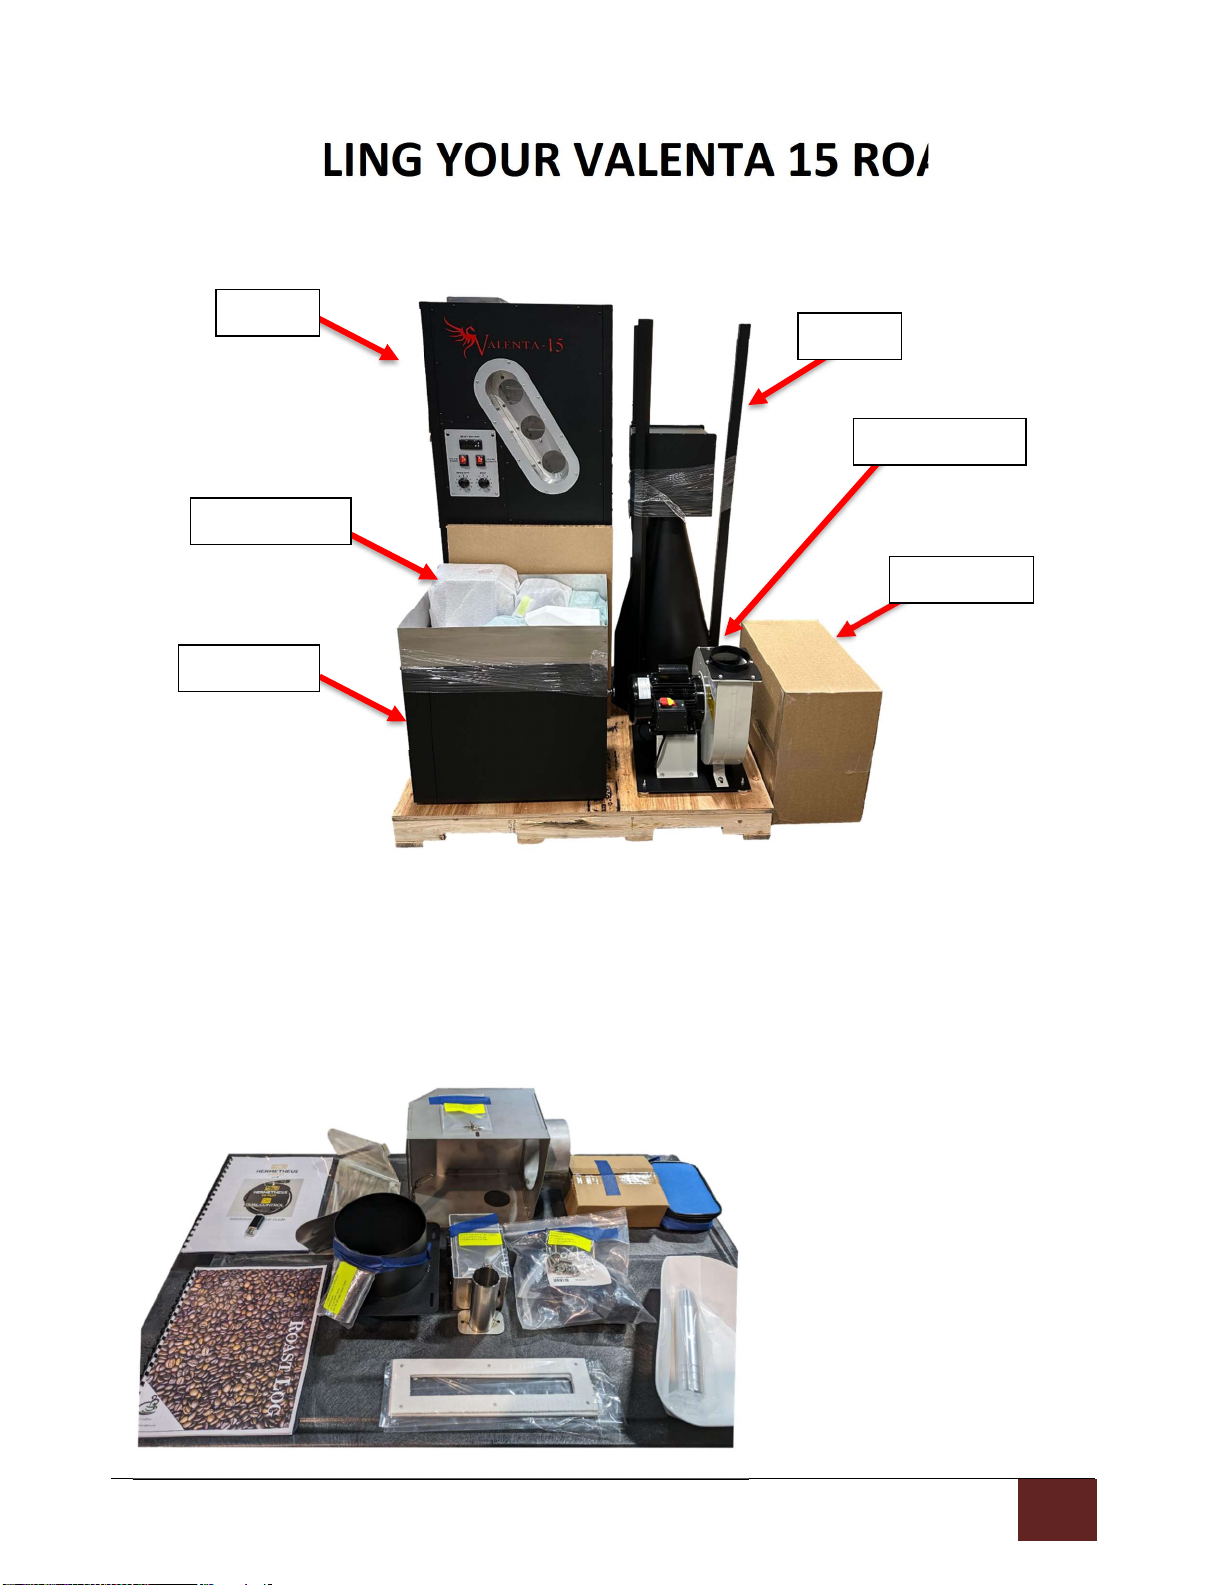
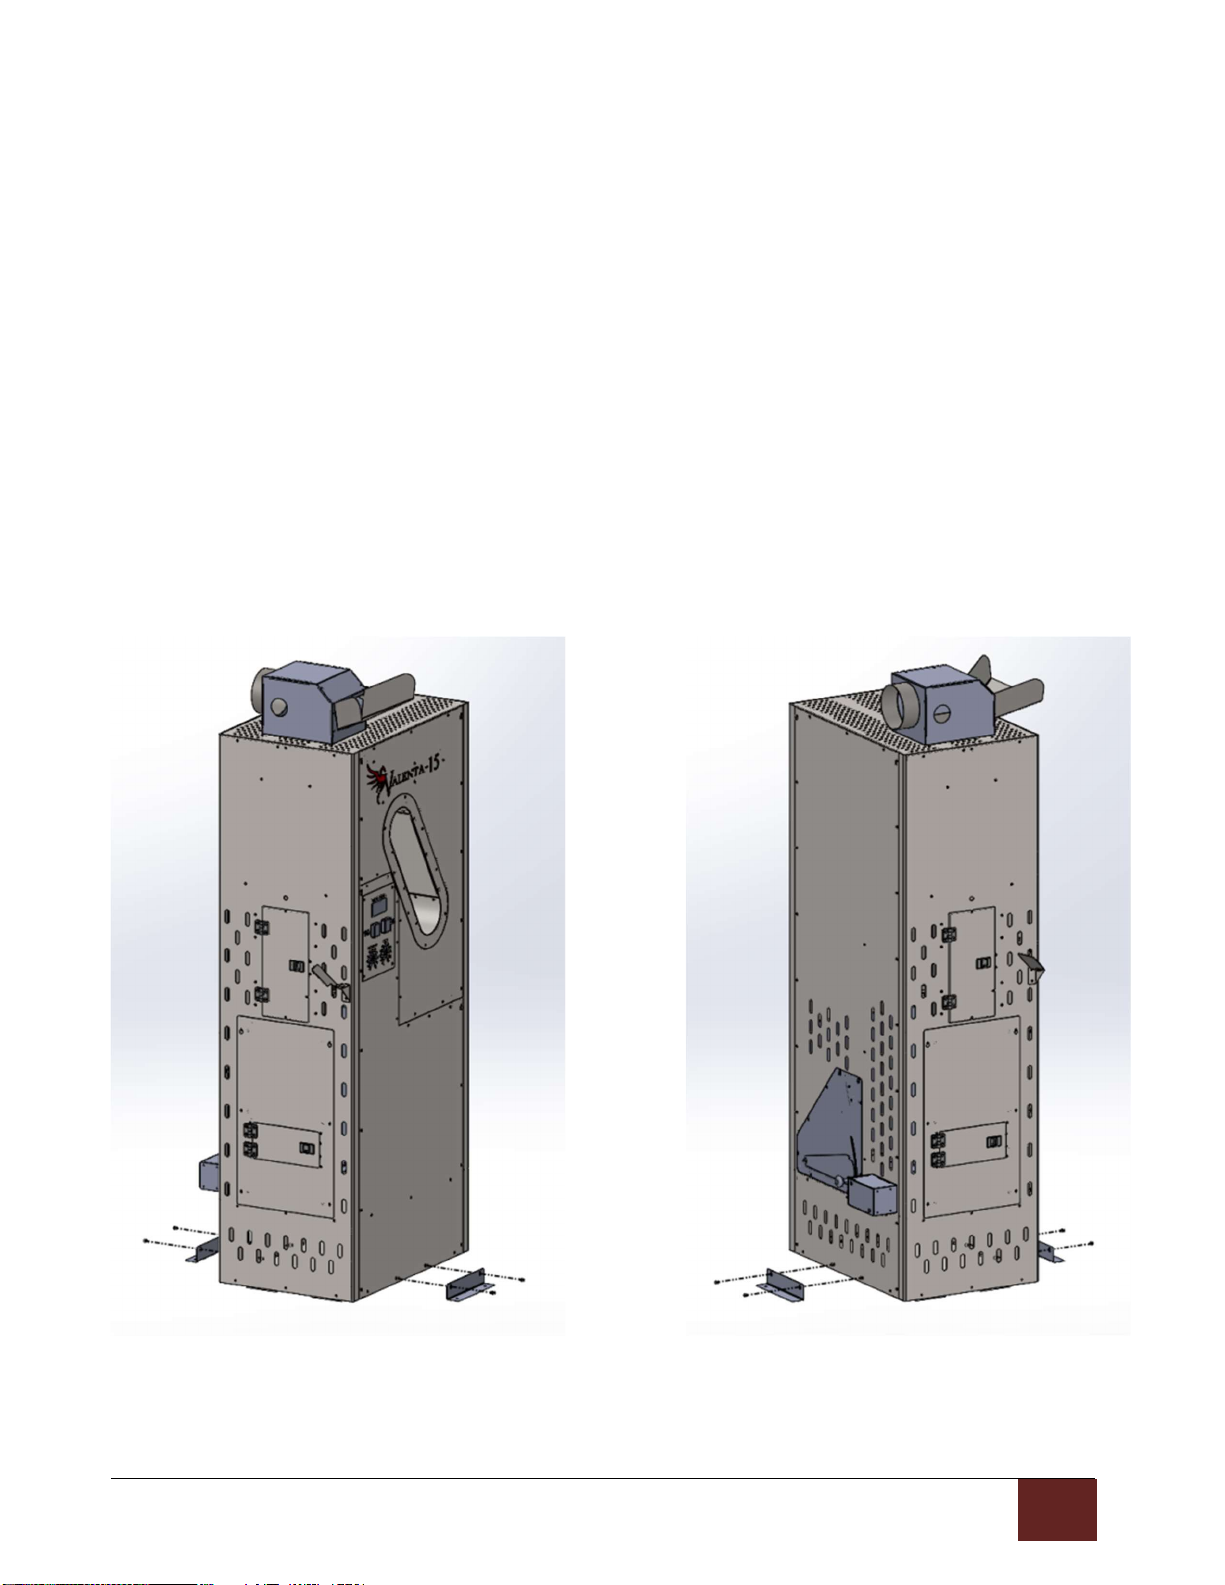
Taking Roaster Off the Pallet ........................................................................................................................ 10
Installing Hood .............................................................................................................................................. 11
Thermometer ............................................................................................................................................... 12
Mounting the Thermometer Bracket to Roaster ......................................................................................... 13
Attaching Probe ............................................................................................................................................ 14
Attaching Loading Chute .............................................................................................................................. 15
Installing Power Distribution Block and Tube .............................................................................................. 16
Assembling the Cyclone ................................................................................................................................ 17
Assembling the Bean Cooler ......................................................................................................................... 18
Installing Exhaust Blower .............................................................................................................................. 19
Installing Ducting .......................................................................................................................................... 20
Ventilation installation ................................................................................................................................. 22
Light Kit Installation ...................................................................................................................................... 23
Temperature Switch ..................................................................................................................................... 24
Helpful Tips ................................................................................................................................................... 25
Roasting ............................................................................................................................................................26
Roast Coffee In 7 Easy Steps ......................................................................................................................... 26
Check Chaff Bag ............................................................................................................................................ 26
Turn On Exhaust Blower ............................................................................................................................... 26
Turn On System Power Switch ...................................................................................................................... 27
Set Bean Loft ................................................................................................................................................. 28

3
Rev
1
Coffee Crafters
-
|
Load Beans in Top Green Bean Hopper ........................................................................................................ 29
Turn on Heating Element .............................................................................................................................. 30
Roasting Complete: Cool the Beans........................................................................................................ 31-32
Coffee Bean Education .....................................................................................................................................33
Proper Storage of Green Coffee Beans ......................................................................................................... 33
Green Coffee Been Abbreviations and Meanings ......................................................................................... 34
Maintenance And Troubleshooting ..................................................................................................................35
Maintenance ................................................................................................................................................. 35
Chaff Bags ..................................................................................................................................................... 35
Roast Hopper Cleaning ................................................................................................................................. 35
Bean Cooling Tray ......................................................................................................................................... 35
Exhaust Tubing ............................................................................................................................................. 36
Exterior Surfaces ........................................................................................................................................... 36
Troubleshooting ..................................................................................................................................... 37-44
Exhaust Blower Losing Suction .................................................................................................................. 37
Bean Loft Motor Won’t Run ...................................................................................................................... 38
Both Heat Elements Won’t Turn On .......................................................................................................... 39
Bean Loft Motor Runs at Full Speed Only .................................................................................................. 39
Both Elements Running but Roasts Take Too Long ................................................................................... 40
Air Coming Out of Dump Gate .................................................................................................................. 40
Troubleshooting Figure 1.1 ....................................................................................................................... 41
Troubleshooting Figure 1.3 ....................................................................................................................... 42
Troubleshooting Figure 1.4 – SSR Connections ......................................................................................... 43
Troubleshooting Figure 1.5 – Contactors .................................................................................................. 44
Wiring Diagram USA .................................................................................................................................. 45
Wiring Diagram EUR .................................................................................................................................. 46
Part List .............................................................................................................................................................47

4
Rev
1
Coffee
Crafters
-
|
Introduction
Introduction
In this manual, you will find everything needed to start roasting coffee. Included in this copy is a description
of your warranty/guarantee, detailed information on installation and assembly, roasting instructions,
additional information on green beans, and a troubleshooting guide.
About Us
While living in Thailand and unable to find fresh roasted coffee, Ken Lathrop, developer of Coffee Crafter’s
Valenta 15 coffee roaster, conceived of a concept to design and build a reliable, affordable machine
capable of roasting five pounds or more of coffee beans in less than ten minutes.
“My goal was to enable new roasters – to help them roast their own beans and have fun doing it”, says
Lathrop. “My focus was to design and build a roaster that could be easy for anyone to learn and use, a
roaster that could roast five pounds or more per roast batch and was easily installed and affordable for
anyone. From the response we have received from customers and at coffee shows, I think we succeeded.”
Coffee Crafters designed and began selling its Artisan V fluid bed coffee roaster in August 2013. “We built
the Artisan roaster specifically to serve small roasters or those new to the industry”, says Lathrop. “The
installation is similar to your home clothes dryer – very simple and straightforward. After installation we
find that our customers are up to speed and roasting typically within 30 minutes.”
Our Mission
To become the best and largest supplier of high-quality affordable coffee “micro-roasting” equipment in
the world.
“Micro-Roasting” defined:
1. Hands on craft roasted coffee
2. Roasting 100 lbs. or less per day
3. Supply “fresh” coffee to customers immediately after roasting at its peak of freshness
Our Vision
We will maintain an uncompromising commitment to our “micro-roasting” customers by:
Serving our customers the way we would like to be taken care of.
Providing our customers with equipment, supplies and information to satisfy all of their micro-
roasting needs.
Supplying high quality products engineered and manufactured in the USA.
Delivering affordable equipment factory direct.

5
Rev
1
Coffee
Crafters
-
|
Introduction
Valenta 15 Complete Roasting & Bean Cooling System Specifications
Roaster Production
Up to 90 lbs. per hour
Roast Time
9-10 minutes
Chaff Collection
Stand-alone chaff cyclone system
Bean Cooling
External 15 lbs. capacity
Roast Air Temperature
Variable
manual
control
Fahrenheit
or
Celsius
Bean Temperature Thermometer
Included
Roaster Power
Single-phase 100-amps, 240v
Exhaust Blo wer System Power
Single-phase 20-amp, 230V 60 Hz
Roaster Heat
15,600 watts
Batch Size
2 lbs to 15 lbs
Venting
Rigid ducting required, not included
Minimum Floor Space for full system
7’ wide by 7’ long
Dimensions & Weight
Roaster 68.2’’ tall x 19.1’’ long x 56.2’’ wide
Cyclone 62.4’’ tall x 20’’ wide
Exhaust Blower 1550 CFM
16.25” wide x 19” deep x 19.75” tall
Shipping Weight
465 lbs.
Shipping Dimensions
1 Pallet (40x48x68 inches)
Electricity
Usage
Full 15 lb. load 0.4 kWh per pound
Min 2 lbs load 1.0 kWh per pound
Certification
UL
CE
Coffee Crafters
708 S Clearwater Loop, Suite 105, Post Falls, ID 83854
(509)228-6916 – sale[email protected]
Valenta
15
Coffee Roaster
Energy Efficient Fluid Bed
Coffee Roasting System

6
Rev
1
Coffee
Crafters
-
|
Warranty
and
Guarantee
Warranty
and
Guarantee
Valenta 15 Model Warranty
Your Valenta 15 Roaster has been manufactured and tested to the highest quality standards by Coffee
Crafters. This Limited Warranty covers defects in material or workmanship on new Valenta roasters. The
Warranty extends to the original purchaser only and is non-transferable. Only consumers purchasing
roasters from Coffee Crafters may obtain coverage under our limited warranty.
Coffee Crafters warrants this product against defects in material or workmanship as follows:
• Under normal installation per Coffee Crafters instructions, use, service, and maintenance for a
period of one year from the original purchase date, Coffee Crafters will replace at no charge, any
product or part of the product that proves defective because of improper workmanship and/or
material.
The specific warranties expressed are the ONLY warranties provided by the manufacturer. These
warranties give you specific legal rights, and you may also have other rights which vary from state to state.
What is Not Covered by the Warranty
1.
Conditions and damages resulting from any of the following:
a. Improper installation, delivery, or maintenance.
b. Any repair, modification, alteration, or adjustment not authorized by the manufacturer.
c. Misuse, abuse, accidents, unreasonable use, or acts of God.
d. Incorrect electric current, voltage.
e. Improper setting of any control.
f. Use of risers (pedestals) that are not authorized by the manufacturer.
g. The Warranty is void if a product is returned with removed, damaged, or tampered labels or
equipment, or any alterations.
2. The Warranty is void if the original serial numbers have been removed, altered, or cannot be readily
determined.
3. Products purchased for use other than roasting coffee.
4. Any food loss due to product failures.
5. Expenses for travel and transportation for product service.
6. Consequential or incidental damages sustained by any person as a result of any breach of these
warranties. Some states do not allow the exclusion or limitation of consequential or incidental
damages, so the above exclusion may not apply.

7
Rev
1
Coffee
Crafters
-
|
Warranty
and
Guarantee
If You Need Service
1. See the Maintenance/Troubleshooting section of this manual.
2. Visit our YouTube channel to find Maintenance and Troubleshooting videos for tips on fixing/replacing
roaster parts
3. If you are still having issues with the roaster, give us a call or send us an email so we can figure out the
problem with you.
• Phone: 509-228-6916
• Email: [email protected]
30-
Day Complete Satisfaction & Money-Back Guarantee
We want you to be fully satisfied with every item that you purchase from Coffee Crafters. If you are not
satisfied with an item that you have purchased, you may return the item within 30 days of purchase
date for a full refund of the purchase price, minus the shipping, handling, or other additional charges.
Return Instructions
Please note: For the purposes of tracking and insurance, all returns must be shipped to Coffee Crafters.
1. Pack the item securely in the original package, if possible. Enclose the return portion of the original
packing slip with the item.
2. All products must be returned in excellent condition, in original boxes, and with all paperwork,
parts and accessories to ensure full credit.
3. All return shipping charges must be prepaid. We cannot accept C.O.D. deliveries.
4. Keep the Return Tracking Number from the package you are returning to ensure that the package is
returned to the warehouse.
5. You can expect a refund in the same form of payment originally used for purchase usually within
10-15 business days of our receiving your returned product. Returned funds may reflect charges
for incomplete components or damage materials. Delays may be experienced in the case of
incomplete returns. Please note that your shipping costs will not be refunded.
Receipt of Damaged or Defective Items
If you receive a damaged or defective item, contact Coffee Crafters Customer Service Department at
1-509-228-6916 immediately upon receiving the item. Please supply your order number, item number and
tracking number from your original confirmation e-mail. Coffee Crafters will also need your e-mail address
and phone number.
A defective item may be repaired or replaced within 30 days of purchase under Coffee Crafters Warranty.

8
Rev
1
Coffee
Crafters
-
|
Assembly
and
Installation
Assembly and Installation
Assembly Introduction
Your Valenta 15 roaster comes mostly assembled. The following instructions will help you complete
the assembly process correctly.
Before you start the assembly process you must select a suitable location for the Roaster and Blower
System. The customer must supply all rigid ducting for the venting except for the fittings provided by
Coffee Crafters (see page 20 for more details). Make sure to check with local codes for venting
requirements as noted in the ventilation installation section of this manual. When correctly installed, the
exhaust gas temperature will not exceed 170° Fahrenheit.
The Roaster must be positioned on a flat smooth surface, do not install on carpet. Make sure the Roaster
has at least a 6-inch gap between the back vent pipes and the wall.
Hardware Packages
Your Valenta 15 roaster comes with all the fittings and hardware needed to assemble the roaster. Not
included is the electrical cord or ducting. A complete list of included hardware and fittings and listed below.
Please Note: ALL HARDWARE is labelled by part and located in the bean cooler tray in bags.
Bean Cooler Exhaust:
4 – 8/32 Keps Nuts
20’’ piece of high heat tape
Bean Cooler Handle:
4 – ¼-20x3/4 SS Bolts
4 – ¼ Lock Washer
4 – ¼-20 Nuts
Distribution Box & Tube:
2 – 8/32 Screws for box
2 – 8/32 Screws for Tube
Cyclone Top:
12 – ¼-20 Flat Washers
12 – ¼-20 Bolts
Thermometer & Hood:
3 – 8/32 Screws for Thermometer
1 – 8/32 Screw for Hood
Duct Fittings:
6x6x6 Wye
6-inch, 90-degree rigid duct
6- to 5-inch reducer
5-inch crimp duct

9
Rev
1
Coffee
Crafters
-
|
Assembly
and
Installation
ASSEMBLING YOUR VALENTA 15 ROASTER
ACCESSORY KIT
Manual and Roast Log
Gooseneck Lamp in box
Thermometer Kit in blue case
Coffee Scoop
2 roast Chamber Gaskets (extras)
Roast Chamber Release Handle
Hood/Loading Chute
Bean Cooler Exhaust Fitting
Bean Cooler Handles x2
Power Distribution Box and Tube
Hermetheus Co-Pilot Manual and
USB
Roaster
Accessory Kit
Bean Cooler
Cyclone
Exhaust Blower
Cyclone Top

10
Rev
1
Coffee
Crafters
-
|
Assembly
and
Installation
Taking the Roaster Off of the Pallet
Step 1: Unscrew the Shipping Brackets on the front and back of the roaster. You can throw out the Shipping Brackets
and the zinc screws, they are no longer needed.
Step 2: Take the roaster off of the pallet and place it in your roasting area.
Step 3: Screw the four provided black screws back into the holes the zinc screws holding the shipping brackets came
out of on the front and back of the roaster as pictured below.
FRONT
B
ACK

11
Rev
1
Coffee
Crafters
-
|
Assembly
and
Installation
VALENTA 15 HOOD INSTALLATION
Slide the hood over the top of the roaster as pictured above. Secure the hood with the
provided 8/32 screw and tighten down.
1
1

12
Rev
1
Coffee
Crafters
-
|
Assembly
and
Installation
Thermometer
Your thermometer will be placed on the Thermometer
bracket located on the left side of the roaster (see
next page for instructions).
The Digi-Sense Thermometer is very easy to operate
(pictured). The large display makes the bean temperature
reading easy to see. There are only a few basic operating
functions.
1. The meter has an auto off function and will power
down after 30 minutes with no key operation. To
disable the auto power off mode, press and hold
the “H” and “Power” keys at the same time. The
clock dial in the upper left corner of the screen will
disappear and the auto off will be disabled.
2. When the battery voltage is under the proper
operation requirements the low battery symbol will show on the LCD screen and the battery will
need to be replaced.
The thermometer comes to you with the battery and thermocouple probe installed and tested. Velcro has
been applied to the back of the thermometer. To install it on the thermometer bracket, remove the plastic
from the Velcro and install it on the bracket as shown in the pictures on the next page. The bottom of the
thermometer should be even with the bottom of the thermometer bracket.

13
Rev
1
Coffee
Crafters
-
|
Assembly
and
Installation
Mounting the Thermometer Bracket to Roaster
2
Step 1: Attach bracket base to the two the
protruding studs on the left side of the roaster.
Tighten with two 8/32 screws. Use the other 8/32
screw to attach bracket to the base.
Step 2: Peel the sticker off the back of
the thermometer Velcro strips.
Step 3: Secure thermometer to
thermometer bracket and press
firmly.
1
3

14
Rev
1
Coffee
Crafters
-
|
Assembly
and
Installation
Attaching the Thermocouple Probe
Step 1: Bring wire behind thermometer and plug
into bottom of thermometer being careful to
insert it into the correct slots. You will not get
any readings from the probe if the wire is
installed backwards.

15
Rev
1
Coffee
Crafters
-
|
Assembly
and
Installation
Attaching the Loading Chute
Place the Loading Chute into the opening of the Hood as pictured below. The Loading Chute will latch onto the Hood
and should stay securely. There is no need to attach the chute with hardware or tape.

16
Rev
1
Coffee
Crafters
-
|
Assembly
and
Installation
INSTALLING THE POWER DISTRIBUTION BLOCK AND TUBE
1. Remove the panel that covers the electrical assembly on the left side of the roaster as shown below.
2. Take off the front plate on the power distribution box in order to access the inside of the box. Use
two of the 8/32 screws provided to secure the box to the back of the roaster as shown below. You
can leave the front plate off for now as it will need to be off for your electrician to run the wires.
3. Use the two remaining 8/32 screws to secure the tube to the roaster from the inside, below the
electrical assembly as shown below. Please note, the tube should secure to the hole on the box, the
screws will not fit otherwise.
Note: We recommend having an electrician wire the roaster for you based on your building’s
electrical setup.
Power
Distribution Box
Tube

17
Rev
1
Coffee
Crafters
-
|
Assembly
and
Installation
ASSEMBLING THE CYCLONE
1. The Cyclone arrives upside down on the same
pallet as the roaster. Take the Cyclone off the
pallet and turn it right side up.
2. Remove the Cyclone Top from the box
and grab
the cyclone hardware kit located in the
accessory kit.
3. Use the hardware to secure the Cyclone Top to
the Cyclone as shown in the picture to the right.

18
Rev
1
Coffee
Crafters
-
|
Assembly
and
Installation
ASSEMBLING THE BEAN COOLER
1. Remove the Bean Cooler from the pallet and
place it on the right side of the roaster. Grab
the Bean Cooler Tray Handles and hardware
kit.
2. To install the handles, place the bolts
through the holes on the Bean Cooler Tray
from the inside, as shown in the picture to
the right. On the outside of the tray, push t
he
handle into the bolt and secure it with the
lock washer and nut.
3. Do this three more times, two for each
handle and four total.
4. Take the tray off and turn the bean cooler
upside down.
5. Take the Bean Cooler Exhaust Fitting and
push it through the hole on the back of the
Bean Cooler with the longer side going in
first.
6. The fitting should fit around the 90-degree
duct inside the bean cooler. Once in place,
secure it with the provided 8/32 keps nuts.
7. Once the fitting is secure, use the provided
high temp tape to cover the seem between
the fitting and the duct.

19
Rev
1
Coffee
Crafters
-
|
Assembly
and
Installation
INSTALLING EXHAUST BLOWER
1. You will need to purchase the proper 20-amp electrical plug that matches the outlet you are
plugging the blower into and attach it to your blower wire.
2. Place the 6 X 6 X 6 Wye on the intake side of the blower. Position it as shown in the picture
below. Secure the wye with the self-taping screw provided you (attached to the wye in a plastic
bag).
3. The exhaust blower comes with a 5-inch flange on the top discharge outlet. We recommend using
5-inch rigid ducting on the discharge side. Be sure to tape the duct seams on the room interior side
of the duct system as discharge smoke is under pressure.
4. VERY IMPORTANT! All of the duct joints and seams on the discharge and intake sides of the
blower must be sealed with high temperature tape. The discharge exhaust ducts are under
pressure and will leak smoke into the roasting area if not sealed.

20
Rev
1
Coffee
Crafters
-
|
Assembly
and
Installation
INSTALLING DUCTING
NOTE: Some installations may require longer runs to access a through wall fitting to the outside
atmosphere. Use the diagram below to see how the ducting setup should look and then adjust the
run from the blower to the outside as needed. The parts in RED are duct fittings that are provided by
Coffee Crafters. All other ducting parts must be provided by the customer. USE ONLY RIGID DUCTING
Recommended Ducting Setup
6
-
inch,
90
-
degree
6
-
inch
5
-
inch
discharge
to outside
6
x6x6 Wye
5
-
inch cr
imp
6
-
to 5
-
inch
reducer
5
-
inch
Table of contents
Popular Commercial Food Equipment manuals by other brands

Star
Star RTW14M Installation and operation instructions

Hussmann
Hussmann Q1-FC Installation & operation guide

Groen
Groen BPM-15G Operator's manual

FWE
FWE COMBI-COMPANION LCH-CC Series operating instructions

Vollrath
Vollrath Stoelting SF144 I2 Operator's manual

Cres Cor
Cres Cor H-339-X-C Series Operating and maintenance instructions

Rational
Rational SelfCookingCenter SCC Training manual

Bonnet
Bonnet MUS.CM2 Manufacturer's Instructions

Fusion
Fusion GMS4H user manual

Silver King
Silver King SKRCB79H-EDUS1 Technical manual and replacement parts list

ROCAM
ROCAM HIRA 500 M2 INSTRUCTION MANUAL ASSEMBLY, INSTALLATION, USE AND MAINTENANCE

Diamond
Diamond TG3N/LG manual