manuals.online logo
Brands
  1. Home
  2. •
  3. Brands
  4. •
  5. ColorDMD
  6. •
  7. Monitor
  8. •
  9. ColorDMD CHROMA eDP WPC User manual

ColorDMD CHROMA eDP WPC User manual

8-Pin DMD Power Cable
(Remove entire cable
from the game)
14-Pin DMD Ribbon Cable
(Unplug cable from DMD
and leave other end
connected to game)
Figure A
Cable connected to lamp
board mounted to speaker
panel. Lamp boards are not
present on most games.
Ground Lug
Carefully remove the translite from the backbox and then lower
the speaker panel to the position shown in Fig. A to gain access
to the backbox.
Installation Instructions
for
WPC
-
CHROMA eDP
Be sure to turn
OFF the power to the pinball machine before
installing the ColorDMD display.
Tools Required
:
Remove and save all of the DMD mounting hardware. Remove
the original DMD from the game and store it in a safe place.
1
2
3
STEP
STEP
STEP
!
Disconnect the DMD power and ribbon cables from the DMD.
Unplug the DMD power cable from the high-voltage A/V board
J-604 (see Fig. E), and
remove this cable from the backbox
.
Congratulations on the purchase of a new ColorDMD display. The ColorDMD
will enhance your pinball machine by introducing
color
to the dot matrix
display graphics produced by the game.
If pinball machine has a lamp board mounted to the speaker panel
(see Fig. A), it can remain in place. Use alternate ColorDMD
mounting holes shown in Fig. C. Ensure lamp board PCB does not
contact ColorDMD metal bracket.
Phillips Screwdriver
5/16" nut driver
1/4" nut driver (if game has a lamp board
mounted to the speaker panel)
STEP
4
•
•
•
ALL RIGHTS RESERVED - US PATENT 8,773,452 B2 - COPYRIGHT 2016 - COLORDMD DISPLAYS LLC
Figure B
Ground Lug
PWR
DMD_IN
USB Port
Figure C
WPC
Mounting
Holes
WPC
Mounting
Holes
WPC Games
With Lamp Board
Mounting Holes
WPC Games
With Lamp Board
Mounting Holes
1/4" Spacer (included
with ColorDMD)
5/8" black Spacer
Washer
Lock Nut
ColorDMD Bracket
WARNING - ELECTRIC SHOCK
To protect against electrical shock,
ground wire from the backbox must
be connected to this metal bracket.
Install one 1/4" Spacer on each of the four threaded studs and
then position the ColorDMD face down (in the orientation shown
in Fig. B) on the speaker panel and align the four WPC
mounting holes (see Fig. C).
Remove the protective film from the front side of the new
ColorDMD display.
Use the original DMD mounting hardware from Step 3 to fasten the
ColorDMD display to the speaker panel. See Fig. B for correct stacking
order of the hardware. Ensure the ground cable lug from Step 7 is
sandwiched between metal bracket and one of the 5/8" black spacers.
5
6
7
STEP
STEP
STEP
!
WARNING
.
Electric Shock Hazard
- To protect against
accidental electric shock,
DO NOT
operate the game without
ensuring that the ColorDMD metal bracket is electrically grounded.
Locate the included green ColorDMD ground cable and connect one
end to the Ground Lug in the backbox (see Fig. B). Loop the other
end over the threaded stud nearest the Ground Lug (see Fig. E).
8
STEP
ALL RIGHTS RESERVED - US PATENT 8,773,452 B2 - COPYRIGHT 2016 - COLORDMD DISPLAYS LLC
Plug Into
Power Driver
Board
J-116
Optional
:
Only use the male-to-male
adapter to re-connect a
pre-existing cable back
into J-116
Plug Into
ColorDMD
PWR
J-603
Figure E
J-116
J-604
Route the new ColorDMD
Power Cable along with
the existing game cables
for a clean install.
DMD Controller
Board
ColorDMD Ground Cable
securely installed.
Grounding lug sandwiched between
metal bracket and 5/8" black spacer.
Power Driver
Board
Locate the included 4-pin ColorDMD power cable. One end of the
cable has a single connector (see Fig. D). Plug this connector
into the PWR header (see Fig. C) on the ColorDMD.
Plug the other end of the new ColorDMD Power Cable (see Fig. D)
into J-116 on the WPC Power Driver Board (see Fig. E). If an
existing cable is currently plugged into J-116, disconnect it before
connecting the ColorDMD power cable
.
If you disconnected a cable from J-116 in the previous step, use
the included male-to-male adapter to re-connect this cable to
the available center connector on the ColorDMD power cable
(see Fig. D). Otherwise, do not connect the male-to-male
adapter and store it in a safe place.
9
10
Figure D
11
STEP
STEP
STEP
TIP
ALL RIGHTS RESERVED - US PATENT 8,773,452 B2 - COPYRIGHT 2016 - COLORDMD DISPLAYS LLC
Enter ColorDMD Menu
/
Advance to Next Menu Item
Toggle Selection Up /
Confirm Menu Exit
Toggle Selection Down
Return to Previous Menu Item /
Initiate USB Download
(Press for 5 Seconds)
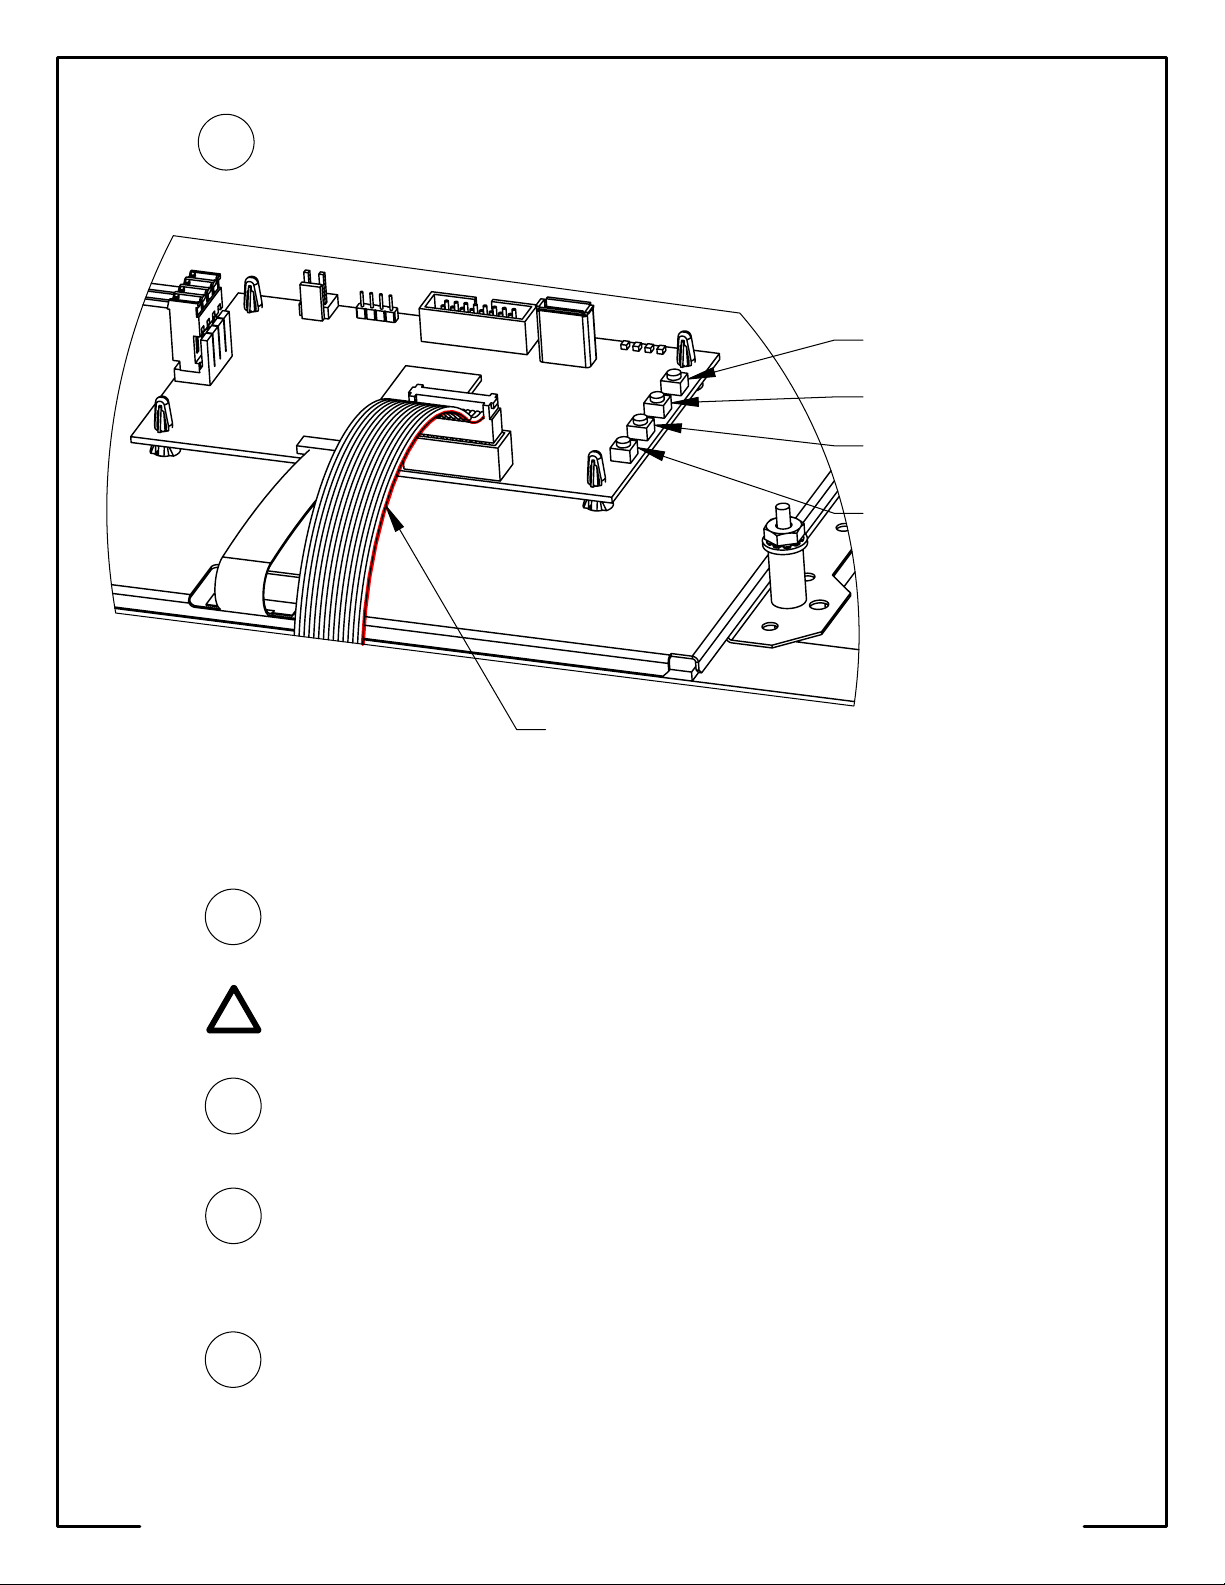
Red Stripe on the
14-Pin Ribbon Cable
Plug the 14-Pin ribbon cable into DMD_IN on the ColorDMD with the
red stripe nearest the push-buttons
(see Fig. F). The other end
of this cable should still be plugged into J-603 on the DMD
Controller Board with red stripe on the left-hand side (see Fig. E).
12
Figure F
STEP
If pinball machine had a lamp board mounted to the speaker
panel, the lamp board PCB must not make contact with the
ColorDMD metal mounting bracket.
STEP
13
Locate and press the right-most
ColorDMD Menu
button (See Fig. F)
to customize the display settings. Continue pressing the button to
advance to the "MOUNTING" menu. Next use the
Toggle Selection Up
button to change the setting to "WPC".
15
STEP
Double check for proper alignment of
all
cable connections.
For additional information regarding display settings please visit
our website at
www.colordmd.com
.
STEP
STEP
Press the right-most button to advance to the "EXIT AND SAVE"
menu. Press the
Confirm Menu Exit
button to save settings and
return to game mode. Video should appear on the new ColorDMD
Display. Visit ColorDMD website to download game specific color
ROM file and install using USB thumb drive. Have fun!
16
14
While ensuring no wires get pinched, raise the speaker panel
and turn on the pinball machine.
ALL RIGHTS RESERVED - US PATENT 8,773,452 B2 - COPYRIGHT 2016 - COLORDMD DISPLAYS LLC
!

Other ColorDMD Monitor manuals

ColorDMD WPC User manual

ColorDMD

ColorDMD WPC User manual

ColorDMD WPC95 - CHROMA User manual

ColorDMD

ColorDMD WPC95 - CHROMA User manual

ColorDMD White Star User manual

ColorDMD

ColorDMD White Star User manual

ColorDMD STERN SAM User manual

ColorDMD

ColorDMD STERN SAM User manual

ColorDMD Gottlieb CHROMA LCD User manual

ColorDMD

ColorDMD Gottlieb CHROMA LCD User manual

ColorDMD CHROMA eDP S.A.M. User manual

ColorDMD

ColorDMD CHROMA eDP S.A.M. User manual

ColorDMD CHROMA eDP SPIKE User manual

ColorDMD

ColorDMD CHROMA eDP SPIKE User manual

ColorDMD CHROMA eDP WPC95 User manual

ColorDMD

ColorDMD CHROMA eDP WPC95 User manual

Popular Monitor manuals by other brands

Farenheit T-1503CM instruction manual

Farenheit

Farenheit T-1503CM instruction manual

Acer CB382CUR user guide

Acer

Acer CB382CUR user guide

SONIQ PT50HD Operation manual

SONIQ

SONIQ PT50HD Operation manual

beneq Lumineq EL320.240-FA3 Operation manual

beneq

beneq Lumineq EL320.240-FA3 Operation manual

Iiyama ProLite TF1634MC user manual

Iiyama

Iiyama ProLite TF1634MC user manual

Lenovo D19270QP1 user guide

Lenovo

Lenovo D19270QP1 user guide

Invacare MK6i Series Service manual

Invacare

Invacare MK6i Series Service manual

Fermax VEO DUOX quick start guide

Fermax

Fermax VEO DUOX quick start guide

Acer V206HQL Guide

Acer

Acer V206HQL Guide

Lenovo ThinkCentre TIO24Gen4Touch user guide

Lenovo

Lenovo ThinkCentre TIO24Gen4Touch user guide

HP 27SV user guide

HP

HP 27SV user guide

Philips 24E1N5300HE user manual

Philips

Philips 24E1N5300HE user manual

Philips 150S6FB/00 Service manual

Philips

Philips 150S6FB/00 Service manual

Philips 220AW8FS/05 user manual

Philips

Philips 220AW8FS/05 user manual

Kenwood LZ-702W Service manual

Kenwood

Kenwood LZ-702W Service manual

Philips B Series user manual

Philips

Philips B Series user manual

Samsung SyncMaster 550b Owner's instructions

Samsung

Samsung SyncMaster 550b Owner's instructions

Jedia JMU-307B operating instructions

Jedia

Jedia JMU-307B operating instructions

manuals.online logo
manuals.online logoBrands
  • About & Mission
  • Contact us
  • Privacy Policy
  • Terms and Conditions

Copyright 2025 Manuals.Online. All Rights Reserved.