Colugo Infant Carrier User manual

Colugo Infant Carrier
English & French Instructions
May 2020
You got this.

3. Warnings
4. Product Overview
5. Pick Your Carry Position
6. Custom Fit Your Carrier
7. Fit Yourself First
Putting Your Child Into the Carrier
8. Front Carry - Facing In
9. Front Carry - Facing Out
10. Back Carry - Facing In
11. Removing Your Child from the Carrier
12. Storage
15. Avertissements
16. Présentation du Produit
17. Choisissez Votre Position de Portage
18. Portage sur Mesure
19. Commencez par L’ajuster à Vous-Même
Mettre Votre Enfant Dans Le Porte-Bébé
20. Portage Frontal - Face au porteur
21. Portage Frontal - Face au monde
22. Portage Dorsal - Face au porteur
23. Retirer Votre Enfant du Porte-Bébé
24. Rangement
2

- Infants can fall
through a wide leg opening or
out of carrier.
• Adjust leg openings to fit baby’s
leg snugly.
• Before each use, make sure all
fasteners are secure.
• Take special care when leaning
or walking. Never run.
• Never bend at waist; bend at
knees.
• Never use a soft carrier when
balance or mobility is impaired
because of exercise, drowsiness,
or medical conditions.
• Never use a soft carrier while
engaging in activities such as
cooking and cleaning which
involve a heat source or exposure
to chemicals.
• Never wear a soft carrier while
driving or being a passenger in a
motor vehicle.
• Only use this carrier for babies
between 7 lbs and 33 lbs.
-
Premature infants, infants with
respiratory problems, and infants
under 4 months are at greatest
risk of suffocation and can
suffocate in this product if face is
pressed tightly against body.
• Do not strap infant too tight
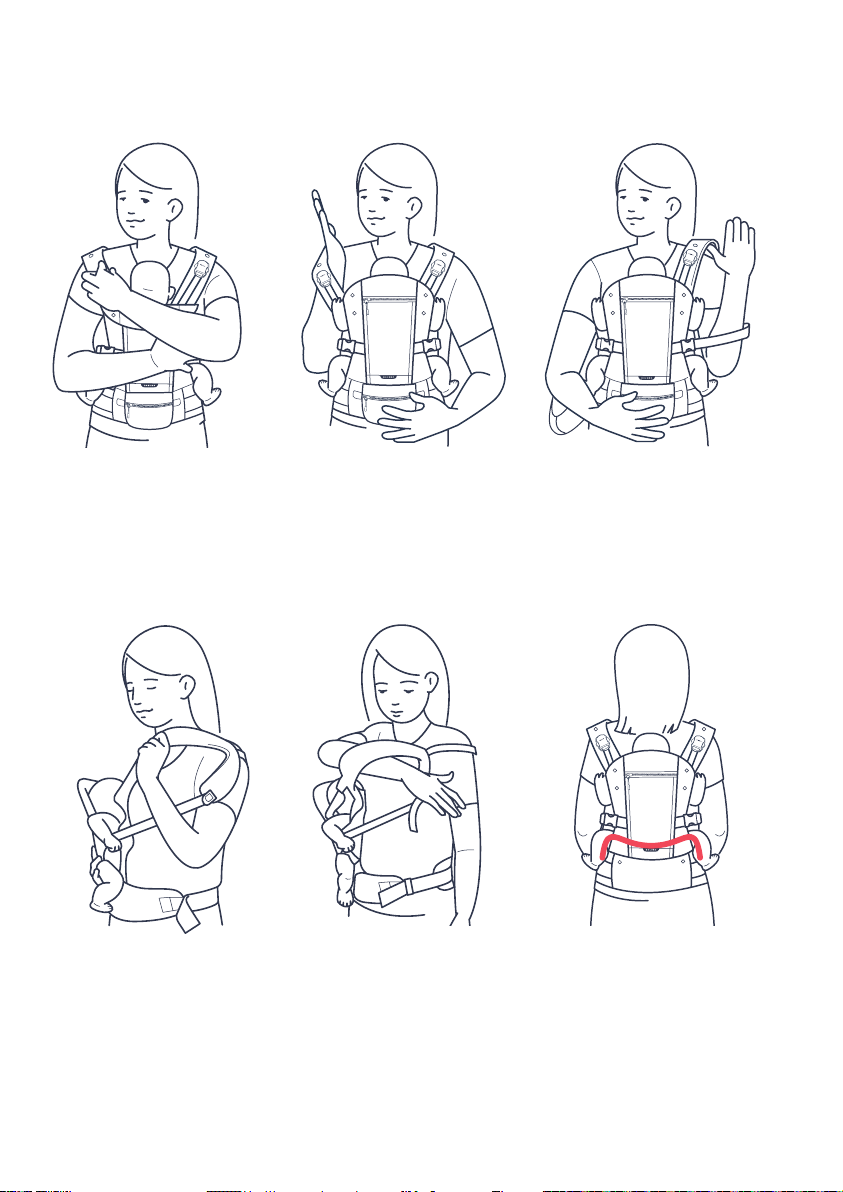
against your body.
• Allow room for head movement.
• Keep infant’s face from
obstructions at all times.
• Check to assure all buckles, snaps,
straps, and adjustments are secure
before each use.
• Check for ripped seams, torn
straps or fabric and damaged
fasteners before each use.
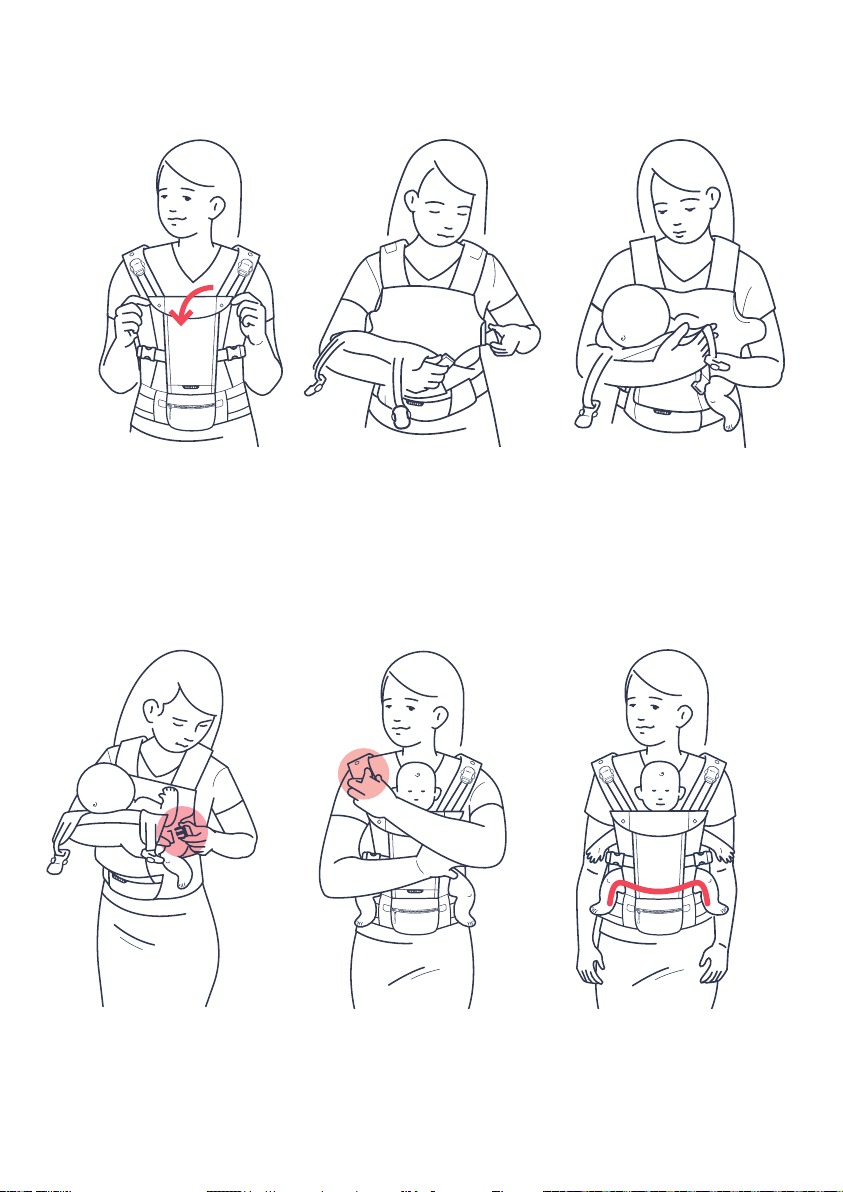
• Ensure proper placement of child
in product including leg placement.
• Child must face towards you until
he or she can hold head upright.
•Made to be washed. Machine wash
cold. Please air dry.
• Improper care will void any and all
warranties.
.
Read all instructions before assembling and using the soft carrier.

5
1
2
3
5
1
2
3
5
4

1
2
3
5
1
2
3
5
1
2
3
5
1
2
3
5
1
2
3
5
1
2
3
5
You have 3 carry positions to choose from, based on your baby’s age and your
plans for the day. Once you’ve picked your position, adjust the velcro tabs as
shown below.
FRONT CARRY
FRONT CARRY
FRONT CARRY
BACK CARRY
5

switch between numbers.
1
2
3
5
1
2
3
5
the chart below.
5’+
5’3”+
5’7”+
5’10+
6’+
6

1. Pull the carrier over your
head (like a t-shirt!).
You may need to loosen the
shoulder straps.
2. Fasten the waist belt.
4. Tighten the shoulder straps.
Pull the straps until you feel
comfortable. You may need to
tighten the straps again once the
baby is in position.
3. Tighten the waist belt. The
bottom of the waist belt should fall
right above your hip bone and the
lumbar support should be in the
middle of your back.
5
which will make it easy to put the carrier on all by yourself.
7

3. Place your child in the
carrier facing you with their
legs on either side of the front
and arms through armholes.
2.
on one side.
1.
buckles on both sides by
squeezing the buttons and
lifting up.
5. Fasten the magnetic
buckles. You will hear a ‘click’
when they are locked.
4. Fasten the side buckle.
You will hear a ‘click’
when it is locked.
Baby should be at a
kissable height with legs
in a hip healthy position.
8

3. Place your child in the
carrier facing away from
you with their legs on
either side of the front and
arms through armholes.
2. magnetic
buckles on both sides by
squeezing the side buttons
on the buckle top at the
same time and lifting up.
one side.
1. Fold down and fasten
the head support.
5. Fasten the magnetic
buckles. You will hear a ‘click’
when they are locked.
4. Fasten the side buckle.
You will hear a ‘click’
when it is locked.
Baby should be at a
kissable height with legs
in a hip healthy position.
9

Re-adjust all straps so you and
your baby are comfortable. Move
your baby back to inward facing
front position before taking them
out of the carrier.
3.
lower part of the side strap. You
have now made a closed loop
around your body.
2.
upwards under the shoulder
strap. You may need to
loosen the shoulder straps.
in the inward facing
5.
back in place. Make sure
they are aligned.
4.
underneath and carefully
move them around to
your back under your
lifted right arm.
The removable pouch can be attached to the lumbar
support, which is now on the front of your body.
10

3. Remove your child.
2.
on one or both sides.
1.
buckles by squeezing the
buttons and lifting up.
11

1
2
3
5
1
2
3
5
Make sure your carrier’s sunshade is
extended.
Tuck in waist belt and roll, tucking in
shoulder straps as you go.
Wrap sunshade around your rolled
carrier and and fasten to the snaps on the
head support.
The Front Pocket opens
on the left or right to hold
items like diapers, wipes or
an extra onesie.
The Removable Pouch can hold
items like your keys, phone, a
pacifier or snack. It’s removable
for easy access (and includes a
strap to make it a wristlet).
5
1
2
3
5
1
2
3
5
12

13

14

peuvent tomber hors du porte-
bébé ou par une ouverture de
jambe trop large.
•Ajustez les trous de jambe pour
aller confortablement aux jambes
du bébé.
• Assurez-vous que toutes
les attaches et boucles sont
sécurisées.
• Ne vous penchez jamais au
niveau de la taille ; pliez les
genoux.
• Faites particulièrement attention
lorsque vous vous adossez ou
marchez. Ne courrez jamais.
• N’utilisez jamais le porte-bébé
quand votre équilibre ou mobilité
est réduite à cause d’exercice,
de somnolence ou de conditions
médicales.
• N’utilisez jamais le porte-bébé
pendant que vous participez
aux activités qui impliquent une
source de chaleur ou l’exposition
aux produits chimiques telles que
la cuisson ou le nettoyage.
• Ne portez jamais le porte-
bébé en tant que conducteur
ou passager dans un véhicule à
moteur.
• N’utilisez ce porte-bébé qu’avec
les bébés de 3.2kg à 15kg.
enfants de moins de 4 mois
peuvent s’étouffer si le visage est
trop serré contre votre corps.
• Ne serrez pas trop l’enfant contre
votre corps.
•
mouvements de sa tête.
• Gardez toujours le visage du bébé
libre de toute obstruction.
• Avant chaque utilisation, assurez-
vous que toutes les attaches et
boucles sont sécurisées.
• Vérifiez le produit pour des
coutures ou attaches déchirées, et
pour du tissu lacéré.
•
l’enfant dans le produit, y compris
l’emplacement des jambes.
•
jusqu’à ce qu’il puisse maintenir
sa tête droite.
• Fait pour être lavé
froide. Veuillez sécher à l’air.
garantie nulle et non-valable.
.

5
1
2
3
5
1
2
3
5
16

1
2
3
5
1
2
3
5
1
2
3
5
1
2
3
5
1
2
3
5
1
2
3
5
Vous avez le choix entre 3 positions de portage, en fonction de l’âge de votre
les onglets en velcro comme indiqué ci-dessous.
PORTAGE
PORTAGE
PORTAGE
PORTAGE
17

1
2
3
5
1
2
3
5
Notre bretelle dorsale est réglable en fonction de votre morphologie. Choisissez un
numéro en fonction de votre taille sur le tableau ci-dessous.
152 CM+
160 CM+
170 CM+
178 CM+
183 CM+
18

1. Passez le porte-bébé
par-dessus votre tête
(comme un t-shirt!). Vous
aurez peut-être besoin de
desserrer les bretelles.
2. Attachez la ceinture
ventrale.
Tirez les bretelles jusqu’à ce que
vous vous sentiez confortable.
Vous aurez peut-être besoin de
resserrer les bretelles à nouveau
lorsque le bébé sera en position.
3. Resserrez la ceinture
ventrale devrait arriver juste
au-dessus de l’os de la hanche
et le support lombaire devrait
être au milieu de votre dos.
5
Gardez la bretelle dorsale attachée. Consultez la page 17 pour
savoir ajuster la bretelle dorsale. Il sera ainsi plus facile d’utiliser le porte-
bébé tout seul. 19

3. Placez votre enfant dans le
porte-bébé face à vous avec
ses jambes à chaque côté du
devant et ses bras à travers
les trous pour les bras.
2. Défaites la boucle
latérale d’un côté.
1. Détachez les boucles
magnétiques des deux
côtés en appuyant sur les
boutons et en levant.
5. Attachez les boucles
magnétiques. Vous entendrez
un « clic » lorsqu’elles
seront bouclées.
4. Attachez la boucle
latérale. Vous entendrez
un « clic » lorsqu’elle
sera bouclée.
Vous devriez être capable
de faire un bisou sur la
tête de votre bébé et ses
jambes devraient être
en position ergonomique
pour ses hanches.
20
Other manuals for Infant Carrier
2
Table of contents
Languages:
Other Colugo Baby Carrier manuals