Colzer YC-100A User manual

INSTRUCTION MANUAL
BUILT-IN WINE COOLER
MODEL:YC-100A
Read this manual and follow all safety rules and operating instructions before first use of this
wine cooler.
- Colzer (service@colzer.com)

Need Help?
Before you request customer support, here are a few things you can do to help us
serve you better.
Read this Instruction Manual:
It is highly recommended that you read this manual before plugging in your new wine cooler
as it contains important safety information, installation instruction, operation instruction,
troubleshooting and maintenance tips to help you use and maintain your wine cooler properly,
so as to ensure the reliability and longevity of your wine cooler.
If you receive a damaged wine cooler:
number and photos of the damage.
Save time and money:
Check the troubleshooting section at the end of this manual before writing to us. This section
will help you solve common problems that may occur.
Thanks for being a valued Colzer Customer.
Colzer Hope this wine cooler you purchased could make your life better as we expected.
We are confident of our quality products and we believe in dependable service. You're covered
with Colzer 1-year free warranty against any manufacturing defect. You are always welcome to
reach us for warranty service or technical support, especially
1) when you received a damaged, defective wine cooler;
2) when you have any concerns, questions, or problems while using this wine cooler.
We will always appreciate your emails, and just as we are glad that you let us know something
had gone wrong, we also rely on your feedback to improve.
To access customer service for technical support or warranty service, please email to
service@colzer.com

TABLE OF CONTENTS
IMPORTANT SAFETY INSTRUCTIONS
PRODUCT DIAGRAM
INSTALLATION INSTRUCTIONS
Before Using Your Wine Cooler
To Install Stainless Steel Handle
To Install Your Wine Cooler
OPERATION INSTRUCTIONS
Controls
Recommended Temperature Settings
Storage
Door Lock
Beech Shelves
To Remove a Sliding Shelf
CARE & MAINTENANCE
Cleaning Your Wine Cooler
Power Failure
Vacation Time
Moving Your Wine Cooler
Energy Saving Tips
Charcoal Filtration System
TROUBLESHOOTING GUIDE

IMPORTANT SAFETY INSTRUCTIONS
Your safety and the safety of others are very important.
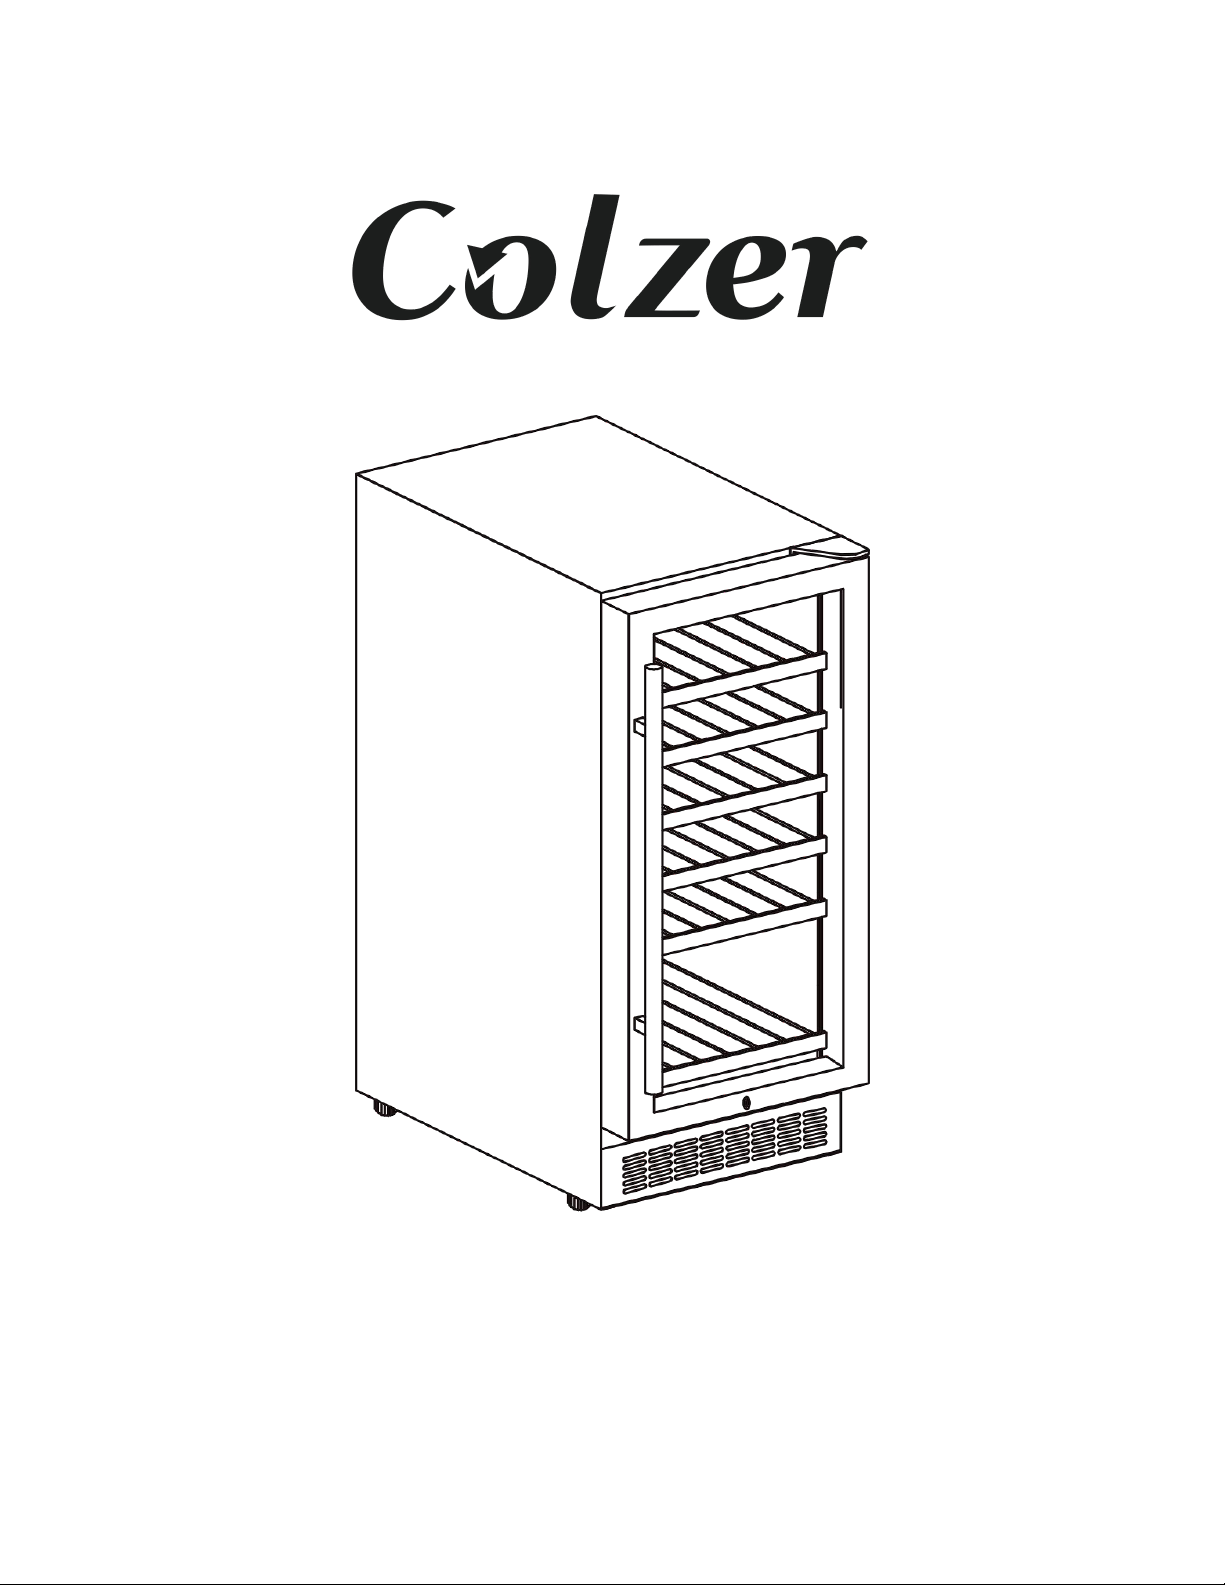
This wine cooler complies with the applicable safety requirements and is safe for daily use.
However, basic safety precautions should always be followed when using an electrical appliance,
to reduce the risk of fire, electric shock, and personal injury.
Plug into its electrical outlet with a voltage rating that matches the rating label on the
cooler (115/120V AC only, 60Hz, 10A). Use receptacles that cannot be turned off by
a switch or pull chain. Be sure that the plug is fully inserted into the receptacle.
Plug into a grounded 3-prong outlet. Do not under any circumstances cut or remove the
third ground prong from the power cord supplied.
To protect against electric shock, do not immerse the wine cooler, plug or cord in water
or other liquids.
Never unplug the cooler by pulling the power cord. To disconnect the wine cooler, always
grip the plug firmly and pull straight out from the wall outlet.
Repair or replace immediately all power cords that have become frayed or otherwise
damaged. Do not use a cord that shows cracks or abrasion damage along its length or at
either end.
Do not connect or disconnect the electric plug when your hands are wet. Do not operate
the cooler with wet hands, while standing on a wet surface or while standing in water.
Unplug the wine cooler or disconnect power before cleaning or servicing. Failure to do so
can result in electrical shock or death.
When moving the wine cooler, be careful not to roll over or damage the power cord.
Never clean wine cooler parts with flammable fluids. These fumes can create a fire
hazard or explosion. And do not store or use gasoline or other flammable vapor and
liquids in the vicinity of this or any other appliance. The fumes can create a fire hazard
or explosion.
Do not attempt to repair or replace any part of your wine cooler unless it is specifically
recommended in this manual. All other servicing should be referred to a qualified
technician.
An empty wine cooler can be dangerous to children. Remove any latches, lids, locks,
and/or doors from unused or discarded wine coolers to prevent child entrapment and
suffocation. Never allow children to operate, play with or crawl inside this wine cooler.

Do not use this wine cooler for other than its intended purpose. For indoor, household
use only.
Move this wine cooler by 2 people. Failure to do so can result in injury.
Place this wine cooler in a well-ventilated area with temperatures above 15°C (60°F) and
below 32°C (90°F).
To ensure proper ventilation for your wine cooler, the front of the cooler must be
completely unobstructed.
This wine cooler must be installed in an area away from wind, rain, water spray or drips.
The wine cooler should not be located next to ovens, grills or other sources of high heat.
Do not kink or pinch the power supply cord of the wine cooler.
It is important for the wine cooler to be leveled in order to work properly. You may need
to make several adjustments to level it.
This wine cooler is designed for storing and cooling wines. Do not store perishable food
or medical products inside the cooler.
When disposing of refrigeration wine coolers, special handling is often required. It is the
consumer’s responsibility to comply with federal and local regulations when disposing of
this product.
WARNING: Risk of child entrapment and suffocation. Before you throw away this or an
old cooler, remove the door. Leave the shelves in place, so that children may not easily
climb inside.
FLAMMABLE REFRIGERANT GAS
DANGER - Risk of fire or explosion. Flammable refrigerant used.
DO NOT use mechanical devices to defrost refrigerator. DO NOT puncture refrigerant
tubing.
DANGER - Risk of fire or explosion. The flammable refrigerant used. To be repaired only by trained
service personnel. DO NOT puncture refrigerant tubing.
CAUTION - Risk of fire or explosion. Flammable refrigerant used. Consult repair manual/owner’s
guide before attempting to service this product. All safety precautions must be followed.
CAUTION - Risk of fire or explosion. Dispose of property in accordance with federal or local
regulations. Flammable refrigerant used.
CAUTION - Risk of fire or explosion due to puncture of refrigerant tubing. Follow handling
instructions carefully. Flammable refrigerant used.
CAUTION - To prevent a child from being entrapped, keep out of reach of children and not in the
vicinity of the cooler.
PRODUCT DIAGRAM

1
Control Panel
5
Top Hinge
2
Beech Shelves
6
Glass Door with Handle
3
Exhaust Window
7
Safety Child Lock
4
Leveling Legs
INSTALLATION INSTRUCTIONS

Before Using Your Wine Cooler
Remove the exterior and interior packaging.
Check to be sure you have all of the following parts:
o6 Beech Shelves
o2 Keys
oStainless Steel Handle
oInstruction Manual
o2 Extra Screws for Installing Handle
IMPORTANT: Before connecting this wine cooler to a power source, let it stand upright for
approximately 2 hours. This will reduce the possibility of a malfunction in the cooling system
from handling during transportation.
Clean the interior surface with lukewarm water using a soft cloth.
Install the handle on the left side of the door.
To Install Stainless Steel Handle
1) Pull away the door gasket in the area where the handle is to be installed, as Illustration #1.
The gasket is easily removed by hand, no tools are necessary.
2) Align the handle with the pre-installed screws on the door frame. Tighten the screws with a
screwdriver until the handles secure tightly against the door frame, as Illustration #2. (Do NOT
over tighten as this will cause damage to the handle assembly).
3) Replace the door gasket to its original position.
Note: This wine cooler includes stainless steel handles that are not required to operate this wine
cooler. If you choose not to use the handle supplied, simply follow step 1 to access the
pre-installed screws and remove them and then place 2 decorative plugs (NOT included) into the
two holes separately. Continue to step 3 to replace the door gasket to its original position.

Illustration #1 Illustration #2
To Install Your Wine Cooler
This wine cooler is designed for freestanding or built-in (fully recessed) installation.
Place your wine cooler on a solid and level floor that is strong enough to support it when it is
fully loaded. This will ensure a vibration-free and noise-free operation. Adjust the leveling
legs in and out to stabilize the cooler horizontally. If the legs are not properly adjusted, the
cooler may be unstable and result in excess noise or vibration.
Locate the wine cooler away from direct sunlight and sources of heat (stove, heater, radiator,
etc.). Direct sunlight may affect the acrylic coating and heat sources may increase electrical
consumption. Extremely cold ambient temperatures may also cause the cooler not to perform
properly.
It is not advisable to install this cooler in moist areas or directly adjacent to a kitchen sink, as
moisture could cause premature corrosion to the components of your new cooler.
It is recommended you install the wine cooler in a place with temperatures above 60°F
(15°C) and below 90°F (32°C), and humidity is under 60%. If the ambient temperature is
above or below the recommended temperatures, the performance of the cooler may be
affected. Placing your cooler in extremely cold or hot conditions may cause interior
1
Gasket
2
Screw
3
Screw Driver
4
Handle

temperatures to fluctuate, and the temperature range of 5ºC-18ºC (40ºF-65ºF) may not be
reached.
Connect the wine cooler to an exclusive, properly grounded, standard electrical supply (115
V AC only, 60 Hz), in accordance with the National Electrical Code and local codes and
ordinances. Any questions concerning power and/or grounding should be directed toward a
certified electrician or an authorized products service center.
Warning:Improper use of the grounded plug can result in the risk of electrical shock. If the
power cord is damaged, have it replaced by an authorized service center.
The wine cooler should always be plugged into its own individual electrical outlet which
has a voltage rating that matches the rating label on the wine cooler. This provides the
best performance and also prevents overloading house wiring circuits that could cause a
fire hazard from overheated.
Do not under any circumstances cut or remove the third ground prong from the power
cord supplied.
Do not use an extension cord or adapter plug. However, if you must use an extension
cord, it is absolutely necessary that it be a UL-listed, 3-wire grounding type wine cooler
extension cord having a grounding type plug and outlet and that the electrical rating of
the cord is 10 amperes (minimum) and 120 volts.
Do not use a cord that shows cracks or abrasion damage along its length or at either end.
If the wine cooler is going to be used in an area that is prone to power surges/outages,
it is suggested that you use a power surge protector. The surge protector that you select
must have a surge block high enough to protect the wine cooler it is connected to.
Damages due to power surges are not considered a manufacturer covered defect and
will void your product warranty.

OPERATION INSTRUCTIONS
Controls
After plugging the wine cooler into a wall outlet, the cooler would turn on automatically and the
LCD screen would show the temperature inside of the cooler.
After setting your desired serving temperature, allow the cooler to cool down for 3 to 4 hours
before placing wine bottles in the wine cooler.
Press once to turn the interior light ON or OFF.
Press to increase or press to decrease the temperature in 1 degree
increments between 5°C and 22°C or between 41°F and 72°F.
After 30 seconds of inactivity, the controls will be locked automatically. To unlock
the control panel and adjust the settings, press and hold this LOCK button for
about 3 seconds until you hear a beep.
Press once to turn ON the cooler. Press and hold about 3 seconds to turn OFF
the cooler.
To toggle the temperature display between Celsius and Fahrenheit, press and hold
both the Light and Up button for 3 seconds.

Recommended Temperature Settings
Storing wines at the proper temperature is important. To preserve them as long as possible,
wine needs to be stored at approximately 55° Fahrenheit. However, the chart below suggests
the optimal drinking temperature for the different varietal of wine.
Wine Varietal
°F
°C
Rose and Sparkling Wines
41°F-46ºF
5°C-8ºC
Dry/White Wines
48°F-53ºF
9°C-12ºC
Red Wines
59°F-65ºF
14°C-18ºC
Storage
This wine cooler is designed to store 30 standard 750 ml wine bottles, including bulk storage.
Many bottles differ in size and dimensions. As such, the actual number of bottles you may be
able to store may vary. Storing large and/or oddly shaped bottles (including champagne and
sparkling wine bottles) will decrease the capacity of your wine cooler.
Door Lock
This cooler can be secured with a lock and key. The keys are located inside the plastic bag that
contains the Instruction Manual. Insert the key into the lock and turn it clockwise to lock the
door, making sure the metal pin is engaged completely. To unlock the door, do the reverse.
Remove the key and put it in a secure location.
Beech Shelves
This wine cooler is equipped with a telescopic runner assembly (except for the bottom shelf) and
you can move the wooden shelves out and in smoothly.
The slide-out shelves allow bottles of wine to be viewed and removed more easily. Any of the
shelves can be removed to store larger bottles.

To prevent damaging the door gasket, make sure to have the door all the way opened when
pulling shelves out of the rail compartment. For easy access to the bottles, you may need to pull
the shelves approximately 1/3 out of the rail compartment.
To Remove a Sliding Shelf
1. Remove all bottles from the shelf.
2. Pull the shelf out as far as it will go.
3. Adjust the lever on each side of the shelf, as shown below (UP on the left, DOWN on the
right) and at the same time, pull the shelf out completely.
CARE & MAINTENANCE
Cleaning Your Wine Cooler
IMPORTANT: Always unplug the cooler before cleaning or performing maintenance. Never use
harsh cleansers or scouring pads to clean any part of the cooler.
Turn off the power, unplug the wine cooler, and remove all items including shelves.
Wash the inside surfaces with warm water and baking soda solution. The solution should
be about 2 tablespoons of baking soda to a quart of water.
Wash the shelves with a mild detergent solution.
Wring excess water out of the sponge or cloth when cleaning the area near the controls,

or any electrical parts.
Wash the outside cabinet with warm water and a mild liquid detergent. Rinse well and
wipe dry with a clean soft cloth. Do not use steel wool or steel brush to rub the stainless
steel, which will contaminate the stainless steel with steel particles and rusting may
occur.
Power failure
Most power failures are corrected within a few hours and should not affect the temperature of
your wine cooler. If the power is off for an extended period of time, proper steps should be taken
to protect your contents.
Vacation Time
Leave the wine cooler operating during vacations of less than three weeks. For periods longer
than this, turn the wine cooler off and leave the door slightly ajar to prevent odor from building
inside the wine cooler.
Moving Your Wine Cooler
Remove all items (bottles) from the cooler;
Securely tape down any loose items, such as shelves, inside the cooler.
Turn the adjustable leg up to the base to avoid damage.
Tape the door shut.
Ensure that the wine cooler stays securely in the upright position during transportation.
Protect the outside of the wine cooler with a blanket or a similar item.
Energy saving tips
- The cooler should be located in the coolest area of the room away from heat sources or direct

sunlight.
- Ensure that the cooler is adequately ventilated. Never cover air vents.
- Only open the cooler door for as long as necessary. Frequent opening of the door will affect
internal temperature.
Charcoal filtration system
Your wine is a living object that breathes through the cork of its bottle. In order to preserve the
quality and taste of your fine wines, they must be stored at the ideal temperature and ambient
conditions. Your wine cooler is equipped with an active charcoal filtration system to ensure air
purity, cooling efficiency, and to maintain an odor free cabinet for the storage of your fine wines.
The filter assembly is located at the rear panel inside your wine cooler and it is suggested to be
changed every 12 months.
To replace the filter
1
Remove the bottles of wine stored on the two (2)
shelves in front of the filter.
Turn Left to remove filter.
2
Remove the shelves and set aside to be replaced
once you have changed the filter
3
Hold the filter and turn it at 45 degrees in the
counter-clockwise direction and then pull it out.
4
Remove the existing filter and replace with a new
one.
5
Put the new filter into the hole and then turn the
filter at 45 degrees in clockwise direction.

TROUBLESHOOTING GUIDE
Before you reach out to Colzer customer service, please check if you can resolve the problems
according to the following hints.
PROBLEM
POSSIBLE CAUSE
SOLUTION
The wine cooler
does not run.
The wine cooler may not be plugged
in, or plug may be loose.
Ensure the wine cooler has been
plugged in properly.
The wine cooler is turned off.
Press to turn on the cooler.
House fuse blown or tripped circuit
breaker.
Check/replace fuse. Reset circuit
breaker.
The wine cooler
is not cold
enough.
External environment may require a
higher setting.
Set a colder setting. Allow several hours
for the temperature to stabilize.
The wine cooler has recently been
disconnected for a period of time.
It takes 3-4 hours for the Wine Cooler to
cool down completely.
Prolonged or frequent door
openings.
Open the door less often.
The door is not closed completely.
Close the door properly.
The door gasket does not seal
properly.
Check the door gasket. Clean or change
gasket if necessary.
The compressor
turns on and off
frequently.
The room temperature is hotter than
normal.
It’s normal for the wine cooler to work
harder under these conditions.
A large amount of contents has been
added to the cooler.
A large amount of contents cause the
wine cooler to run more until the
desired temperature is reached.
Prolonged or frequent door
openings.
Open the door less often.
The temperature has not been set
correctly.
Press either or to check
the set temperature, and set the
temperature properly.
The door is not closed completely.
Close the door properly.
The door gasket does not seal
properly.
Check the door gasket. Clean or change
gasket if necessary.

PROBLEM
POSSIBLE CAUSE
SOLUTION
The light does not
work.
Not plugged in.
Plug the cooler in.
The circuit breaker tripped
or a blown fuse.
Check the breaker and/or fuses.
The light button is “OFF”.
Press to turn the light ON.
Vibrations.
The cooler is not leveled.
Check to assure that the cooler is level.
The bottles are vibrating.
Make sure the bottles don’t touch each
others.
There is an object under the
cooler.
Remove the object under the cooler.
The cooler seems to
make too much
noise.
The cooler is not level.
Level the cooler.
Normal noise from the flow
of the refrigerant
The rattling noise may come from the flow
of the refrigerant, which is normal. As each
cycle ends, you may hear gurgling sounds
caused by the flow of refrigerant in your
cooler. Contraction and expansion of the
inside walls may cause popping and
crackling noises.
The door will not
close properly.
The cooler is not level.
Level the cooler.
The door was reversed and
not properly installed.
Re-install the door properly.
The gasket is dirty.
Clean the door gasket.
The shelves are out of
position.
Place the shelves properly.
Moisture build up on
interior or
exterior of the wine
cooler.
This is normal during high
humidity periods.
Lower the room humidity.
This is normal in high
temperature environment.
Move the cooler to a cooler place, and avoid
heat and sunlight.
Prolonged or frequent door
openings.
Open the door less often.
The door does not seal
completely.
Check door gaskets for proper seal.
Error Code:
E1-E2-E3-E4-E7-E8
A sensor has failed.
Contact the customer service at
Table of contents
Popular Kitchen Appliance manuals by other brands

A.J.Antunes
A.J.Antunes roundup MS-150 owner's manual

Rieber
Rieber thermoport Series Original user guide

Throwback
Throwback Stir Stick Popcorn instruction manual

I.G.F. Italstampi
I.G.F. Italstampi 4200 Manual for use and maintenance

Hyundai
Hyundai HDM120 instruction manual

Pizza D'lite
Pizza D'lite GB-GP02 manual

AGA
AGA AQVIA user manual

Breville
Breville JUICE FOUNTAIN JE95XL user manual

B&S Commercial Kitchen Appliances
B&S Commercial Kitchen Appliances CCF Series Installation, operating and servicing instruction manual

Hendi
Hendi Concept Series user manual

Salton
Salton Juiceman II Instruction booklet

Thor Kitchen
Thor Kitchen MK07SS304 installation manual