Combi-Camp Trailer User manual

www.combicamp.com
INSTRUCTIONBOOK
Country Valley
uk

2
contents UK
Introduction 3
Beforeyousetout/HitchingtheCOMBI-CAMP 4-5
Openingandfinaladjustment 6-7
Integratedsuncanopy/awning 8-9
SunCanopyaskitchencanopy 10
Accessoriestothetrailertent 11
Kitchen 12-13
Maintenance 14-15
Storage/Technicaldata 16-17
GUARANTEE 19

3
We are delighted that you have chosen COMBI-CAMP and we wish
you many a happy holiday in the years to come.
This booklet has been created to help you get the optimum from
your COMBICAMP trailer tent, and we advise you to read it carefully.
Get to know your COMBI-CAMP at home - erect the trailer tent a few
times, so that you have good knowledge of what to do before you
embark on the first trip.
ON YOUR NEW COMBI-CAMP
congratulation
Introduction uk

4
Before you set out
•Heavyitemsshouldbeplaced
ontheaxlelineevenifonlythe
roofrackisused.Beawareofthe
addedweightifakitchenislater
fittedandadjustthebalance
accordingly.Theweightat
thehitchshouldbebetween44-
110pounds(20to50Kg.).
•Donotplaceluggagetooclose
totheouterwallsofthetrailer-
theremustbe8inchesofspace
lefttoaccommodatethetentand
frames.Thiswillensureproper
closureofthetrailerlid.
•Theapprovedgrossweightofall
COMBI-CAMPtrailerarewritten
onthefactoryID-sign.Payload
willdifferfromtypetotypeand
theamountofequipmentfitted.
PLEASENOTE!
Unzipthetent
doorandclosethe
ventflapwhen
foldingdownthe
trailertent.
•NEVEROVERLOAD
THETRAILER!!!
•DriveTarpaulintocovertheroof
rackisavailableasanoptional
extraforallCOMBI-CAMPmodels.
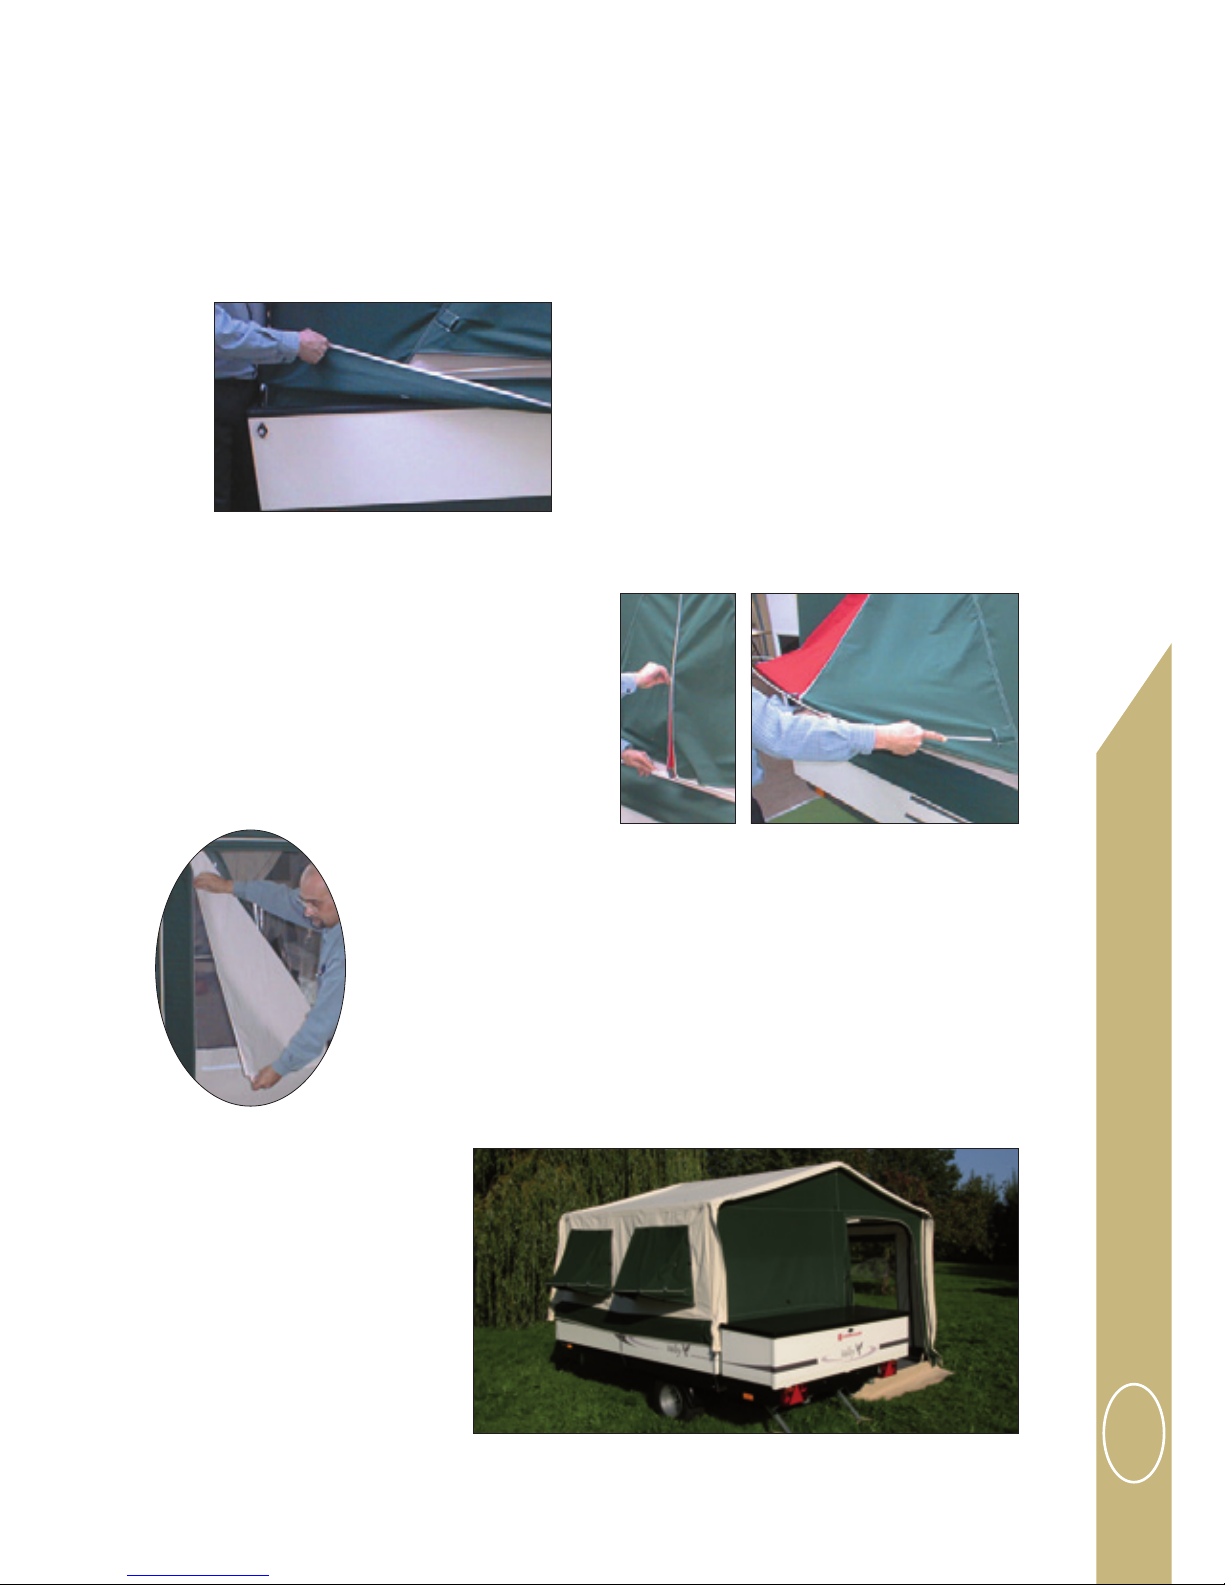
Packing of the Cargo box:
Thecargoboxisusedforthe
heavyobjectssuchastheawning
andframes.
Thecargoboxisexcellentforitems
thatarenotineverydayuseoras
asafewhenyouaresleeping.
Check points:
•Closeandsecurelylockalllocks
ontrailerandkitchen
•Checktheproperfunctionofall
roadlightsbeforeyoustartyour
trip.
•Itisimportanttotightenwheelnuts
afterdrivingthefirst200Km.
•IfyourCOMBI-CAMPisequipped
withbrakes,theymustbeadjusted
afterdrivingthefirst200Km.
•Checkyourtyrepressure.Loadsup
to500kg20PSI-1.5BAR.Loads
upto750kg30PSI-2.1BAR.
•Checkthatyourhitchiscorrectly
attachedtothecar.
•Checkthatthejockeywheelis
tightenedandinitupperposition.
•Checkyourtrailerspeedlimits
especiallyinforeign
countriesandfit
yournationalidenti-
ficationplate.Inthe
UKitismaximum
60Mph.(never
overtakeinthethird
laneonmotorways
onlyusenearside
andmiddlelane)
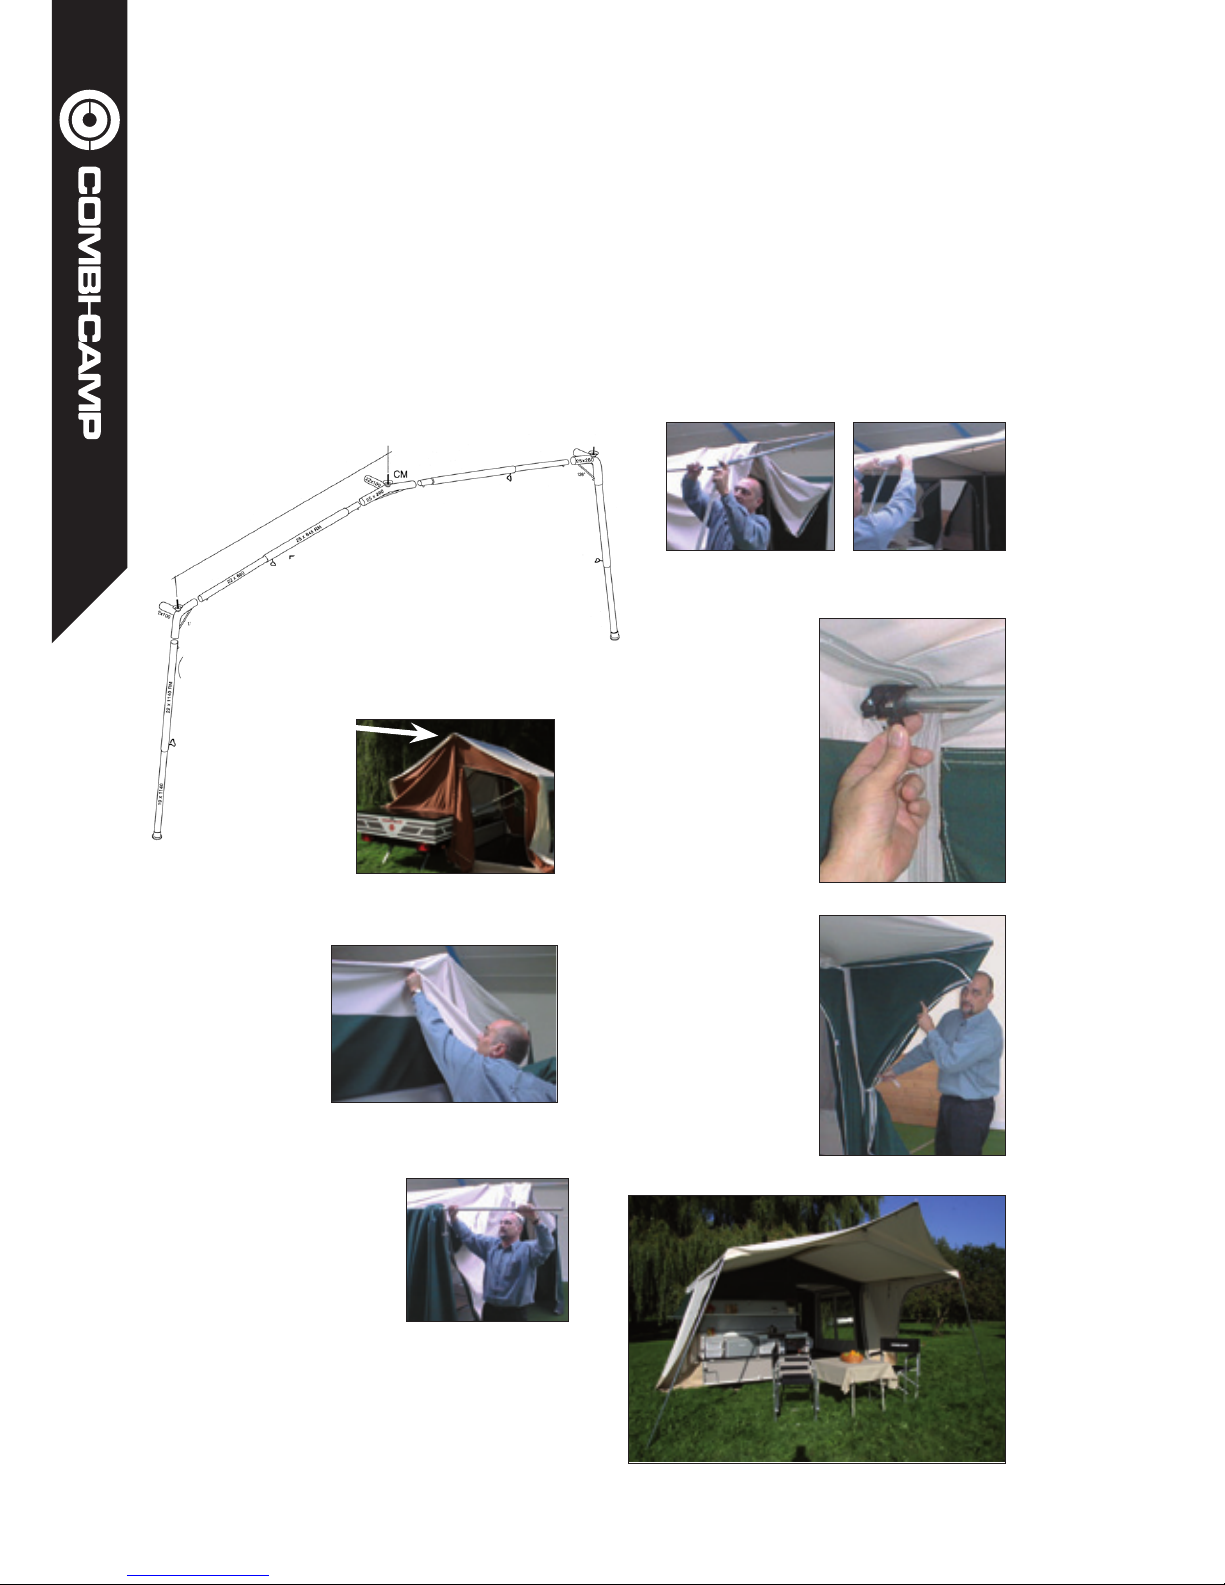
Packing the COMBI-CAMP:
•Insidetheclosedtrailerthereis
roomforapprox.34cubicfeet
(1cubicmetre)worthofluggage
space.Furthermore,thereisluggage
spaceontheroofrackandinthe
cargocarrierfittedunderthe
bedroomfloor.Pleasenotethat
packingmustbecarriedoutina
waythatensuresthebalanceofthe
trailer.

5
Trailers without brakes:
•Thehandleisintheupperposition
andkeptherewhilstthehitchis
loweredbyusingthejockeywheel
ontothevehicle’stowbar.
•Whenthehitchisloweredthe
handlewillgointonormalposition.
•Tounhitchthetrailer,liftthe
handleandturnthejockeywheel
handletodismounttheCOMBI-CAMP.
Light
•Alwaysremember:thetrailers,
electricalplugmustbeinsertedto
thevehicle.Seediagrampage19.
Trailers with brakes:
•Thehandleis,intheupper
positioni.e.open,thenthehitchis
loweredbyusingthejockeywheel
ontothevehiclestowbar.
•Whenthehitchisinthecorrect
position,thegreenindicatoronthe
frontofthe
hitchwillbe
visibleandthe
handlewill
automatically
movetothenormalposition.
•Remembertoattachthesafety
cable,whichactivatesthebrakes
incasethetrailerbecomesdetac
hedfromthetowbar.
Hitching the COMBI-CAMP
Beforeyousetout UK

6
Opening the trailer
and erecting the tent
•Openingthetrailertentshouldbe
carriedoutonafairlylevelsite.
•Rememberitisnotrecommendable
toplacethetrailerundertrees.
Objectscanfalldownandeventually
damageordiscolourthetentcanvas.
•WhentheCOMBI-CAMPisunhitched
andplacedonthedesired
spot,usingthefrontsupportlegor
jockeywheeliffittedtolevelthe
trailertent.
•Winddowntherearjacklegsuntil
trailerislevel,itisrecommendedto
haveajackplatetoavoidtheleg
goingintotheground,thenunhook
theroofrack.
•Lifttheroofrackoverthetrailerall
theway,whichisapprox.115
degreesfromthetopofthetrailer.
(fig.2)
•Nowopenthetopofthetrailer
(Fig.3),pullittowardsandpastthe
positionoftheroofrackandfurther
untilitreachestheground.
Neverusetheroofrackasalever.
Walkintothetentandpushupthe
twoconnecting
polesonthe
centretrailer
frameuntil
thetentis
fullyerected
andthentighten
the
thumbscrew.
•Thetentcanvasisnowerected.
Adjusttheinternalframeadjusters
asshownbelowAdjustthefront
supportlegorjockeywheeliffitted
inordertolevelthetentfloorso
thatitissupportedbytheroofrack
whichisnowsituatedbelowthe
floor.Ifrequiredthetworearjack
legscanalsobeadjusted.
Fig.1
Fig.3
Fig.2

7
•Pulltherainprotectionskirtout
overthetrailerandadjustthe
nylonskirtovertheflooredge.
•Allwindowsarecompletewith
ventilationpanelsfittedwithmos-
quitonets.Shouldyouwishventila-
tionrolethecanvasparttotheside
andtie.Shoulditrain,thepanelcan
beopenedjustalittlewithuseofa
guyropeintothe“D”ringlocatedat
thebottomofthepanel.
•Finallytheoutsideventcanbe
opened.Zipupandplacethe
fibreglasssectionintothesleeve
andbendthesectionandinsert
intothepocketintheotherside.
Opening and final adjustment
Openingandfinal UK

8
•Hereafterthefrontsectionofthe
frameisattached(fig.6)Nowthe
frameisadjustedsothatthecan-
vasisniceandtight.
•Theheightis
adjustedonthe
twolegs.Adjust
theintegrated
framesandlock
theblack
adjuster(Fig.7)
•Thesidecan
nowbepegged
orrolledback
tothetrailer.
•Suncanopy
fullyerected.
Erection of integrated,
sun canopy/awning
Theframesystemis
showninFig.6
•Thebodycanvasisloweredbyuse
ofthetwothumbscrews,sothat
allforceisreducedfromthetent
canvasand
theintegra-
tedframes
canmove
freely.
Thecanvas
isnowzip-
pedontotheCOMBI-CAMP
•Thesun
canopyis
puton
topofthe
integrated
frames,
whilst
theyarepulledout.Boththe
frames22mmand19mm
arepulledout,
suchasthelittle
pressurespring
isengagedinto
the22mm
frameandthisis
pulledout¾way.
Integrated sun canopy/awning
Fig.6
Fig.7

9
Integrated sun canopy/awning
•Thesmallelasticcaneasilybe
attachedtotheawning“D”rings.
•Thedraughtskirt
isfittedbelowthe
kitchen.
Whenclosingthetrailerdown,tosavetimeyoumayleavethe
suncanopyattachedandstoredontopofthetrailerroof.
Important -whenclosingtheintegratedframestheymustbe
pushedallthewayback.
Suncanopy/awning UK

10
Sun Canopy as kitchen canopy:
•Ifyouarehavingaonenightstop,
foreaseyoucanmovetheintegrated
frameshalfwayoutandfoldtherest
oftheroofbelowthecanopyroof.
•Whenthesuncanopyisstillontop
ofthetrailer,pulloutthe19mm
frameapprox.
10cm(4”)until
thepressurespring
becomesvisible
•Hereafterpulloutthe22mmframe
approx.1m(3’4”)
•Thesuncanopyispulledforward
andtheframeisinsertedintothe
smallgreyPVCpockets.
Pleasenotethatthecanopymustbe
ontopofallframes.
Theframe’s
adjustersare
tightenedandthe
loosehangingsun
canopyistightened
tothetrailerbody
canvasbyusingthe
ribbons.
•Thesidescan
eitherbepegged
orattachedtothe
bodycanvas.
Sun Canopy as kitchen canopy

11
Fitting the annex:
•Thedetachablesideofthetrailer’s
bodycanvasiszippedout.
•Theannexcabiniszippedin.
•Thepoleswiththeaccompanying
tworoundcornersareputinto
thesleeveinsidetheannex.
•Thesupportpoleswithhookend
areputintothetwoholesinthe
trailerssteelsectionatthefloor.
•Thelasttwosupportpolescan
thenbeplacedbetweentheroun-
dedcornersandtheannexfloor.
•Thenylonflooroftheannexis
thenstretchedandpeggedallthe
wayround,donotovertighten.
•Finallyplacethefibreglasspole
insidetheventilationflap,where
aftertheinnertentisfitted.
The door canopy is fitted as
follows:
Thedoorcanopyiszippedtogether
andtheframesareattachedand
fittedwithguyropes.
Extra sun canopy is fitted as
shown:
Thesuncanopyhas3brasseyelets
ineachend.Theonefitstheawning
framesspigotsandisthenattached
totheguyropeoneachside.
The3legsarefittedandpegged
withtheguyrope
Accessories to the trailer tent
Suncanopyandtent UK

12
kitchen
Liquidgasoperation
• Regulator "B" is pressed down
and kept in this position for 10
seconds. This is clearing the
pipes from any oxygen and gas,
which may reach the burner unit.
This, on a new unit can take a
few attempts.
• The burner is ignited by pressing
button “E” down a few times.
• To check if the burner is running
put your hand over the chimney
Frigde
Before using your fridge:
• Cleaning of the fridge.
Before using the fridge you
should clean the inside and out
side with lukewarm water contai-
ning a mild detergent. From time
to time, the PVC-seal of the lid
should be rubbed with a little
talcum powder.
• The fridge can be used with 12v,
220/240v or gas (Propane or
Butane only).The regulator sup
plied is to fit the blue Camping
Gaz bottle.
Electricoperation
If you wish the unit to operate from
12 volts, it is recommended to save
energy it is advisable to pre-cool
with mains 12 hours before going
on tour. Mains are connected by
using the two pin plug fitted on the
back of the fridge unit.
A
B
E

13
attherighttopcornerofthe
fridge.Theregulatorispressed
downsome20-25secondslonger
toactivatetheautomaticignition
safetydevise,whichthencontrols
thegassupply.
•Whenthedesiredtemperatureis
reachedregulator"B"isturned
backwardstowardsposition"MIN"
•Remembertocutthegassupply
whentherefrigeratorisnolonger
runningongas.
Gasburners
Thekitchenhasthreeburnersthat
functioninthefollowingmanner:
•Openthegassupplytap.
•Thecontrolswitchisturnedto
thebigflameandpressedin.
•Whilstdepressingthecontrol
switchtheburnerisignited.
Toactivatetheautomaticignition
safety,keeppressingonthecon-
trolswitchforapproximately5-10
seconds.Shouldtheflamegoout,
pleaserepeatthisfunction.
•Releasethecontrolswitchand
turnittothedesiredposition.
PLEASE NOTE.
Do not cover the ventilation on
the front panel.
Gas taps
Onetapisforthefridgeandthe
otherforthegasburnersonthe
cookertop.Theopenpositionisin
thevertical.Thetapscanbeused
separately.
Fitting the regulator
to gas bottle
Screwtheregulatorontothe
bottleuntiltight.Theregulator
isopenwheninposition“O”and
closedinposition“F”.
The water tap
Thewatertapiselectricallyope-
ratedandshouldbepoweredby
twobatteriesplacedintothebat-
teryboxbehindthelowerplastic
drawer.Twobatteriestype4R25,
6voltsshouldbeused.Theyare
notsupplied.Whenthewatertap
isturnedon,thepumpinthewater
containerisactivated.Afterafew
secondsthewaterwillflow.
Pleasenote.
Thedraintube
fromthesink
isnotconnec-
tedtoany
wastetank.
Basic kitchen box
Apermanentfittedkitchenbox,
with2burnersandlotsofstorage
spaceforkitchenutensilsandother
equipments.
kitchen
Kitchen UK

14
Wheel / Axle / Hinges
Atleasttwiceayear-at
thebeginningandattheend
oftheseasonyoushould:
•Checkthewheelbearingfor
wear.Theseisdonebygrasping
thewheellikeyouwoulda
steeringwheelandthentryto
rockthewheelsidetoside.If
tighteningisnecessaryyouwill
immediatelyfeelit.
•Ifindeedtighteningisnecessary
youwillneedtoremovethe
wheelhub-capandsplitpin,then
turntheaxlenutinwardsto
tightenthebearinguntilaxleis
slightlybraked.
Loosenagainuntilthenextsplit
pinhole-checkbearingwear-
splitpinisthenrefitted.
•Thewheelhubisgreasedsothat
upto1/2to2/3ofthehubis
filledwithgrease.
•Checkthattheaxleandtowbar
arethoroughlyboltedtotheir
consoles.
•Greaseallhingesandhand
wheels.
Alsothebigcentralhingebet
weenthetopandbottomofthe
trailer.
The tent
•TheCOMBI-
CAMPcanbevery
easilyopenedandclosed
eveninrainyweather.Ifyou
hadtopackinmistyweatherit
isadvisabletoopenthetrailer
assoonaspossibletogiveit
freshairandtodrythetent
canvasandthemattresses,
otherwiseyoumayfacemould
andconsequentlyrot.
However,shouldsignsofsuch
occurtheonlytreatmentisto
drytheattackedspot
thoroughlyandthenbrushit
down,cleanandre-impregnate
thecanvas.
•Itisthereforeimportantthat
yourCOMBI-CAMPisnotleft
wetforlongerperiodsthan,
twodayswhenclosed.
•Useofchemicalcleanersis
notadvisable.
•Pleasenotethatmattress
coversshouldbedry-cleaned.
•Normaldirtcanbewashed
withwateraddingalittlevine
garandasoftbush.Moreresi
stantdirtcanoftenbemoved
withtheuseofavacuumclea-
ner.
The superstructure
Normalroaddirtcanberemovedby
washingthetrailerbodywithsoapy
water and a soft brush. More resi-
stantdirtcanoftenbemovedwitha
normalpolish,butmustnotcontain
cuttingcompound.
Be good to your COMBI-CAMP, this will serve both you and your
COMBI-CAMP best.A reasonable maintenance will ensure you a reliable
trailer tent for many years to come.
Maintenance

15
Chassis / Roof rack
Boththechassisandtheroofrack
haveaneffectiverustproofing.
Theroofrackhasbeenfittedwith
plasticprotectorstominimise
damagetotheroofrackwhen
openedagainsttheground.
Werecommendthatthebottomof
thetrailerissealedwithrust
proofingmaterial.
Before the first trip:
WhenyouopenyourCOMBI-CAMP
forthefirsttime,westrongly
recommendthatthetentcanvasis
sprayedwithwater.Eventhefinest
impregnatedcottoncanvasisnot
100%effectivebeforethefirstrain
shower.
Whilstthetentissprayedandlater
drying,itisimportantthatthe
windowsanddoorsremainclosed
astosecureauniformshrinkingof
thetentcanvas.
Allourcottontentcanvasesare
designed“shrinktofit”.
Donotfolddownthetentbefore
itisabsolutelydry.
The tent canvas is made from a
natural cotton product. Should you
experience a slight leak around the
stitching of the canvas this can be
cured by impregnating the seams
with seal seam.
Maintenance
Maintenance UK

16
•Seethatthetrailerandtentare
completelydrybeforestorage.
•Youarewelladvisedtoremove
mattressesaswellastheinner
tentandstoreinatotallydry
spotduringthewinter.
•Ifstoragespaceislimitedthe
COMBI-CAMPcanbestoredon
it’ssidebymeansoftheoptional
sidestoragelegs.Suchlegsare
availablefromyourlocalCOMBI-
CAMPdealer.
Puncture/ Spare wheel
•Shouldyouexperienceapunc
turewithyourCOMBI-CAMP,both
thefrontjacklegorjockeywheel
iffittedaswellastherearsup
portlegscanbeusedasjacks.
We advise you to purchase a spare
wheel before you go camping
or travelling.
•Tableandchairs
•Lightforuseinsidethetent
•Extensioncableforconnectiontomains
•Woodenblocksforlevellingthetrailer
•Rubbermallet
•Bucketorcontainerforusedwaterinkitchensink
•Groundsheetfortheawning
•Clotheslineandpegs
•Sparepegs
•Smalldustpanandbrush
storage
Useful hints, worth remembering

17
Tekniskeoplysninger
Fitting instructioN for 7 Pin plug (12N) or 13 Pin plug
1.Yellow-Lefthandindicator
2.Blueheavycable-Fridge
3.White/black-Earth
4.Green-Righthandindicator
5.Brown-Righthandsidelight
6.Red-Brakelight
7.Black-Lefthandsidelight
Orange and thin blue (fog light).
Not in use.
1.Yellow-Lefthandindicator
2.Bluethin-Foglight
3.White-Earth
4.Green-Righthandindicator
5.Brown-Righthandsidelight
6.Red-Brakelight
7.Black-Lefthandsidelight
9.Blueheavycable-Fridge(+)
13.Blue/White-Fridgeearth.
Orange not used.
Netweight: 350kg
withoverrunningbrakes: 375kg
Cross weight: 750 kg
Netweight: 450kg
Gross weight: 750 kg
technical data
UK
All dimensions i mm
1
8
6
11
12
13
10
97
5
2
4
3
1110
Valley
Valley
539
4160
3051
1998
1692
1258
1260
2900
2450
420
1130
539
4160
3372
1998
1692
1250
1270
2700
420
2450
335
CountryVALLY

18

19
General conditions of guarantee
AllCOMBI-CAMPmodelsareguaranteedfor12monthsasregardsmaterials,workman-shipand/or
defectsthatcanbetracedbacktothefactory.
Normalwearandtearandtyres,tubesetc.arenotcoveredbytheguarantee.Theguaranteetakes
effectasfromthedateofdelivery.Dulycompleted.Theguaranteeshallnotbevalidifourdirec-
tionsforuseandmaintenancearenotstrictlyobserved.
guarantee
www.combicamp.com

This manual suits for next models
1
Table of contents
Popular Utility Vehicle manuals by other brands

Landoll
Landoll 317B Operator's manual

Primo Water
Primo Water UT5 10-18HSS Series Assembly instructions

TrailMaster
TrailMaster Challenger 150UTV-X Setup Instruction

TrailMaster
TrailMaster TAURUS 400UTV Setup Instruction

Skeeter
Skeeter Boat Trailer Owner's operation manual

MotoTec
MotoTec POWERSPORTS GK008 owner's manual