Comfee CWB412ASB User manual

Model Numbers CWB412ASB
USER MANUAL
Free 3 months
extension of the
original limited warranty
period!* Simply text a
picture of your proof of
purchase to:
1-844-224-1614
*The warranty extension is for the
three months immediately following
the completion of the product’s
original warranty period.
Deluxe Bottom-Loading
Water Dispenser
with Self-Cleaning
Version A-0 12-2021
Rated Power: 520W
Voltage: 115V
Frequency: 60Hz

TABLE OF CONTENTS
page
1
4
6
7
9
12
13
13
Safety information-----------------------------------------------------------------------------------------
Installation and safety precautions--------------------------------------------------------------------
Part name----------------------------------------------------------------------------------------------------
Dispensing water ------------------------------------------------------------------------------------------
Deep cleaning-----------------------------------------------------------------------------------------------
Trouble shooting--------------------------------------------------------------------------------------------
Technical parameters -------------------------------------------------------------------------------------
1 Year limited warranty -----------------------------------------------------------------------------------
ELECTRICAL REQUIREMENTS
WARNING
A 115 V, 60 Hz, AC only, 15 A or 20 A fused, grounded
electrical supply is required. It is recommended that a
separate circuit serving only your water dispenser be
provided. Use an outlet that cannot be turned off by a
switch. Do not use an extension cord.

SAFETY INFORMATION
1
FAILURE TO FOLLOW THESE INSTRUCTIONS CAN RESULT IN
DEATH, FIRE OR ELECTRICAL SHOCK.
To reduce the risk of injury and property damage, user
must read this entire guide before assembling, installing and operating
water dispenser.
Failure to execute the instructions in this manual can
cause personal injury or property damage.
This product dispenses hot water above 176 F, failure to
use properly can cause personal injury. Never allow children to dispense
hot water without proper adult supervision.
This water dispenser is equipped with a power cord
WARNING
having a grounded wire and must be connected into a properly grounded
polarized outlet. Consult a qualified electrician if the grounding
instructions are not completely understood.
If the wall outlet is a standard 2-prong outlet, it is your
WARNING
personal responsibility and obligation to to have it replaced with a
properly grounded 3-prong wall outlet. DO NOT cut or remove the
third (ground) prong from the water dispenser power cord.
DO NOT use adapter plugs or an extension cord with
WARNING
your water dispenser.
DO NOT use dispenser if power cord becomes frayed or
WARNING
otherwise damaged.
This appliance must be grounded, in the event of an
electrical short circuit, grounding reduces the risk of electrical shock.
When operating this dispenser, always exercise basic
WARNING
safety precautions, including the following:
Prior to use, this dispenser must be properly assembled and
installed in accordance with this manual.
This dispenser is intended for water dispensing only; DO NOT
dispense or use other chemicals or liquids from the dispenser; DO
NOT use for any other purposes other than dispensing purified
water; DO NOT use any other liquid in the dispenser other than
known and microbiologically safe bottle water; DO NOT use tap
water to refill your water bottle.
For indoor use only, keep the water dispenser in a dry place away
from direct sunlight. DO NOT user water dispenser outdoors.
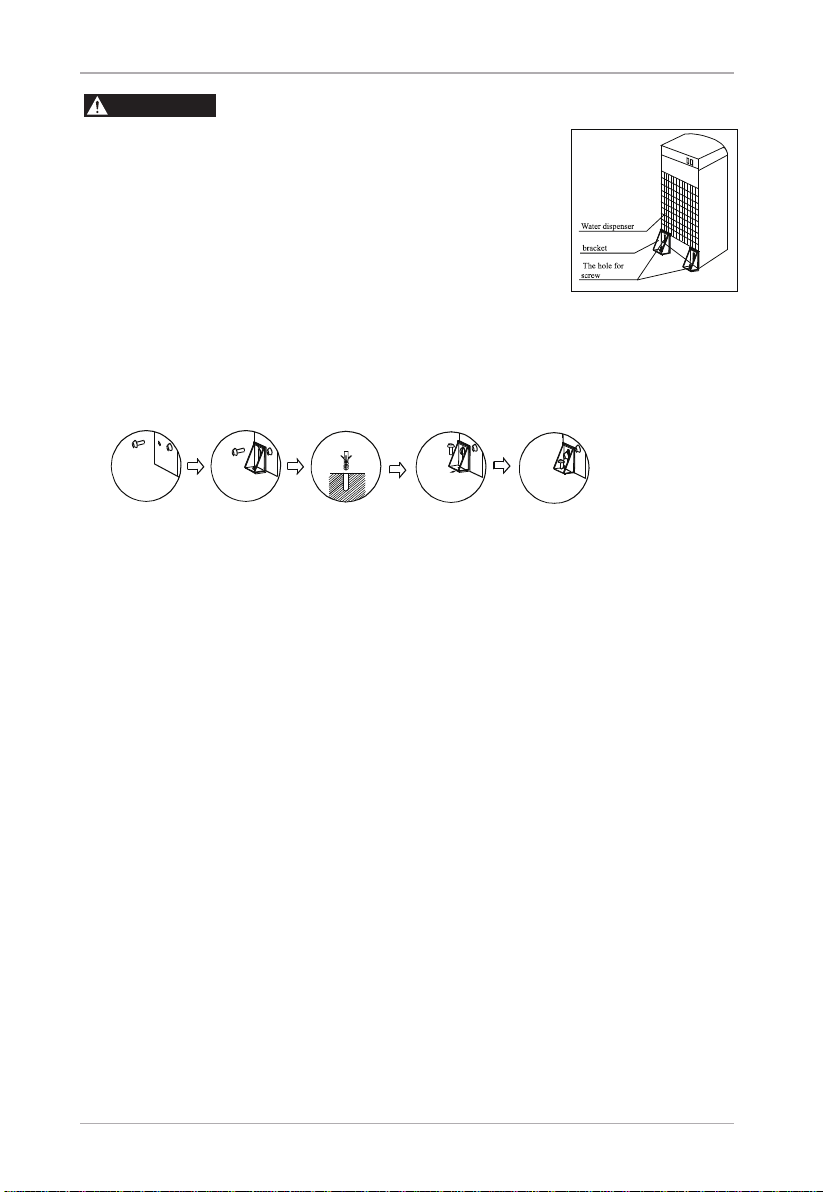
Install and use water dispenser on hard, flat and level surface and
install the safety brackets according to the Water Dispenser
Installation procedure.
WARNING
WARNING
WARNING
WARNING

2
DO NOT place water dispenser inside an enclosed space or cabinet.
DO NOT operate water dispenser in the presence of explosive fumes.
Water dispenser must be position no closer than 8” (20 cm) from wall
to permit free airflow between wall and back of dispenser. There must
be at least 8” (20 cm) clearance on the sides of the water dispenser
to permit airflow.
Always grasp the power cord plug and pull straight out from the wall
outlet, never unplug by pulling on the power cord.
This appliance can be used by children 8-years and above if properly
supervised by an adult or given supervision or instruction concerning
use of the appliance in a safe way and if they understand the hazards
involved.
Cleaning and user maintenance shall not be made by children unless
they are older than 8 and supervised by an adult. Keep the appliance
and its cord out of reach of children less than 8-years old.
Appliances can be used by persons with reduced physical, sensory, or
mental capabilities or lack of experience and knowledge if they have
been give supervision or instruction concerning use of the appliance in
a safe way and understand the hazards involved. Children shall not
play with the appliance.
Do not store explosive substances such as aerosol cans with a
flammable propellant in this appliance.
If the supply cord is damaged, it must be replaced by an original
manufacture part. Please contact customer service.
Never turn the machine upside down or lean it more than 45 degrees.
The thermostat has been factory adjusted for optimum performance.
No need to adjust it by yourself. When the machine is below the
freezing point, ice will form inside the cold tank and potentially block
water flow. If this happens, turn Off the cooling switch for 4-hours to
melt the ice block. Once melted, water should start to flow from faucets.
The machine should not be turned On until 3-minutes after turning off
the power switch.
When operating this dispenser, always exercise basic
safety precautions, including the following:
WARNING
For household use only. This appliance is intended to be used in a
household and similar applications.

3
To prevent the water dispenser from tipping, please install
WARNING
the enclosed two safety brackets.
Loosen the two screws on the back lower left
and right side of the water dispenser. (Refer to
illustration on right.)
Slide safety bracket under the loose screw and
secure the safety bracket to the water dispenser
by tightening the screws.
Using the safety bracket as a template, secure the
safety bracket to the floor’s surface where the water dispenser is to be
installed. (Make sure the back of the water dispenser is at least 8”
from wall for proper air-flow.)
Secure the two safety brackets to the floor by tightening the two screws.
1.
2.
3.
4.

4
1.
2.
3.
4.
5.
1.
2.
INSTALLATION AND SAFETY PRECAUTIONS
LOCATE DISPENSER
NOTE: If the unit has been on its side for a long period of time,
place the water dispenser in the upright position for more than 24-hours
before turning it on.
Place dispenser upright.
Locate dispenser on a hard and level surface and in a cool shaded
location, near a grounded outlet.
Position the water dispenser so the back and sides are 8” (20 cm)
clearance on all sides.
Plug in power cord.
Turn on Cooling and Heating switches
ASSEMBLE DRIP TRAY
INSTALL WATER BOTTLE
Assemble the drip tray cover to the drip tray.
Install drip tray and cover onto the lower front door by sliding in until
you hear a click.
Open lower cabinet door.
Inside the cabinet, remove the water bottle
straw and place water bottle straw on front
door hanger.
Place new water bottle outside of the cabinet.
Remove the entire plastic cap from the water
bottle.
Clean the outside of the water bottle with a
clean cloth.
Insert the water bottle straw into the water
bottle.
Slide the collar down until it locks into place.
Press head down until the tube hits the bottom
of the bottle.
Slide the water bottle into the cabinet and close
the door.
1.
2.
3.
4.
5.
6.
7.

5
ACTIVATE NIGHTLIGHT
Push top side of blue power switch in to turn light on. Push bottom side
in to turn light off.
PLUG INTO A GROUNDED ELECTRICAL OUTLET
Plug power cord into a properly grounded wall outlet.
At this time, you will hear the water pump turn on and start filling the
water reservoirs with water. It will take approximately 4 to 5 minutes to
fill the water reservoirs for the first time. During this period, the water
pump will run continuously, this is normal.
ACTIVATE HEATING AND COOLING SWITCHES
NOTE: The water cooler will not dispense hot or cold water until the
switches are turn ON.
To activate the cooling and heating system, turn On the two switches
on the back of the water dispenser. See illustration.
Once the switches are activated, both the cooling and heating lights
should turn On.
If you do not want to cool water, keep the switch
in the Off position.
If you do not want to heat water, keep the switch
in the Off position.

6
PART NAME
NOTE:
Top Cover
Hot Water Dispense Button
1
Part Description
2
3
4Room Temp. Dispense Button
Cold Water Dispense Button
Cooling ON Indicator Light
Heating ON Indicator Light
Self-Cleaning Indicator Light
Empty Bottle Indicator Light
This machine is suitable for 3 or 5 gallon water bottles.
Do not use tap water to refill a 3 or 5 gallon water bottle.
Water Outlet Spout
Drip Tray
5
Part Description
6
7
8
9
10
11
12
13
14
15
16
17
Hot Water On/Off Switch
Cold Water On/Off Switch
Power Supply Cord
Nightlight On/Off Switch
Drain Outlet
Condenser
Self-Cleaning On/Off Switch
517
16
6
8
7

7
DISPENSING WATER
Dispensing Cold Water
Dispensing Room Temperature Water
Dispensing Hot Water
This unit has been tested and sanitized prior to packing and shipping.
During transit dust and odors can accumulate in the tank and lines.
Dispense and dispose at least one quart of water prior to drinking any water.
After set-up, it will take 1-hour to get water to the maximum cold water
temperature. During this time the compressor will run continuously, this
is normal.
Place bottle, glass, pitcher or cooking pot below water outlet spout.
Press cold water dispense button to dispense cold water(Dark Blue Button).
Release button to stop dispensing water.
After set-up, it will take 15 to 20 minutes to get water to maximum hot
temperature. During this time the compressor will run continuously,
this is normal.
Place bottle, glass, pitcher or cooking pot below water outlet spout.
Slide the red toggle to the left and depress the button to dispense hot
water.
Release button to stop dispensing water.
1.
2.
3.
1.
2.
3.
1.
2.
3.
Place bottle, glass, pitcher or cooking pot below water outlet spout.
Press room temperature dispense button to dispense room temperature
water.(Light Blue Button)
Release button to stop dispensing water.
Hot Water will be extremely hot and produce severe
WARNING
scalding, never let children dispense water without direct adult supervision.
Red - Hot Water Button
Light Blue - Room Temp Button
Dark Blue - Cold Water Button

8
Empty Water Bottle Indicator Flashing
Do not dispense water if the empty water bottle indicator
WARNING
is flashing, doing so may cause the hot water to overheat and cause
damage to the hot water heater.
The Hot and Cold water indicator lights
will flash together when the water bottle
is empty.
Replace the empty water bottle as soon
as possible.
How To Replace Empty Water Bottle
Open the cabinet door.
Place the probe assembly on the probe hanger.
Place a fresh bottle outside of cabinet.
Remove the entire plastic cap from the top of bottle.
Clean the outside of the new bottle with a cloth.
Place the probe into the bottle. Slide the collar down until it clicks
into place. If you are using a 3 gallon
bottle rather than a 5 gallon bottle
you can adjust probe by pressing
the two tabs at the head of the probe
and sliding the collar down to the
neck of the bottle.
7.
6.
Push the head down until the
tube hits the botton of bottle. Slide the bottle into cabinet
and close the door.
8. 9.
1.
2.
3.
4.
5.

9
DEEP CLEANING
operation.
To avoid electrical shock, unplug the water dispenser
WARNING
WARNING
before performing the cleaning operation.
This cleaning procedure should be performed by an adult.
The hot water is extremely hot and can cause severe burns,
WARNING
please allow the water dispenser to cool off before performing the cleaning
The water dispenser was disinfected before shipping from the factory.
However, prior to use, please clean the external cabinet and dispenser
at least 0.5 gallon(2 liters) of water prior to use.
Perform this cleaning operation every 3 to 6 months.
Use the Self-Cleaning Ozone Feature
The cycle takes 90 minutes to complete. During this time do not
dispense and drink the water.
Doing so may result in an odd taste. For your convenience, we recommend that you
do this during a period when the dispenser is not in use, sush as overnight hours or
when staff is away from the office. During the cycle you may smell a faint trace of
ozone.
It is highly recommended that you use self-cleaning feature on weekly basis to clean
tanks and water lines.
To activate the self-cleaning cycle, press in the self-cleaning switch(15), hold for 5
seconds, and release.
The power indicator light on the front of the dispenser will begin blinking, indicating the
cleaning process is underway.
During the cleaning cycle, ozone is produced and injected into the water system.
This ozone helps to kill bacteria and biofilms typically found in water dispensers. By
the time the cleaning cycle ends, the ozone is converted to harmless oxygen and
emitted into the air.
IMPORTANT:

10
1.
2.
3.
4.
Rinsing, Cleaning, and Draining
To prolong the lifetime of the machine, it is recommended that the unit be
cleaned and sanitized manually about every six months.
To clean the outside of the unit
Use a disinfectant of your choice to wipe down the outside of the machine.
Disinfectant does not come with this unit. It can be purchased separately
from a local store.
To rinse the inside of the unit
The machine has been disinfected prior to departing from the factory. Howev-
er, it is recommended to rinse and drain the unit prior to installation.
Remove the white cold water tank cover and the separator.
Pour 0.6 gallons of clean water into the cold tank. (The cold water tank
is the open cylinder that the white cover was removed from).
Place a large bucket beneath the drain outlet located on the back of
the unit. Remove the drain cover and allow the water to drain from the
unit. Water will start flowing as soon as the drain cover is removed.
The dispenser will heat water to a temperature of
WARNING
approximately 194°F. It can cause severe burns if not handled carefully.
Please use caution while operating and cleaning. Please allow ample time
for any hot water inside the machine to cool down before draining it.
Before cleaning, make sure that the cooling switch and heating switch
are in the off (O) position and unplug the machine.
Remove the two screws located on the back (at the top, in line with the
switches) of the cooler. Remove the top cover by lifting at an angle and
pull off.
Pour fresh water into
cold water tank. Remove plastic
drain plug cover

11
5.
1.
3.
4.
5.
Once water is completely drained, reposition the drain cover, cold tank
cover and the top cover. Ensure that the pipes and wires are connected
properly and you may use the dispenser as normal.
Cleaning:
The dispenser will heat water to a temperature of
approximately 194°F. It can cause severe burns if not handled carefully.
Please use caution while operating and cleaning. Please allow ample time
for any hot water inside the machine to cool down before draining it.
Unscrew the top cover and lift off the cold tank lid.
2. Place a large bucket beneath the drain outlet located on the back of the
unit. Remove the drain cover and allow the water to drain from the unit.
Water will start flowing as soon as the drain cover is removed.
To remove mineral deposits from the water system, mix 1-gallon of water
with 200 grams of citric acid crystals (not included) or a citric acid cleaning
solution of your choice.
WARNING
Once water is completely drained, reposition the drain cover so water
does not drain into bucket.
Put the mixture into the machine's cold tank.
Plug in the power cord and turn on (I) the heating switch . Allow the
water to heat for 15 minutes.
6. Turn off the heating switch and allow the liquid mixture to cool down for
20 minutes.
7. Drain the liquid from the drain outlet. Flush water system with fresh water
two or three times by following the rinsing instructions above. Only
disassemble parts mentioned to avoid damaging the machine.

12
TROUBLE SHOOTING
Water dispenser
is leaking
Water dispenser is
not dispensing water
Problem Drain outlet is not secure.
Possible Cause Suggested Solution
Tighten drain cap
Unplug and replace unit
Plug into electrical outlet
Activate power switches to the
ON position
Make sure the lower door is properly
closed.
Make sure the dispenser is on an
even floor surface.
This is a normal noise.
Replace with full water bottle and
wait for the water to heat or cool.
Unplug water cooler and reset the
breaker or replace the fuse.
Replace empty water bottle
Activate the child safety lock by
sliding the red lock button to the
side while pressing the hot water
button at the same time.
Internal water leak.
The unit is unplugged
Lower door is not closed shut
Water dispenser placed on
uneven floor
Water pump makes a noise
when running
All the water in the tanks
has been used
The circuit breaker in your
home has tripped or the
fuse has blown
Cold or hot water On/Off sw-
itches, located in the back of
the unit are in the Off position
Empty water bottle.
Child safety lock (hot water)
is not activated
Water is not cold
or hot enough
Water Dispenser
is noisy
Thermostat is set too cold. Turn off cooling system for 4-hours
and retest faucets for water flow.

13
TECHNICAL PARAMETERS
Hot Water Capacity
MODEL
Hot Tank Volume Cold
Water Capacity Cold
Tank Volume
Package Dimensions
Refrigerant
High Side
Low Side
Voltage / Frequency
Heating Power
Rated Power
Cooling Method
Heating Method
1 gallon/hr
CWB412ASB
1/3 gallon
2/3 gallon/hr
1 gallon
15.2" x 14" x 43.9" inch
R134a/36g(1.27oz)
1.6MPa(232psig)
0.62MPa(90psig)
115V 60Hz
520W
Internal Element
Compressor
420W
1 YEAR LIMITED WARRANTY
This is the only express warranty for this product and is in lieu of any other warranty or condition.
Customer Service Phone: 1-844-224-1614
This warranty gives you specific legal rights, You may have other legal rights that vary depending on where
you live. Some states or provinces do not allow limitations on implied warranties or special, incidental
consequential damages, so the foregoing limitations may not apply to you.
We exclude all claims for special, incidental, and consequential damages by breach of express or implied
warranty. All liability is limited to amount of the purchase price. Every implied warranty, including any
statutory warranty or condition of merchantability or fitness for particlular purpose, is desclaimed except
to the extent prohibited by law, in which case such warranty or condition is limited to the duration of this
written warranty.
This warranty does not cover wear from normal use or operation that does not comply with the instruction
manual of damages to the product resulting from accident, alteration, abuse, or misuse. This warranty
extends only to the original consumer purchaser or gift recipient. Keep the original sales receipt, as proof
of purchase is required to make a warranty claim. This warranty is void if product is used for other than
single-family household use or subjected to any voltage and waveform other than as specified on the label.
This product is warranted to be free from defects in material and workmanship for a period of one (1) year
from the date of original purchase. During this period, your exclusive remedy is repair of replacement of
this product or any component found to be defective, at our opiton; however, you are responsible for all
costs associated with returning the prouduct to us and our returning the product or component under this
warranty to you. If the product or component is no longer available, we will replace with a similar one of
equal or greater value.

Table of contents
Popular Water Dispenser manuals by other brands

Curtis
Curtis MILANO G3 user manual

Omnifilter
Omnifilter OMNI OM40KCS installation instructions

GE
GE SmartWater GXSF18G Owner's Manual & Installation Instructions

Elkay
Elkay EZ Series Installation & use manual

Halsey Taylor
Halsey Taylor HAC8EECQ 1E Series owner's manual

Hamilton Beach
Hamilton Beach 2202 Use & care manual

Philips
Philips ADD4954 user manual

Hellenbrand
Hellenbrand ProMate DMT Series Consumers manual

Royal Sovereign
Royal Sovereign RWD-500W owner's manual

BRAVILOR BONAMAT
BRAVILOR BONAMAT Chill-002 operating instructions

Spectrum
Spectrum SWS Series Installation, service & operation manual

KYOWA
KYOWA KW-1514 instruction manual