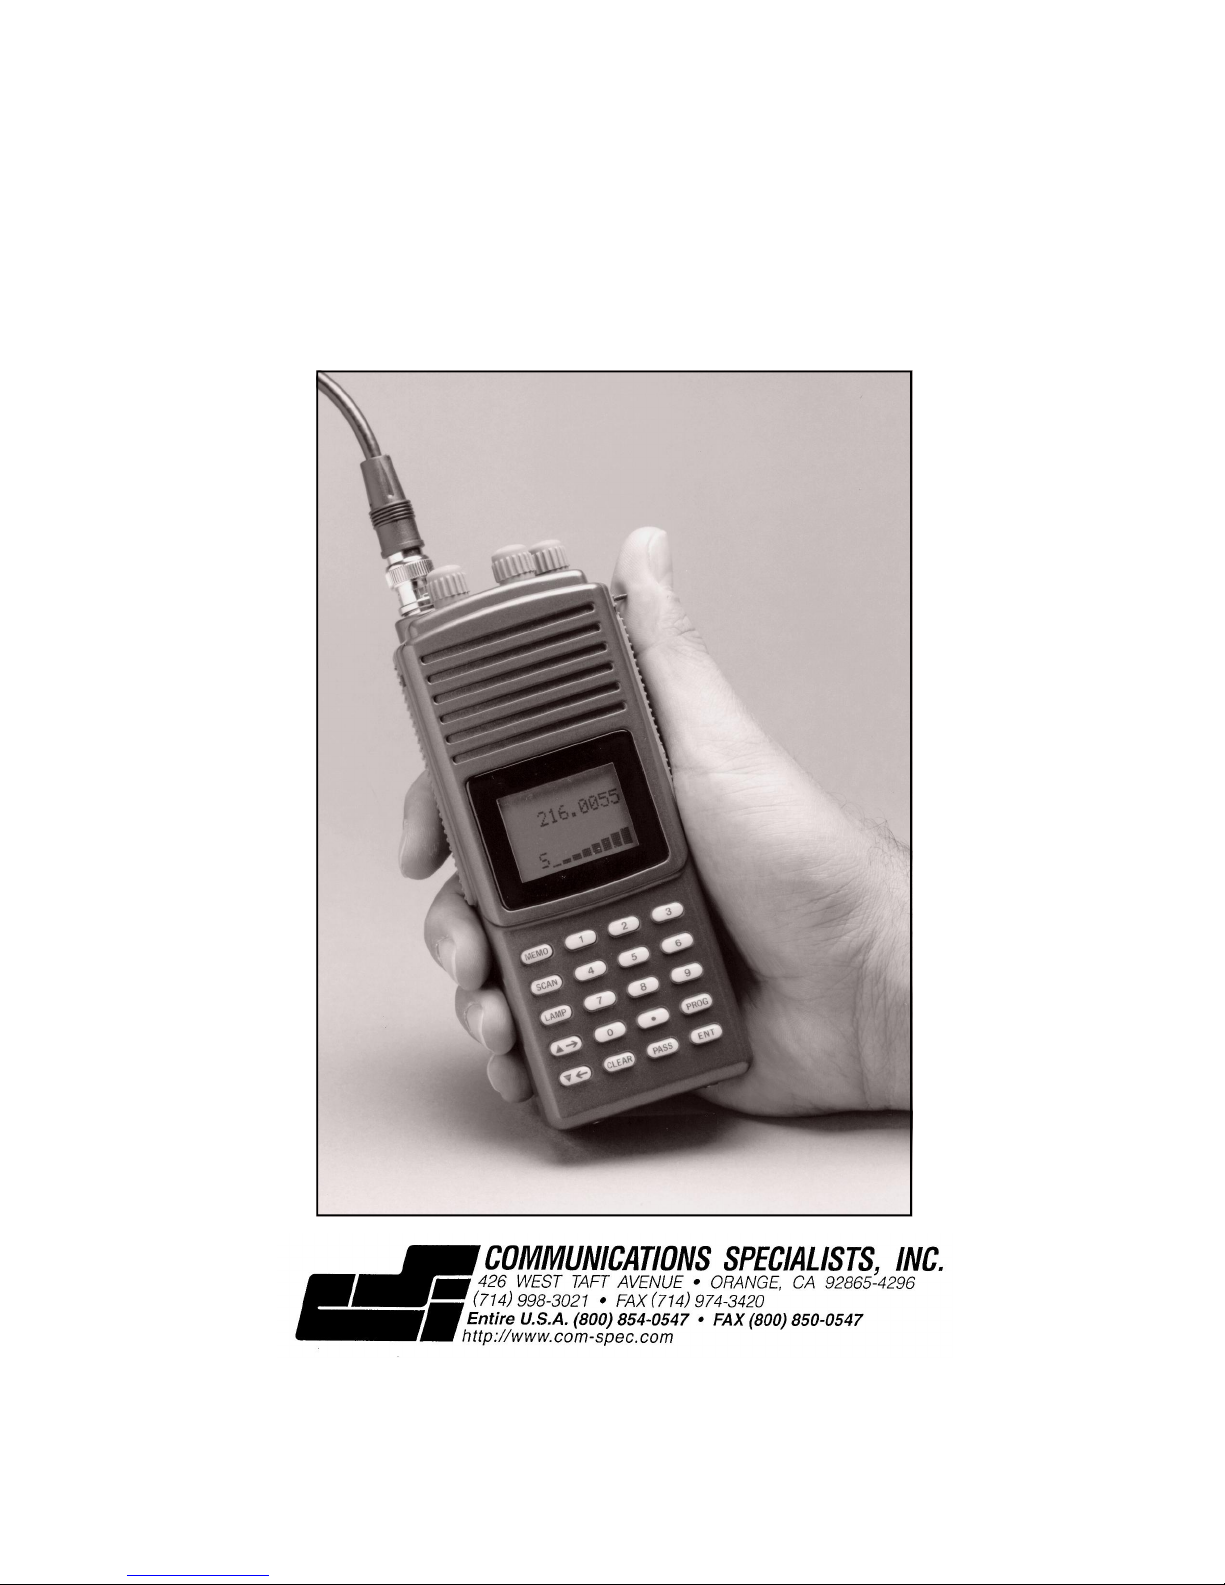
Communications Specialists R-1000 User manual

R-1000 TELEMETRY RECEIVER
OPERATING MANUAL

TABLE OF CONTENTS
Features Page 2
Specifications 2
Photos 3
Basic Start-up 4
Storing Data in the Memory Bank 4
Accessing the Memory Bank 5
Scanning the Memory Bank 5
Changing Data in the Memory Bank 5
Pass 5
Modify Number of Channels 6
Keyguard Lock 6
Programming Menu 6
Change Scan Dwell Time 6
Change Frequency Steps 6
Turn Beep On or Off 6
CPU Reset 7
Lamp 7
Battery Information 7
Close-in Direction Finding 8
Supplied Accessory Price List 9
Optional Accessory Price List 10
FCC Compliance Statement
This device complies with Part 15 of the FCC
Rules. Operation is subject to the following two
conditions: (1) this device may not cause harmful
interference, and (2) this device must accept any
interference received, including interference that
may cause undesired operation.

FEATURES
Factory tuned to any 4 MHz wide segment in the 148 - 174 MHz Band. Dual front
end also covers 216 – 222 MHz.
Very high sensitivity of -148 to -150 dBm.
Variable RF Gain control with 80dB range.
Step increments programmable in .1 kHz, .2kHz, .5kHz, or 1.0kHz steps.
Digital signal strength meter that responds to narrow telemetry pulses.
Loud 120mw audio output.
999 non-volatile memory channels. Each one with alphanumeric comment field
and .1kHz (100Hz) resolution frequency storage.
Scans through all memory channels. Dwell time on each channel is
programmable from 1 to 30 seconds in 1 second steps. Any memory channel
can easily be programmed out of the scan sequence.
Audible beep feedback when any key is pushed confirms entry and can be
programmed on or off.
For illumination in darkness, the display and keyboard are backlit with LEDs for
5 seconds when lamp key is pushed. If key is held for 2 seconds, LEDs will
stay on continuously until key is pushed again.
Supplied with 4 high capacity NiMH rechargeable batteries for 12-hour operation.
Also supplied with both 110vac wall charger and 12vdc cigarette lighter charger.
Both chargers will charge and operate receiver with good, dead, or no batteries.
Easy slide off battery compartment door to allow operation off regular "AA"
alkaline batteries.
Also supplied with tough nylon case with belt loop, rubber duck antenna for
non-directional use, belt clip, wrist strap, mono headset adapter and coax cable.
1 year warranty.
1 day delivery.
Price $695.00 (Visa/Mastercard and Discover welcomed)
Please specify desired 4 MHz wide segment when ordering.
SPECIFICATIONS
Selectivity: 6dB down @ ± 1.2 kHz, 60dB down @ ± 2.2 kHz
Receive Mode: CW
Antenna Impedance: 50 ohms
Antenna Jack: Standard BNC (BNC female)
Power Requirements: 4.8vdc (4 ea. "AA" Ni-cad or NiMH rechargeable
batteries), or 6.0vdc (4 ea. "AA" Alkaline batteries),
or 9-16vdc from supplied 110vac wall or
cigarette lighter charger
Current Drain: 160ma at maximum audio output
Dimensions: 6.1" (15.5cm) high, 2.6" (6.6cm) wide, 1.5" (3.8cm)
deep, less knobs
Weight: 12.4oz. (352 g) with supplied NiMH rechargeable
batteries
Headphone Jack: Top Mounted 3.5mm (1/8") mono headphone jack
2

TOP VIEW
FRONT VIEW
3

OPERATING INSTRUCTIONS
[BOLD] = Front panel keyboard keys, (BOLD) = Top panel knobs
BASIC START-UP
1. Turn (PWR/VOL) knob to the right.
2. Press [CLEAR].
3. Enter frequency (i.e.: 164.4375MHz) press [1] [6] [4] [.] [4] [3] [7] [5]
on the keypad and press [ENT]. 164.4375 will appear in the display
window. Rotate (DIAL) to fine tune if needed. If you make a mistake
press [CLEAR] to start over.
4. The (GAIN) knob will serve as your attenuator. Turn it to the right for
long range reception and to the left for close tracking.
STORING DATA IN THE MEMORY BANK
Store as many as 999 frequencies in the memory bank. Each memory
channel holds one frequency with an alphanumeric comment for convenient
identification. The stored data can be recalled quickly and easily.
1. Turn the receiver on and press [PROG]. PROG-MEMORY will appear
at the top of the display window.
2. The cursor will be on the top line. Press [] to bring the cursor to
(CH) channel selection. Enter the number 001 - 999 where the frequency
will be stored and press [ENT] or scroll with (DIAL) to desired channel.
3. Press [] to move the cursor to the top line and use the keyboard to
enter the frequency to be stored in that channel, then press [ENT]. The
receiver will now be active on that frequency. Once the frequency is
entered rotate (DIAL) to fine tune if needed. Push [ENT] again if no
TXT line or no change is required to TXT line after entering frequency,
to exit programming mode.
4. Press [] to move cursor to TXT line. Rotate (DIAL) until the
chosen letter or symbol is displayed. A maximum word length of seven
characters may be used. Press [] to advance to next character.
Press [ENT] when finished to exit programming mode.
5. If you make a mistake, press [PROG] to start over.
4

ACCESSING THE MEMORY BANK
1. To access memory bank, press [MEMO], channel number and [ENT] or
scroll through the channels by using [] or [] or (DIAL).
2. To exit memory press [CLEAR].
SCANNING THE MEMORY BANK
The receiver will pause on each channel for 1 to 30 seconds. The default
setting is 5 seconds. See Menu Programming to change the default setting.
1. Press [SCAN].
2. To exit Scan, press [MEMO] or [CLEAR].
CHANGING DATA IN THE MEMORY BANK
The data stored in the memory bank can be changed or deleted at any time.
1. Press [PROG]. If channel shown is not the one you want to change, press
[] to bring cursor to the channel number. Enter the channel number
you want to change and [ENT] or scroll using (DIAL).
2. Press [] to bring cursor to the frequency, key in new frequency and
[ENT] or rotate (DIAL) to desired frequency.
3. If you are only changing the frequency, press [ENT].
4. Press [] to bring the cursor to TXT to change the comment, press
[ENT] when finished.
5. To delete a channel press [PROG] then []. The cursor is now on the
channel line, enter the channel number and [ENT] or scroll using (DIAL).
Press [CLEAR] and [ENT].
PASS
The pass feature allows you to skip or pass over selected frequency channels
from your memory bank while in the scan mode.
1. You can select the channel to be passed over from the scan or memory
mode by pressing [PASS] while the selected frequency is shown on the
display. The frequency is now omitted from the scan list.
5

2. To add the channel back to your scan list press [MEMO], the channel
number and [ENT] or use [] or [] or (DIAL) to scroll through
the memory channels. Passed frequencies will display a small "p" in
front of the frequency. Press [PASS] to cancel the pass feature and the
frequency will be returned to your scan list.
MODIFY NUMBER OF CHANNELS
You may notice, while scrolling through the memory bank, a slight delay
after the last channel before it returns to the first channel. This is due to
the receiver scanning all 999 channels before returning to channel 001. If
you only use the receiver to monitor a few frequencies, you may choose to
modify the number of channels
1. To limit number of channels to 99 press and hold [1] while turning on
power, to limit channels to 199 press and hold [2] while turning on
power, to limit channels to 299 press and hold [3] etc.
2. To return to 999 channels press and hold [0] while turning on power.
KEYGUARD LOCK
The keyguard lock feature allows you to lock the keypad. While in the
keyguard mode the only keys on the keypad that can be used are the []
[] keys. (DIAL) (GAIN) and (PWR/VOL) knobs operate normally.
1. To activate keyguard mode, press and hold [MEMO] for 5 seconds.
2. To cancel keyguard press and hold [MEMO] for 5 seconds.
PROGRAMMING MENU
You can customize your receiver by changing the default settings in the
programming menu.
1. To access menu, press and hold [ENT] for 5 seconds.
2. Move the cursor with [] or [] to select menu option.
3. Rotate (DIAL) to:
Change scan dwell time from 1 to 30 seconds in 1 second steps.
Change steps to .1kHz, .2kHz, .5kHz, 1.0kHz.
Select beep tone on or off.
4. Press [ENT] when finished.
6

CPU RESET
Should the microprocessor "hang up" and need to be reset, this can be
done easily and without losing memory.
1. Press and hold [CLEAR] while turning receiver on.
2. Menu Programming will return to default settings of 5 second scan,
1.0 kHz steps, and beep on.
LAMP
The [LAMP] key will illuminate the display and keypad for use in
darkness.
1. Press [LAMP] to illuminate the display and keypad for 5 seconds.
2. Press and hold [LAMP] for 2 seconds to illuminate continuously until
[LAMP] is pressed again.
EARPHONE JACK
A 3.5mm (1/8") earphone jack is mounted on the top panel. When an
earphone or headphone is plugged in, the internal speaker in the receiver
is disconnected. If stereo headphones are used, only one side will be
active.
RECHARGING THE BATTERY
The receiver is supplied with both wall and cigarette lighter chargers that
plug into the side to recharge the batteries. A fully charged radio will
provide approximately 12 hours of operation at moderate volume. The
batteries should be charged overnight. Do not keep receiver on charger
any longer than two or three days.
USING ALKALINE BATTERIES
If "AA" alkaline batteries are installed in receiver, DO NOT plug either
wall or cigarette lighter charger into receiver. Remove at least one
alkaline battery if you choose to operate receiver directly off wall or
cigarette lighter charger without consuming battery power. If supplied
rechargeable batteries are installed, they may be left in while using wall
or cigarette lighter charger.
7

LOW BATTERY WARNING
If the NiMH batteries are low, the LOW BATTERY WARNING
indication will not go off when plugging in the charger. The radio
must be turned off first to extinguish the warning. This will
alleviate the radio from being accidentally left on and draining the
batteries.
CLOSE-IN DIRECTION FINDING
Your receiver has the ability to obtain directional information
within inches of the transmitter. Because the RF gain control has
such a high range of attenuation, it is imperative that the gain
control be placed fully clockwise when tracking a weak or distant
signal.
If the gain is left at the point where it was used for close-in
direction finding, you may NOT be able to hear the transmitter
during your initial attempts to track a new signal.
8

SUPPLIED ACCESSORY
PRICE LIST
RA-1 AA NiMH Rechargeable Battery (4 ea) $ 2.95 ea.
RA-2 Nylon Case with Belt Loop $ 14.95 ea.
RA-3 Rubber Duck Antenna $ 14.95 ea.
RA-4 Belt Clip $ 3.95 ea.
RA-5 Wrist Strap $ .95 ea.
RA-6 AC Wall Charger $ 12.95 ea.
RA-7 DC Cigarette Lighter Charger $ 7.95 ea.
RA-8 Mono Headset Adapter (1/4" female to 3.5mm male) $ 9.95 ea.
RA-60 5’ Coax Cable with BNC at each end $ 7.95 ea.
R-1000 (complete with above accessories) $695.00 ea.
Please specify desired 4 MHz wide segment
when ordering.
Factory sweep align front end to a new 4 MHz $100.00
wide segment in the 148 - 174 MHz Band.
9

OPTIONAL ACCESSORY
PRICE LIST
Directional Antennas
RA-150 148-152 MHz Folded Yagi Antenna w/ Grip $125.00 ea.
RA-159 158-161 MHz Folded Yagi Antenna w/ Grip $125.00 ea.
RA-165 163-166 MHz Folded Yagi Antenna w/ Grip $125.00 ea.
RA-170 169-172 MHz Folded Yagi Antenna w/ Grip $125.00 ea.
RA-216 216-222 MHz Folded Yagi Antenna w/ Grip $125.00 ea.
Non-Directional Antennas
RA-9 Magnetic Mount Antenna $49.95 ea.
RA-10 Auto Roof Mount Antenna $28.95 ea.
The RA-9 & RA-10 antennas must be cut to the center of
the operating frequency. A cutting chart is supplied with antenna.
Miscellaneous
RA-13 Mono Headset $36.95 ea.
10

WARRANTY
The R-1000 is warranted to be free of defects
in materials and workmanship for a period
of one (1) year from the date of purchase.
Just return the unit to the factory and we
will repair it at no charge.
Rev. 082912PL
Table of contents