Conglom QT014 Use and care manual

Before beginning installation, read ALL instructions first. Save these instructions
for future use. IF THERE ARE ANY PROBLEMS WITH INSTALLATION OR
OPERATION, DO NOT RETURN TO STORE. PLEASE FIRST CALL CUSTOMER
SERVICE AT 1-877-333-0098 (Monday to Friday, 8:30am to 5:00pm, EST)
• Observe all local plumbing and building codes.
• Carefully inspect the new toilet and components for damage.
• If the existing toilet installation area does not have a supply shut-off valve (see
Fig. 9) below the tank, you will need to install one before installing the new toilet.
• Ceramic toilets are very fragile, so please handle your new toilet with extra care
during installation.
•
Once the toilet is removed from the packaging, always ensure it is placed on a
soft surface such as a towel or blanket before installation.
INSTALLATION
Tools required for assembly: Safety goggles, hack-
saw, level, putty knife, adjustable wrench.
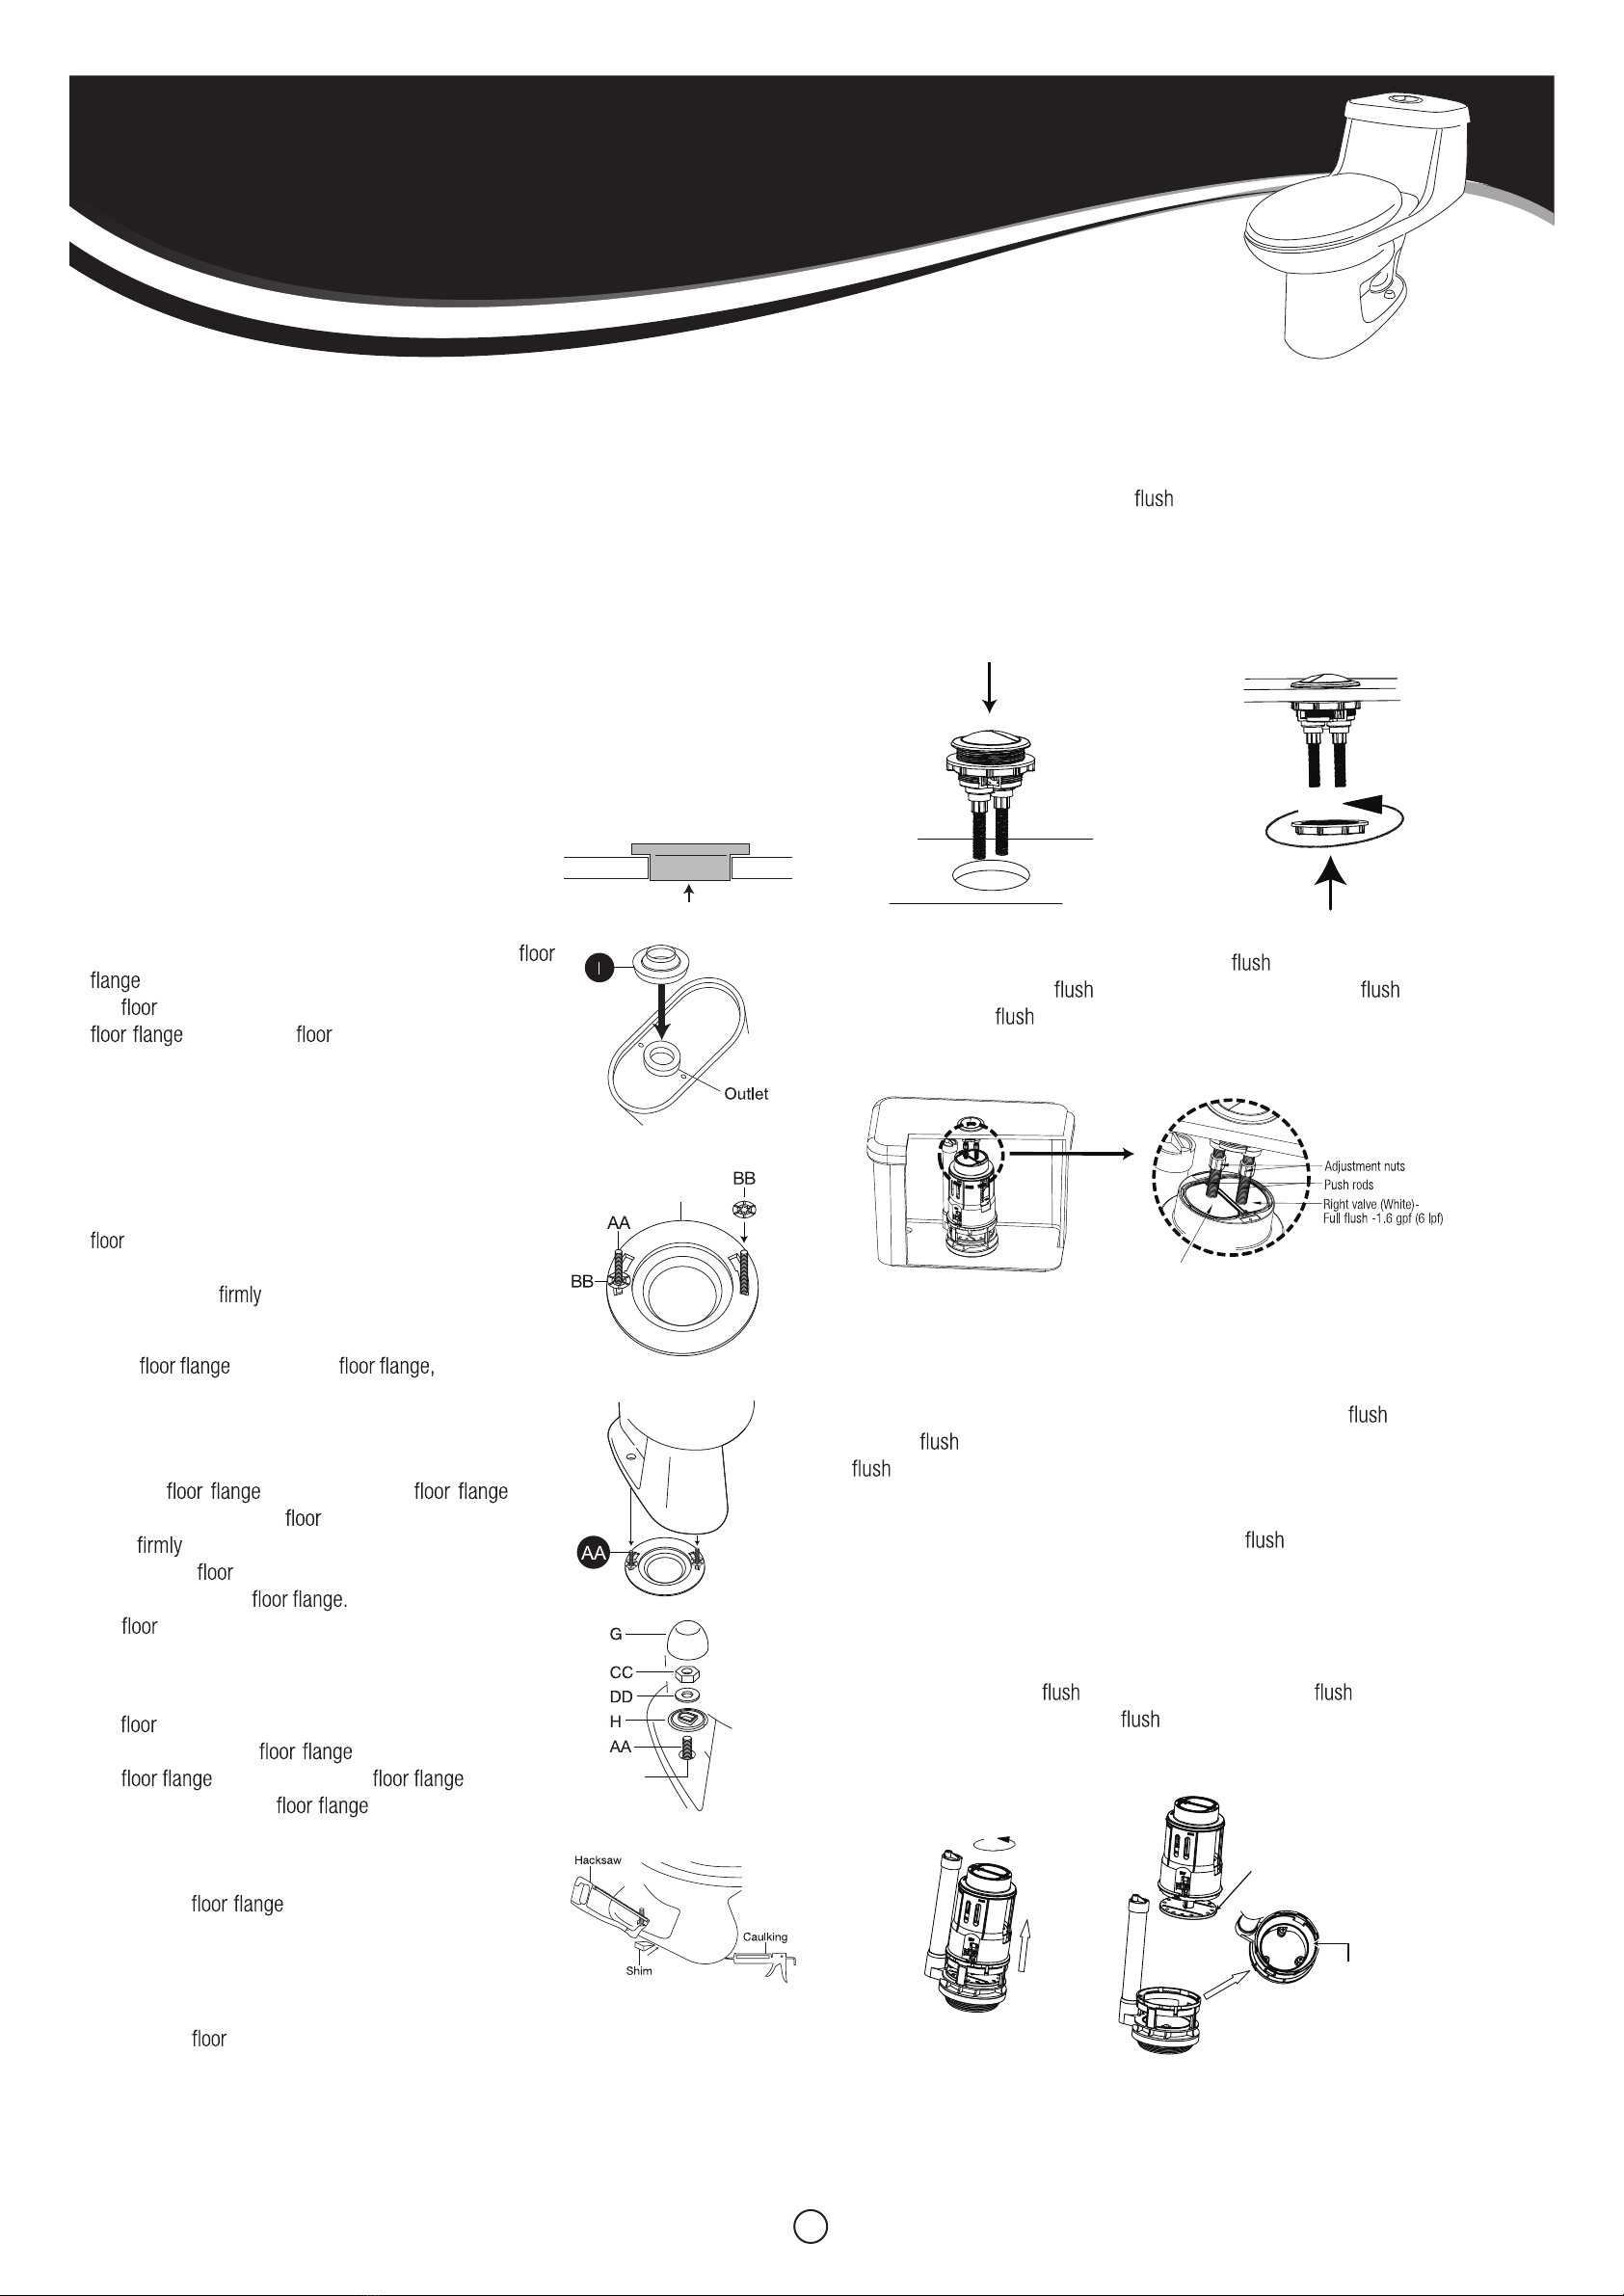
1.Check to make sure that the top surface of the
(not supplied) (see Fig. 1) is above the plane of
the surface on which the bowl will be installed. If the
is below the surface due to any reason
(i.e. marble or ceramic tiles, or improper installation,
etc.), then you will have to put on the outlet seal “I”
(see Fig. 2) that is thick enough to create a proper seal.
Note: A professional plumber is recommended for this
type of installation.
2.
Turn the toilet bowl upside-down and rest it gently on the
on something soft (i.e. a towel or piece of cardboard).
Then center the wax side of the outlet seal “I” over the toilet
bowl outlet and push it down around the bowl outlet
(see Fig. 2).
3. Place bolts “AA” in securing them
in place with the disk nuts “BB” to hold them in place
while installing the bowl (see Fig. 3).
4. Lift the toilet bowl, turning it right-side up, and lower it
over the while having the bolts
“AA” come through the mounting holes of the bowl.
Then push down and twist the toilet bowl until it is
touching the and ensuring a proper seal of the toilet
bowl outlet with the Be careful not to damage
the around the bottom of the toilet bowl (see Fig. 4).
5. If required, place shims (not supplied) under the base of
the toilet bowl to prevent any rocking of the toilet bowl on
the (see Fig. 5b). On both sides of the bowl, place the
bolt cap bases “H”, bolt washers “DD”, and
the nuts “CC” onto the bolts “AA”.
Alternately tighten the nuts “CC” by a couple
of turns each until snug. DO NOT OVER TIGHTEN. Snap
the bolt cap “G” onto the bolt cap base “H” (see Fig. 5a).
Note: If the bolts “AA” are too long, then cut
the top of the bolt with a hack saw to make room for the
bolt cap to snap into place (be careful not to damage the
ceramic while cutting). If desired, place a bead of caulking
(not supplied) around the base of
the toilet bowl where it
contacts the (see Fig. 5b).
Floor flange
Floor
Fig. 1
Fig. 2
Floor
flange
Fig. 3
Fig. 4
Fig. 5b
Floor
mounting
holes Fig. 5a
6. DUAL FLUSH BUTTON INSTALLATION
(i) Push button installation: The dual button mechanism will be shipped inside the
tank in a separate plastic bag and will need to be installed on the tank cover. Open
bag and carefully remove contents.
• Insert button mechanism through tank lid (see Fig. 6). The buttons should be
rotated so the smaller button is on the left.
• Securely tighten nut. DO NOT OVER TIGHTEN.
Fig. 6
(ii) Push rod adjustment: To ensure both buttons the toilet correctly, the bottom of
each push rod must be with the top surface area of the valve cylinders. If
the rods are not with the top surface, adjust the length of each rod by turning
the adjustment nut on each push rod (see Fig. 7).
Valve cylinder surface Fig. 7
DUAL FLUSH VALVE TROUBLE SHOOTING
Flush volume
If the push rods are too short and not fully connecting with the valves, this may re-
sult in low volume. Readjust push rod height and ensure the bottom of the push rod
is with the top surface of the valve cylinder (see instruction ii, Fig. 7).
Flush valve leaking
If the push rods are too long, this may result in the valve leaking. Shorten push rods
with the adjustments nuts (see instruction ii, Fig. 7).
Tank leaking from the valve (and for maintenance and cleaning)
To clean the valve seal or replace the entire unit:
• Turn cylinder counter clockwise and lift off
•
Clean the bottom of the valve seal and the top of the valve seat
• Reverse this procedure to attach valve cylinder (see Fig. 8)
1
High efficiency dual flush toilet
I N S TA L L AT I O N | R E PA I R | C A R E | W A R R A N T Y
Flush valve seal
Flush
valve
seat
Fig. 8
QT014

7. Connect the supply line “L” directly onto the threaded supply line connection of the
valve until it is hand tight. Open the shut off valve to the tank, and check for leaking.
If there is leaking from around the supply line connection then tighten the supply line
“L” until the leaking stops. DO NOT OVER TIGHTEN (see Fig. 9).
8. The valves are pre-calibrated at the factory, however variations in water pressure will
affect the water level. In order to ensure proper performance, it is very important
that the water level is adjusted to the level indicated on the tube or tank liner.
To lower or raise the water level for this type of valve, turn the adjusting screw (see
Fig. 9).
9. Check for leaks.
10. Install seat. See page 3 for seat installation instructions.
CARE AND CLEANING
REPLACEMENT PARTS
For general cleaning, use a mild, nonabrasive soap and warm water. Do not use abrasive
cleaners (such cleaners contain sand or silica that will scratch the china surface). Com-
mon bowl cleaners may be used on the china surface of the bowl. Do not use “in-tank”
bowl cleaners because they can contain aggressive chemicals that attack the tank com-
ponents (see warranty exclusions).
Fig. 9
Supply line connection
Supply line (L)
Refill tube
Shut off valve
Adjusting screw Waterline
HOME USE WARRANTY
This product is guaranteed to be free from structural and manufacturer defects for
the applicable warranty period shown below. This non-transferable guarantee ap-
plies only to the original purchaser and proof of purchase is required for all claims.
5 year limited warranty on fittings
20 year limited warranty on ceramic components
Exclusions
This warranty excludes defects resulting from:
• Improper installation whereby Conglom Kitchen & Bath’s installation instructions
are not followed correctly.
• If it has been altered in any way after shipping
• If it has been used for any application other than for home use
•Improper maintenance resulting from failure to reasonably clean, care for or
maintain aproductin accordance to Conglom Kitchen & Bath’s cleaning instructions.
• USE OF ANY TOILET CLEANERS THAT ARE APPLIED IN THE TOILET TANK WILL
VOID THE WARRANTY (In-tank cleaners can damage the rubber, metal and/or
plastic components causing leaks and reducing performance)
Warranty claim procedure
If a claimable defect occurs, please contact our customer service department
at 1-877-333-0098 (Monday to Friday, 8:30am to 5:00pm, EST).
Before you make your claim call, please make sure you have:
1. The description of the toilet
2. Proof of sale
3. Details regarding the defect
4. Name and address of the owner and installer
Claims must be out in writing and returned within six (6) months of appearance
of defect. Failure to comply with this stipulation will make the warranty null and void.
We reserve the right to a thirty-day (30) delay following receipt of claim in which to
inspect the product. We assume no responsibility for labor costs or removing/replac-
ing a previously installed product or transportation or return of a product.
2
If you are missing or require replacement parts, please call customer service at 1-877-
333-0098 (Monday to Friday, 8:30 am to 5 pm, EST). Identify the required part(s) and
have the replacement part number ready when you call.
PART ILLUSTRATION PART NUMBER QUANTITY
Hinge cover QHT112
QHT113
2
Bolt 2
QHT114
Adjustment washer 2
QHT115
Hinge gasket 2
PART ILLUSTRATION PART NUMBER QUANTITY
Rubber washer QHT116
QHT119
2
Washer QHT117 2
Plastic wing nut QHT118 2
Floor mounting bolts 2
Other parts are available at any plumbing retailer. Please contact your local plumbing
retailer for help.

I N S TA L L ATION I N S T R U C TIONS F O R S L O W C L O S E T O I L E T S E AT
IMPORTANT INFORMATION PRIOR TO ASSEMBLY:
1. The full set of installation parts can be found in the triangular wedge box labeled
HARDWARE.
2. For indoor use only.
3. Keep instructions for future use.
4. Verify that there are no missing parts.
To ensure this product is installed properly, please read these instructions carefully
before you begin.
PARTS LIST:
A Toilet seat ........................................................................................................ 1
B Hinge cover...................................................................................................... 2
C Bolt.................................................................................................................. 2
D Adjustment washer........................................................................................... 2
E Hinge gasket .................................................................................................... 2
F Rubber washer ................................................................................................. 2
G Washer ............................................................................................................ 2
H Plastic wing nut ................................................................................................ 2
ABC
D E F G H
INSTALLATION
Side view of toilet seat hinge connection:
Hinge cover
Bolt
Adjustment
washer
Hinge
gasket
Hinge
Rubber washer
Washer
Plastic wing nut
1.Attach the hinge gasket (E) to the bottom
of the toilet seat hinges. Align the hinges
over the toilet’s mounting holes.
Back
Hinge gasket
E
2.This installation kit includes a set of
adjustment washers (D).
TANK
FRONT OF BOWL
To move
seat forward
To move
seat back
3.Slip bolts (C) through the adjustible
washer (D) and mounting holes.
C
D
4.Thread plastic wing nuts on to bolts. Rubber
washer
Washer
Plastic
wing
nut
F
G
H
F
G
H
5.Tighten bolts using a flathead screwdriver.
Do not over-tighten.
6.Gently snap the hinge covers (B) into
place.
CARE AND CLEANING:
To clean the toilet seat, wash with mild, soapy water, rince thoroughly with clean water and
dry with a soft cloth. Avoid detergents, disinfectants, or cleaning products in aerosol cans.
Never use abrasive scouring pads or powders on the toilet seat. Some bathroom chemicals
and cosmetics may damage the toilet’s finish.
3
Imported by
St-Laurent, Quebec H4S 2C3
1-877-333-0098
www.conglomkb.com
Made in China
Other Conglom Plumbing Product manuals
Popular Plumbing Product manuals by other brands

Sanela
Sanela SLU 93NB Instructions for use

brondell
brondell SWASH LT89 owner's manual

Toto
Toto TLE0150 Series instruction manual

Hans Grohe
Hans Grohe Talis M51 200 2jet 72813 Series Instructions for use/assembly instructions

Cobra Pro
Cobra Pro CP3020 Operational manual

Hans Grohe
Hans Grohe Axor ShowerHeaven 720 Instructions for use/assembly instructions