Conservator GRH1482TW User manual

GRH1482TW


1. IMPORTANT SAFETY WARNINGS
WARNING CONCERNING R600a REFRIGERANT
DANGER - RISK OF FIRE OR EXPLOSION. FLAMMABLE REFRIGERANT USED. DO NOT PUNCTURE
REFRIGERANT TUBING.
DANGER - RISK OF FIRE OR EXPLOSION. FLAMMABLE REFRIGERANT USED. THE UNIT IS TO BE
REPAIRED ONLY BY TRAINED SERVICE PERSONNEL. DO NOT PUNCTURE REFRIGERANT TUBING.
CAUTION - RISK OF FIRE OR EXPLOSION. FLAMMABLE REFRIGERANT USED. CONSULT THE USER’S
MANUAL / OWNER'S GUIDE BEFORE ATTEMPTING TO SERVICE THIS PRODUCT. ALL SAFETY
PRECAUTIONS MUST BE FOLLOWED.
CAUTION - RISK OF FIRE OR EXPLOSION. DISPOSE OF PROPERTY IN ACCORDANCE WITH FEDERAL
AND/OR LOCAL REGULATIONS. FLAMMABLE REFRIGERANT USED.
CAUTION - RISK OF FIRE OR EXPLOSION DUE TO PUNCTURED REFRIGERANT TUBING. FOLLOW
HANDLING INSTRUCTIONS CAREFULLY. FLAMMABLE REFRIGERANT USED.
WARNING! DO NOT STORE OR USE GASOLINE OR OTHER FLAMMABLE VAPORS AND LIQUIDS IN
THE VICINITY OF THIS OR ANY OTHER APPLIANCE. READ PRODUCT LABELS FOR FLAMMABILITY.
CAUTION - THE UNIT MUST BE POSITIONED AND INSTALLED PROPERLY FOLLOWING THE
INSTRUCTIONS CONTAINED IN THIS MANUAL, UNDER THE SECTION "INSTALLATION". WHEN USING
AN ELECTRICAL APPLIANCE, YOU SHOULD ALWAYS OBSERVE BASIC SAFETY PRECAUTIONS TO
REDUCE THE RISK OF ELECTRIC SHOCK, FIRE OR PERSONAL INJURY.
1. WARNING - Keep the ventilation openings in the enclosure free of obstructions. Do not cover the
appliance.
2. WARNING - Be careful not to damage the refrigerant tubing.
3. WARNING - Do not use electrical appliances inside food storage compartments.
4. WARNING – DANGER: Risk of trapping children! Before discarding of your old appliance:
xTake the doors off.
xLeave the shelves in place to prevent children from climbing easily into the refrigerator.
5. Always unplug the appliance before cleaning and/or servicing.
6. Please make sure that all persons who will use with this appliance are familiar with its operation and safety
precautions. It is very important to install the appliance correctly and to follow all safety instructions.
This appliance may not be used by persons (including children) with reduced physical, sensory or mental
capacities or lack of experience and knowledge unless instructed by a person responsible for their safety.
Children must not play with this unit.
7. If the power cord is damaged, it must be replaced by the manufacturer, its service center or a qualified
electrician to avoid incidents.
1

1. IMPORTANT SAFETY INSTRUCTIONS (continued)
8. Please dispose of the appliance according to local regulations since the appliance uses flammable
refrigerant and gas. Before discarding the appliance, remove the doors to prevent children from climbing
inside the appliance.
9. This appliance is intended for home use only. Any other use will void the warranty.
10. Do not use this unit to store explosive materials such as aerosol containers with a flammable propellant.
11. Do not use extension cords or 2-prong adapters to connect this appliance to an electrical outlet.
DANGER
IT IS DANGEROUS FOR ANY PERSON OTHER THAN AUTHORIZED SERVICE PERSONNEL TO MAKE
REPAIRS ON THIS APPLIANCE.
DO NOT ATTEMPT TO REPAIR THE APPLIANCE YOURSELF. IT IS DANGEROUS TO MODIFY THE
SPECIFICATIONS OF THIS PRODUCT OR CHANGE IT IN ANY MANNER. ANY DAMAGE MAY RESULT
IN A SHORT-CIRCUIT, FIRE OR ELECTRIC SHOCK.
12. DANGER - Risk of fire or explosion. Flammable refrigerant used. To be repaired only by authorized
personnel. Do not puncture refrigerant tubes.
13. DANGER - Risk of fire or explosion. Flammable refrigerant used. All safety measures must be followed.
14. DANGER - Risk of fire or explosion if refrigerant tubes are perforated. Follow the precautionary
instructions. Flammable refrigerant used.
2

2. PRODUCT OVERVIEW
** All images appearing in this instructions manual are for referential purposes only.
For more detailed information, please refer to your appliance.
1
2
4
3
5
6
7
ĞĐŽƌĂƚŝǀĞďůŽĐŬ
^ŚĞůĨ
^ŚĞůǀĞƐ
ƌŝƐƉĞƌ
ĂůĐŽŶŝĞƐ
>ĞǀĞůŝŶŐ&ĞĞƚ
ĂůĐŽŶŝĞƐ
1
2
4
3
5
6
7
3

3. INSTALLATION INSTRUCTIONS
RECOMMANDATIONS
WARNING
BEFORE CONNECTING THE APPLIANCE
You should make sure that you have a properly grounded outlet that is compatible with the 3-prong plug on this
appliance.
BEFORE STARTING THE APPLIANCE
We recommend that you wait at least two (2) hours before connecting the unit to allow the refrigerant to flow
back to the compressor.
BEFORE USING YOUR APPLIANCE
1. Before placing food in your appliance, plug it in and wait 24 hours to ensure it is working properly and that
it reaches the correct temperature. Your appliance should not be overfilled.
2. Do not place bottled or sealed liquid products such as beer and soft drinks in the freezer as they may
explode.
3. Do not store or place dry ice in refrigerator.
4. It is recommended to place the appliance in a place where the ambient temperature is between 16° C and
32° C. The unit may not operate properly if it remains at a temperature above or below the indicated range.
5. Install your appliance in a dry place, avoid highly humid locations.
6. Do not expose the unit to direct sunlight, rain or frost.
7. Do not install the appliance near heat sources such as stoves, fireplaces or radiators.
8. The appliance requires power supply of 115V / 60Hz AC.
9. Do not use the appliance if the power cord is damaged or the plug is worn.
10. Do not place flammable, explosive, volatile and highly corrosive objects in the appliance as they may cause
damage or even fire.
11. Do not place flammable objects near the appliance.
12. This product is a household appliance and should only be used for food storage. According to National
standards, refrigerators should not be used for any other purposes, such as storing blood, medicines or
biological products.
13. The location of the power outlet must be accessible when installing the appliance and must be grounded.
14. When connecting to an electric outlet, do not use extension cords or power bars as they may overload the
system and cause a fire.
15. Plug your appliance into a stand-alone electrical outlet with a voltage matching what is indicated on the
rating plate. Do not plug other appliances on the same outlet.
16. Make sure the plug is not flattened or damaged. Failure to do so could result in a short circuit, electrical
shock or fire.
4

3. INSTALLATION INSTRUCTIONS (continued)
3.1 Positioning
When selecting a position for your unit, you should make sure the floor is flat and solid so as to support the load and
that the room is well ventilated. Avoid locating your unit near a heat source, e.g. stove, boiler or radiator. Also avoid
direct sunlight as it may increase the electrical consumption. Extreme cold ambient temperatures may also cause
the unit to not perform properly. This unit is not designed for use in a garage or outdoors. Do not drape the unit with
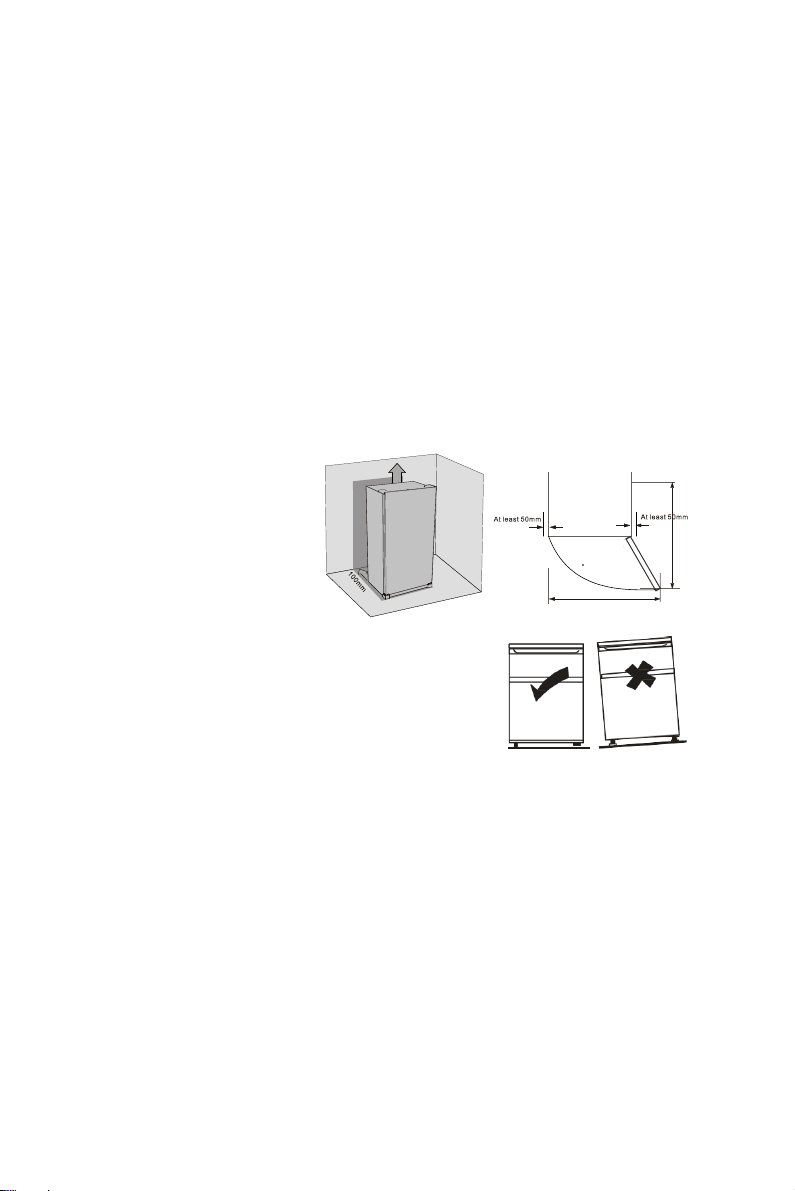
any covering. When installing the unit, ensure that 3 inches of free space is left at both sides, 1 inch at the rear and
1 inch at the top of the unit. This will allow cool air to circulate around the refrigerator and improve its efficiency.
3.2 Door Space Requirements
3.3 Levelling the Unit
To make this adjustment, use the two levelling feet at the front of the
unit. If the unit is not level, the door and magnetic seal alignments will
not meet up properly. Drop down from the top, clockwise and
counterclockwise, loosening or tightening.
3.4 Cleaning before use
Wipe the inside of the unit with a light solution of baking soda and water. Then rinse with warm water using a
wrung-out sponge or cloth. Wash the shelves and vegetable crisper bins in warm soapy water and dry completely
before replacing in the unit. Clean the exterior of the unit with a damp cloth. If you require more information refer
to the CLEANING section.
3.5 Interior Accessories
Various glass shelves and/or plastic storage bins are included with your appliance - different models have different
combinations.
You should always slide one of the full-sized glass storage shelves into the lowest set of guides, above the fruit and
vegetable bins and keep it in this position. To do this, pull the storage shelf forward until it can be moved upwards
or downwards and then removed. Do the same in reverse if you wish to insert the shelf at a different height.
In order to make full use of the volume of the fresh food storage compartment and of the frozen-food storage
compartment, the user can remove one or more shelves and/or drawers out of the appliance, to better suit your
needs.
PP
PP
ͼ^ĞůĞĐƚĂůŽĐĂƚŝŽŶǁŝƚŚŽƵƚĚŝƌĞĐƚĞdžƉŽƐƵƌĞƚŽƐƵŶůŝŐŚƚ
ͼ^ĞůĞĐƚĂůŽĐĂƚŝŽŶǁŝƚŚĞŶŽƵŐŚƐƉĂĐĞĨŽƌƚŚĞƌĞĨƌŝŐĞƌĂƚŽƌĚŽŽƌƐƚŽŽƉĞŶĞĂƐŝůLJ
ͼ^ĞůĞĐƚĂůŽĐĂƚŝŽŶǁŝƚŚůĞǀĞů;ŽƌŶĞĂƌůLJůĞǀĞůͿĨůŽŽƌŝŶŐ
ͼůůŽǁƐƵĨĨŝĐŝĞŶƚƐƉĂĐĞƚŽŝŶƐƚĂůůƚŚĞƌĞĨƌŝŐĞƌĂƚŽƌŽŶĂĨůĂƚƐƵƌĨĂĐĞ
ͼůůŽǁĐůĞĂƌĂŶĐĞƚŽƚŚĞƌŝŐŚƚůĞĨƚďĂĐŬĂŶĚƚŽƉǁŚĞŶŝŶƐƚĂůůŝŶŐdŚŝƐ
ǁŝůůŚĞůƉƌĞĚƵĐĞƉŽǁĞƌĐŽŶƐƵŵƉƚŝŽŶĂŶĚŬĞĞƉLJŽƵƌĞŶĞƌŐLJďŝůůƐůŽǁĞƌ
5

4. REVERSING THE DOORS
Tool required: Philips screwdriver, flat bladed screwdriver, hexagonal spanner.
xEnsure the unit is unplugged and empty.
xTo take the door off, it is necessary to tilt the unit backwards. You should rest the unit on something
solid, so that it will not slip during the door reversing process.
xAll parts removed must be saved to do the reinstallation of the door.
xDo not lay the unit flat as this may damage the coolant system.
xIt’s better that 2 people handle the unit during the assembly.
FREEZER DOOR
1. Unscrew the top hinge cover (see figure 1).
2. Remove the top hinge cover.
3. Loosen the top hinge screws with Phillips head screwdriver.
4. Adjust the door or put a spacer in between and then tighten the screws.
5. Replace the top hinge cover.
6. Move the hinge cover from left side to right side.
REVERSING THE DOOR SWING
Left/right door opening method:
This product allows you to reverse the door opening from left to right and back. You can select your preference of
door opening by following the procedure to make the change.
Dismantling (see figures 1 and 2):
1. Close shut the refrigerator and freezer doors with adhesive tape on both sides to hold the doors in place.
2. As shown in figure 1, remove the hinge cover screw on the upper part of freezer door with a Phillips head
screwdriver. Then remove the three screws that hold the hinge. Take out the hinge by pulling it vertically
and set it aside in a safe place.
3. Remove the adhesive tape on freezer door, lift and take off the door and carefully set it aside.
4. Remove all the screws of the middle hinge, lift and take off the middle hinge and keep all hinge parts in a
safe place.
6

4. REVERSING THE DOORS (continued)
REVERSING THE DOOR SWING (continued)
5. Move the hinge hole covers from left side to right side.
6. After removing the refrigerator door hinge, remove the screw cover from the upper left side of
refrigerator door frame, then insert the cover into the hinge hole on the right of door frame.
7. Remove the adhesive tape on refrigerator door, lift and take off the door then carefully set it aside.
8. Tilt the refrigerator on a 45-degree angle to have access to the bottom front.
9. Remove both left and right front feet from bottom. Then remove all screws on the bottom door hinge.
Set aside the screws and leveling legs in safe place.
Fig 4
REINSTALLATION
1. Take a new bottom hinge from the user’s manual bag. Align the holes in the bottom hinge to the
corresponding holes on the left side of the cabinet. Insert and tighten the screws. Reinstall both front
feet. Install the short leveling leg on the left side and the long leveling leg on the right side.
2. To install the refrigerator door: Line up the left bottom hole of the refrigerator compartment door over
the bottom hinge pin. Move door forward to make sure it is straight and aligned with the bottom hinge.
Ensure the door is aligned horizontally and vertically so that the seal is closed on all sides before finally
installing and tightening the middle hinge. Install and tighten the middle hinge again and turn the hinge
axle until it completely enters the door body. Secure it with the screws.
Fig 5
3. To install freezer door: Line up the left bottom hole of the door over the center hinge’s middle pin. Move
door forward to make sure it is straight and aligned with the freezer compartment. Ensure the door is
aligned horizontally and vertically so that the seal is closed on all sides before finally tightening the top
hinge. Take the new upper hinge from the user’s manual bag, turn the hinge axle until it completely
enters the door body. Screw the top hinge.
4. Install the top cover and screw it to the top of unit.
7

5. OPERATION
Keys Operaon
5.1
5.2
SUMMER,RECOMMENDED and WlNTER.
8

6. CLEANING
6.1 Defrosting
This appliance does not require defrosting as it is specially equipped with a ‘Frost-free’ type cooling system. The
defrost water is routed into a pan located near the compressor where it then evaporates.
6.2 Cleaning the Interior and the Exterior of the Unit
˓
Remove all the shelves and the produce bins. Toremove the produce bins, first remove the lower doorshelf.
˓
Clean the inside of the unit with a mild solution of baking soda and water and then rinse with warm water
using a wrung-out sponge or cloth. Wipe completely dry before replacing the shelves and the produce bins.
˓
Use a damp cloth to clean the exterior then wipe with a standard furniture polish. Make sure that the door
is closed to avoid the polish getting onto the magnetic door seal or inside the unit.
6.3 Cleaning Tips
Condensation may appear on the outside of the unit. This may be due to changes in room temperature. Wipe off
any moisture residue with a clean cloth. If the problem persists, please contact a qualified technician for assistance.
7. MAINTENANCE
7.1 Changing the Internal Light
We do not recommend that you change the LED light yourself. Please contact an authorized service center.
7.2 Care When Handling / Moving Your Unit
Hold the unit around its sides or its base when moving it. Under no circumstances should it be lifted by holding the
top end and edges.
The condenser is located at the bottom of the refrigerator; please be careful. Keep the bottom end dry during use,
processing and handling.
Before moving the unit, make sure that the surface on which it will rest is perfectly flat and as level as possible and
solid enough to hold the weight of the unit and its contents.
7.3 Servicing
The unit should be serviced by an authorized technician and only genuine spare parts should be used. Under no
circumstance should you attempt to repair the unit yourself. Repairs carried out by inexperienced persons may
cause injury or serious malfunction. Contact a qualified technician.
7.4 Switching Off Unit for Long Periods of Time
When the unit is not in use for a long period of time, disconnect it from the main source of power supply, empty out
its contents and clean the appliance, leaving the door ajar to allow air out and to help prevent odor.
9

8.
10
TROUBLE SHOOTING
The following issues can be handled by the user. Please call the aer-sale service department only if they are not
resolved.
Non operational
Check if the appliance is plugged and connected to power;
Low voltage;
Failure power or tripping circuit.
Odors
Odorous foods should properly wrapped;
Check if foods are spoiled;
Check if the interior needs cleaning.
Long-term operation of
compressor
It is normal that the appliance operates for a longer period of time in summer
when the ambient temperature is higher;
Do not store too much food in the
appliance at one time;
Do not store cooked foods until they are well cooled;
Frequent opening of t
he door will cause compressor to start.
Light does not work
Check if the appliance is connected to power;
Check if light is damaged.
The refrigerator door
does not close properly
The door is blocked by food packages;
The compartments are overstuffed;
Appliance is not level.
Loud noises
Check if food is properly set flat;
Check
if the appliance is level;
Check if the parts are properly installed.
8.1
Tips
It is a normal for the refrigerator enclosure to give offheat during operaon especially in summer; this is
caused by emissions from the compressor.
Condensaon can be detected on the exterior surface and door seals of the freezer when the ambient
humidity is high; this is a normal phenomenon and the condensaon can be wiped offwith a dry towel.
Humming sounds can be generated by a funconing compressor especially when starng up or shung
down.


CKCST-G01
Table of contents
Other Conservator Refrigerator manuals

Conservator
Conservator GRM072AW User manual

Conservator
Conservator GRLH152SW User manual

Conservator
Conservator GRM183TW User manual

Conservator
Conservator VPS10FGMWW Operating instructions

Conservator
Conservator GRM183UW User manual

Conservator
Conservator GRMH183UW User manual

Conservator
Conservator GRMH141AW User manual

Conservator
Conservator GRM183QW User manual

Conservator
Conservator GRLH184TW User manual