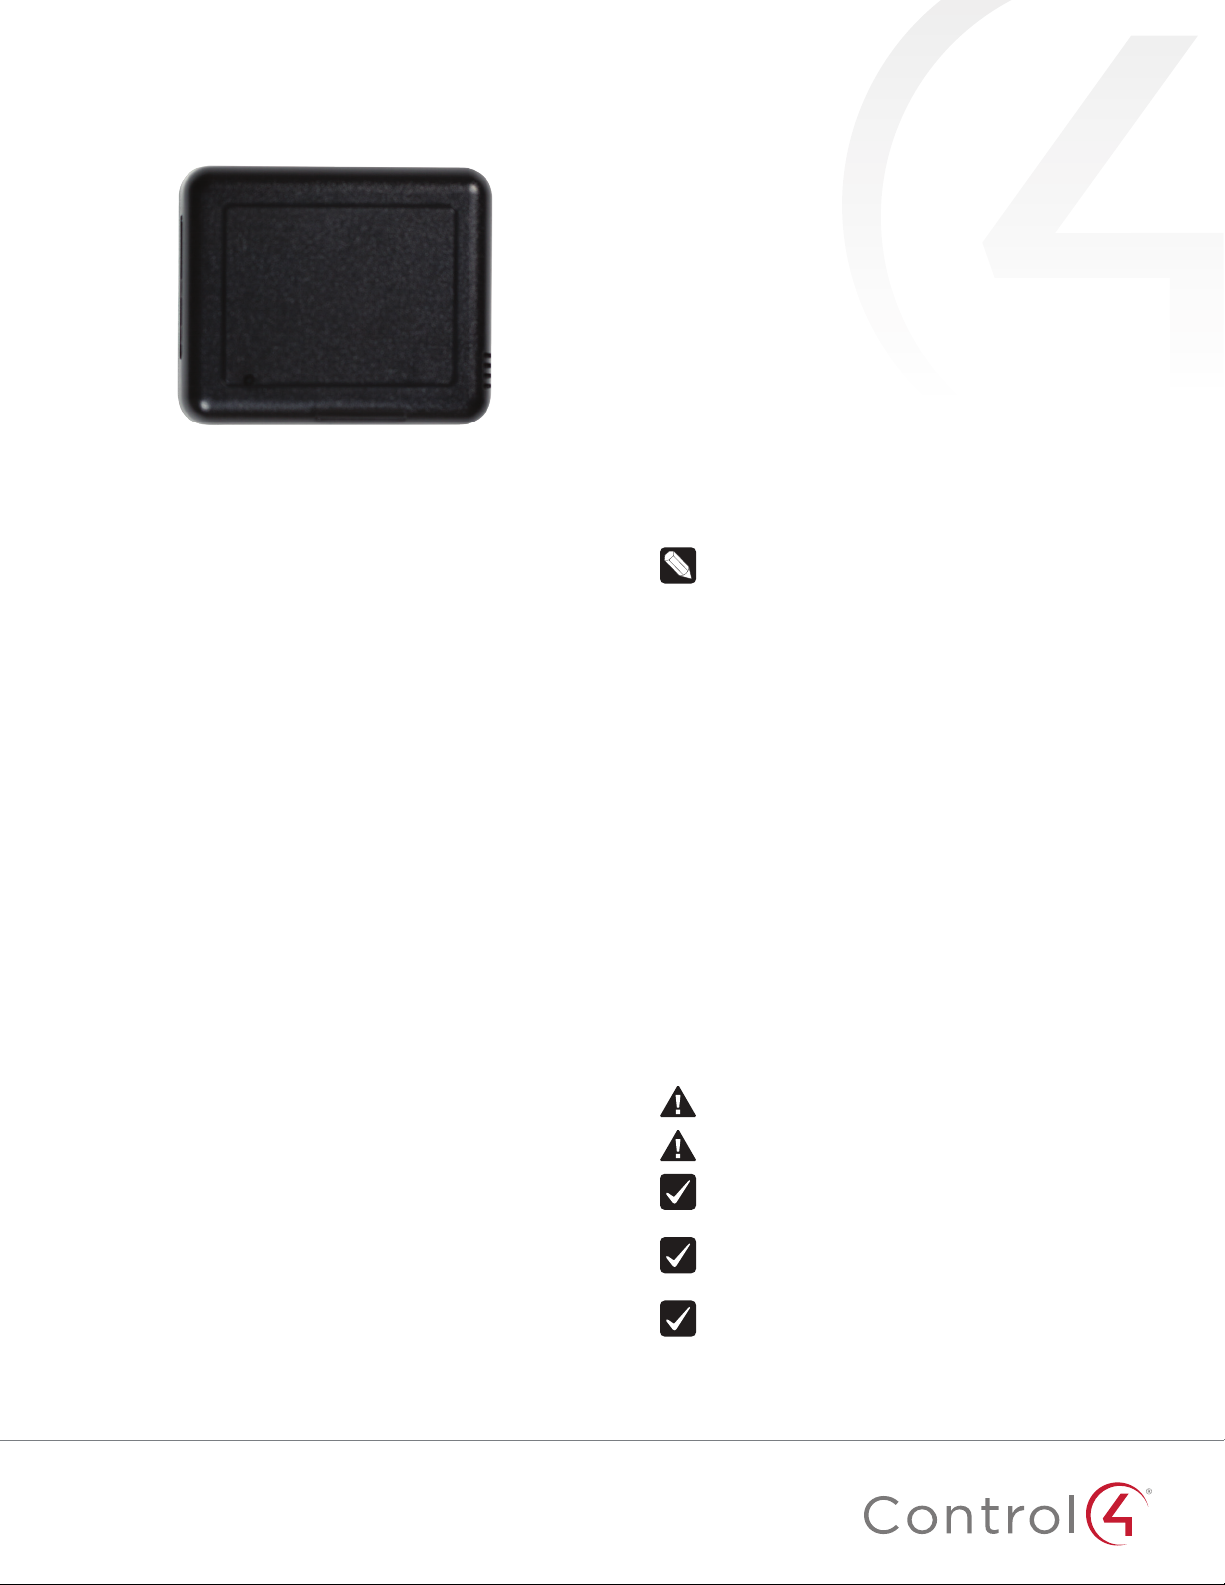
Contro l4 ZigBee C4-Z2C User manual

11
Package contents
• C4-Z2C ZigBee Contact Sensor
• Four wall mounting screws
• Four plastic dry wall anchors
• AA batteries (2)
Requirements
• Composer Pro 2.10.0 or higher
Features
The ZigBee Contact Sensor (Z2C) is a single device that
combines the features of:
• Remote contact sensors (up to four)
• Remote thermistors (one)
• Internal contact (internal magnetic reed switch)
• Internal thermistor and humidistat
Any of these inputs can be used to trigger and control automated
events—such as sending an e-mail or turning on a cabinet light
when its door is opened—throughout the Control4 system.
You can position this wireless device anywhere you need contact
connections or climate reporting.
As a contact sensor
The device contains five contacts: one internal contact and
connections for four wired contacts.
The internal contact is a magnetic reed switch. To use this internal
contact, the Z2C should be mounted so that the indention (along
the same edge as the identify button) comes in close proximity
to a mounted magnet (not included) in a fully closed state (door
is closed). When the door opens, the magnetic connection is lost,
and that state change is pushed to the system.
Wiring guide:
Contact 1 -> Pin C1
Contact 2 -> Pin C2
Contact 3 -> Pin C3
Contact 4 -> Pin C4
(All can use either of the Cm pins as Common)
As a thermistor and humidistat
The device contains an integrated thermistor and humidistat,
as well as a connection for an external thermistor, allowing it to
be used almost anywhere to report environmental conditions
or to inform the climate control system. The thermistor
senses temperatures from 32°F to 104°F (0°C to 40°C), and
the humidistat senses humidity from 5% to 90%. The device
checks the temperature and humidity every five minutes. If the
temperature has changed more than 0.9°F (0.5°C), the device
reports the new temperature and humidity values.
Notes:
• The humidity and internal and external temperature
outputs can be connected (bound) to the Control4
Wireless Thermostat by Aprilaire (C4-THERM).
• A value of -40° in the Remote Temperature field
could indicate either a negative temperature or that
no remote thermistor is connected.
• The integrated humidistat will return a zero value
after the device is rebooted until the actual humidity
value can be reported.
• See “Sample wiring configurations” below for an
example of an external thermistor connection.
• To display the temperature and/or humidity in
Navigator, add the “Temperature Display Driver
(OS 2.10+)” to the project and connect the driver’s
temperature driver to the Z2C.
• Given the variations in temperature and humidity
measurements and environments, it may be
necessary to independently test and verify the
local and remote temperature and humidity. The
properties Local Temperature Oset, Remote
Temperature Oset, and Local Humidity Oset can
be used for this purpose.
Important safety instructions
Caution! You should install this device in accordance
with all national and local electrical codes.
Caution! Improper use or installation of this device can
result in loss of and damage to property.
Important: This product is not intended for direct
connections to AC mains (120V/220V). Refer to the
specifications.
Important: You must operate this device in accordance
with the instructions and specifications in this
installation guide.
Important: Using this product in any manner other than
outlined in this document voids your warranty. Also,
Control4 is not responsible or otherwise liable in any
way for any damage resulting from the misuse of this
product. See
ctrl4.co/warranty
for details.
ZigBee Contact Sensor
Installation Guide

2
Specifications
Model numbers C4-Z2C (single)
C4-Z2C-5PK (5-pack)
System requirements
Control4 OS system
requirements OS version 2.10.0 or greater
Control4 system
integration
Each installed ZigBee Contact Sensor requires
input connections to the Composer project.
Driver The ZigBee Contact Sensor (C4-Z2C) is available in
the Composer Online Driver Database.
Communication
Networks supported Control4 ZigBee Pro mesh networking protocol,
based on the IEEE 802.15.4 ZigBee standard
ZigBee data rate 250 kbps
ZigBee frequency
range 2.405 – 2.475 GHz
Connections
Contact sensor input 4 inputs, accepts AWG 16-28, common ground
connection.
External thermistor 1 thermistor input, sold separately.
See “Accessories”
Integrated features
Internal contact Internal magnetic reed switch
Requires external magnet, sold separately
Integrated internal
thermistor
Internal thermistor can be used for local
temperature sensing: 32°F to 104°F (0°C to 40°C)
Integrated humidistat Can measure local humidity from 5% to 90%.
Power
Power consumption 100mA at 3V, fully active
Power AA batteries (2), included. Alkiline batteries are
recommended.
Other
Available colors Black (water-based paintable enclosure)
Dimensions (L × W × H) 3.1” (78.7 mm) × 2.6” (65.7 mm) × 1.05” (26.6 mm)
Weight 2.5 oz. (70.9 g) without batteries
Environmental
Temperature:
Operational 32°F to 104°F (0°C to 40°C)
Storage -20°F to 158°F (-29°C to 70°C)
Humidity 5% to 95% non-condensing
This device is not waterproof and must be kept out
of direct contact with water. The product must not
be immersed.
Paintable enclosure
The cover assembly plastics are paintable with any
water-based residential paints. Do not clog the
cover assembly vent holes with paint.
Accessories
External thermistor ZCA-EXT10A, AC-DOTS1-W, AC-PMT51-W
Installing
Opening the case and installing the batteries
1 Detach the tray from the cover by inserting a flat screwdriver
into the opening slot in the side of the cover and pushing
in gently, while at the same time pulling the cover out and
away from the tray.
COVER
TRAY
Temperature chamber/LED display
Internal contact location
Opening slot
The cover holds the radio logic board
(the actual device) and pins and the
internal contact. The cover attaches
to the tray. The tray holds the wiring
terminals and is mounted to a wall or
flat surface.
The cover “rocks” into contact with
the tray. To separate the two, insert a
screwdriver or other flat object into the
opening slot on the side of the cover,
gently push in and then “rock” it away
from the tray.
2 Install the two AA alkaline batteries (included) into the
device, oriented according to the diagram in the battery
compartment.
Battery use and care
• Keep the battery contacts and compartment clean.
• Remove the batteries from the device if it is not going to
be used for several months.
• Extreme temperatures reduce battery performance. Avoid
putting the device in very warm places.
• NiMH batteries are not recommended due to their low
voltage causing inaccurate battery level readings.
Battery replacement safety rules
Warning! To prevent a battery short, leakage or rupture:
• Use typical AA alkaline batteries only.
• Do not mix battery types.
• Do not attempt to recharge a battery unless the
battery is specifically marked “rechargeable.”
• Never dispose of batteries in a fire.
AVERTISSEMENT ! Pour empêcher court-circuiter, fuite
ou rupture de batterie:
• Utilisez les accumulateurs alcalins typiques d’AA
seulement.
• Ne mélangez pas les types de batterie.
• N’essayez pas de recharger une batterie à moins
que la batterie soit spécifiquement marqué «
rechargeable ».
• Ne vous débarassez jamais des batteries dans un feu.

33
Installing the device
1 Place the device in a location which ensures the following:
• Easy access to any externally-connected wires
• ZigBee mesh networking eciency
Note: Make sure the device has good ZigBee wireless
reception by (1) ensuring it is within range of another
ZigBee device and (2) avoiding other electrical
equipment that may cause interference with the ZigBee
signal (such as cordless telephones that operate on the
2.4 GHz frequency.)
• Avoiding unnecessary exposure to extreme environmental
conditions.
IMPORTANT! Do not place the device in direct sunlight.
2 If an external thermistor is used with the device, place
it away from direct sunlight, drafts, doorways, skylights,
windows, and exterior walls for best accuracy.
3 Position the tray against the wall or other flat surface.
4 If you are using the internal contact, position the device so
that the narrow indentation that marks the internal contact
(on the long edge of the cover) aligns with the external
magnet (not included).
A A
Indentation
5 Mark the locations of the four screw holes on the wall.
6 If mounting the device to drywall, remove the tray from the
wall and drill four 3/16-inch (4.75mm) mounting holes at the
four screw hole locations (A) previously marked on the wall.
7 Thread any contact or thermistor wires from the wall through
the openings in the tray and to the terminal block.
T C1C2CmC3C4VO Cm
Note: The two Cm (common/ground) pins are
connected and can be used interchangeably.
8 Insert and tighten the mounting screws.
Note: You may optionally choose to use robust two-
sided tape to mount the tray assembly to the wall or
other flat surface, as long as the tape won’t prevent the
back of the tray from sitting flush against the mounting
surface.
9 Connect the wires from the tray to the terminals in the cover,
matching the proper wires to the target terminal locations.
Important! When using multiple external contact
sensors, or when using an external contact sensor along
with an external thermistor, you must connect each
device to one of the Common (Cm) pins in addition
to the appropriate sensor or thermistor pin to make
a proper wiring connection. See the “Sample wiring
configurations” section of this document for examples.
10 Attach the cover assembly to the tray:
A. Align the cover edge’s
two latching tabs with
corresponding tab receivers
on the tray’s edge.
B. Close the cover by rocking
it toward the other end of the
tray until it snaps into place
with the tray.
AB
Configuring
To configure your device:
1 Add the device to your Composer Pro project. When
prompted to identify the device, press the ID button on the
face of the cover four times. The green LED blinks twice to
confirm the ID has been sent to the Control4 system.
- OR -
In Composer Express, add a device into the project, scan for
ZigBee devices, then press the ID button on the face of the
cover four times.
2 In the driver’s Properties tab, view or configure the settings
explained below under “Properties,” then click Set to the
right of the setting after each change.
3 Add generic contact drivers (such as Door Contact Sensor,
Gate, and Motion Sensor) in System Design view, then
connect the generic driver to the appropriate connection on
the C4-Z2C device in Connections view.
4 For programming, use these events:
• Missed Checkin: Triggers when the device misses a
controller check in for the number of times specified in
the driver’s “Missed Checkin Limit” setting.
• Online: Triggers when the device comes online.
• Oine: Triggers when the device goes oine.
• Reboot: Triggers when the device reboots.
Properties
General properties
• Log Level: Standard for most drivers, this property
allows you to filter which message types display in the
Lua Output window. Options 0 - 5 correspond to Fatal
through Trace levels, increasing in level of verbosity.
Options are 0=Fatal, 1=Error, 2=Warning, 3=Info, 4=Debug,
and 5=Trace. Default is 1 - Error.

4
• Log Mode: Activates logging of diagnostic information.
The log level is set in the above property. Options include
O, Print (to the window), Log (to the Director Log), and
Print and Log (both). Default is O.
• Driver Version: (Read only) Shows the version number of
the driver currently in use.
• Device Status: (Read only) Shows the current status of
the product, whether online or oine. However, in some
cases, the device may not report its status immediately,
such as when the device is rebooting.
• Firmware Version: (Read only) Shows the version
number of the firmware currently in use on the device.
The firmware will be updated automatically over the air
when the Control4 OS is updated and when that update
includes a new firmware version for this device.
• Bootloader Version: (Read only) Shows the version
number of the firmware currently in use on the device.
The bootloader can only be updated by Control4, so this
property is for support/diagnostic information only.
Battery properties
• Battery Level: Reports the charge level of the battery.
When the batteries on a Z2C are low, a low battery alert
can be configured using the Z2C’s battery level. When the
batteries are very low, the LED behavior and temperature
and humidity reporting become unreliable.
Humidity properties
• Local Humidity: (Read only) Shows the relative humidity
measured where the device is located. The value is shown
as a percentage.
• Local Humidity Oset: The humidity sensor provides
accuracy of +/- 4% relative humidity. Adjusting the
Local Humidity Oset can result in increased inaccuracy
of relative humidity reporting without using humidity
calibration equipment for validation.
Temperature properties
• Temperature Scale: Sets which scale is used to
calculate the temperature used in the Local and Remote
Temperature properties described below, and aects only
the Properties tab’s settings. Options include Fahrenheit
and Celsius. Default is Fahrenheit.
• Local Temperature: (Read only) Shows the most recent
reported temperature recorded by the internal thermistor.
The scale of the temperature is determined by the
Temperature Scale property.
• Local Temperature Oset—Modifies the reported local
temperature to account for environmental variances. The
temperature can be changed downward or upward by a
maximum of 20 degrees. The default is 0(no correction).
• Remote Temperature: (Read only) Shows the most recent
reported temperature recorded by the remote thermistor.
The scale of the temperature is determined by the
Temperature Scale property.
• Remote Temperature Oset—Modifies the reported
remote temperature (the temperature recorded by
an external thermistor) to account for environmental
variances. (When multiple temperature sensors are
located in the same room, you may notice each sensor
shows a slightly dierent reading. This results from normal
manufacturing variances in temperature sensors and the
device’s position/location in the room.) The temperature
can be changed downward or upward by a maximum of
20 degrees. The default is 0(no correction).
Contacts properties
• Contact Internal Status: (Read only) Shows the status of
the static connection for the internal contact.
• Contact 1-4 Status: (Read only) Represents the status of
the wired contacts.
Checkin properties
• Checkin Interval: Defines how often the device checks
with the controller to see if the controller is requesting
information from the device, such as version information,
or if the controller is trying to update any settings on
the device, such as the check in interval. A check in can
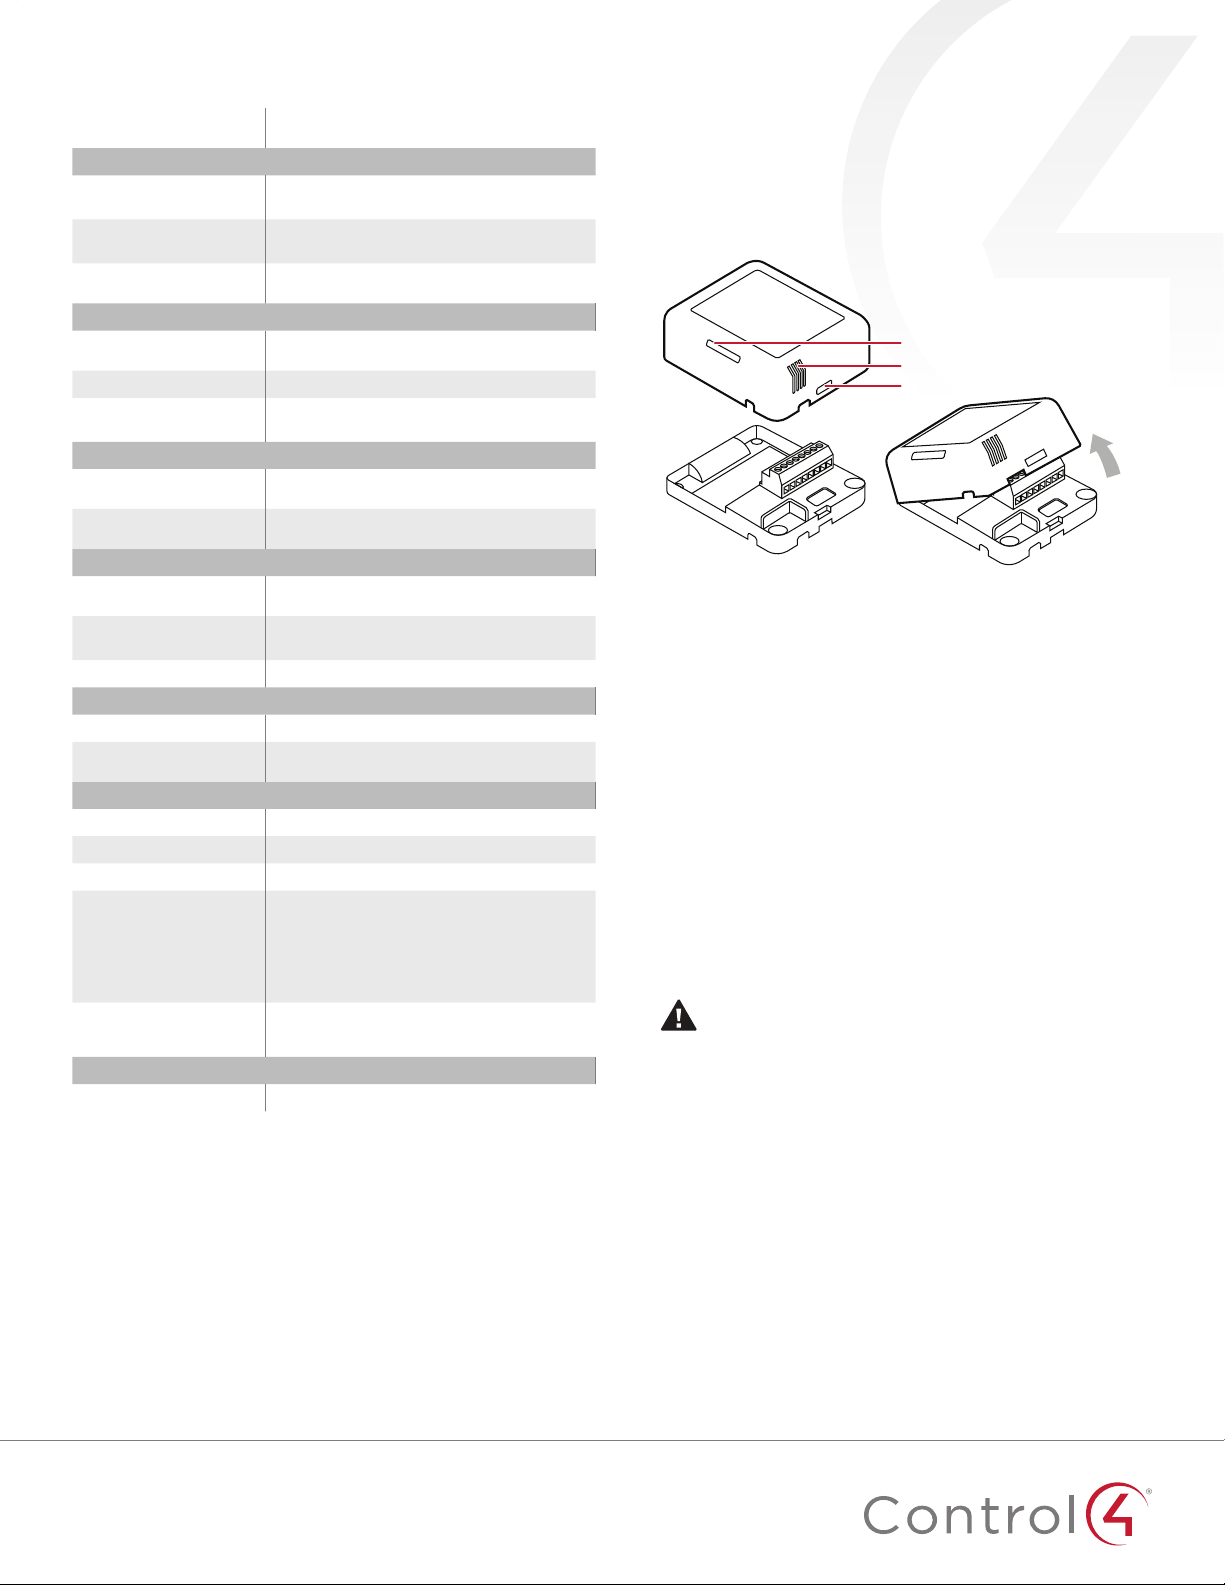
also be manually triggered by pressing the button on the
Z2C. The check-in interval can be configured to check in
with the controller between 10 minutes and 4 hours. The
default is 10 minutes. Increasing the check-in interval will
increase the battery life of the device.
• Last Checkin Time: (Read only) Shows the most recent
time the device checked in with the controller.
• Missed Checkin Limit: Sets the number of times the
checkin is missed before triggering the “Missed Checkin”
programming event.
Actions tab
Buttons located on the Actions tab allow you to view version
and diagnostic information.
• Version Information: This action button will display the
versions of the driver’s Base Template and Template, as
well as the Boot Loader to the Lua Output window of the
Lua tab. The Log Mode property does not have to be set
to Print to display this information to the window.
• Diagnostic Information: This action button will display the
following information to the Lua Output window of the
Lua tab (the Log Mode property does not have to be set
to Print to display this information to the window): device
ZigBee MAC address, ZigBee mesh PAN id, Template
Version, Base Template Version, Boot Loader Version,
ZigBee Node ID.

55
Troubleshooting
If the device is not working:
• Reboot the device by disconnecting power, then re-
connecting power.
• Check for proper wiring. See the “Wiring Configuration”
diagrams.
• Review the log in the driver’s Lua tab.
• Restore factory defaults (13 button presses).
Note: Un-identifying a device o the ZigBee mesh will cause it
to do a factory reset. The settings are preserved, however, after a
power cycle or reboot.
LED diagnostics
The indicated statuses appear during device identification and
when the ID button is pressed once.
LED Description
[Green] On Oine/Waiting for Director
[Yellow] Slow flashing Scanning
[Blue] On Join success
[Green] Fast flashing Join success signal strength=good
[Yellow] Fast flashing Join success signal strength=adequate
[Red] Fast flashing Join success signal strength=risk/low
[Red] Medium flashing Join failed (then returns to oine)
[Green] Slow flashing Signal strength=good (from Network Tools)
[Yellow] Slow flashing Signal strength=adequate (from Network Tools)
[Red] Slow flashing Signal strength=risk/low (from Network Tools)
Button sequences
Functions # of button presses
Identify 4
Reboot/Reset 15
Reset application defaults 9
Leave mesh, restore factory defaults 13
Signal strength flash LEDs 1
Restoring to previous firmware version
1 Power o the device (disconnect power).
2 While holding down the ID button, reconnect power, and
continue to press the ID button until the LED changes from
red to white (about five seconds).
3 Release the button. The device will reboot to its previous
firmware version in about one minute.
Sample wiring configuration
16-28 AWG
from
equipment
C1C2C3C4
3/8˝
(9.5 mm)
Thermistor
Common
T C1C2CmC3C4VO Cm
Additional resources
The following resources are available for additional support:
• Control4 Knowledgebase and forums
• Control4 Technical Support
• Control4 website:
www.control4.com
• Composer documentation available at
ctrl4.co/docs
.
For the latest version of this document, open this URL or scan the
QR code on a device that can view PDFs.
DATA SHEET
ctrl4.co/z2c-ds
MOST RECENT VERSION
ctrl4.co/z2c-ig
Regulatory/Safety information
To review Regulatory information for your particular Control4
products, see the information located on the Control4 website at
ctrl4.co/reg
.
Patent information
Applicable patents are available at
ctrl4.co/patents
.
Warranty
Visit
ctrl4.co/warranty
for details.
Copyright ©2017, Control4 Corporation. All rights reserved. Control4, the Control4 logo, the 4-ball logo, 4Store, 4Sight, Control4 My Home, and Mockupancy are
registered trademarks or trademarks of Control4 Corporation or its subsidiaries in the United States and/or other countries. All other names and brands may be claimed
as the property of their respec-tive owners. All specifications subject to change without notice. . B
DOC-00184-B
2017-09-18 MS
This manual suits for next models
1
Table of contents
Other Contro l4 Accessories manuals