Conversor Listenor User manual

Conversor Products Ltd.
Tel:
0800
037 6262 (Inside the UK)
Tel:
+44 2890 341707
(Outside the UK)
sales@conversorproducts.com
www.conversorproducts.com
MANUFACTURED UNDER LICENCE BY GLENTRONICS LTD.
64 Mallusk Road, Newtownabbey, Co. Antrim BT36 4QE
Your Distributor:
User Guide
The Listenor
•
Reduces unwanted
background noise
•
Enhances sound
level and clarity
•
Zoom
and
Wide
settings focus on
desired sounds
Assistive
Listening
Device for
Persons with
Slight Hearing
Diffi culty
•
Designed for
easy
use with
binaural
h
eadphones

5
Welcome!
Setting up
The Listenor
Charging the Battery
Turning on the Unit
Connecting the Headphones
Switching bet
ween
Wide
and
Zoom
Settings
Positioning
The Listenor
for Easy Listening
The Listenor for Easy ListeningThe Listenor
Accessories
Direct Audio Input
Use with Hearing Aids
1
2
2
3
3
4
4
5
5
© Copyright 2005. Conversor Products Ltd. All rights reserved.
Accessories
Table of Contents
Use with Hearing Aids
The Listenor
can be used with
The Listenor can be used with The Listenor
a
hearing aid,
using an optional
Neck Loop
,
ordered separately.
The Listenor microphone takes over
for the hearing aid microphone to
provide enhanced sound level and
clarity without annoying feedback.
For more info
rmation about these optional accessories, please contact
your distributor,
or contact Conversor Products Ltd.
Direct Audio Input
The socket on the underside of the
Listenor microphone is intended
for direct audio input. An optional
SCART
Adaptor
and lead, which
are ordered separately, allow you to
connect
The Listenor
directly into the
The Listenor directly into the The Listenor
audio output of your television, radio,
or stereo/HiFi.
The SCART soc
ket is a multi-pin
socket found on the rear of many
audio devices. Simply plug the optional
SCART Adaptor into this socket. Plug
the red end of the adaptor
’
s lead into
the SCART Adaptor, then plug the
black end of the lead into the input
socket located on the underside of
the Listenor microphone. Switch the
SCART Adaptor to
Output
.
5
Optional SCART Adaptor
and Lead
Audio Input
Socket
Socket
SCART Adaptor Connected
to a Television

Positioning
The Listenor
for Easy
Listen
ing
The Listenor
includes a conven-
ient fold-out stand
on the underside
of the unit, allowing
you to place the
unit in a raised
position on a
near-
by surface, pointed
at the desired
sound source. You
can also hold the
Listenor micro-
phone in your
hand and point it
at
desired sound
sources.
Thank you for your purchase of
The Listenor,
a versatile, easy-to-use
assistive listening device that en-
ables greater sound enjoyment for
persons who do not wear a hearing
aid, but experience slight hearing
diffi culties when watching television,
listening to the radio or stereo, or
when conversing with others.
Inside Your Package
Your package includes
The Listenor
,
a powerful lig
htweight microphone
with
Zoom
and
Wide
settings for
focusing on desired sounds near or
at a distance. Also included in your
package is a pair of
binaural head-
phones
with buil
t-in volume control,
which plug easily into the Listenor
microphone. A
power supply/battery
charger
and
mains lead
are also
mains lead are also mains lead
provided for charging the Listenor
microphone for
a full day of
continuo
us use.
Options:
An optional
SCART
Adaptor
can be ordered separately,
Adaptor can be ordered separately, Adaptor
which allows you to conn
ect
the
microphone direc
tly to
an audio
device without interruption to
sound for others listening with you.
An
optional
Neck Loop
is also
available for using
The Listenor
with a hearing aid. More information
can be found on Page 5 of this guide
.
Your Listenor
package should
include:
• Listenor Microphone
• Binaural Headphones
with Volume Control
• Power Supply /
Battery Charger
• Mains Lead /
Power Co
rd
If you are missing any of
these items, please contact
your distributor, or contact
Conversor Products Ltd.:
•
Inside the UK:
0800
037 6262
•
Outside
the UK:
+44 2890 341707
4
1
Welcome!
Setting Up
The Listenor
Switching Between
Wide
and
Zoom
Settings
The Listenor
is equipped with a micro-
The Listenor is equipped with a micro-The Listenor
phone direction switch at the top front
of the unit, which allows you to focus
on desired sounds near or at a
distance of up to 25 metres away.
The Listen
or microphone direction
switch sh
oul
d already be switched
forward to the
Wide
setting, revealing
a blue dot below the switch. Point the
Listenor microphone at
different
sources of sound, both near and far,
to experience the way it picks up
surrounding sounds with enhanced
clarity.
Now set
the sw
i
tch to the
Zoo
m
setting by moving it back so that
the blue dot disappears. When the
Listenor microphone is set to the
Zoom
se
tting
, it will focus only on
sounds at the front of the micro-
phone, fi ltering out surr
ounding
sounds. What you hear depends on
the direction in which the Listenor
microphone is pointed.
Microphone
Microphone
Direction
Switch
Fold-Out
Fold-Out
Stand
Stand
Zoom Setting
Zoom Setting
Wide
Wide
Wide
Setting
Setting
Setting

2
3
Setting Up
The Listenor
Turning On the Unit
The blue
OFF/ON/ON HI switch
on the top side of
the Listenor
microphone allows you to tu
rn on
the unit and adjust the sound gain.
The OFF position is indicated when
you see the empty white dot under
the switch. When the unit is OFF,
the LED on the top side of the unit
does not illuminate.
To turn the unit ON, move the blue
switch up one position to reveal the
fi lled white dot under the switch.
After a few seconds, the LED on the
top side of the unit will glow green.
The ON setting is intended for
normal or noisy environments.
The ON HI setting is intended for
quieter environments, and amplifi es
the desired sounds that are at a
lower volume and/or at a distance.
To set the unit to ON HI, move the
blue switch up one position to re-
veal the two fi lled white dots under
the switch.
For now, move the switch to the
ON setting
.
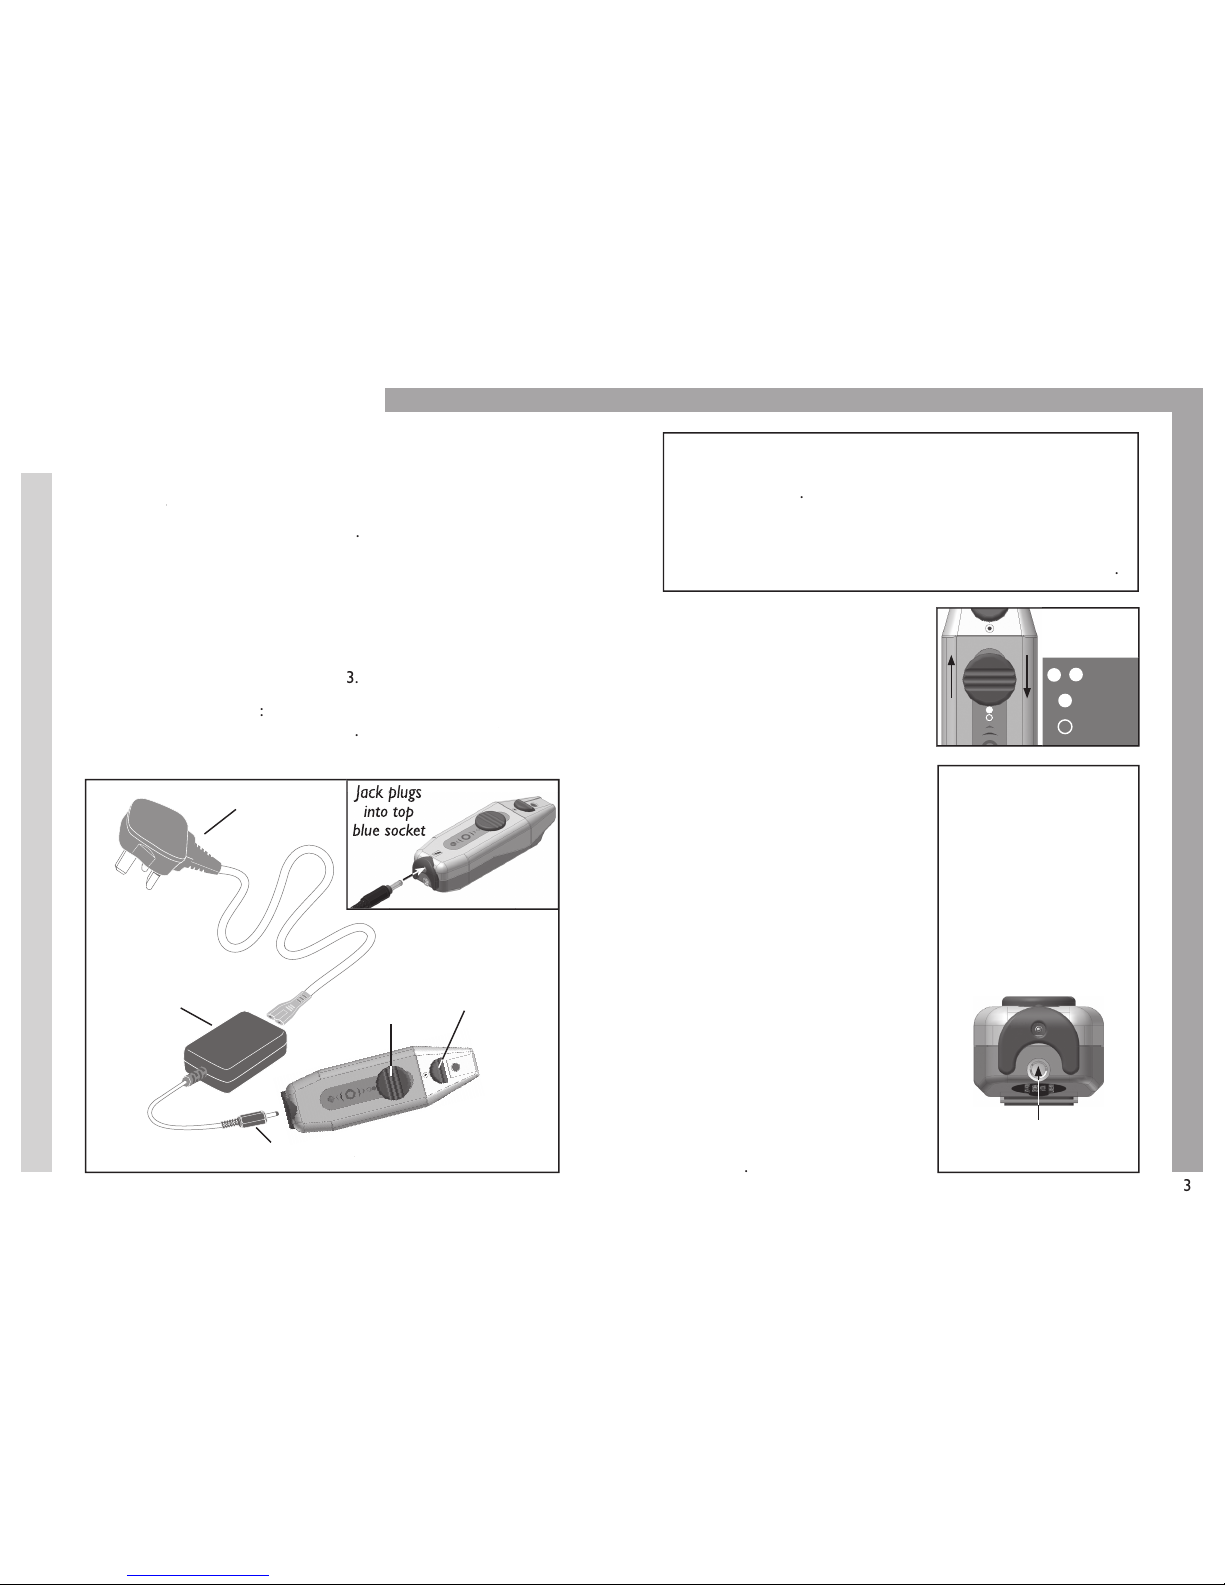
Connect the smaller fi gure
of 8 plug of the Mains lead
into the rear of the Power
Supply/Battery Charger.
Plug the Power Supply/
Battery Charger jack
(marked with a blue ring)
into the top socket at the
back end of
the Listenor
microphone (
blue socket
microphone (blue socket microphone (
marked with power symbol).
Plug the Mains Lead into
an electrical socket.
Allow
The Listenor
to
The Listenor to The Listenor
charge up to 4 hours.
Charging the Battery
The Listenor
contain
The Listenor containThe Listenor
s a 1.3 volt
NimH rechargeable battery. There
may be suffi cient charge left in the
unit for short-term use, however
we rec
ommend that you fully
charge the unit before trying it
out.
The L
istenor
may be charged
when the unit is ON or OFF.
To charge the ba
ttery for a full
day of continuous use, pl
ease
follow these instructions
:
1.
2
.
3
.
4
.
Status of Battery
Level During Recharging
When the unit is switched
OFF, the LED fl ashes red at the start of
the charge process
.
When the charge cycle is complete, the LED
fl ashes green
.
When the unit is switched ON, the LED shines red
at the start of the charge process. When the charge i
s
complete,
the LED shines green. In both cases, the unit fl ashes red and green
repeatedly when it is still charging.
Recharging takes up to 4 hours
.
Connecting the
Headphones
Plug the headphone jack
into the bottom socket
at the back end of
the
Listenor microphone.
The headphones have a
volume control switch
built into the cord
, which
allows you to obtain a
comfortable listening level.
Mains Lead
Power Supply/
Battery Charger
Jack plugs into
Jack plugs into
Jack plugs into
rear of mi
rear of mi
crophone (See above)
OFF/ON/
ON HI
Switch
Direction Switch:
Wide
or
Zoom
settings
Headphone
Socket
OFF
ON
ON HI
OFF/ON/
ON HI Switch
Jack plugs
Jack plugs
into top
blue socket
Table of contents
Other Conversor Hearing Aid manuals
Popular Hearing Aid manuals by other brands

Hearing Products International
Hearing Products International EchoAlert manual

Unitron
Unitron Passport Moxi 3G Operating instruction

Geemarc
Geemarc CLA3 A-USB Installation

Miracle-Ear
Miracle-Ear MECROS RIC 312 user manual

Digitear
Digitear DE-NR INEAR user guide

Kirkland Signature
Kirkland Signature Signature 9.0 quick start guide