Ignite mini BTE User manual

mini BTE,
BTE,
Power BTE,
Power Plus BTE
(Behind-The-Ear)
OPERATIONS MANUAL


Table of Contents
Overview
Features, Controls and Identification ................................. 2
Preparation
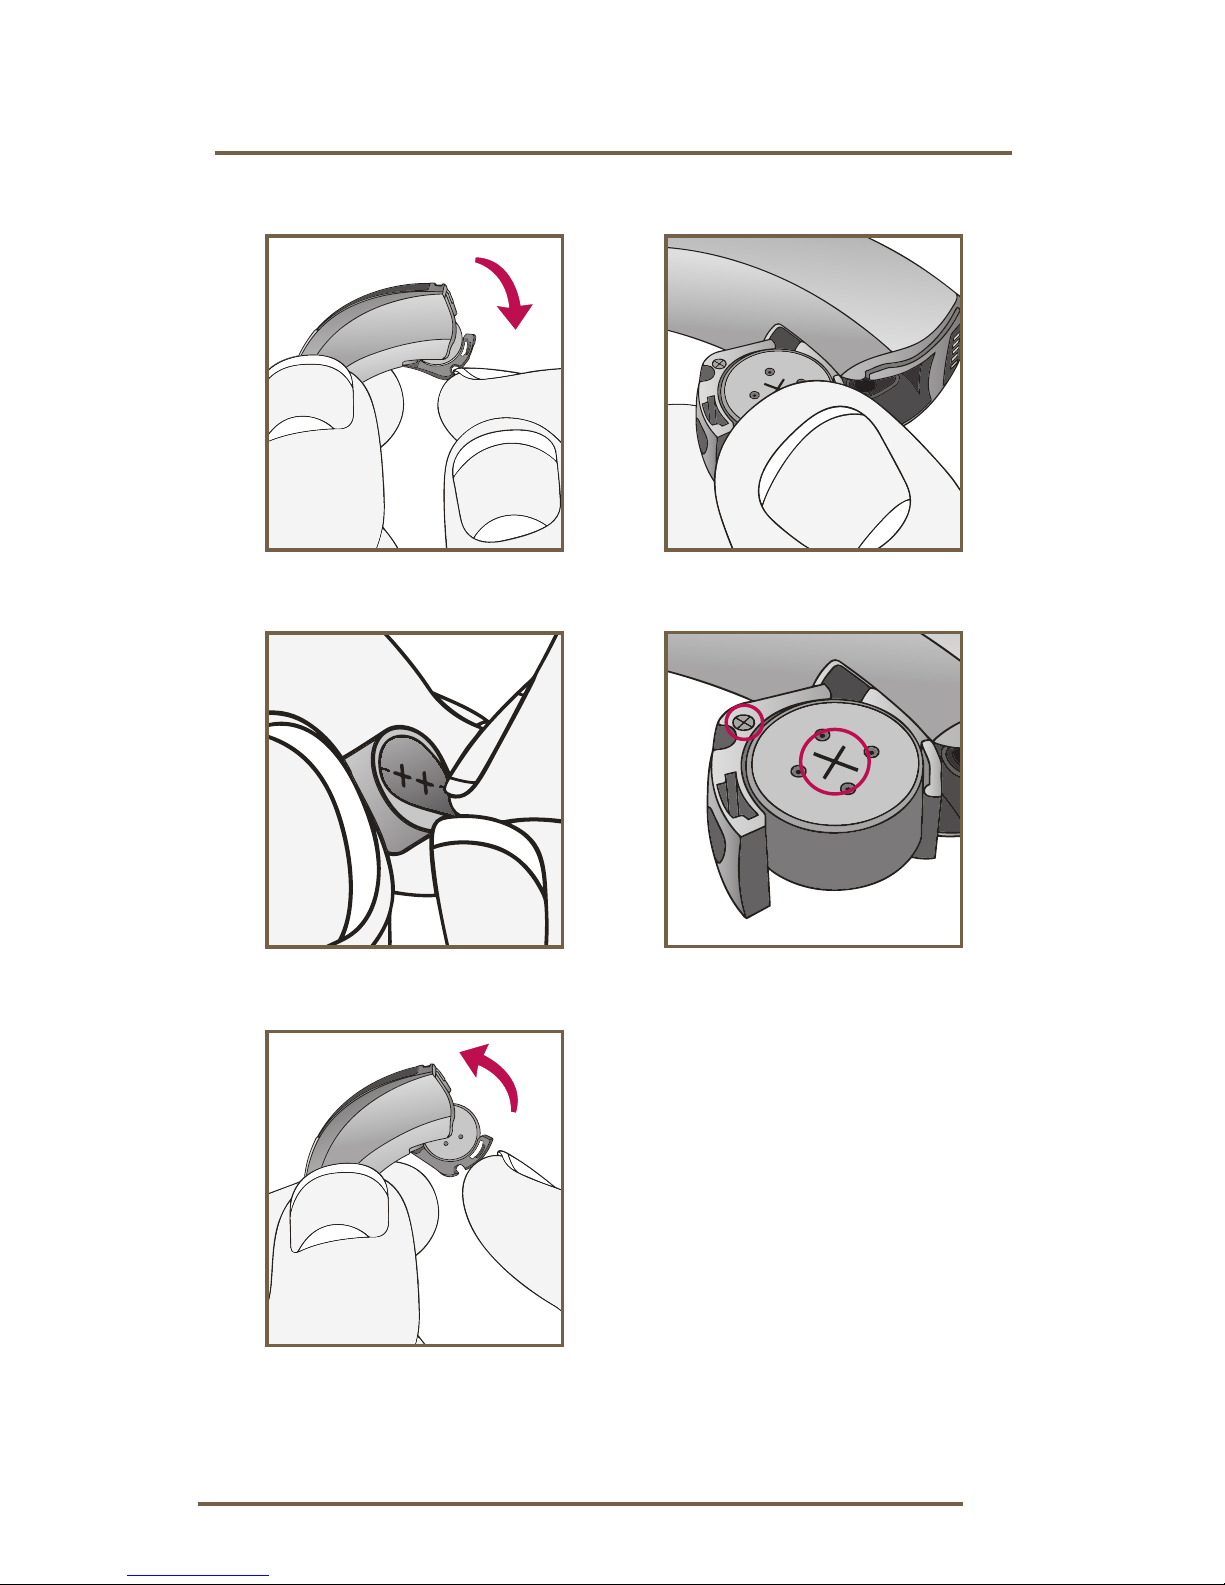
Batteries ............................................................................. 4
Battery Indicators ............................................................... 6
Tamper Resistant Battery Compartment ............................ 6
Insertion and Removal
Custom Earmold ............................................................... 8
Earbud or Eartip .............................................................. 10
Operation
On & Off........................................................................... 14
Control Surface: Volume and Multimemory ..................... 15
Directional Settings .......................................................... 18
Telephone Use.................................................................. 19
Direct Audio Input (DAI)................................................... 22
Hearing System Care
Instrument Care................................................................ 24
Standard Tubing Care ...................................................... 25
Thin Tubing Care.............................................................. 26
Service and Repair............................................................ 28
Troubleshooting Guide .................................................... 29
Tips for Better Communication
For You ............................................................................. 30
For Your Family and Friends............................................. 31
FDA Information
Required Information ....................................................... 32
Limited Warranty .............................................................. 34

2
Overview
Features, Controls and Identification
Your hearing instrument controls include:
1. Earhook
2. Microphone
3. Control surface: Volume and/or Memory control
4. Battery compartment (on/off control)
5. Side indicator RED is for RIGHT ear,
BLUE is for LEFT ear.
6. Tamper resistant battery compartment lock
(BTE, Power BTE and Power Plus BTE only)
Your hearing instrument can be identified by:
7. Location of serial number
8. Location of manufacturer’s name and
model name
Comfort Fit Solutions:
9. Standard Earmold with tubing
10. Thin tube with Instant Fit Earbud
11. Thin tube with Custom Eartip

3
2
Overview
3
11
10
9
4
00-000000
8
1
7SERIAL NUMBER
5
6

4
Preparation
Batteries
Your hearing system uses a battery as its power
source. The battery size can be identified by
the brown (312) or orange (13) color code on
the packaging.
To insert or replace the battery:
1. Use the nail grip on the battery door.
2. Open the battery door gently and remove
the old battery.
3. Remove the tab from the new battery.
4. Line up the battery’s plus “+” sign (flat side of
the battery) with the battery door “+” sign.
5. Close the battery door.
My hearing instrument uses a:
312 Battery (mini BTE) – Brown
13 Battery (BTE, Power BTE,
Power Plus BTE) – Orange

5
Preparation
1 2
3 4
5

6
Preparation
Battery Indicators
An indicator will sound when the battery’s voltage is
low. You have approximately 5 minutes* to replace
the battery. An indicator will sound just before the
battery stops working.
* Actual time between low battery indicator and shut
down will vary depending on environmental noise
levels and brand of battery used.
Tamper Resistant Battery Compartment
(BTE, Power BTE, Power Plus BTE only)
To lock the battery door:
Use an appropriate tool to
slide the recessed switch to
the left until it “clicks” and
the colored mark is visible.
To unlock the battery door:
Slide the recessed switch to
the right until it “clicks” and
the colored mark disappears.
Locking the door is not
required for operation.
My hearing instrument has a tamper resistant
battery compartment. See below.

7
Helpful Hints
• NEVERFORCETHEBATTERYDOORSHUT;
thiscouldresultinseriousdamage;ifthedoor
will not close securely, check that the battery
is inserted correctly.
• Donotopenthebatterydoortoofaror
damage is likely to occur.
• Disposeofusedbatteriesimmediatelyinthe
proper waste or recycling container.
• Becausebatteriesvaryinsizeandperformance,
your hearing care professional is your best source
for lifespan estimates and verification that you are
using the proper size and type.
Preparation
Warnings
Batteries are dangerous if swallowed. To help
prevent the accidental ingestion of batteries:
Keep out of reach of children and pets.
Check your medications before taking them –
batteries have been mistaken for pills.
Neverputbatteriesinyourmouth,astheycan
easily be swallowed.
National Button Battery Ingestion Hotline:
202-625-3333

8
Insertion and Removal
Custom Earmold
Insertion and Removal of Custom Earmold
To insert the Custom Earmold and hearing instrument:
1. HoldtheCustomEarmoldwithyourthumband
forefinger on the outer side near the tubing.
2. Tilt your hand slightly forward and gently insert the
canal tip of the Custom Earmold into your ear canal.
3. Rotate the Custom Earmold backward.
4. Softly press the Custom Earmold into place with
your fingertip.
5. Carefully place the BTE behind your ear wrapping
the earhook over the top of your ear.
To remove the hearing instrument and
Custom Earmold:
Take the instrument from behind your ear and gently
pull the Custom Earmold outward. Pulling lightly down
on the ear lobe may help loosen the Custom Earmold
as it is removed.
My hearing instrument uses:
A Custom Earmold. See below.
An Earbud or Eartip. See page 10.

9
1 2
3 4
5
Insertion and Removal

10
Insertion and Removal
Earbud or Eartip
To insert the Earbud or Eartip and
hearinginstrument:
1. Insert the Earbud or Eartip into your ear canal.
2. Gently wrap the BTE over your ear until it rests
securely behind your ear.
3. Place the lock in the concha bowl of your ear.
1
3
2

11
Insertion and Removal
To remove the hearing instrument and Earbud:
1. Remove the lock from the concha bowl of your ear.
2. Remove the hearing instrument from behind
your ear.
3. Gently grasp the tubing at the opening of the ear
canal and pull outward.
1
3
2

12
Insertion and Removal
To remove the hearing instrument and Eartip:
1. Remove the lock from the concha bowl of your ear.
2. Remove the hearing instrument from behind
your ear.
3. Gently grasp the tubing at the Custom Eartip
and pull outward.
1
3
2

13
Insertion and Removal
Helpful Hints
• Minorirritationandinammationmayoccur
as your ear becomes accustomed to having an
objectinit;ifso,pleasecontactyourhearing
care professional.
• Ifanactualallergicreactionoccurs,alternative
earmoldmaterialsareavailable;contactyour
hearing care professional.
• Severeswelling,dischargefromtheear,
excessive wax, or other unusual conditions
warrant immediate consultation with a physician.

14
Operation
On & Off
To turn ON:
Insert a battery and completely close the
battery door.
To turn OFF:
Open the battery door until the battery is no
longer touching the battery contacts.
Your instrument has a Power-On delay and may
require a few seconds to power on. You may hear
a tone series indicating that your device is fully
powered on.

15
Control Surface: Volume and Multimemory
Your hearing system features a Control Surface
which adjusts multiple features depending on
the setting.
My Control Surface is set for:
Sweep volume control. See Section A – page 16.
Touch and Release volume control.
See Section B – page 16.
Automatic volume control. See Section C – page 17.
Multimemory. See Section D – page 17.
Sweep volume control and multimemory.
See Section E – page 17.
Operation

16
Section A – Sweep Volume Control
Your volume control is a Sweep
volume control. To make sounds
louder, sweep your finger from
B to A. Each sweep increases
the volume one step until you
reach the desired volume or
the maximum setting. To make
sounds softer, sweep your
finger from A to B. Each sweep
decreases the volume one step
until you reach the desired
loudness or the minimum setting.
Section B – Touch and Release Volume Control
Your volume control is configured as a Touch and
Release volume control. Each time you touch
anywhere on the control surface the volume of your
hearing instrument changes.
The Touch and Release volume control is
configured to automatically decrease in volume
before it increases. To make sounds louder, touch
and release the control surface. Repeat this motion
until you are at the minimum setting. The next
time you touch the control surface, the volume will
increase one step. Continue to touch and release
untilyoureachthedesiredloudness.NOTE:If
10minutes or more have passed since the last
volume change, the volume will automatically
decrease before it increases.
For more information on Touch and
Release Volume Control Settings, see page 18.
Operation
B
A

17
Section C – Automatic Volume Control
Your hearing instruments have been set to
a specific volume level by your hearing care
professional. If sounds are generally too loud or
soft, please contact your hearing professional for
advice and adjustment.
Section D – Multimemory
Your hearing care professional can set up to
four hearing memories for you. These additional
programs are accessed by touching and releasing
anywhere on the control surface.
Ask your hearing professional about your specific
hearing programs.
Section E – Sweep Volume Control and Multimemory
Your control surface is set up to allow changes for
both volume and memory/program. To make sounds
louder, sweep your finger from B to A. To make sounds
softer sweep your finger from A to B. To change memory/
program, touch anywhere on the control surface.
Operation

18
Touch and Release Volume Control Settings
Your device will always power-on to the optimal
volume setting determined by your hearing care
professional. The minimum and maximum steps will
have an additional tone following the beeps.
Ask your hearing professional about your specific
hearing programs.
Directional Settings
Your hearing system has directional microphones to
help improve speech understanding in noisy situations.
Ask your hearing care professional about your
particular directional settings.
Operation
Volume Level Tone
Level 5 (More volume) Five beeps plus tone
Level 4 Four beeps
Level 3 (Power on volume level) Three beeps
Level 2 Two beeps
Level 1 (Less volume) One beep plus tone
This manual suits for next models
2
Table of contents
Other Ignite Hearing Aid manuals