manuals.online logo
Brands
  1. Home
  2. •
  3. Brands
  4. •
  5. Conway
  6. •
  7. Tent
  8. •
  9. Conway CardinaI User manual

Conway CardinaI User manual

Step-by-Step
Instruction
Leaflet
=======-==
===
= =
Con
way
Products
Limited
Skul l House Lane, Appley Bridge, Wigan WN6 9DW
Duetoa processof ever-continuing product improvement. somedetailscontained In this 1988 brochuremaychange.
However, the rntorrnatron iscorrectat the trme ofgoingtopress.
---
- -
Ca
rd
ina
I,
La
se
r &
Ta
rd
is
Please
fol/ow
these simpleandeasy
instructions
tosetupyo
• •
• •
• •
Park trailer In position required on site. fuily orake trail er. unplug etectncs .
uncouple trailer from car. Level off trailer tongitudrnally by using Jockey
wheel Level off sideways by means of proprietary caravan leveller or
blocks Wino down corner steadies onto woooen pads (i.e no pressure)
Release all four corne- catc nes
li
ft root corner by hand near door to avoid damage to draft seal on top of
door. Open door and remove Winch handle from interi or of trailer
Turn handle clockwisetowind up roof. until the setting wireIStaut. check
oenco rcauv that the roof IS rising equally
..
.
.-
\.
Pull out rear bed unti l It reaches the bed end SlO P and remove rear bed
support bars from under each mattress
Fit rear bed support oars. pull over bed end canvas but do not elasticate.
Slide uo socket cover Insert Winch handle Into Winch socket Pull out front bea
until
It reaches bed end stop and fit front bea support
bars Pull over bed ena canvas but do not elasticate
• •
-
folding
camper.
•Finish off the four corner steadies by giving each steady a futl
)1/
2 turns Now pusn out bed end frame and locate shaped
flat
end of roof
support
pole
With the corner steady handle Into the bracket
situated
at each roof corner•
•Step Inside trailer,
lrft
up hinged wardrobe and
slide
Into position on top of Place tao!e ana cushions to one side
•
•
base
cabinet
Lift
over hinged
kitchen
unit
Into position, ensure that the waste
outlet
sits
Uricup
door from roof POSition, lower the door
while
YOu
walk outside
•
Into drain
outlet
correctly
•Remove bed end roof frame oars from under each mattress, locate open Close the lower door, take hold of top door section on both sides, 11ftagaInst
•
ena over
white
plastic
lugs at corner of each bed end frame the spring hinge, lower top door onto bottom
door,
locating
the oblongpegs
Into the
mating
holes at each side of the lower door and then
pur
the top
door towards
YOu
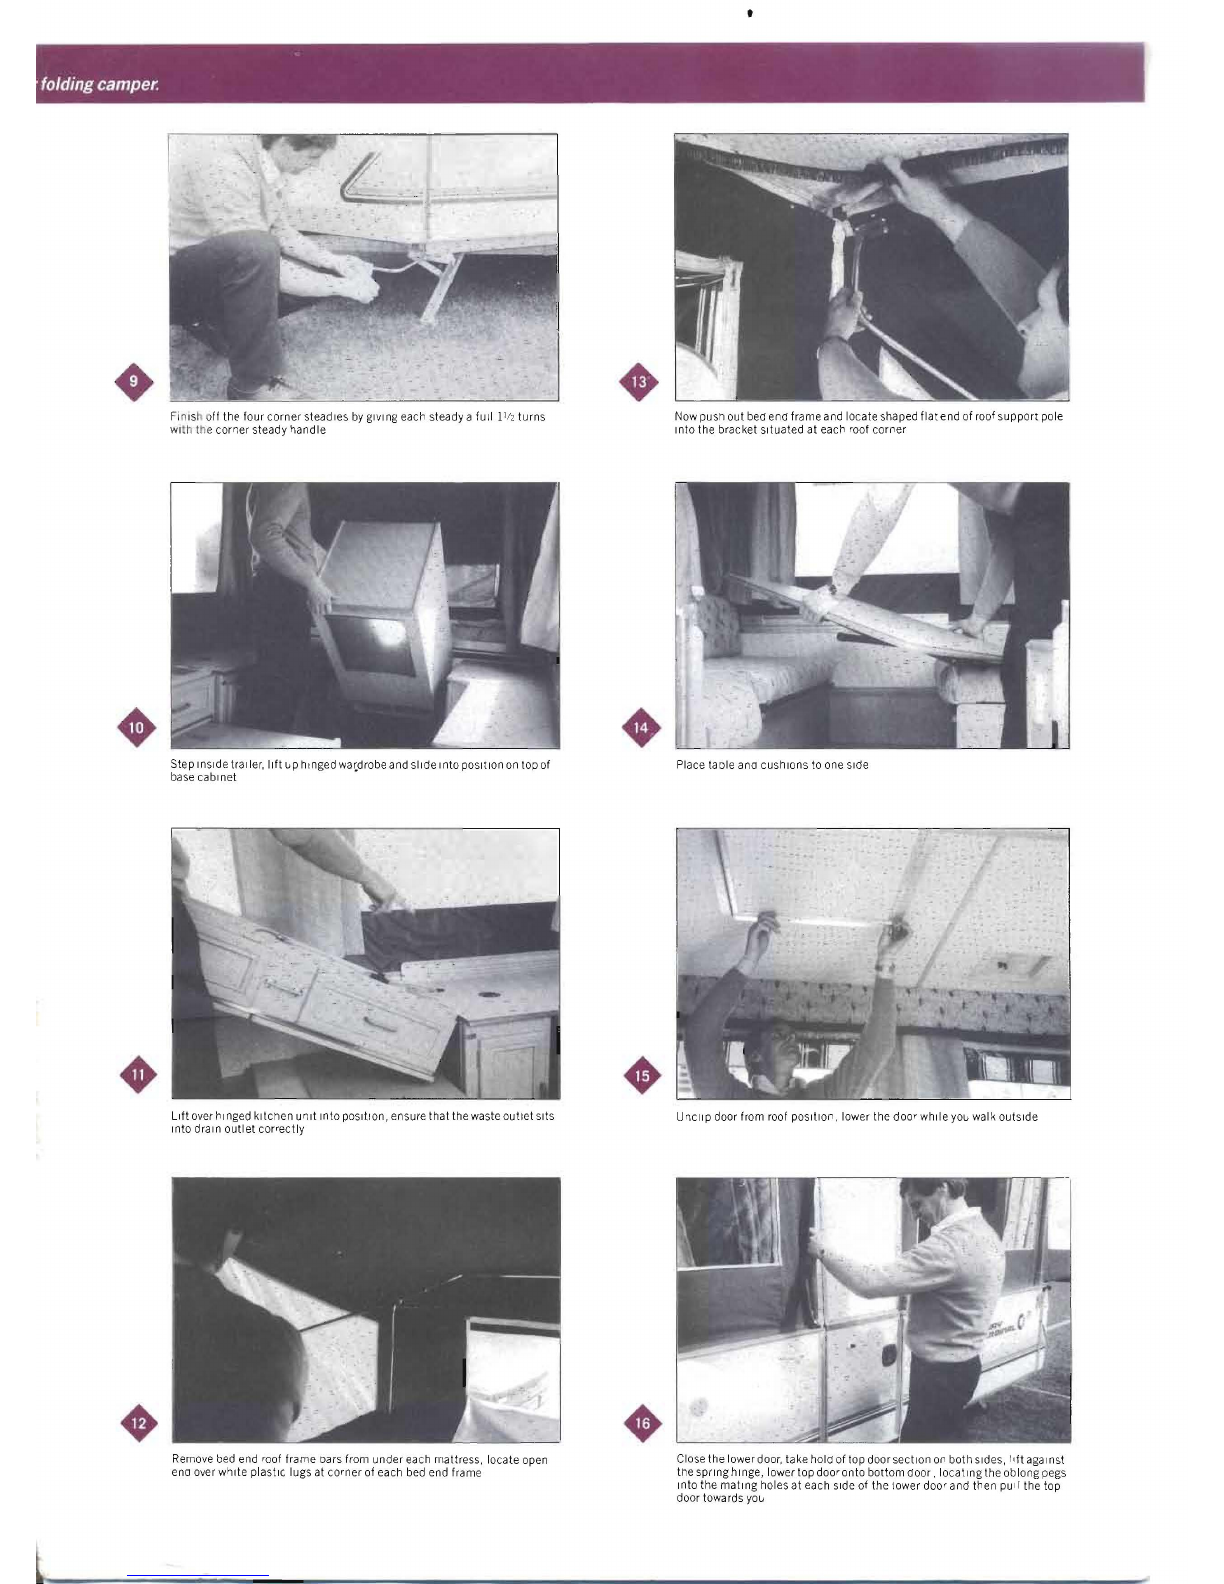
Release chrome clips on top door Open aoor and step msrde. Secure top
door with turn buckles. Totit wall canvas to door. Insert canvas hard edge
Into door channel by foldi ng thr ough 180· starting at the bott om, firmly
presscanvas Into channel
• •
•
•
• •
•
•
• •
•
•
Z'Pup the four corners ensuring that the hook and eye f
itti
ngs have been
engaged and that the small
PVC
rai n defl ector is m positron .
Etasucate the oed end underfraps onto the locati on buttons under the bed
board
Removal of gas Dottl e boxlocka ble lid Unlock
11
0to posit ionas shown then
lift off
The underslung spare wheel is removed by using the corner steady/wheel
brace to removethe retaini ng bolt. drop to floo
rt
hen slide out sparewheel
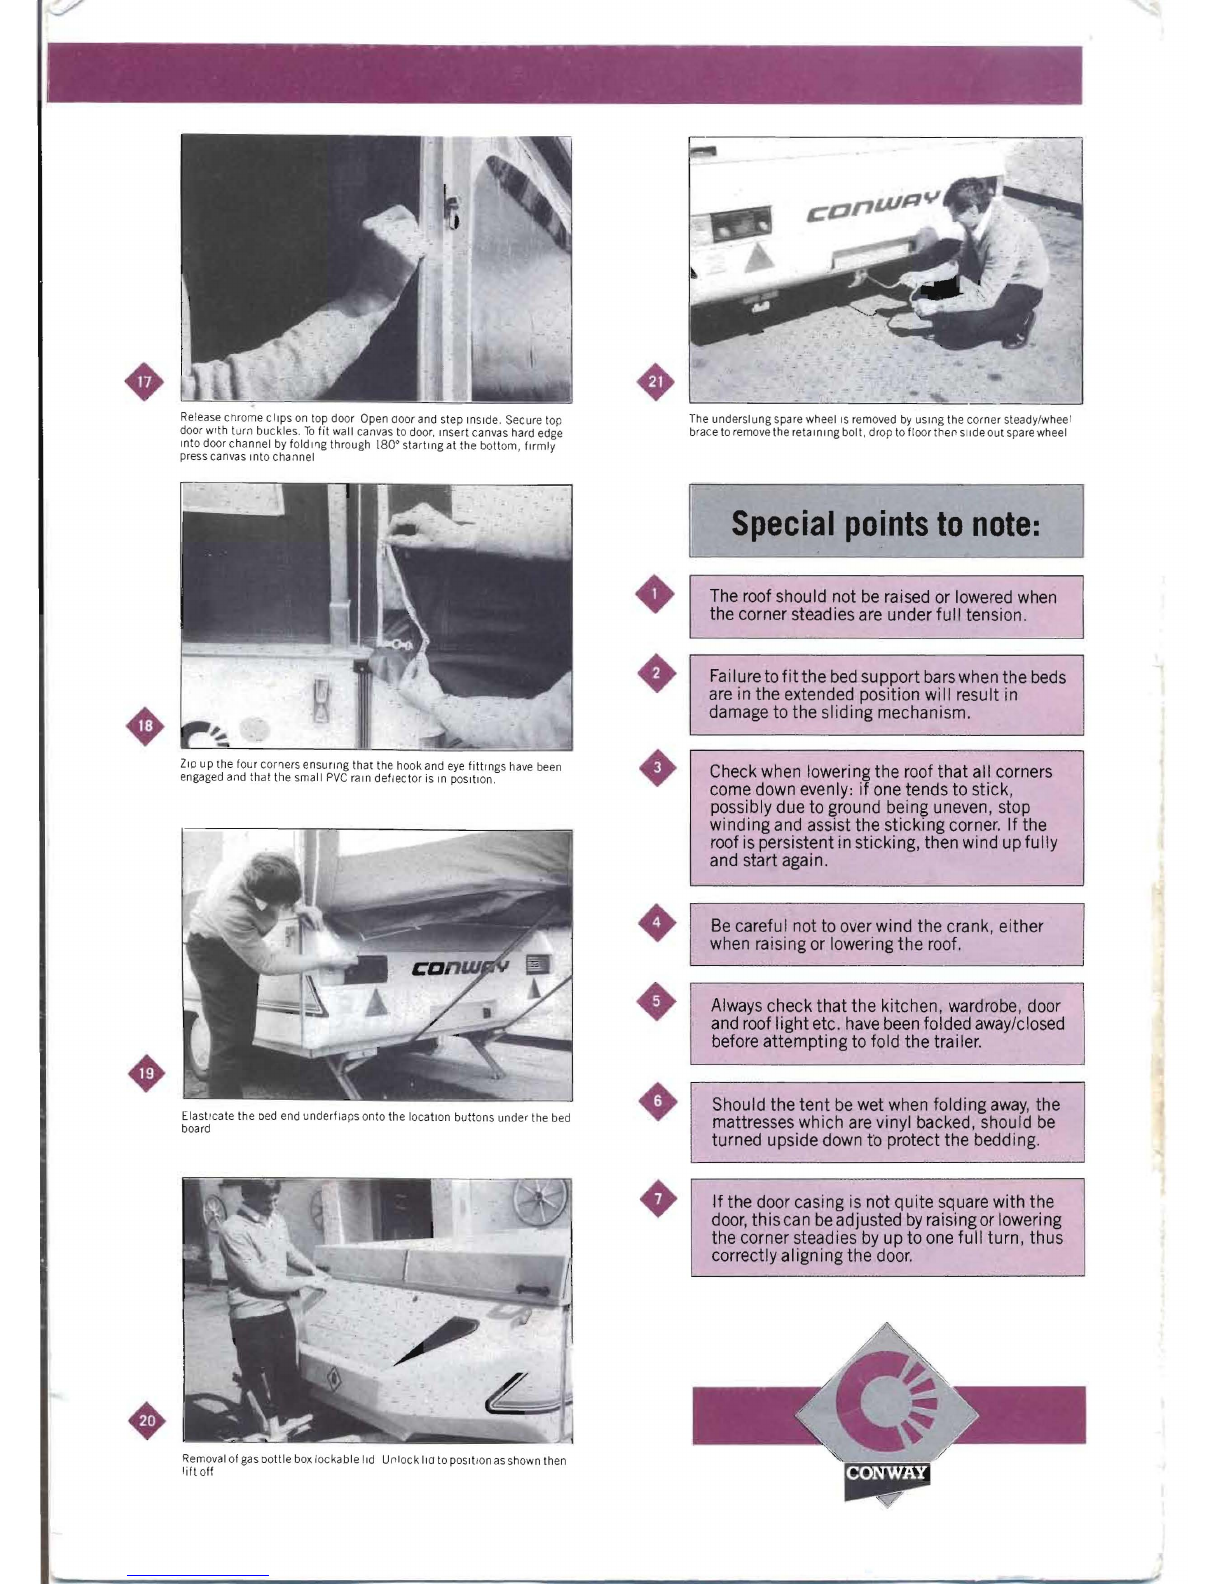
Special
points
to
note:
The roof should not be raised or lowered when
the corner steadies are under full tension.
Failure to
fit
the bed support barswhen the beds
are in the extended position will result in
damage to the sliding mechanism.
Check when lowering the roof
that
all corners
come down evenly: if one tends to stick,
possibly due to ground being uneven, stop
winding and assist the sticking corner. If the
roof is persistent in sticking, then wind up fully
and start again.
Be careful not to over wind the crank, either
when raising or lowering the roof.
Always check
that
the kitchen, wardrobe, door
and roof lightetc. havebeen folded away/closed
before
attempting
to fold the trailer.
Should the
tent
be wet when folding away, the
mattresses which are vinyl backed, should be
turned upside down to protect the bedding.
If the door casing is not quite square with the
door,
this
can beadjusted byraising or lowering
the corner steadies by up to one full turn , thus
correctly aIigning the door.
-~
Awn
ing
Please
follow
these
instructions
to erectyour
awning.
.
•Remove awrung canvas from Its bag and slide w
hite
corded se
cti
on througn
theawrung channel fi
ll
ed to th eside of the root As Illustrated it ISsimpler •
'-
rent 01the campe r roof ana then
to do ttnswhen yoor camper IS in the folded position
• •
Fold the canvas back onto the roof of the camper Reoeat for the 2
'Id
e roof poles
------------------,
•r oi ly erect the cam per booy as orevrously
Illu
strated Pul
. r
•Lay out the frame as shown after connec ting together the vanous frame •Poll down rant of . w," ng and locate gusset save' cen tre ana Carne, angles
sections (Care should be taken at trus pornt n tto snag the canvas or wmd ows on the
frame)
Toilet
Extension
•
~
E
XC
EP
T
·CARDINAL
Slide front 'V' section througn the sleeve In the front
(Of
the short stub •
canopy Ensure that the holes punched in the tubrng
In
tt.ecentreand at
either eno face towards the awning.
..
ZiPout the pan l in the right hand awning wall
Fit the 3 short canopy poles between the main extension frame and front
'U' frame. ZiP In the toilet/wardrobe extension.
•
•
•
• From rnsioe the awn109, fit the frame as shown
•Iension frame and peg Out
The
awn
ing
skirt
supplied
fits
to
the
trail er by
press
stud
s.
These are
not
factory
fin
ed.
but
are
includ
ed in the
awn
ing
bag.
To
fit.
st
art
by
fixing
the
two
press
st
uds
by
the
door
and
then
work
outwards.
•Peg out ensuring that the canvas IS square and that the filletsreturn ing
msice theawning tully cover the gap at the edge.
CARDINAL
The3wnlngskirt supplied withthe traile rtit 1I,tOtheawn109channel,
which runs underneath thetraIler Asmall looseflap IS suppliedwith press
CLUBMAN
stuns (0co
.....
er the
......
heel arch.
CARDINAL
-

This manual suits for next models

2

Popular Tent manuals by other brands

Best CADIZ Assembly instructions

Best

Best CADIZ Assembly instructions

OZtrail SEAVIEW 9+3 owner's manual

OZtrail

OZtrail SEAVIEW 9+3 owner's manual

Blumfeldt Sommerfest manual

Blumfeldt

Blumfeldt Sommerfest manual

Eureka N!ergy Screen House Assembly instructions

Eureka

Eureka N!ergy Screen House Assembly instructions

Aztec Tents ATC product manual

Aztec Tents

Aztec Tents ATC product manual

Barronett Blinds SNAKE EYES owner's manual

Barronett Blinds

Barronett Blinds SNAKE EYES owner's manual

Baytex ELECTRON 6m Assembly instructions

Baytex

Baytex ELECTRON 6m Assembly instructions

OZTENT JV SIGNATURE EDITION owner's manual

OZTENT

OZTENT JV SIGNATURE EDITION owner's manual

EuroTrail ATLANTIS PRO manual

EuroTrail

EuroTrail ATLANTIS PRO manual

Clarke PUC 88 Assembly guide

Clarke

Clarke PUC 88 Assembly guide

Wechsel Voyager quick start guide

Wechsel

Wechsel Voyager quick start guide

Dometic GROUP All-Season AIR Tall Annexe Installation and operating manual

Dometic GROUP

Dometic GROUP All-Season AIR Tall Annexe Installation and operating manual

Coleman 2000008494 Setup instructions

Coleman

Coleman 2000008494 Setup instructions

Dancover PRO EventZone 9m Series manual

Dancover

Dancover PRO EventZone 9m Series manual

RioOutdoors 6S-DH installation instructions

RioOutdoors

RioOutdoors 6S-DH installation instructions

Shappell S4000 manual

Shappell

Shappell S4000 manual

Carefree Buena Vista+ owner's manual

Carefree

Carefree Buena Vista+ owner's manual

Rubicon Expedition Products Hitch Tent manual

Rubicon Expedition Products

Rubicon Expedition Products Hitch Tent manual

manuals.online logo
manuals.online logoBrands
  • About & Mission
  • Contact us
  • Privacy Policy
  • Terms and Conditions

Copyright 2025 Manuals.Online. All Rights Reserved.