Rubicon Expedition Products Hitch Tent User manual

REP Hitch Tent™ Manual Page | 1
Section 1: Assembly and Installation
Parts List…………………………………………………………………………………………………………………………..Page 2
Hitch Ball Assembly…………………………………………………………………………………………………………..Page 2
Cross Bars Assembly………………………………………….……………………………………………………………..Page 3
Legs Assembly…………………………………………………………………………………………………………………..Page 5
Rooftop Tent Installation……………………………………………………………….……………..………………….Page 8
RubiConX Installation……………………………………………………………………………….….…………………..Page 12
Section 2: Use Instructions, Tips, and Tricks
RubiConX w/ Hitch Tent………………………………………………………………………….…….………………….Page 14

REP Hitch Tent™ Manual Page | 2
Hitch Tent Assembly Instructions:
Included in your new Hitch Tent
package is everything required for
assembly and install. To begin please
verify all parts are present.
A) Cross Bar
B) Cross Bar w/ Locking Bracket
C) Main Column w/ two Center
Brackets
D) Left Leg Complete
E) Right Leg Complete
F) RubiConX Complete w/ silent
hitch pin
G) Hitch Ball
H) 5/32” Allen Key and Small 3/8” Open ended wrench (In parts kit)
I) 8 M8x1.25 x 45mm Long Hex Head Bolts; 23Zero replacement hardware (in parts Kit)
____________________________________________________________________________________
Section 1 – Assembly and Installation
Part one: install the hitch ball in the end of the main support column.
1) 3)
2) Note: Hand tight is sufficient for this component.
Occasionally check that it is still tight during use.
Table of Contents
_____________________________________________________________________________________

REP Hitch Tent™ Manual Page | 3
Part two: Attach the Cross Bars(A and B) to the Main Column(C).
1) Locate Cross bar w/ Locking Brackets (B)
2) Place Cross bar A near the hitch ball end
of the main column
3) Option: If you’d like the locking brackets
on the top cross bar when Hitch Tent is
on the vehicle. Switch Cross Bar’s A and
B at this step.
4) Locate Cross bar A
5) Place Cross bar A away from the hitch ball
6) Remove the hardware from the top of the
center brackets using included 5/32” Allen Key.

REP Hitch Tent™ Manual Page | 4
7) Place the Cross bar A in the center
bracket, making sure the “Center” marks
are aligned with the middle of the bracket.
9)ONLY LOOSELY ASSMEBLE THE TOP
HARDWARE AT THIS STEP.
10) Repeat step 8 for Cross bar B
11) Hitch Tent is compatible with a large
variety of Rooftop Tents. While most are
adjustable to fit varying cross bar spacings,
some are not. If your tent requires a specific
spacing, now is the time to set that. If your
tent doesn’t require a specific rail spacing, we
recommend 32” center to center between
cross bars.
12)Position cross bars the desired distance
apart, and roughly 1” from the Non-Ball hitch
end.
13) Once the Cross Bars are Positioned as
desired, carefully lift the main column and
tighten the 4 bolts on the bottom of the Center
Bracket.
14) Repeat step 13 for the Second Center
Bracket Bottom.

REP Hitch Tent™ Manual Page | 5
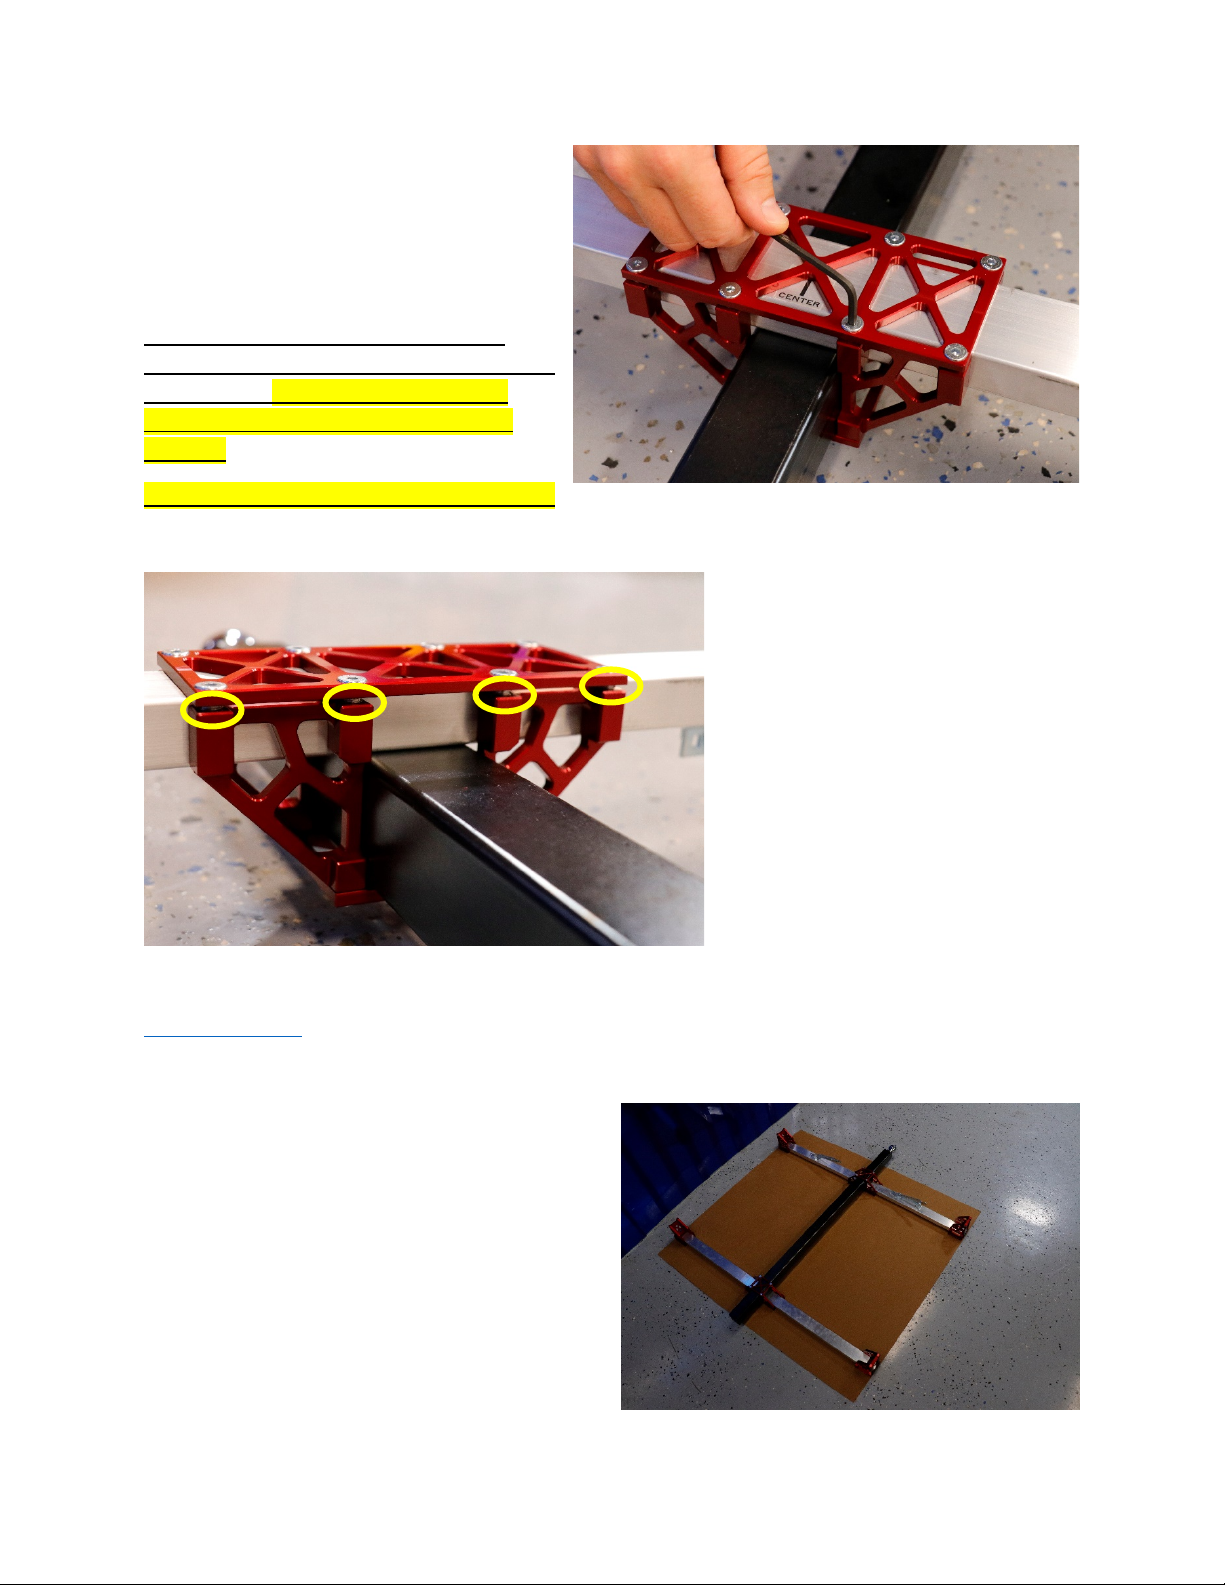
15) Verify the Cross bars have not moved and
that the “Center” Mark is still in the center of
the bracket.
16) Using an alternating pattern lightly
tighten each of the bolts on the top.
Do not to overtighten one side. The top
plate should make even contact to the top of
the cross bar. A GAP BETWEEN THE TOP
PLATE AND ANGLED PARTS BELOW WILL
REMAIN.
--Over tightening can damage the bracket!!--
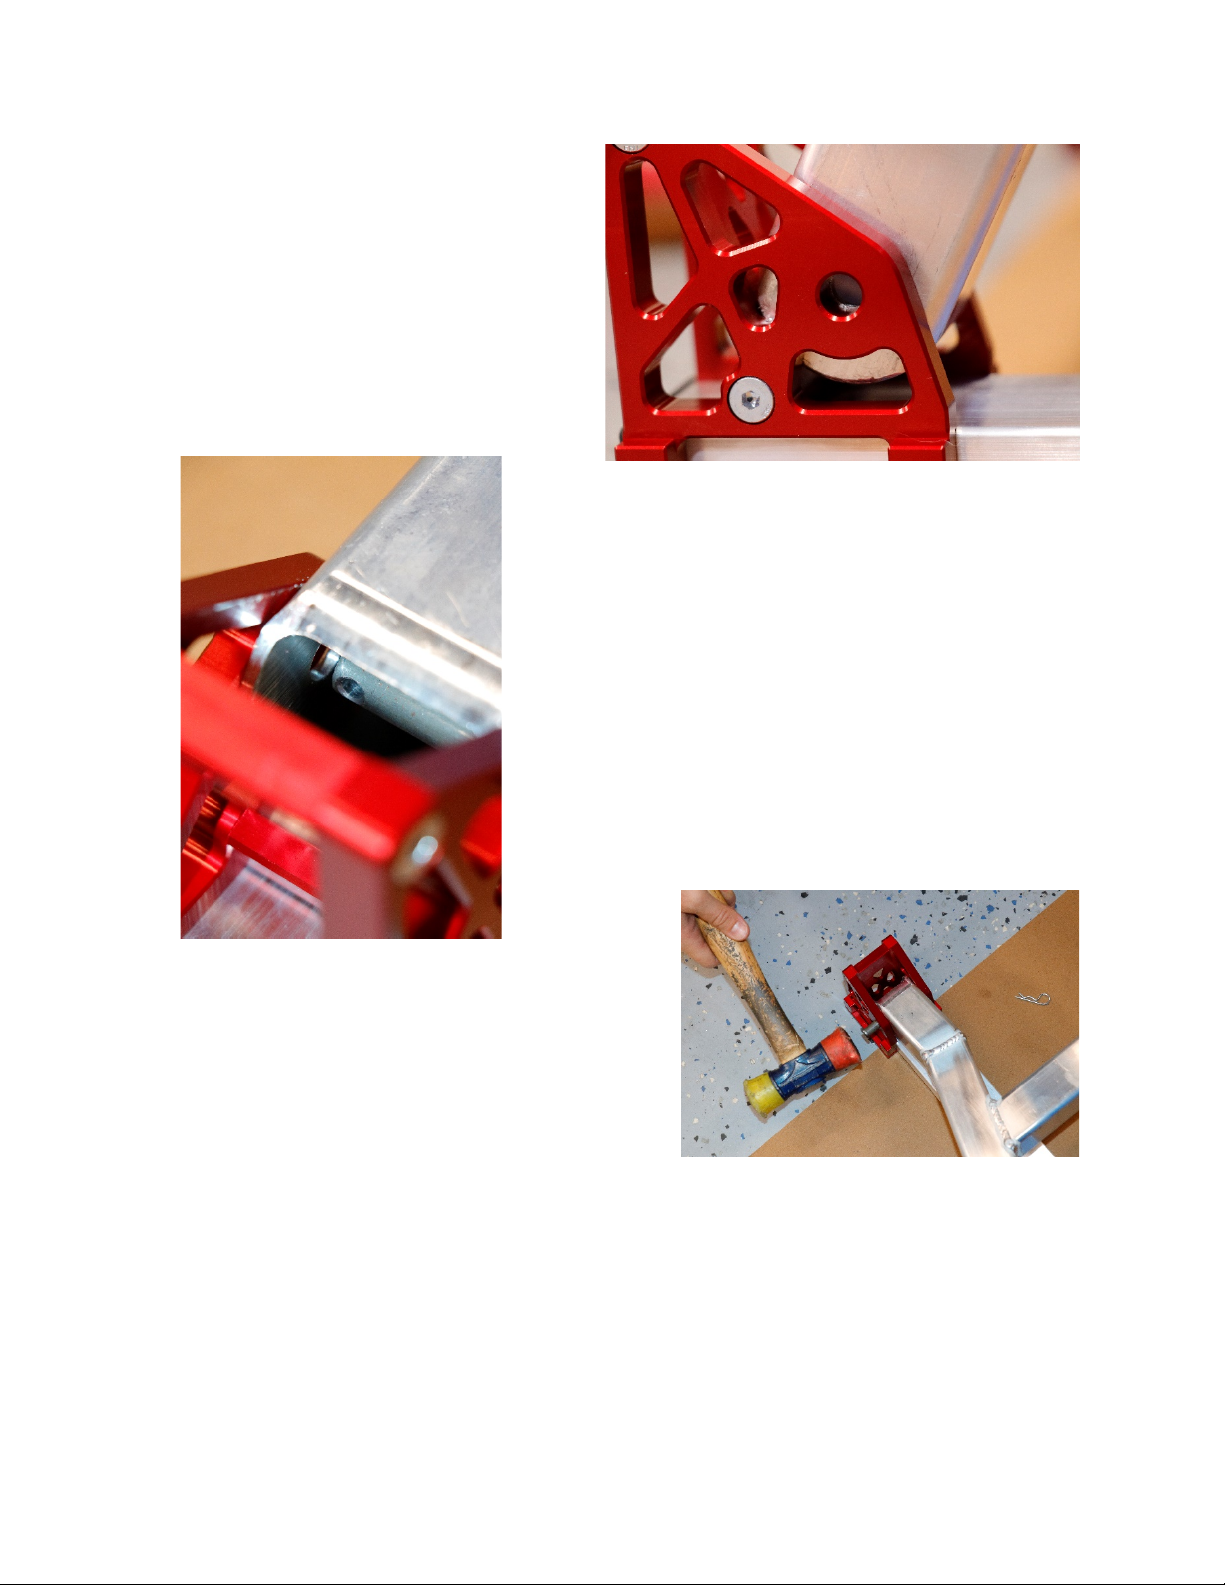
17) Note the gap approx. .125” (1/8th”)
on the tight top plate of the center
bracket. This needs to remain for
proper functionality of the Hitch Tent.
18) After verifying an even gap all the
way around, in an alternating pattern
tighten each of the bolts snugly. (this
should be no more than ½ turn of the
wrench if everything was properly
seated. (Don’t try to break the wrench
tightening them!)
Table of Contents
_____________________________________________________________________________________
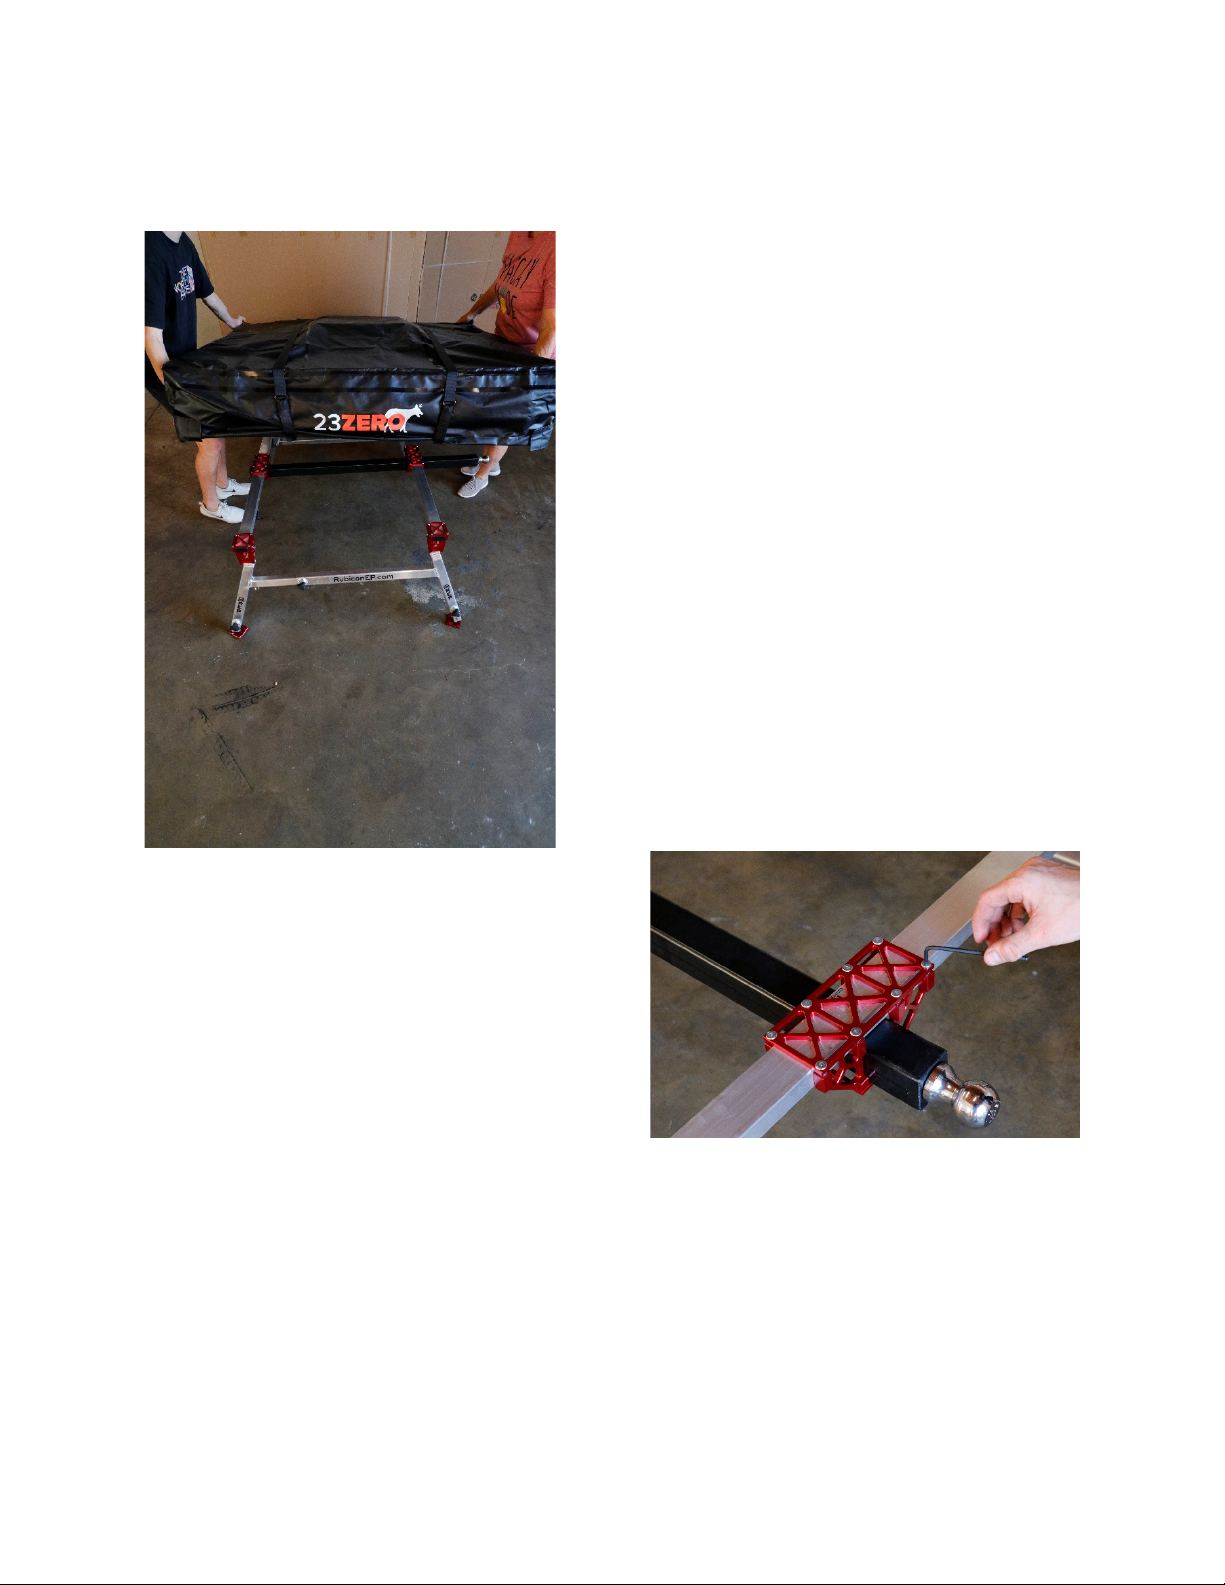
Part Three: Install the legs.
1) Flip the Hitch Tent assembly to its back.
This exposes the brackets to receive the
legs.
2) 2) Locate Legs (D and E)

REP Hitch Tent™ Manual Page | 6
3) Remove the hairpin and clevis pin
from the leg top and set aside.
4) Loosen the leg width adjustment knob
(Circled in image right).
5) Slide legs apart to match the with of
the hinge brackets at the end of the cross
bars.
6) Verify the Knobs are facing Up (or
away from the center)
7) Roughly insert the leg tops into both
brackets. Don’t worry about pin
alignment yet, just ensure both leg tops
are centered in the hinge brackets.
9)Align the hole in the leg top with the round
hole on the center bracket.

REP Hitch Tent™ Manual Page | 7
Note: Due to the close tolerances of the leg to
hinge bracket interface to ensure a long life, it
may take moving the bracket up and down, or a
second set of hands to aid in alignment.
10) Insert Pin from the outside of the rack.
Note: peeking at this angle with the leg down can aid in
aligning the pin with the hole on the opposite side.
11) Insert the pin the rest of the way.
11) It may be necessary in some cases to gently persuade
the pin to go all the way in using a soft-sided mallet or
something similar.

REP Hitch Tent™ Manual Page | 8
12) Once the pin is in place, slide the hair pin in place
to keep it retained.
13) Repeat steps 9-12 for all 4 corners
14) With the legs fully open, insert the locking
pins to lock the leg in the open position.
15) Tighten Leg width adjustment knob from
step 6
This completes the assembly of Hitch Tent
Table of Contents
_____________________________________________________________________________________
Part Four: Install a Rooftop tent on to Hitch Tent.
Note: this is for 23Zero products, however the process will
be the same for most folding style rooftop tents. If you have
install questions refer to the Tent’s Owners manual, or feel
free to contact us at 916-891-5922.
1) Gather your rooftop tent, supplied hardware (I)
2) Find a buddy to help you lift the tent into place
3) Determine which way you would like the tent to open,
toward the passenger side, or toward the Driver’s side.
4) Place the tent’s hinge mechanism on the side you’d like
the tent to open toward.
Tip: The closure straps on the outside of the 23Zero tents
will also tell you which way its going to open. The metal
buckles and Velcro will be on the side the tent opens
TOWARD.

REP Hitch Tent™ Manual Page | 9
5) Commandeer a friend to help lift your tent up on to
the Hitch Tent rack system.
Note: As described in the prior tip, the tent would be
opening toward the camera in this orientation. With the
Hitch Tent facing right as you see here, this would mean
the tent will open to the passenger side upon
deployment.
Note: If the front bracket is installed too close to the
ball, the tent wont be supported optimally. To resolve
this, follow these steps:
a) loosen the top plate hardware for both center
brackets.
b)

REP Hitch Tent™ Manual Page | 10
c) slide the main column
forward leaving about 1 inch
at the end.
d) tighten top plate hardware
as described in Step Two,
number 17 of the assembly
instructions.
6)Locate all tent hardware that came with the
tent, as well as the 8 bolts included with Hitch
Tent. These 8 Bolts are shorter, and limit
interference with the legs of Hitch Tent. USE THE
SHORTER HARDWARE SUPPLIED WITH HITCH
TENT.
7) Slide hardware next to the Cross bar

REP Hitch Tent™ Manual Page | 11
8) Lift tent in place to allow hardware to pass the cross bar
9) Loosely assemble the retention plate, washers,
and nuts as shown left
10) Repeat steps 7-9 for the 4 intersections between
the tent and Hitch Tent’s cross bars.
11) With the tent resting on Hitch
Tent, set the spacing from the ball.
There should be 3” from the end
of the Main Support (where the
ball threads in) to the tent. If this
distance is to small, the tent cover
will catch when folding it into the
RubiConX™ causing damage to
your tent. If this distance is too
great, the tent will be unnecessarily
tall in the folded position.

REP Hitch Tent™ Manual Page | 12
12) Use a tape measure to verify that the rack is parallel to the cross bars. It doesn’t matter what this
dimension is, just that it is even from the left to right side of the
rack
13) Then check that the tent is centered on the
platform from left to right.
Note: For most tents this dimension is 48” Which
means the tent and legs should be close to flush.
14) Tighten hardware for tent to secure it to Hitch Tent.
Table of Contents
_____________________________________________________________________________________
Part Five: Install RubiConX (Pronounced Ruby-connects)
1) Locate RubiConX w/ Included “Lets Go Aero” anti-rattle
pin. This allows the RubiConX to be installed such that it
will not move around in the receiver.

REP Hitch Tent™ Manual Page | 13
2)
3) The LGA Pin comes pre-installed in the most extended
position. If after your tent is installed and folded up on the
rear of your vehicle you’d like to move it closer, simply move
the spring nut to a different hole and reinstall.
4) RubiConX properly installed
Table of Contents
_____________________________________________________________________________________

REP Hitch Tent™ Manual Page | 14
Section 2: Use Instructions, Tips and Tricks
RubiConX use with Hitch Tent.
Part One – Attaching and folding up Hitch tent.
1) Open the main
latch of RubiConX
to allow the rear
door to swing
open.
2)Release the
Disconnect Cam
Lever

REP Hitch Tent™ Manual Page | 15
3)Pull up on the ball to allow the flange nut to pass through the
keyway in the Pivoting Support Side of RubiConX.
4) Once the flange nut passes through the keyway,
RubiConX will open, allowing installation or removal of
accessories such as Hitch Tent.
5) Bring your Hitch Tent, with RTT attached, near the
open RubiConX to connect the two.
6) Lift the ball of your Hitch Tent into the area between the
Delrin retainer pads. This doesn’t need to be perfectly
aligned, there is about 35 degrees of lateral, and 50 degrees
of vertical flexability.

REP Hitch Tent™ Manual Page | 16
7) Close the pivoting side of the RubiConX. The Ball will
self align between the retainer plates for proper location
regardless misalignment.
8) Guide the ball and flange nut back through the
keyhole.
Note: Make sure the Cam Handle is in the “Relaxed”
position or you wont be able to complete the next
step.
9) With one hand, squeeze the top of the RubiConX
closed, with the other pull the ball to guide the nut
the rest of the way though the keyhole. Then allow
the nut to slide down and settle into position.

REP Hitch Tent™ Manual Page | 17
10)In this position, Hitch Tent can be moved and
manipulated as needed, for leveling or packing,
without disconnecting from RubiConX.
11) Lift Hitch Tent into the vertical position.
Note: Depending on the size and type of tent attached
to Hitch Tent there may be a substantial about of
weight (50+ lbs) to lift. Practice proper lifting
technique to avoid injury. If you don’t feel confident
lifting alone, use a friend for assistance.
Note: during lifting, make sure tent is straight and
enters RubiConX as pictured right.

REP Hitch Tent™ Manual Page | 18
12) Once Hitch Tent is vertical close the rear door and main latch AND cam handle.
Note: Closing the cam handle is critical to the
stiffness of RubiConX with the weight of Hitch
Tent. If you’re noticing unusally high “wobble” of
the tent during transport, check that the cam
handle is tight.
Note: Main latch tension is set from the factory
and should be ideal out of the box. After some use
it will be necessary to adjust this. Instructions are
in the next section.
13) Remove Locking Pins, fold the legs in and reinsert locking
pins.
14) A simple shake test is a good way to ensure everything is tight. Simply push a few times on the side
of the tent to check the stiffness of the system. If anything is moving more than expected check the
trouble shooting section.
Table of Contents

REP Hitch Tent™ Manual Page | 19
____________________________________________________________________________________
Adjusting The RubiConX main latch tension:
Note: This should be adjusted with the Hitch Tent in the RubiConX in the upright position.
1) Loosen the small stop nuts on the
closure loop side of the latch. This
must be done on the top and
bottom of the latch.
2) With both nuts loose, turn the tension
adjustment nut ½ turn clockwise. Do this for
the top and bottom nuts. Ensure any
tightening or loosening of the top nut is
mimic’d on the bottom.

REP Hitch Tent™ Manual Page | 20
3) Before tightening the stop nuts, check the
main latch tension by closing the latch. It
should require 10-15 lbs of force to close. If it
is too loose or too tight, make necessary
adjustments.
4) Once tension is ideal, tighten stop nuts from
step 1.
Table of Contents
_____________________________________________________________________________________
Table of contents