manuals.online logo
Brands
  1. Home
  2. •
  3. Brands
  4. •
  5. Coomber
  6. •
  7. Cassette Player
  8. •
  9. Coomber 2242 User manual

Coomber 2242 User manual

Operating Instructions: 2242 PA CD Cassette Player Coomber
CD I/P
RL
+
-
+
-
SPEAKERS
LEFT RIGHT
EXT & INT
EXT
BALANCEBASS
POWER
Coomber
RECORDING
(mono)
R
(stereo)
INPUTS OUTPUTS
2242
L
TAPE
CD
MASTER
TREBLETAPE/CD
VOLUME
INPUT
VOLUME
RESET
EXT AMP
STEREO HEADPHONES
AUXMIC2MIC1
FULL AUTO STOP
PAUSE
STOP/EJECT
FF/CUE
REW/REVPLAYREC
2242 Stereo PA CD Cassette
Power from Mains
The Mains ON/OFF switch is located on the side panel. When ON, the
power indicator (1) on the front panel will illuminate.
Amplifier Controls
●Volume control (7)
To protect listeners, always adjust the volume control (7) to
minimum before use - particularly if headphones are being used.
Turn the volume level up once the CD or cassette is playing.
If necessary restart the CD or cassette once the volume level is set.
●Balance Control (8)
The balance control (8) allows fading between the speakers.
Maximum output of both speakers is achieved when the dial is set
to the centre point.
When turned fully left, the right hand speaker cuts out completely
and vice versa - ideal where music is recorded on one track and
voices on the other.
●Treble (9) and Bass (10) Controls
The treble and bass controls allow listeners to adjust the sound
output to suit, enhancing sound quality as required.
NB Recording
The position of the above mentioned amplifier controls will not
affect recordings, regardless of their position.
●Input Volume (14) Control
The input volume control is used for public address work and
controls the volume of microphones or auxiliary equipment.
Public Address (PA) facility
Microphone(s) can be used to amplify your voice. External sources such
as a guitar or keyboard etc, played through the PA amplifier.
●To amplify your voice: Connect microphone(s) to either or both of
the two mono microphone input sockets (3).
●To amplify an external source: Connect line level equipment using a
stereo jack plug to the Aux socket (4).
●Volume: Adjust the Input Volume (14) to suit.
NB The MIC and AUX inputs are passively mixed and may be
connected simultaneously.
Preventing Feedback
1. Make sure the microphone is switched off before switching the
system on.
2. Ensure that the INPUT VOLUME (14) is turned down (anti-
clockwise) to its lowest position.
3. Switch on the microphone.
4. Gradually turn up the INPUT VOLUME (14) until feedback just
starts to occur (you should hear a whine noise) and then turn the
volume down a little until you can no longer hear the feedback.
You might have to experiment with the volume control to
get optimum results.
Note: Some microphones are not designed for Public Address and
further advice may be needed.
Headphone Sockets (11 & 12)
Connecting Mono or Stereo headphones to the MASTER headphone
socket (12) automatically disconnects the internal loudspeakers.
Up to five more pairs of headphones may be connected to Sockets (11).
Note: If the MASTER socket is not used, then the internal loudspeakers
are not disconnected and sound will be reproduced through the
internal loudspeakers and any headphones connected.
SAFETY: For safety you are advised to use only 600 ohm headphones
such as Coomber 1929 headphones.
Prior to using headphones, always turn the volume down,
fit the headphones and then adjust the sound to a
comfortable level.
Tape / CD Selector (5)
The SELECT button (5), should be pushed IN to play CDs or OUT to play
cassette tapes.
External Amplifier Outputs (6)
Use EXT AMP L & R (6) outputs to connect to an external amplifier,
Coomber Booster Speakers or a mixing desk.
The output level is not fixed and may be adjusted by using the
VOLUME and BALANCE controls.
1456
7
8
9
11
10
12
13
23
14
PLEASE NOTE: ALWAYS CLOSE THE CD TRAY (1)
WITH THE UNIT SWITCHED ON. PUSHING THE TRAY
CLOSED WITH THE POWER OFF MAY LEAD TO
DAMAGE DURING SUBSEQUENT TRANSPORTATION.
USING THE CD PLAYER
Ensure the TAPE/CD selector switch (6) is pushed IN for CD playback.
OPEN/CLOSE button (21)
Press the OPEN/CLOSE button (21) to open or
close the CD loading tray (18).
Insert the CD with the label side facing up.
Notes: The CD tray is spring mounted to improve playback performance.
It is perfectly normal for the loading tray to wobble when touched.
The loading tray can be closed by using one of the following methods:-
Lightly pushing the front of the CD tray (18) inwards.
Pressing the PLAY/PAUSE button (20)
Pressing the PLAY/PAUSE button on the remote control unit.
Pressing the OPEN/CLOSE button (21)
Using the PLAY/PAUSE buttons to load the disc will automatically allow
any audio CD in the tray to start playing.
PLAY/PAUSE button (20)
Press the PLAY/PAUSE button (20) once
to start playing a CD.
To pause a CD, press the PLAY/PAUSE button (20).
To resume playback, press PLAY/PAUSE button (20) again.
Note: While in PAUSE mode, the word ‘PLAY’ will flash on and off in
the LCD display.
F. SKIP/FF (22) and
B.SKIP/REW buttons (23)
Press the F.SKIP/FF button (22) to
move to the next track.
Press the B.SKIP/REW button (23) to
return to the start of the track.
Press the button again to go back to
the previous track.
TIP: Press and hold the F.SKIP/FF or B.SKIP/REW buttons down to search
forwards or backwards through the track at high speed (i.e. cue and
review)
STOP button (19)
Pressing STOP (19) will cause the CD to stop playing.
The CD player will return to the READY MODE.
Remote Control Sensor (27)
The 2242 is supplied with a remote control unit. The CD player
incorporates an infra red sensor mounted on the front panel.
The controls of the remote control are the same as those on the CD
player (described elsewhere) and operate in the same way.
To use the remote control, press the buttons required while pointing it
at the front face of the CD player.
LCD Display (26) Information
Standby Mode No disc inserted
Ready Mode Disc inserted
Number of tracks on
the CD is displayed
Disc Playing ‘PLAY’ appears
Track 1 currently playing
Disc Paused ‘PLAY’ flashes on and off
Track 1 currently paused
Error Warning Disc Problem
Check to ensure that disc
has been inserted correctly.
Has an audio disc been inserted?
Repeat Mode (24)
Depressing the REPEAT button once allows the
track currently playing to be repeated when it
has ended.
Repeat Mode ‘PLAY’ and ‘REPEAT’ appear
Track 3 will play again when
it ends.
Depressing the REPEAT button a second time allows the whole CD
currently playing to be repeated when it has ended.
All Repeat Mode ‘PLAY’, ‘ALL’ and ‘REPEAT’
appear The entire CD will play
again when it ends.
Press REPEAT again to cancel the REPEAT/ALL REPEAT modes.
Program Mode (25)
The CD Player can be programmed to play a
selection of tracks in any order - from any audio CD
inserted in the loading tray.
Note: Program mode will only work with the
currently inserted disc. It will not remember a selection once the disc
has been removed.
Example: tracks 3, 8 and 2 are selected using the process shown below.
Press PROG once. The word ‘PROG’ and 00
flash on and off
Press F.SKIP/FF to The word ‘PROG’ and 03
select track 3. flash on and off
Press PROG again The word ‘PROG’ and 00
flash on and off
Press F.SKIP/FF to The word ‘PROG’ and 08
select track 8. flash on and off
Press PROG again The word ‘PROG’ and 00
flash on and off
Press F.SKIP/FF to The word ‘PROG’ and 02
select track 2. flash on and off
Press PROG again. Programming is now complete.
PLAY
PLAY
PLAY
REPEAT
STOP PLAY/PAUSE OPEN/CLOSE
PROG REPEAT B.SKIP/REW F.SKIP/FF
PLAY
ALL
REPEAT
PROG
STOP PLAY/PAUSE OPEN/CLOSE
PROG REPEAT B.SKIP/REW F.SKIP/FF
PROG
PROG
PROG
PROG
PROG
STOP PLAY/PAUSE OPEN/CLOSE
PROG REPEAT B.SKIP/REW F.SKIP/FF
REMOTE
PLAY
PROG
ALL
REPEAT
18 19 20 21
222324252627
STOP PLAY/PAUSE OPEN/CLOSE
PROG REPEAT B.SKIP/REW F.SKIP/FF
STOP PLAY/PAUSE OPEN/CLOSE
PROG REPEAT B.SKIP/REW F.SKIP/FF
STOP PLAY/PAUSE OPEN/CLOSE
PROG REPEAT B.SKIP/REW F.SKIP/FF
STOP PLAY/PAUSE OPEN/CLOSE
PROG REPEAT B.SKIP/REW F.SKIP/FF
STOP PLAY/PAUSE OPEN/CLOSE
PROG REPEAT B.SKIP/REW F.SKIP/FF
The CD Player software initially takes a few moments to run a
diagnostic check when first started. Please expect a few seconds
delay before the CD controls function.
Press PLAY to begin playing the selection.
In PLAY Mode ‘PLAY’ and ‘PROG’ appear
‘PROG’ flashes on and off
The first programmed track plays.
Note: While in this mode. the B.SKIP/REW and F.SKIP/FF buttons will
only select the programmed tracks.
Press STOP to exit from PROG PLAY. Press PLAY to listen to the CD in
the normal way or, press PROG and PLAY to repeat the program again.
Cancelling the Programmed Play List
Press PROG and STOP to clear the programmed play list from the CD
player memory.
Removing the CD will also clear the programmed play list.
Remote Control
(operates CD Player only)
The remote control supplied with the
2242 mimics the CD player controls. It
operates the CD functions only.
Note: The remote control unit requires 2x
AAA batteries.
USING THE CASSETTE RECORDER
Ensure that the TAPE/CD selector switch (6) is in the OUT position for
tape playback.
Keys
PAUSE (31): Stops tape recording and playback, without
disengaging the tape heads and capstan wheel.
STOP/EJECT (32): Opens the cassette door (30) to insert or remove
tapes. Stops play, fast forward and rewind functions.
FF/CUE key (33): From the STOP position, the cassette will fast-wind
forwards.
From the PLAY position, the cassette will fast-wind
forwards while the button is pushed down. This
allows the user to move forward as required
without having to STOP-START the cassette.
REW/REV (34): From the STOP position, the cassette will wind
backwards.
From the PLAY position, the cassette will wind
backwards while the button is pushed down. This
allows the user to quickly repeat a passage as
required without having to STOP-START the
cassette.
PLAY (35): Plays pre-recorded tape.
REC (36): Press the REC key to record from microphones, CD
or any other external source.
The PLAY button (35) will automatically depress at
the same time.
Playing a Pre-recorded Tape
Ensure the TAPE/CD selector switch (5) is in the OUT position for tape
playback. Open the cassette door (30) with the STOP/EJECT key (32) and
insert a pre-recorded tape. Close the door and press the PLAY key (35).
Adjust the VOLUME (7), BALANCE (8), TREBLE (9) and BASS (10) controls
to suit. To pause the tape, press the PAUSE (31) key.
Recording (cassette only)
Insert a blank cassette into the tape deck and depress the RECORD key
(35) to begin recording from the selected source.
The record level is automatically set to provide simple, good quality
recordings from External Microphone, Auxiliary input or CD.
Note: it is not possible to record from CD and External sources at the
same time.
●RECORDING FROM AN EXTERNAL MICROPHONE
Ensure the TAPE/CD selector switch (5) is in the OUT position. This
will cause the i/p indicator (2) to illuminate.
Plug a suitable microphone into the EXT record input socket (3).
Depress the RECORD key (36) on the cassette deck to begin
recording. Recording will be in MONO only.
Tip: When connecting microphones make sure the INPUT VOLUME
(14) is initially set low to prevent acoustic feedback. Once
connected, adjust setting to required volume and start recording.
●RECORDING FROM AN EXTERNAL SOURCE
Ensure the TAPE/CD selector switch (5) is in the OUT position. This
will cause the i/p indicator (2) to illuminate.
Connect a guitar, keyboard or external music source into the AUX
socket (4) using a suitable patch lead. Recordings can be in STEREO
or MONO depending upon the nature of the source and the
connecting leads used.
Depress the RECORD key (36) on the cassette deck to begin
recording.
●RECORDING FROM A CD
Ensure the TAPE/CD selector switch (5) is in the IN position. This will
cause the CD indicator (2) to illuminate.
Insert the CD. Depress the RECORD key (36) on the cassette deck to
begin recording and then depress the PLAY button (20) on the CD
player.
Recording difficulties
If your recording is blank, please check that the TAPE/CD selector
switch (5) was correctly set to IN for CD recordings or OUT for
microphone recordings.
Note: If the RECORD key on the cassette mechanism cannot be
depressed, then check that the left-hand safety tab on the top edge of
your cassette has not been removed to protect an original recording.
A cassette can be reused by sticking a piece of self adhesive tape over
the hole.
Useful Tips
a. You may find, when replaying a recording, that a small amount of
distortion is heard at the start, especially when the signal to be
recorded is strong (loud). This can be overcome by allowing the
automatic level control to settle before recording. Press the PAUSE
key followed by the RECORD key. Allow a few seconds for the level
to settle. Release the PAUSE key to start the recording.
b. Reset the turns counter (37) to zero by depressing the RESET button
(38) whenever you wish to return to the start of a particular
passage.
c. It is important to keep the pinch wheel and heads clean in the usual
manner to ensure consistent good performance.
PLAY
PROG
reset
FULL AUTO STOP
PAUSE
STOP/EJECT
FF/CUE
REW/REVPLAYREC
37 38
30
36 35 34 33 32 31
STOP PLAY/PAUSE
BÆSKIP FÆSKIP
REPEAT PROG
Coomber Electronic Equipment Ltd.
Brindley Road, Warndon, Worcester, WR4 9FB, U.K.
Tel: 0044 (0)1905 342070 e-mail: sales@coomber.co.uk
Fax: 0044 (0)1905 759170 web: www.coomber.co.uk
SAFETY & GENERAL INFORMATION
WARNING: This equipment is fitted with a LASER diode which can harm the eyes
Do not attempt to disassemble the casing or use any part of the contents for any purpose
other than its intended use.
Headphones: For personal safety and comfort connect headphones into equipment, turn
volume down and then switch on before placing headphones over ears. For safety use only 600
ohm headphones (i.e Coomber type 1929).
Environments: The equipment should not be exposed to dust, moisture, water, chlorine and
other corrosive substances in normal use or during storage. It will cause damage to this equipment.
Swimming pool atmospheres: are very hostile to all electro-mechanical equipment (e.g. steel
rusts and rubber perishes). Equipment returned for repairs showing evidence of use in adverse
environments may, at our discretion, be charged for even during the 12 month warranty period.
•Rechargeable battery replacement must be carried out by a competent qualified technician.
•The disposal of batteries (rechargeable or otherwise) where used in Coomber equipment
should be discarded in accordance with local regulations.
•Do not cover the ventilation openings with any items (e.g. newspaper, fabrics etc.)
•Naked flames, such as lighted candles, should not be placed on or near the apparatus.
•The apparatus should not be exposed to dripping or splashing. No objects filled with
liquids, such as vases, should be placed on or near the apparatus.
European Safety Standard: All Coomber equipment complies with EN60065. Any local
requirements for use of this equipment should be taken into account.
Class I construction: This equipment must be EARTHED.
Mains Voltage
UK & EEC: 220-240V 50Hz: Mains Cable: Line - Brown, Neutral - Blue, Earth - Yellow & Green
USA: 110-120V 60Hz: Mains Cable: Line - Black, Neutral - White, Earth - Green
Disconnect from mains supply when not in use.
Mains Plug: The mains cable fitted to this equipment is already provided with a moulded plug. If
another plug type is required, follow instructions from the plug manufacturer, or seek advice
from a qualified person. DISPOSE OF ORIGINAL PLUG SAFELY. DO NOT RE-USE.
Mains Plug fuse rating: 3Amp to BS1362 (applicable in UK)
Model type and rating information is located on a label on the rear of the product.
Additional Technical Information: If you require any further help or information, or if
any point is not clear, then please telephone 01905 25168/9 quoting your model number and
serial number (located on a label on the rear of the product). Our Technical Department will
be pleased to help you.
Note: This equipment contains no user serviceable parts and should only be dismantled by
competent qualified personnel. Dismantling will render the warranty void.
Electrical Safety Testing: Safety testing and servicing should only be carried out by
competent qualified personnel. When undertaking an earth bond safety test, only use the
mains module chassis/metalwork as other exposed metal surfaces not 25Amp earth bonded
will cause internal damage. If the supply cable is damaged the equipment should be returned
to Coomber or their agent for cable replacement.
2242 Instructions © Coomber Electronic Equipment Ltd. 2002 OPS 2242 R4.1 180402
•Coomber reserve the right to change
products and specifications without notice.
•All Coomber equipment is covered by a
12 months warranty against defective
components or faulty manufacture from date
of dispatch. Any modifications to or misuse of
the equipment renders this warranty void.
•Equipment that is security marked or
damaged cannot under any circumstances
be exchanged.
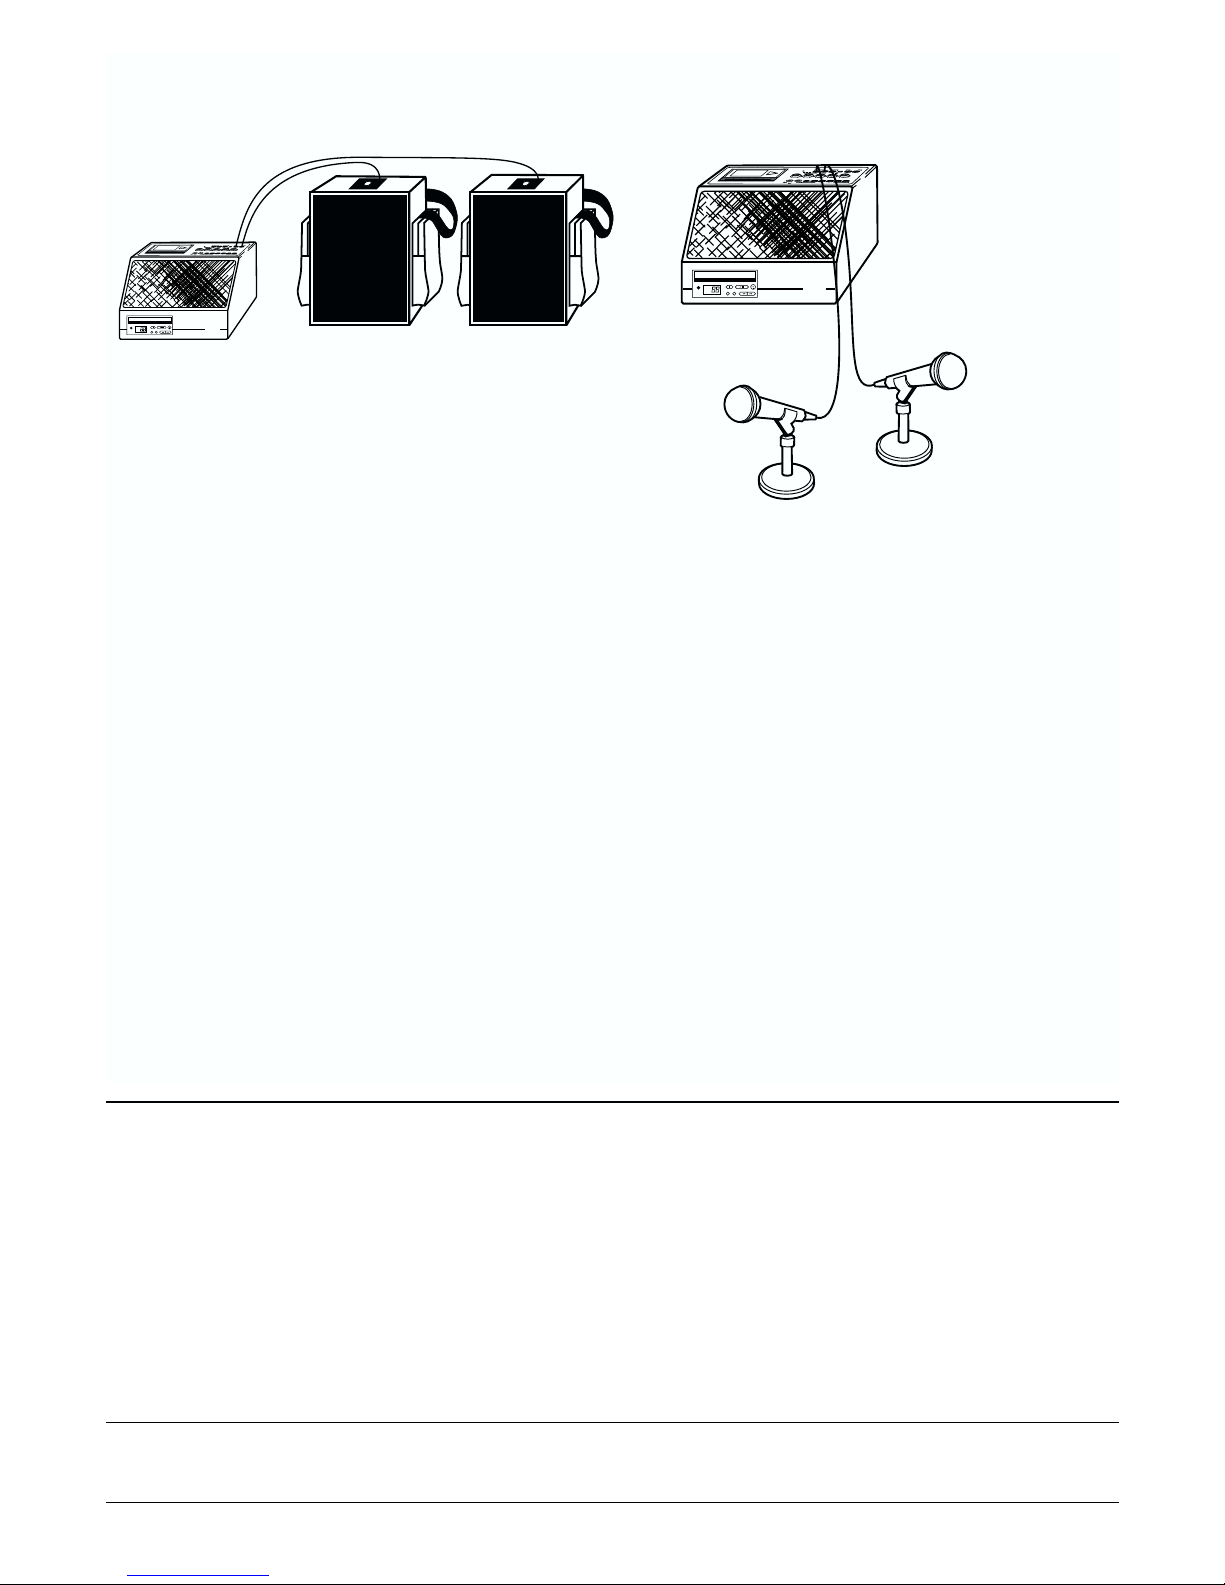
Using your 2242 CD Cassette Recorder
with Coomber accessories
Connecting to Coomber booster speakers /
external amplifiers (6)
The 2242 is designed to be compatible with Coomber Booster
Speakers (model no. 2185/2186) which are ideal for increasing sound
level.
Note: the 2242 requires 2 booster speakers for effective stereo
operation (as shown in the illustration above). Use EXT AMP L & R (6)
outputs to connect to an external amplifier, Coomber Booster
Speakers or a mixing desk.
The output level is not fixed and may be adjusted by using the
VOLUME and BALANCE controls.
2 x Coomber 2185 or 2186 booster speaker will upgrade your 2242 to
around 300 watts of music power. Phone: 01905 25168 for more
information.
Headphone Group Listening
for more than six positions
Connecting our six position stereo headphone distribution system,
1908/PK C, to one of the stereo headphone sockets will allow up to
eleven people to listen through headphones any one time.
Copyright
Your attention is drawn to the fact that copying pre-recorded tapes,
CD’s or other published material may infringe copyright laws.
Coomber Microphones and Desk Stands
For assessment recording purposes Coomber models 1903 professional
quality microphone and 1902 dynamic microphone are both suitable
for use with the 2242.
Both microphones can be used with the Coomber 1912 desk stand,
making them ideal for use in an examination environment.
Simply plug the microphones into the microphone socket (3), switch on
and begin recording for high quality results.
Coomber
STOP PLAY/PAUSE OPEN/CLOSE
PROG REPEAT B.SKIP/REW F.SKIP/FF
REMOTE
PLAY
PROG
ALL
REPEAT
CD I/P
R
L
+
-
+
-
SPEAKERS
LEFT RIGHT
EXT&INT
EXT
BALANCE
BASS
POWER
Coomber
RECORDING
(mono)
R
(stereo)
INPUTS OUTPUTS
2242
L
TAPE
CD
MASTER
TREBLE
TAPE/CD
VOLUME
INPUT
VOLUME
RESET
EXTAMP
STEREOHEADPHONES
AUX
MIC2
MIC1
FULLAUTOSTOP
PAUSE
STOP/EJECT
FF/CUE
REW/REV
PLAY
REC
2242StereoPACDCassette
Coomber
STOP PLAY/PAUSE OPEN/CLOSE
PROG REPEAT B.SKIP/REW F.SKIP/FF
REMOTE
PLAY
PROG
ALL
REPEAT
CD I/P
R
L
+
-
+
-
SPEAKERS
LEFTRIGHT
EXT&INT
EXT
BALANCE
BASS
POWER
Coomber
RECORDING
(mono)
R
(stereo)
INPUTSOUTPUTS
2242
L
TAPE
CD
MASTER
TREBLE
TAPE/CD
VOLUME
INPUT
VOLUME
RESET
EXTAMP
STEREOHEADPHONES
AUX
MIC2
MIC1
FULLAUTOSTOP
PAUSE
STOP/EJECT
FF/CUE
REW/REV
PLAY
REC
2242StereoPACDCassette

Other Coomber Cassette Player manuals

Coomber 844-7 User manual

Coomber

Coomber 844-7 User manual

Coomber 2241 User manual

Coomber

Coomber 2241 User manual

Coomber 2020 User manual

Coomber

Coomber 2020 User manual

Coomber 2241 User manual

Coomber

Coomber 2241 User manual

Popular Cassette Player manuals by other brands

Sony Walkman WM-FX481 operating instructions

Sony

Sony Walkman WM-FX481 operating instructions

Philips FC 880 manual

Philips

Philips FC 880 manual

Tascam 688 Midistudio owner's manual

Tascam

Tascam 688 Midistudio owner's manual

Aiwa HS-GS194 Service manual

Aiwa

Aiwa HS-GS194 Service manual

Sony TCM-20DV - Mini Cassette Recorder Service manual

Sony

Sony TCM-20DV - Mini Cassette Recorder Service manual

JVC TD-W254BK Service manual

JVC

JVC TD-W254BK Service manual

Technics RS-TR333 - SCHEMATICS manual

Technics

Technics RS-TR333 - SCHEMATICS manual

Ultrak KR4096HN-A Operation instructions

Ultrak

Ultrak KR4096HN-A Operation instructions

Sony TC-S9 Service manual

Sony

Sony TC-S9 Service manual

Kenwood KRC-940 instruction manual

Kenwood

Kenwood KRC-940 instruction manual

Vitek VT-3456 GY instruction manual

Vitek

Vitek VT-3456 GY instruction manual

Akai GX-F31 Service manual

Akai

Akai GX-F31 Service manual

Yamaha K-07 owner's manual

Yamaha

Yamaha K-07 owner's manual

Sony TCM-400DV Service manual

Sony

Sony TCM-400DV Service manual

Sony TCM-200DV - Cassette Recorder operating instructions

Sony

Sony TCM-200DV - Cassette Recorder operating instructions

JVC TD-W208BK Service manual

JVC

JVC TD-W208BK Service manual

Harman Kardon CD291 owner's manual

Harman Kardon

Harman Kardon CD291 owner's manual

Marantz PMD520/F1B Service manual

Marantz

Marantz PMD520/F1B Service manual

manuals.online logo
manuals.online logoBrands
  • About & Mission
  • Contact us
  • Privacy Policy
  • Terms and Conditions

Copyright 2025 Manuals.Online. All Rights Reserved.