Cooper Lighting MSLED180 User manual

1
Instruction Manual/Instrucciones
• Locate sensor away from moving objects such as
trees, large shrubs and street traffic.
• You will need to adjust the angle of the solar panel
throughout the year as seasons change in order to
keep it at the best possible angle to the sun.
• Keep solar panel clear of any objects that will block
the sunlight. It will be necessary to periodically clean
the solar panel with soft wet cloth.
• During periods of several cloudy days, the battery
may fall below the operating level and will need to be
recharged with sunlight.
MOUNTING YOUR FIXTURE
1. Locate area in which you would like to install your
light fixture.
NOTE: For fixture to operate properly, the solar panel (B)
must be located in an area that will receive the maximum
amount of sunlight and is free from obstructions.
2. Using the fixture mounting screws (C) provided,
mount fixture (A) to a solid surface 8-12 feet above
the ground by placing the screws through the holes
on either side of the fixture (Fig. 2). Adjust sensor
head so that control switches are facing the ground.
Remove label from the front of the sensor head.
3. Using the solar panel mounting screws (D) provided,
mount solar panel (B) to a solid surface (Fig. 3).
Adjust the angle of the solar panel (B) so that it will
receive the maximum amount of direct sunlight
during the daylight hours.
NOTE: For best results, locate panel to receive at least
3-4 hours of direct sunlight daily.
4. Carefully route the wire from the solar panel (B)
to the fixture (A) and plug it into the connector
extending from the side of the fixture housing (A)
(Fig. 4). Make sure to push the connector plugs
tightly together until you hear two clicks to ensure
they are fully engaged.
OPERATING YOUR FIXTURE
NOTE: Make sure you allow fixture to receive four full
days of sunlight before turning fixture ON.
1. Move slide switch on bottom of the sensor
to “TEST” (Fig. 5).
NOTE: Fixture has a warm up period of about one
minute. Light will turn on during this period. Once the
light turns off, you are ready to test.
PACKAGING CONTENTS/CONTENIDO DEL PAQUETE
ITEMS REQUIRED
(Purchase separately)
• Phillips screwdriver
HOW IT WORKS
During the daylight hours, the solar panel turns the sunlight
into energy that is stored in the rechargeable battery pack.
Your light features a motion sensor that turns the light ON
at night when motion is detected. This light is equipped
with a photocell, which only allows the fixture to turn ON
during the nighttime hours.
WARNINGS AND CAUTIONS
INSTRUCTIONS PERTAINING TO A RISK OF FIRE OR INJURY TO PERSONS.
To reduce the risk of fire or injury to persons, read and follow these instructions:
• DO NOT replace batteries.
• DO NOT dispose of this product in fire. Batteries inside this product may explode or leak.
• DO NOT puncture this battery pack. DO NOT work on this battery pack
• DO NOT disassemble fixture. The fixture does not have any user serviceable parts.
• For outdoor use only.
• Lithium-Ion batteries must be disposed of in accordance with local waste ordinances and
regulations.
• Do not operate a luminaire with a missing or damaged lens.
• Fixture is suitable for wall mount only. NOT suitable for ground mount installation.
• Do not cut the solar panel wire. Discontinue use if the wire becomes frayed or broken.
SAVE THESE INSTRUCTIONS.
FOR BEST RESULTS
• Allow fixture to receive four full days of sunlight before turning fixture ON.
• Locate solar panel in an area that will receive the
maximum amount of sunlight during the daylight
hours. Locate panel to receive at least 3-4 hours of
direct sunlight daily.
• Test your charged unit before permanently installing.
• Install the motion sensor 8-12 feet above the ground.
(Motion sensor is less sensitive above 12 feet.)
• Locate motion sensor so motion moves across the
detection zone (Fig. 1).
• Locate sensor away from heat producing sources to
prevent false triggering. Also be very careful not to
include objects such as windows, white walls and
water in the detection zone.
MSLED180 (Black)
MSLED180W (White)
A. Light fixture with 12 in. lead wire connector
Accesorio para la luz con conector de cable de 12 pulg
ENGLISH
Fig. 1
B. Solar panel with 15 ft. cord
Panel solar con cable de 15 pies
C. (2) Fixture mounting screws
(2) Tornillos de montaje
del accesorio
D. (4) Solar panel mounting
screws
(4) Tornillos de montaje
del panel solar
Up to
70 feet
180 degrees
Fig. 2
A
C
C
Fig. 3
DBD
DD
(Single head position)
(Posición de cabezal simple)
(Twin head position)
(Posición de cabezal doble)
Fig. 4
B
A
Fig. 5
A

2
2. Aim sensor toward the general direction in which motion will occur. Always position the
sensor head with control switches facing toward the ground.
3. Walk across the detection zone at the farthest distance you wish your sensor to
detect motion.
4. For more range, aim sensor slightly upward. For less range, aim sensor slightly downward.
Light will turn off 4 seconds after motion stops.
NOTE: Allow 5 seconds after light turns off before your next test.
5. Move slide switch on bottom of sensor to 1 min. or 3 min. Light will turn ON at night when
motion is detected and turn OFF at the selected time interval after motion stops.
NOTE: When battery is low, the fixture will flash twice to indicate it will automatically turn
OFF. (The fixture will not turn ON until the battery has recharged to the operating level.) The
red LED indicator light will blink every 5 seconds at night until the battery is charged to the
operating level.
PROPER BATTERY CARE
NOTE: Proper care should ensure the longest possible life for your battery.
• Make sure that your solar panel is located in a sunny location.
• When battery is low, the fixture will flash twice to indicate it will automatically turn OFF.
(The fixture will not turn ON until the battery has recharged to the operating level.) The
red LED indicator light will blink every 5 seconds at night until the battery is charged to
the operating level.
• To ensure proper recharge, turn fixture OFF and allow fixture to receive 4 full days of
sunlight before turning the fixture ON.
TROUBLESHOOTING
Problem Cause / Solution
Light Does Not
Come On With
Motion At Night
Surrounding external ambient light is too bright. (If so, the unit may
think it is daytime.)
• Re-aim the head.
• Relocate or reposition the unit away from the light source.
Fixture is not charging during the day.
• Solar panel must be connected to the connector extending
from the side of the fixture housing when charging.
• Solar panel must be receiving direct sunlight to charge during
day (reposition if shadowed).
• Solar panel must be clean and free from debris.
• Make sure batteries have been charged for 4 full days of
sunlight prior to turning the fixure ON.
• When battery is low, the fixture will blink twice and
automatically turn OFF until the battery is charged to the
operating level.
Light Comes On
For No Apparent
Reason At Night
There is motion in the detection zone.
• Make sure the sensor is not picking up moving objects such as
trees, traffic, etc.
TEST FOR YOURSELF.
• Cover the sensor lens with black electrical tape to prevent
sensor from detecting motion. If the light stays off, something in
the detection zone is triggering the sensor.
• Reposition the sensor.
* If the light stays on with the sensor lens covered, contact
customer service.
Light Stays On At
Night And Does
Not Turn Off
There is motion in the detection zone.
• Make sure the sensor is not picking up moving objects such as
trees, traffic, etc.
• Reposition motion sensor.
* If the light continues to stay on, contact customer service.
Light Is On
During The Day
The switch on the bottom of the motion sensor is in the TEST mode.
• Move the switch to 1 min. or 3 min.
The motion detector is shadowed.
• Reposition motion sensor.
supplied, installed, and/or used in conjunction with Eaton products. Damage to the product
caused by replacement bulbs or corrosion or discoloration of brass components are not
covered by this warranty.
LIMITATION OF LIABILITY:
IN NO EVENT SHALL EATON BE LIABLE FOR SPECIAL, INDIRECT, INCIDENTAL, OR
CONSEQUENTIAL DAMAGES (REGARDLESS OF THE FORM OF ACTION, WHETHER IN CONTRACT,
STRICT LIABILITY, OR IN TORT INCLUDING NEGLIGENCE), NOR FOR LOST PROFITS; NOR SHALL
THE LIABILITY OF EATON FOR ANY CLAIMS OR DAMAGE ARISING OUT OF OR CONNECTED WITH
THESE TERMS OR THE MANUFACTURE, SALE, DELIVERY, USE, MAINTENANCE, REPAIR OR MODI-
FICATION OF EATON PRODUCTS, OR SUPPLY OF ANY REPLACEMENT PARTS THEREFORE, EXCEED
THE PURCHASE PRICE OF EATON PRODUCTS GIVING RISE TO A CLAIM. NO LABOR CHARGES WILL
BE ACCEPTED TO REMOVE OR INSTALL FIXTURES.
To obtain warranty service, please contact Eaton at 1-800-334-6871, press
following information:
• Name, address and telephone number
• Date and place of purchase
• Catalog and quantity purchase
• Detailed description of problem
All returned products must be accompanied by a Return Goods Authorization Number issued
by the Company and must be returned freight prepaid. Any product received without a Return
Goods Authorization Number from the Company will be refused.
Eaton is not responsible for merchandise damaged in transit. Repaired or replaced products
shall be subject to the terms of this warranty and are inspected when packed. Evident or
concealed damage that is made in transit should be reported at once to the carrier making the
delivery and a claim filed with them.
Reproductions of this document without prior written approval of Eaton are strictly prohibited.
Printed in China
ARTÍCULOS NECESARIOS
(se compran por separado)
• Destornillador en cruz (Phillips)
CÓMO FUNCIONA
Durante las horas del día, el panel solar transforma la luz
solar en energía que queda almacenada en el paquete de
la bateríarecargable. Su luminaria cuenta con un sensor
de movimiento, que enciende la luz cuando es de noche
y se detecta algún movimiento. Esta luminaria está
equipada con una fotocélula, que sólo permite que el
artefacto se encienda durante las horas de la noche.
ADVERTENCIAS Y PRECAUCIONES
INSTRUCCIONES CONCERNIENTES AL RIESGO DE INCENDIO O LESIONES A
LAS PERSONAS:
ATENCIÓN: Para reducir el riesgo de incendio o lesiones personales:
• NO sustituya las baterías.
• NO deseche este producto por medio de métodos combustibles. Las baterías que se
encuentran dentro de este producto pueden explotar o tener pérdidas.Atienda todas
las advertencias.
• NO perfore este pack de baterías. NO trabaje sobre este pack de baterías.
• NO desarme la luminaria. La luminaria no contiene piezas que puedan recibir un servicio de
mantenimiento por el usuario.
• Para uso en exteriores solamente.
• Las baterías de ión de litio deben desecharse de conformidad con las ordenanzas y
normas locales sobre disposición de desechos.
• No ponga en funcionamiento esta luminaria si le falta la lente o está dañada.
• La luminaria es apta para un montaje en paredes solamente. NO es apta para su instalación
por medio de su montaje en el suelo.
• No corte el cable del panel solar. Discontinúe su uso si se pela o rompe el cable.
GUARDE ESTAS INSTRUCCIONES.
PARA OBTENER LOS MEJORES RESULTADOS
• Deje que el accesorio capte luz solar durante cuatro días completos antes de encenderlo.
• Coloque el panel solar en un área tal que reciba la
máxima cantidad de luz solar durante las horas del
día. Para obtener mejores resultados, ubique el panel
de modo tal que reciba al menos 3-4 horas de luz
directa del sol por día.
• Pruebe la unidad cargada antes de instalarla
definitivamente.
• Instale el sensor de movimiento a 2,45 – 3,65 m
• (8 – 12 pies) de altura sobre el suelo (por encima
ESPAÑOL
TWO YEAR LIMITED WARRANTY
THE FOLLOWING WARRANTY IS EXCLUSIVE AND IN LIEU OF ALL OTHER WARRANTIES,
WHETHER EXPRESS, IMPLIED OR STATUTORY INCLUDING, BUT NOT LIMITED TO, ANY
WARRANTY OF MERCHANTABILITY OR FITNESS FOR ANY PARTICULAR PURPOSE.
Eaton warrants to customers that, for a period of two years from the date of purchase, Eaton
products will be free from defects in materials and workmanship. The obligation of Eaton
under this warranty is expressly limited to the provision of replacement products. This
warranty is extended only to the original purchaser of the product. A purchaser’s receipt or
other proof of date of original purchase acceptable to Eaton. This is required before warranty
performance shall be rendered.
This warranty does not apply to Eaton products that have been altered or repaired or that have
been subjected to neglect, abuse, misuse or accident (including shipping damages). This
warranty does not apply to products not manufactured by Eaton which have been
Hasta
70 pies
180 grados
Fig. 1

3
de 3,65 m / 12 pies, el sensor de movimiento es menos sensible).
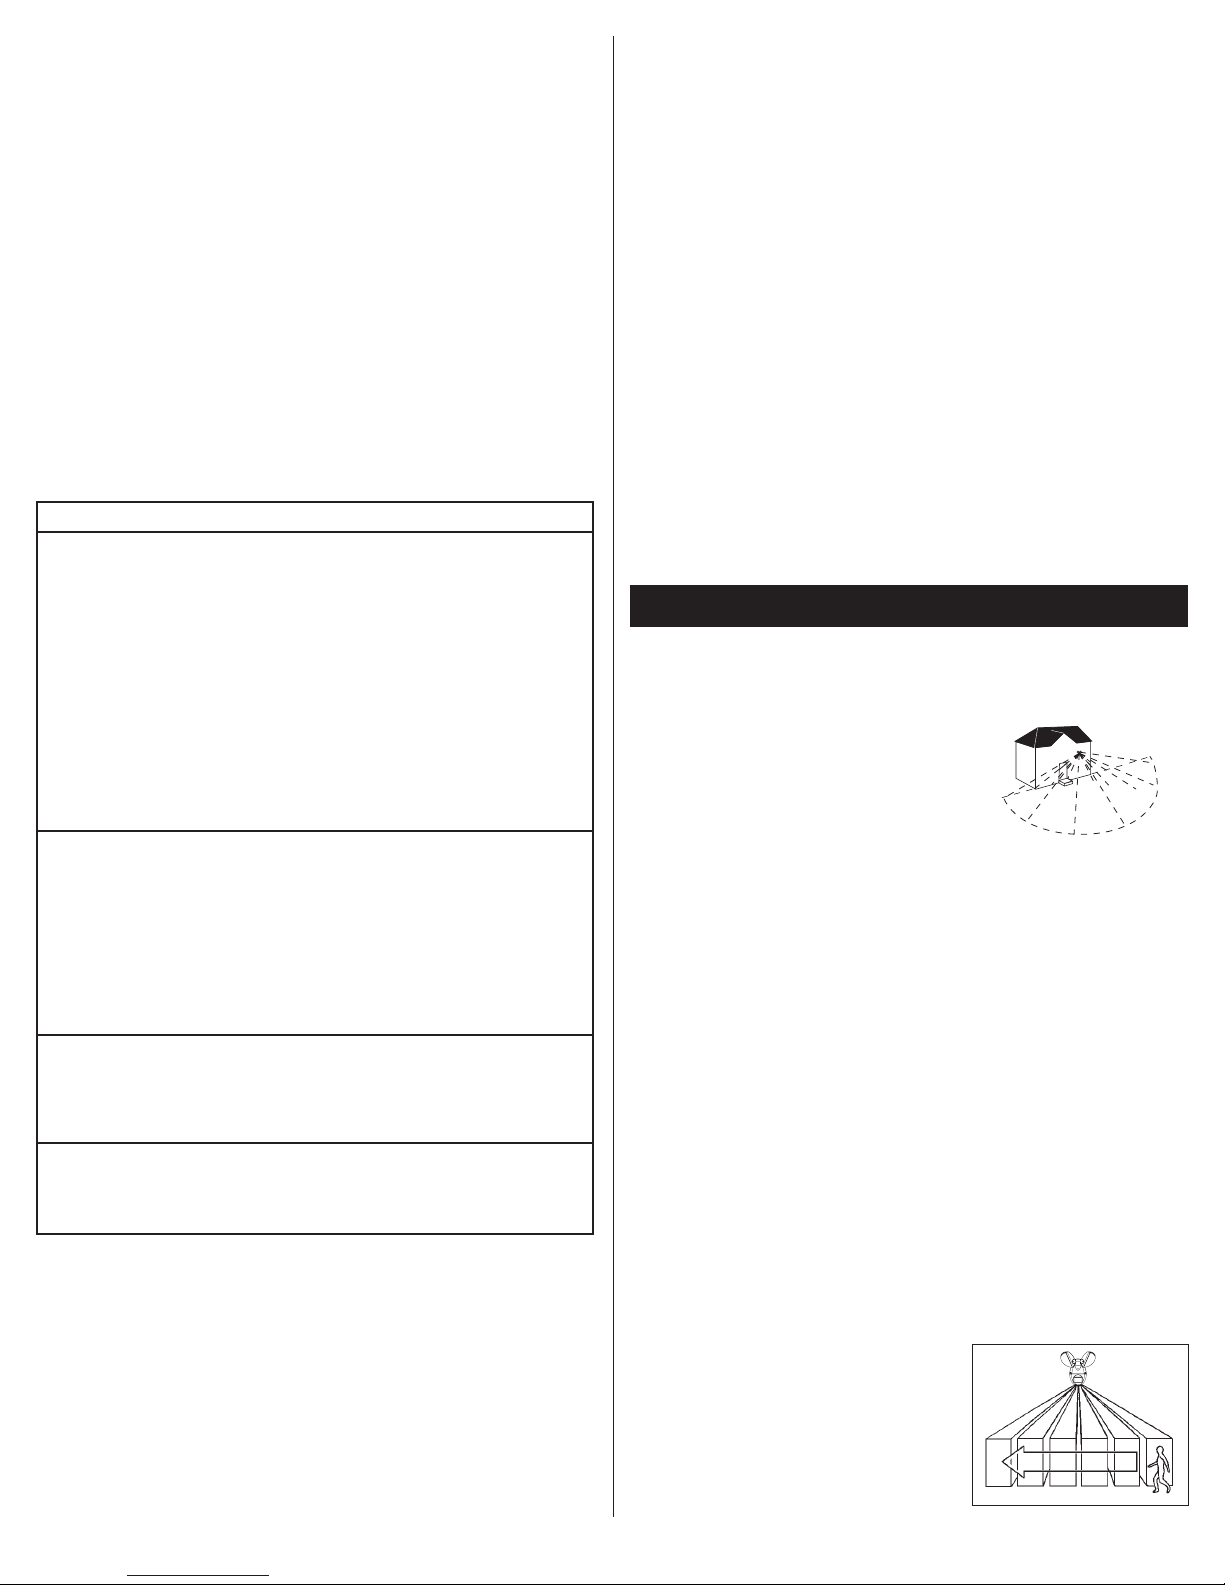
• Coloque el sensor de movimiento de manera tal
• que los movimientos queden cubiertos por el área
• de detección (Fig. 1).
• Coloque el sensor lejos de fuentes que produzcan calor, a fin de evitar falsos disparos.
• Además, medida de lo posible, tenga mucho cuidado de no incluir objetos tales como
ventanas, paredes blancas y agua, en la zona de detección.
• Coloque el sensor lejos de objetos móviles, como por ejemplo árboles, arbustos grandes
y tráfico callejero.
• Deberá ajustar el ángulo del panel solar a medida que avance el año y cambien las
estaciones, para poder mantener el mejor ángulo respecto del sol.
• Conserve el panel solar libre de cualquier objeto que pudiera interceptar la luz solar.
Es necesario limpiar periódicamente el panel solar con un paño suave humedecido.
• Durante aquellos períodos en los que haya varios días nublados, la batería caerá debajo
del nivel de carga suficiente y necesitará recargarse con la luz solar.
MONTAJE DEL ACCESORIO
1. Ubique la zona en la que desea instalar su
artefacto de luz.
NOTA: Para que el artefacto funcione debidamente,
el panel solar debe quedar ubicado en una zona en la
que reciba la máxima cantidad posible de luz solar,
y esté libre de obstrucciones.
2. Usando los tornillos de montaje del accesorio
provistos, monte el artefacto en una superficie
sólida, a 2,45 – 3,65 m (8 – 12 pies) de altura sobre
el suelo, insertando los tornillos en los agujeros
situados a ambos lados del artefacto (Fig. 2). Ajuste
el cabezal sensor, de modo que los interruptores
de control queden mirando hacia el suelo. Retire la
etiqueta del frente del cabezal sensor.
3. Usando los tornillos de montaje del solar panel
provistos, monte el panel solar en una superficie
sólida (Fig. 3). Ajuste el ángulo del panel solar, de
modo que reciba la máxima cantidad de luz solar
directa durante las horas de luz diurna.
NOTA: Para obtener mejores resultados, ubique el
panel de modo tal que reciba al menos 3-4 horas de
luz directa del sol por día.
4. Cuidadosamente conduzca el cable que conecta el
panel solar (B) con el accesorio (A) y conéctelo
al extensor del conector que sale del lateral del
alojamiento del accesorio (A) (Fig. 4).
NOTA: Asegúrese de empujar los enchufes para
conector firmemente hasta que escuche dos clics que
le garanticen que están completamente conectados.
OPERACIÓN DEL ACCESORIO
NOTA: Asegúrese de que el accesorio haya captado luz
solar durante cuatro días completos antes de proceder
a encenderlo.
1. Lleve el interruptor deslizante ubicado en el fondo
del sensor hasta la posición “TEST” (Fig. 5).
NOTA: El accesorio tiene un período de calentamiento
de alrededor de un minuto. Durante este período, se
encenderá la luz y el accesorio puede ser probado.
2. Apunte el sensor hacia la dirección en general en la
cual se producirán los movimientos. Asegúrese de
que el cabezal sensor esté posicionado de modo
tal que los interruptores de control queden mirando
hacia el suelo.
3. Camine a través del área de detección, en el
punto más distante en el que desea que el sensor
detecte movimientos.
4. Para un rango mayor, oriente ligeramente el
detector hacia arriba. Para un rango menor, oriente
la cabeza del detector ligeramente hacia abajo. Las
luces se apagarán 4 segundos después de que ya
no haya movimiento.
NOTE: Después de que la luz se haya apagado,
deje pasar cinco segundos antes de pasar a la
próxima prueba.
5. Mueva el interruptor de pendiente sobre la base
del sensor a “1 min.” o “3 min.” En la noche, al
detectar movimiento, se encenderá la luz, y se
apagará una vez que haya transcurrido el intervalo
especificado después de que haya cesado el
movimiento.
Fig. 2
A
C
C
Fig. 3
DBD
DD
Fig. 4
B
A
Fig. 5
A
NOTA: Cuando la batería esté baja, el accesorio parpadeará dos veces indicando que se
apagará automáticamente. (El accesorio no se encenderá hasta que se haya recargado la
batería con el nivel suficiente como para funcionar.) La luz indicadora LED de color rojo se
encenderá de manera intermitente cada 5 segundos en la noche hasta que la batería sea
cargada hasta el nivel operante.
CUIDADO ADECUADO DE LA BATERÍA
NOTA: El cuidado adecuado debería asegurar el máximo tiempo de vida posible de la batería.
• Asegúrese que el panel solar esté colocado en un lugar donde le de el sol.
• Cuando la batería esté baja, el accesorio parpadeará dos veces indicando que se apagará
automáticamente. (El accesorio no se encenderá hasta que se haya recargado la batería
con el nivel suficiente como para funcionar.) La luz indicadora LED de color rojo se
encenderá de manera intermitente cada 5 segundos en la noche hasta que la batería sea
cargada hasta el nivel operante.
• Para garantizar que el accesorio se recargue adecuadamente, apáguelo y déjelo captar luz
solar durante cuatro días completos antes de encenderlo.
DIAGNOSTICO Y SOLUCION DE PROBLEMAS
GARANTIA LIMITADA DE DOS AÑO
LA SIGUIENTE GARANTÍA ES EXCLUSIVA Y REEMPLAZA A TODAS LAS DEMÁS GARANTÍAS, YA
SEAN IMPLÍCITAS, EXPLÍCITAS O ESTATUTARIAS, INCLUIDAS ENTRE OTRAS, LAS GARANTÍAS
DE COMERCIABILIDAD E IDONEIDAD PARA UN FIN PARTICULAR.
Eaton garantiza a sus clientes que los productos de Eaton no presentarán defectos en los
materiales y en la fabricación durante un período de dos año desde la fecha de compra. La
obligación de Eaton según esta garantía se limita expresamente al suministro de los
productos de reemplazo. Esta garantía se extiende sólo para el comprador original del
producto. Un recibo del comprador u otra prueba de la fecha de compra original aceptable
para Eaton. Esto es necesario para la ejecución de la garantía.
Esta garantía no se aplica a los productos de Eaton que hayan sido alterados o reparados o
que estuvieron sujetos a negligencia, abuso, mal uso o accidente (incluso los
Problema Causa Posible / Acción Correctiva
La Luz No Se
Enciende Durante
La Noche Aunque
Haya Movimiento
La luz ambiental exterior es demasiado brillante. (Sí es así, para la
unidad es de día).
• Redirija el cabezal.
• Cambie la ubicación de la unidad o diríjala en dirección contraria
de la fuente de luz.
El accesorio no carga durante el día.
• El panel solar debe estar conectado al extensor del conector
que sale del lateral del alojamiento del accesorio.
• El panel solar debe estar recibiendo luz solar para cargarse
durante el día (reposicione si está en la sombra).
• El panel solar debe estar limpio y libre de residuos.
• Antes de encender el accesorio, asegúrese de que las baterías
se hayan cargado con la luz del sol por 4 días completos.
• Cuando la batería esté baja, el accesorio parpadeará dos veces
indicando que se apagará automáticamente hasta que se haya
recargado la batería con el nivel suficiente como para funcionar.
La Luz Se
Enciende Durante
La Noche Sin
Motivo Aparente
Hay movimiento en la zona de detección.
• Asegúrese de que el sensor no esté reaccionando a objetos
móviles tales como árboles, tráfico, etc.
COMPRUÉBELO USTED MISMO.
• Cubra la lente del sensor con la cinta aislante negra para evitar
que detecte movimiento. Si las luces permanecen apa gadas,
hay algo en el área de detección que está activando el sensor.
• Cambie la posición del sensor de movimiento.
* Si las luces permanecen encendidas con la lente del
sensor cubierta, póngase en contacto con el servicio de
asistencia al cliente.
La Luz Se
Enciende
Durante El Dia
Los controles en la base del detector de movimiento se encuentran
en el modo de prueba.
• Coloque el interruptor en “1 min.” o “3 min.”
Hay sombra sobre el detector de movimiento.
• Cambie la posición del sensor de movimiento.
La Luz Se
Enciende Durante
La Noche Y No
Se Apaga
Hay movimiento en la zona de detección.
• Asegúrese de que el sensor no esté reaccionando a objetos
móviles tales como árboles, tráfico, etc.
• Cambie la posición del sensor de movimiento.
* Si las luces permanecen encendidas con la lente del sensor
cubierta, póngase en contacto con el servicio de asistencia
al cliente.

4
daños durante el envío). Esta garantía no se aplica a los productos Eaton no fabricados por
Eaton que hayan sido suministrados, instalados o utilizados junto conlos productos Eaton. Los
daños del producto causados por bombillas de reemplazo, corrosión o decoloración de los
componentes de latón no están cubiertos por esta garantía.
LIMITACIÓN DE RESPONSABILIDAD:
EATON NO SERÁ RESPONSABLE LEGAL EN NINGÚN CASO DE DAÑOS INDIRECTOS,
ACCIDENTALES O RESULTANTES (SIN IMPORTAR LA ACCIÓN LEGAL, YA SEA POR CONTRATO,
RESPONSABILIDAD ESTRICTA O DE FORMA EXTRACONTRACTUAL INCLUYENDO LA
NEGLIGENCIA) TAMPOCO DE LA PÉRDIDA DE GANANCIAS, EATON TAMPOCO SERÁ
RESPONSABLE DES O DAÑOS QUE SURJAN O ESTÉN CONECTADOS CON ESTOS TÉRMINOS
O CON LA FABRICACIÓN, VENTA, ENTREGA, USO, MANTENIMIENTOM, REPARACIÓN O
MODIFICACIÓN DE LOS PRODUCTOS DE EATON O DEL SUMINISTRO DE CUALQUIER
PIEZA DE REPUESTO QUE EXCEDA EL PRECIO DE COMPRA DE LOS PRODUCTOS DE EATON
ORIGINANDO UN RECLAMO. NO SE ACEPTARÁN CARGOS POR MANO DE OBRA PARA QUITAR O
INSTALAR LOS ACCESORIOS.
Para obtener el servicio de la garantía comuníquese con Eaton al 1-800-334-6871, presione
la opción 2 para el Servicio al Cliente, o por correo electrónico a ConsumerProducts@eaton.
com e incluya la siguiente información:
• Nombre, dirección y número de teléfono
• Fecha y lugar de compra
• Catálogo y cantidad de la compra
• Descripción detallada del problema
Todos los productos devueltos deben estar acompañados por un Número de autorización
de productos devueltos emitido por la compañía y deben devolverse con flete prepagado.
Se rechazará todo producto recibido sin un Número de autorización de productos devueltos
desde la compañía.
Eaton no se hace responsable por la mercancía dañada durante el transporte. Los productos
reparados o reemplazados estarán sujetos a los términos de esta garantía y se inspeccionan
al ser empacados. El daño evidente y oculto que se provoque durante el transporte se debe
informar de inmediato al transportista que realiza la entrega y se debe presentar un reclamo.
La reproducción de este documento sin la aprobación previa por escrito de Eaton está estrictamente prohibida.
Impreso en China
1121 Highway 74 South, Peachtree City, GA 30269
www.eaton.com/lighting
© 2016 Eaton 08/16
IB502004ML
This manual suits for next models
1
Table of contents
Languages:
Other Cooper Lighting Spotlight manuals