Coopers of Stortford Cyclone Air Oven User manual

Cyclone Air Oven 11277 Instructions for Use
Please read and retain these instructions for future reference v001: 08/08/18
Power Details:
220-240V a.c.
1400-1650W
50Hz-60Hz
CAUTION! THIS ELECTRICAL APPLIANCE’S
EXTERNAL SURFACES WILL GET HOT IN NORMAL
USE.
ALLOW TO COOL BEFORE TOUCHING THE
EXTERNAL SURFACES.
USE OVEN GLOVES WHEN OPENING THE GLASS DOOR WHEN REMOVING
COOKED FOOD.
Please read this instruction manual thoroughly before starting and ensure you are familiar with the
operation of your new Cyclone Air Oven.
Product components
Main Structure:
① Touch screen; ② Upper housing; ③ Power cord; ④ Inner chamber;
⑤ Front door;
Accessories:
⑥ Drip tray; ⑦ Mesh basket; ⑧Chicken fork; ⑨U-Shape handle; ⑩; 5.5L Basket and removable handle
⑪; Toast rack ;⑫ Dual rack

Cyclone Air Oven 11277 Instructions for Use
Please read and retain these instructions for future reference v001: 08/08/18
Control Panel
MENU PRESETS COOKING TIMES & TEMP
SETTING
PRESET
TEMPERATURE
PRESET TIME
IDEAS FOR USE
Bake
160℃
25 MINUTES
Cakes, Cookies
Beef
160℃
10 MINUTES
Beef
Chips
180℃
20 MINUTES
Chips
Fish
180℃
14 MINUTES
Fish, Steak
Chicken
180℃
20 MINUTES
Chicken
Toast
190℃
6 MINUTES
Bread, Bagels
NOTE:
Please note that the above pre-set cooking times are for Guidance and may vary depending on size and
weight, quality and personal preference. If cooking instructions are noted on the food’s packaging, we
advise you to follow these in order to get the best results. Check food is cooked before serving. If in doubt
cook a little more and check again.
▲BEFORE FIRST USE
1. Remove all packaging materials, stickers and labels.
2. Clean accessories with hot water, dishwashing liquid, and a non-abrasive sponge.
3. Wipe the inside and outside of the appliance with a cloth.

Cyclone Air Oven 11277 Instructions for Use
Please read and retain these instructions for future reference v001: 08/08/18
Usage
1. Place the appliance on a stable, horizontal and flat surface. Leave
at least 10cm free space on the back and sides, and keep clear of
curtains, wall covering and other combustible materials.
2. After opening front door, the drip tray should be pushed in to catch
any fat dripping. Insert the drip tray as shown along the guiding
steps on either side of the inner wall of the unit. The drip tray
should always be used when the unit is in use. See pictures as
below.
3. Insert the mesh basket along guiding steps as below.
Note:
Choose appropriate accessories for different cooking purposes.
Please use oven gloves when taking out the dual rack or drip tray or mesh basket or other accessories.

Cyclone Air Oven 11277 Instructions for Use
Please read and retain these instructions for future reference v001: 08/08/18
4. U-Shape handle
Please use U-Shape handle to take the chicken fork
out of the appliance.
--To take out the Chicken fork
Guide U-Shape handle to take out the left end upward and pull the left end outward and downward then
take out the right end from the hole in unit. See the images below.
5. The dual rack should be placed in the unit after the drip tray has been installed. Please see pictures
below. The dual rack can be used to place food on. The dual rack is perfect for more delicate items such
as vegetables.

Cyclone Air Oven 11277 Instructions for Use
Please read and retain these instructions for future reference v001: 08/08/18
1. The handle should always be used when placing the basket in or removing it from the unit. The metal
locking hook needs to be in place before lifting the basket. See images below.
To place the handle on the basket squeeze the handle together in the open position. Then attach to the
basket with the hook facing down. Once it is secured lock the metal hook. See pictures below.
2. Place the ingredients e.g. chips in the basket, if desired drizzle with cooking oil for a crispier finish. Slide
the basket back into the unit and remove the handle. NOTE: Do not overfill the basket, as this may
affect the quality of the food. See pictures below.

Cyclone Air Oven 11277 Instructions for Use
Please read and retain these instructions for future reference v001: 08/08/18
The 5.5L basket should be put on the dual rack to improve air circulation. Please always keep the tray
positioned in the lowest level for catching oil from fried food.
Do not let food exceed the MAX position. If the ingredients increase in size during cooking, the heated
volume is the maximum.
There is a safety switch shown in picture below for operating safety.
The oven can only work properly when the door is closed. If the door is not properly closed an alarm
will sound when you press the Start/Stop Button.

Cyclone Air Oven 11277 Instructions for Use
Please read and retain these instructions for future reference v001: 08/08/18
3. Toast Rack
• Allows you to easily toast bread and bagels.
• The Toast Rack can be placed on the tray as
shown.
CARE
• Dishwasher safe, but hand washing is
recommended.
▲Mode Choosing
Plug in the unit, Power button will light up and a long
beeping sound indicating the oven is on standby.
Press the Power button slightly, the digital panel will
light up, and the screen will show the default time and
temperature alternately“60:00 ” ” 200℃”.
At this time, there are two kinds of operating modes for users to choose, Menu mode or Manual mode.
Menu mode: There are six different settings of common foods menus to choose (Bake, Beef, Chips, Toast,
Chicken or Fish).
Manual mode: Allows the users to manually set the temperature and cooking time to suit the size of the
food to be cooked. The temperature can be adjusted from 65℃to 200℃, and time can be adjusted from 0
to 60 minutes.
▲Rotating function (Rotisserie)
1. Insert the chicken fork through the foods you want to roast and bind the chicken with string. See the
pictures below.
2. Put the small end of the chicken fork into the shaft connector on the right hand wall of the inner
chamber, then support the big end of the chicken fork by the shaft supporter on the left hand wall of
the inner chamber. See the pictures below.

Cyclone Air Oven 11277 Instructions for Use
Please read and retain these instructions for future reference v001: 08/08/18
Notes: * The total weight of chicken must not exceed 3Lbs/1.36kgs;
* The bound chicken must be in accordance with the description above picture.
3. Close the door, and plug in the machine correctly with the correct power rating.
4. Press the Power button on the right of the control panel, set the time and temperature, then press
the ROTATE button on the left of the control panel, and the ROTATE button will light-up. See the
picture below.
5. Press the Start/Stop button, the oven will run in rotating function. The ROTATE function can be started
or stopped at any time by touching the Start/Stop button.
Cooking Finish
1. When the cooking is finished, the appliance will beep 5 times. The heater has stopped working, but the
motor still works continuously until the temperature in the centre of the Inner chamber drops to 120℃.
Tip: The motor still works after the cooking is finished to lower the temperature of the inner chamber and
to protect the appliance from overheating after it has stopped working.
2. After the cooking is finished and the motor has stopped, the door can be opened (see the picture
below), and trays and other accessories taken out wearing oven gloves and/or using the U-Shape
handle and placing them on safe level surface.

Cyclone Air Oven 11277 Instructions for Use
Please read and retain these instructions for future reference v001: 08/08/18
DANGER: When taking out the basket from the appliance, never
try to unlock the Handle and the Basket. It’s dangerous.
CAUTION: The accessories may be hot, never try to touch them
with bare hands to avoid injury.
Tip: If the food is not yet cooked after cooking time has finished,
simply put the accessory back into the appliance and add a few
minutes of extra cooking time.
3. Remove the cooked food onto a plate or tableware.
4. After cooking is finished, please press the power button
to power off,and unplug the power cord from wall.
See the picture below.
WARNINGS AND SAFETY INSTRUCTIONS:
FOR DOMESTIC USE ONLY.
DO NOT IMMERSE THE POWER CORD, PLUG OR HOUSING IN WATER OR UNDER THE TAP DURING
CLEANING, TO AVOID DAMAGING THE APPLIANCE OR DANGER OF ELECTRIC SHOCK.
AVOID ANY LIQUID ENTERING THE APPLIANCE TO PREVENT FROM ELECTRIC SHOCK OR SHORT-
CIRCUIT.
DO NOT COVER THE AIR INLET AND OUTLET OF THE APPLIANCE DURING WORKING.
SOME PARTS OF THE APPLIANCE GET VERY HOT DURING OPERATION, E.G. BASKET, TOAST RACK,
TRAY, ETC. PLEASE USE OVEN GLOVES. DO NOT TOUCH WITH BARE HANDS.
DO NOT PLUG IN THE APPLIANCE OR OPERATE THE CONTROL PANEL WITH WET HANDS.
EXTERNAL POWER CORD CONNECTION IS NOT ALLOWED.
HIGH TEMPERATURE IN FRYER INNER CHAMBER DURING OPERATION, PLEASE DO NOT PUT PLASTIC
DISHES, BOWLS OR PROTECTION FILM INTO IT.
THE APPLIANCE SHOULD BE PLACED ON A HORIZONTAL AND STABLE SURFACE WHEN USING. DO NOT
PLACE IT ON PLASTICS, BOARD OR ANY OTHER LOW HEAT RESISTANT, EASY-WEAR SURFACE.
DO NOT PLACE THE APPLIANCE AGAINST A WALL OR OTHER APPLIANCES, 10CM OF CLEARANCE ALL
AROUND IS REQUIRED. DO NOT PLACE ANYTHING ON THE TOP OF APPLIANCE.
DO NOT USE THE APPLIANCE BEYOND THE SPECIFICATION OF THIS MANUAL.
DO NOT LEAVE THIS APPLIANCE UNATTENDED.
DURING THE APPLIANCE OPERATION, HOT STEAM WILL EXHAUST THROUGH THE REAR AIR OUTLET.
KEEP YOUR HANDS AND FACE AT A SAFE DISTANCE FROM THE STEAM AND THE AIR OUTLET
OPENINGS. ALSO BE CAREFUL OF HOT STEAM AND AIR WHEN YOU REMOVE THE BASKET, TRAY,
TOAST RACK FROM THE APPLIANCE. THIS IS NORMAL FUNCTION.
WHEN REMOVING THE BASKET ONCE COOKING IS DONE, THE HEATER COMPONENT IS VERY HOT. DO
NOT TOUCH IT. USE OVEN GLOVES.

Cyclone Air Oven 11277 Instructions for Use
Please read and retain these instructions for future reference v001: 08/08/18
IF THE PRE-SET TIME IS TOO LONG, THE FOOD WILL BURN AND SMOKE WILL RELEASE FROM THE AIR
OUTLET. UNPLUG IMMEDIATELY AND CLEAN THE FOOD AND OIL OF THE BASKET, TOAST RACK AND
TRAY.
AFTER USING THE FRYER,PLEASE PRESS THE POWER BUTTON,THEN PULL THE PLUG FROM THE
SOCKET. DO NOT PULL THE POWER CORD.
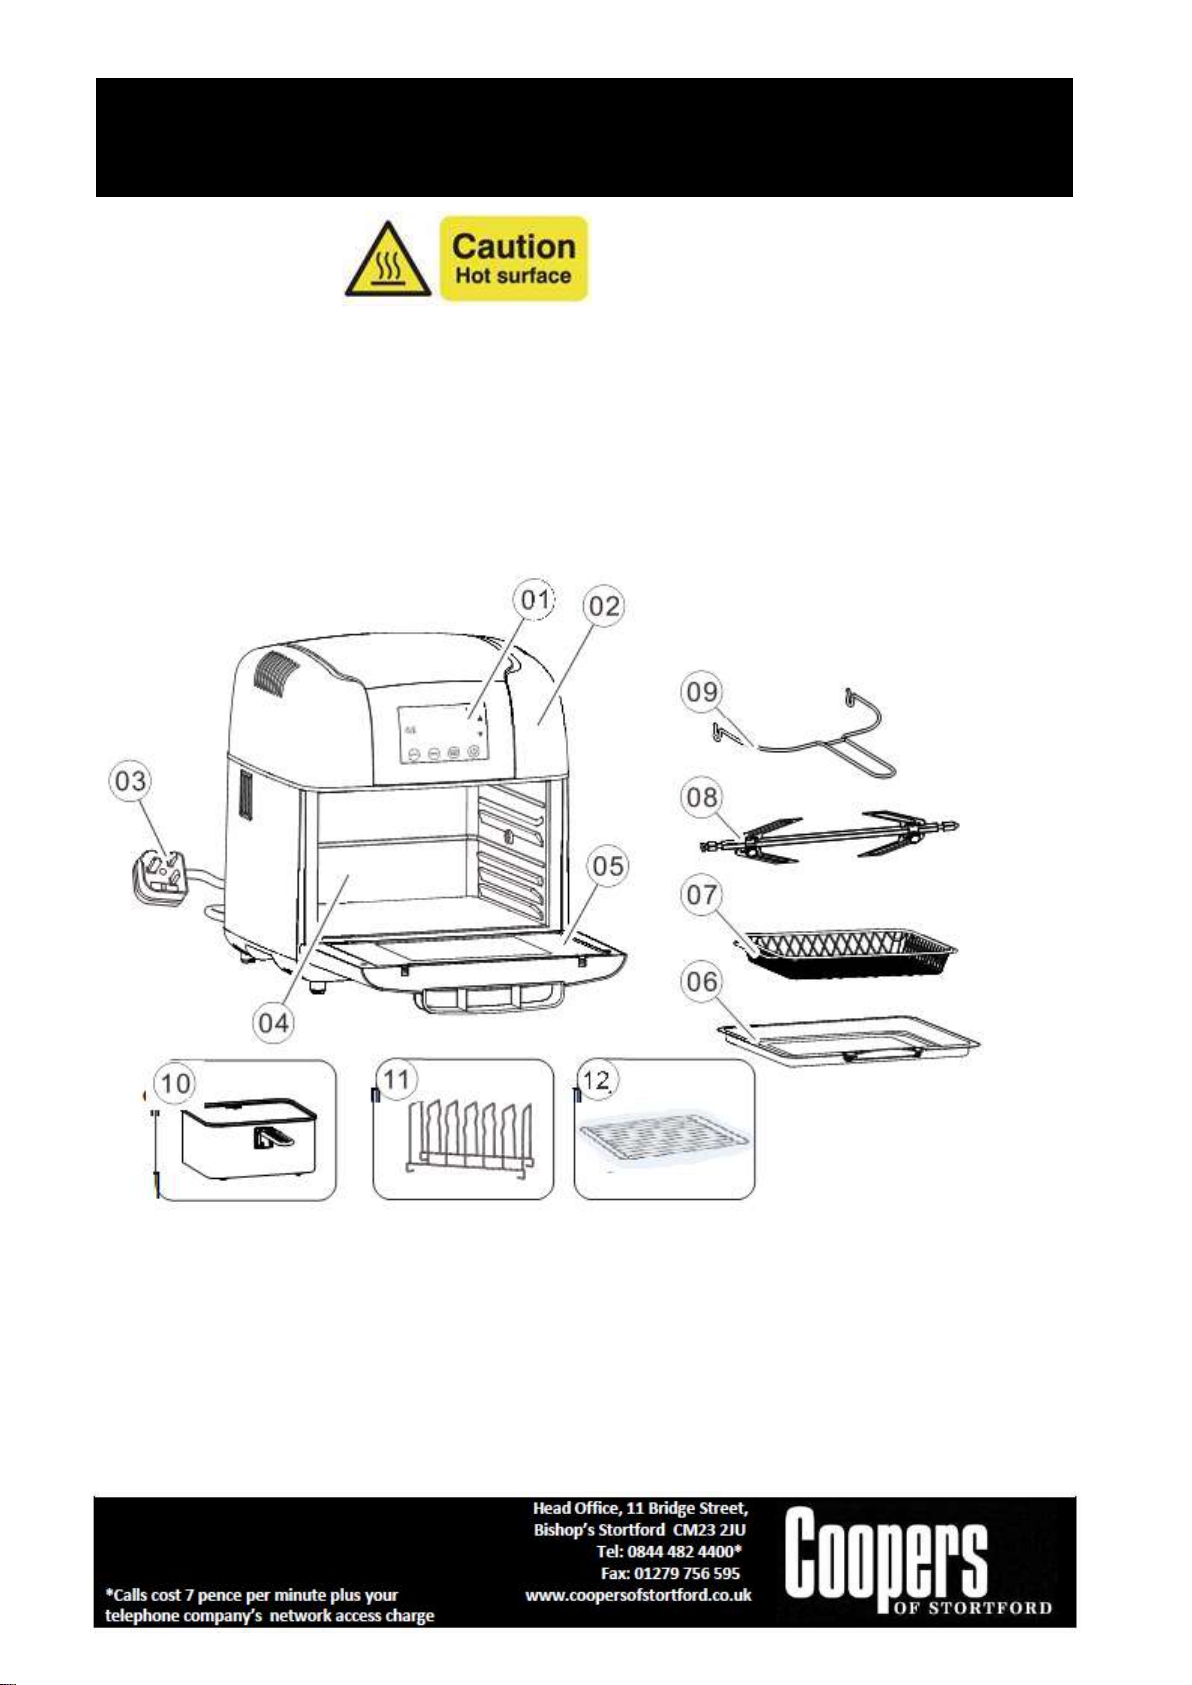
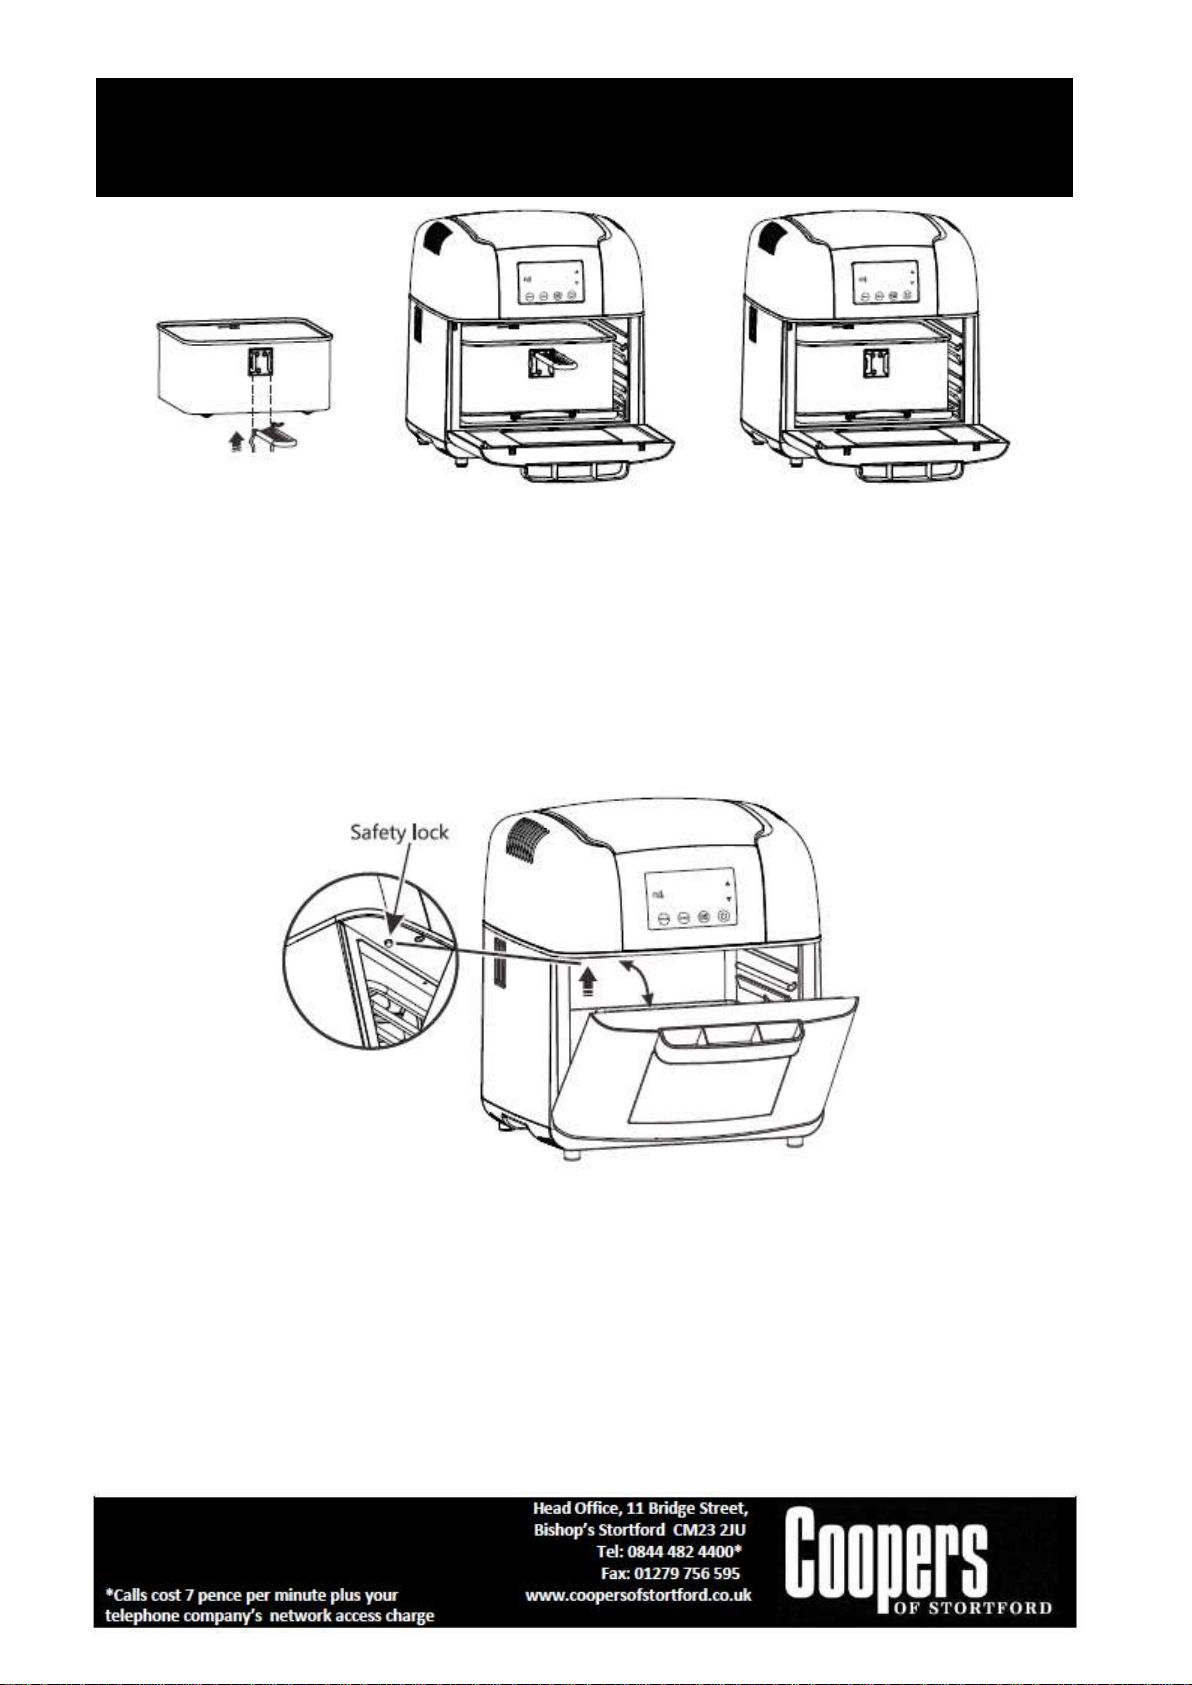
CLEAN AND WIPE DRY THE BASKET, TOAST RACK AND TRAY, BEFORE PUTTING FOOD INSIDE.
THE APPLIANCE HAS A BUILT-IN SAFETY SWITCH. ONLY IF THE COMPONENT IS IN THE CORRECT PLACE
CAN IT BE SWITCHED TO STANDBY MODE.
ALWAYS UNPLUG THE APPLIANCE WHILE NOT USING.
WARNINGS AND SAFETY INSTRUCTIONS:
WHEN USING ELECTRICAL APPLIANCES, BASIC SAFETY PRECAUTIONS SHOULD ALWAYS BE FOLLOWED:
READ ALL INSTRUCTIONS BEFORE USE.
DO NOT USE OUTDOORS OR FOR COMMERCIAL USE.
BEFORE USE, CHECK THOROUGHLY FOR ANY DEFECTS AND DO NOT USE IF DEFECTS ARE FOUND.
TAKE CARE NOT TO DROP THE APPLIANCE AS HEAVY IMPACTS MAY CAUSE INTERNAL DAMAGE.
BEFORE CONNECTING THE APPLIANCE, CHECK IF THE VOLTAGE INDICATED ON THE BOTTOM OF
THE APPLIANCE IS IN ACCORDANCE WITH THE MAINS VOLTAGE IN YOUR HOME.
CHECK THE APPLIANCE AND POWER CABLE CAREFULLY FOR DAMAGE BEFORE EACH USE.
THIS APPLIANCE CAN BE USED BY CHILDREN AGED FROM 8 YEARS AND ABOVE AND PERSONS WITH
REDUCED PHYSICAL, SENSORY OR MENTAL CAPABILITIES OR LACK OF EXPERIENCE AND
KNOWLEDGE IF THEY HAVE BEEN GIVEN SUPERVISION OR INSTRUCTION CONCERNING USE OF THE
APPLIANCE IN A SAFE WAY AND UNDERSTAND THE HAZARDS INVOLVED. CHILDREN SHALL NOT
PLAY WITH THE APPLIANCE. CLEANING AND USER MAINTENANCE SHALL NOT BE MADE BY
CHILDREN WITHOUT SUPERVISION.
CHILDREN OF LESS THAN 3 YEARS SHOULD BE KEPT AWAY UNLESS CONTINUOUSLY SUPERVISED.
SOME PARTS OF THIS PRODUCT CAN BECOME VERY HOT AND CAUSE BURNS. PARTICULAR
ATTENTION HAS TO BE GIVEN WHERE CHILDREN AND VULNERABLE PEOPLE ARE PRESENT.
THE USE OF ANY ACCESSORY ATTACHMENTS NOT RECOMMENDED BY COOPERS OF STORTFORD
MAY CAUSE INJURIES AND INVALIDATE ANY WARRANTY YOU MAY HAVE.
DO NOT LET THE POWER CABLE HANG OVER THE EDGE OF A TABLE OR COUNTER, OR TOUCH HOT
SURFACES.
DO NOT PLACE ON OR NEAR HEAT SOURCES.
DO NOT USE THIS APPLIANCE FOR ANY OTHER USE THAN THE INTENDED USE IT IS DESIGNED FOR.
ALLOW THE ITEM TO COOL THOROUGHLY BEFORE PUTTING ON OR TAKING OFF PARTS. –FOR
OVENS / HEATERS / WATER BOILERS / ANY ITEM WITH HEATING ELEMENTS.
DO NOT PLACE THIS ITEM IMMEDIATELY BELOW A SOCKET-OUTLET.
UNPLUG FROM OUTLET WHEN NOT IN USE AND BEFORE CLEANING.
•DO NOT OPERATE ANY APPLIANCE WITH A DAMAGED POWER CABLE OR PLUG OR AFTER THE
APPLIANCE MALFUNCTIONS, OR HAS BEEN DAMAGED IN ANY MANNER. WE RECOMMEND THAT
THE POWER CABLE IS NOT KINKED OR STORED IN A TWISTED MANNER, AND THAT YOU REGULARLY
CHECK ITS CONDITION.
•ANY REPAIRS MUST BE CONDUCTED BY A QUALIFIED ELECTRICIAN OR ELECTRICAL SERVICE AGENT.
PLUG WIRING (UK & IRELAND)
This appliance is fitted with a BS 1363 13-amp plug. If you have to replace the fuse, only those that are
ASTA or BSI approved to BS1362 and with a rated current of 13-amps should be used. If there is a fuse

Cyclone Air Oven 11277 Instructions for Use
Please read and retain these instructions for future reference v001: 08/08/18
cover fitted, this cover must be re-fitted after changing the fuse. If the fuse cover is lost or damaged the
plug must not be used. Spare fuse holders and fuses are available from electrical outlets. If the socket
outlets in your home or office are not suitable for this product’s plug, the plug must be removed and
disposed of safely. Attempts to insert the plug into the wrong socket is likely to cause electric hazard. A
replacement plug should be wired according to the following instructions:
The cable
A mains electricity cable contains two or three inner wires. Each has a core of copper and an outer layer of
flexible plastic. This product is earthed; the wires in the plug are colour coded in the following way:
The diagram below shows the key features of a correctly wired three-
pin mains plug.
BLUE NEUTRAL
BROWN LIVE
GREEN & YELLOW EARTH
CARE AND CLEANING INSTRUCTIONS
Always switch off and unplug before cleaning.
NOTE: Remove the basket to let the air fryer cool before cleaning.
Do NOT immerse in water. Risk of electric shock.
Clean the appliance after every use. Do not clean the tray or other accessories and the inside of the
appliance with any metal kitchen utensils or abrasive cleaning materials, as this may damage the
coating on them.
Wipe the outside of the appliance with a moist cloth.
Do NOT use abrasive cleaners or sharp utensils to clean this appliance.
Wipe surfaces with a soft dry cloth.
Allow to dry thoroughly before further use.
•Clean the basket, tray, or accessories with hot water, some liquid detergent and a non-abrasive sponge.
You can remove any remaining food residue with degreasing liquid.
•Clean the inside of the appliance with a non-abrasive sponge.
•Clean the heating element with a cleaning brush to remove any food residue.
Store the appliance in a cool, dry place.
DISPOSAL
•Dispose of all packaging, paper, cartons and plastic, plastic bags in
accordance with your local recycling regulations.
•At the end of the product’s lifespan please dispose of it at an
authorised household WEEE waste recycling centre.
Table of contents
Other Coopers of Stortford Oven manuals
Popular Oven manuals by other brands

CONTINENTAL EDISON
CONTINENTAL EDISON CEFE5ECI3 Operating and installation instructions

Bosch
Bosch HRG8769 7 Series User manual and installation instructions

SQ Professional
SQ Professional BLITZ 7183 instruction manual

Siemens
Siemens HSL6EI231 Instructions for installation

Brandt
Brandt FP667XS1 Guide to installation

Caple
Caple C240SS Instructions for use