Coselgi D-CIC-M TR User manual

dinamico
USER INSTRUCTIONS
THE COSELGI DINAMICO™ FAMILY
D-CIC/D-CIC TR/D-CIC-M/D-CIC-M TR model
Completely-in-canal

YOUR HEARING AID
(To be filled out by the hearing care professional)
Your hearing aid series:
PROGRAMS
Master
Music
TV
Comfort
Phone
Zen
SPECIAL PROGRAMS
Master + Zen
Master + Phone
SMARTTOGGLE PROGRAMS
Zen+
2

NOTE
The CIC-M is not a wireless hearing aid, which means that the hearing aids
cannot communicate with each other or with any accessory. Consequently,
you cannot adjust the sound and you will only have one listening program.
3

CONTENTS
YOUR HEARING AID................................................................................6
Welcome...........................................................................................................6
Important safety information.........................................................................8
THE HEARING AID.................................................................................10
Indications for use..........................................................................................10
Intended use...................................................................................................10
The battery......................................................................................................10
Sound signals..................................................................................................12
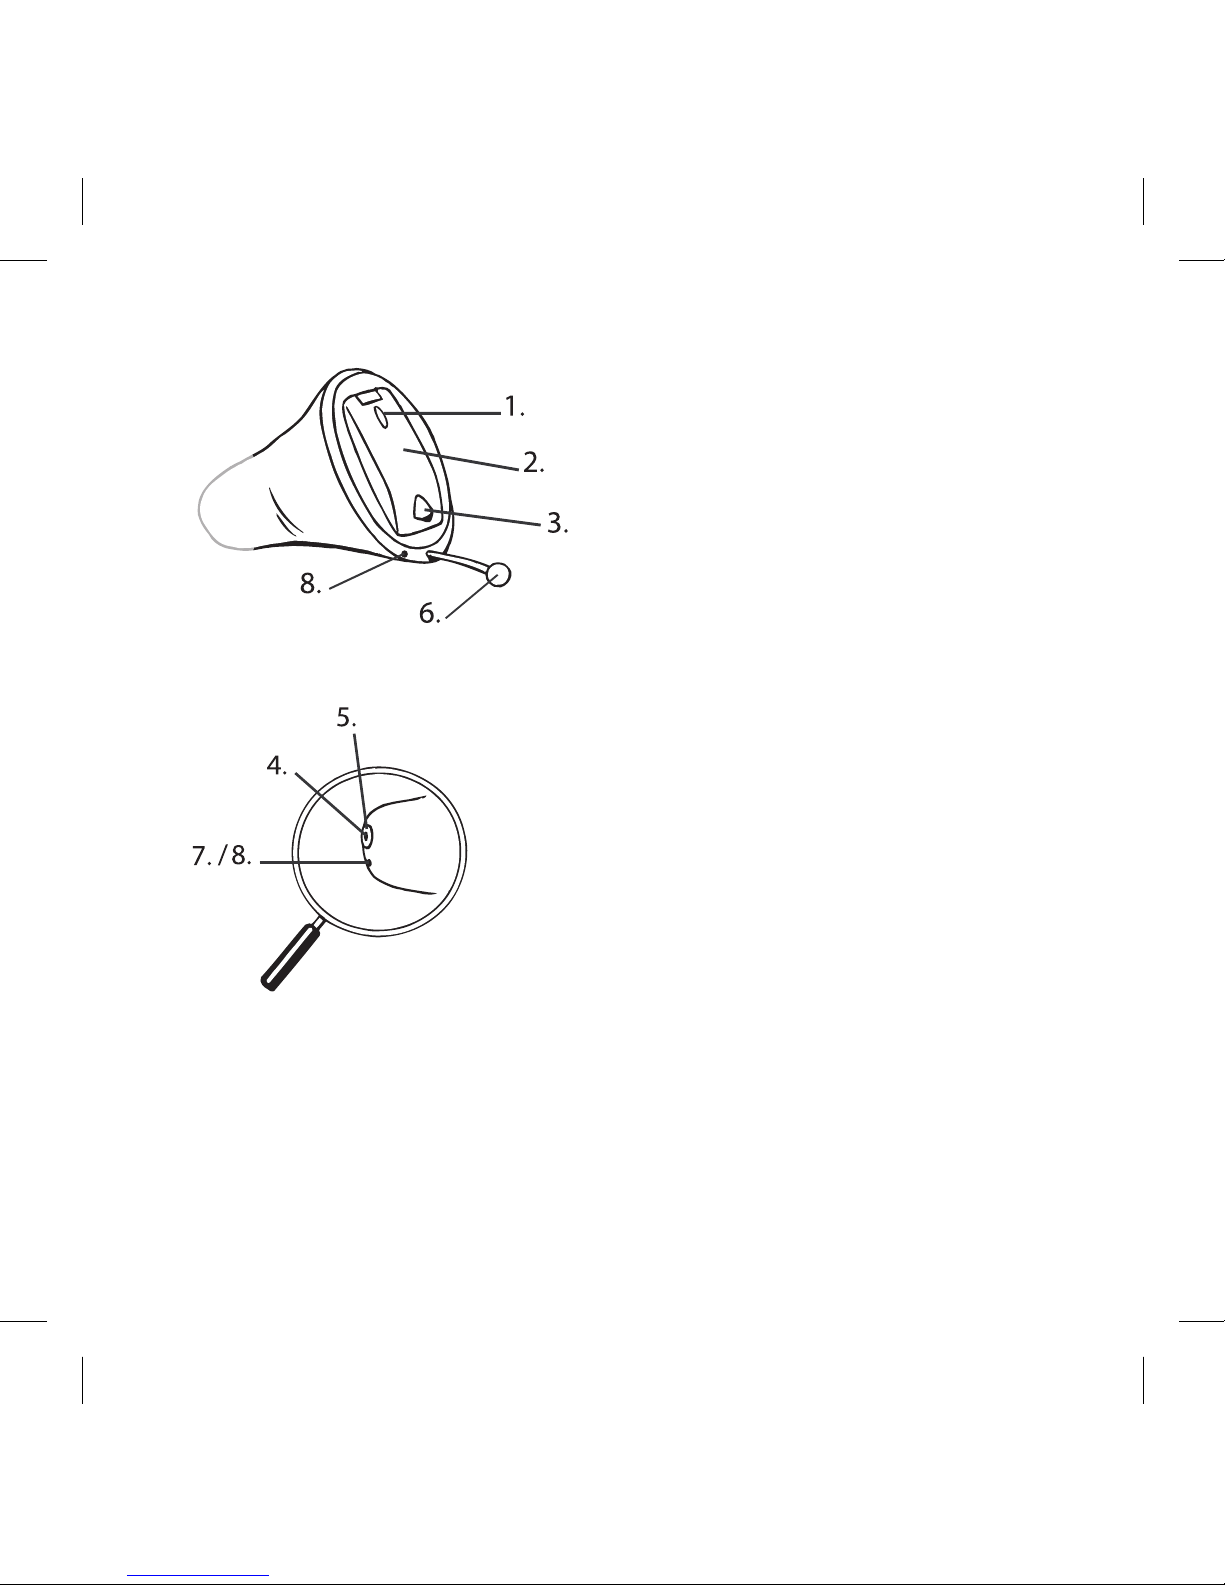
How to tell right from left..............................................................................13
Turning the hearing aid on and off...............................................................13
Putting on and removing your hearing aid.................................................14
Sound adjustment..........................................................................................15
Programs.........................................................................................................16
CLEANING............................................................................................. 18
Tools.................................................................................................................18
Cleaning...........................................................................................................18
The wax guard................................................................................................ 21
ACCESSORIES.......................................................................................24
Accessories.....................................................................................................24
TROUBLESHOOTING.............................................................................25
4

REGULATORY INFORMATION............................................................... 28
EC directives...................................................................................................28
FCC and IC statements..................................................................................28
SYMBOLS..............................................................................................32
5

YOURHEARINGAID
Welcome
Congratulations on your new hearing aid.
Use your hearing aid regularly, even if it takes some time getting used to it.
Infrequent users don’t usually get the full benefit of a hearing aid.
NOTE
Your hearing aid and its accessories may not look exactly as illustrated in this
booklet. We also reserve the right to make any changes we consider necessary.
6

Your hearing aid at a glance 1. Microphone openings
2. Battery lid (on/off function)
3. Nail grip
4. Sound outlet
5. Widex wax guard
6. Extraction cord
7. Relief vent (short)
8. Relief vent (full length)
7

Important safety information
Read these pages carefully before you begin using your hearing aid.
Hearing aids and batteries can be dangerous if swallowed or used im-
properly. Swallowing or improper use can result in severe injury or even
fatalities. In case of ingestion, contact a doctor immediately.
Take your hearing aids out when you are not using them. This will help to
ventilate the ear canal and prevent ear infections.
Contact your doctor or hearing care professional immediately if you sus-
pect you may have an ear infection.
Remove your hearing aids before showering, swimming or using a hair
dryer.
Do not wear your hearing aids when applying perfume, spray, gels, lotion
or cream.
Do not dry your hearing aid in a microwave oven - this will ruin it.
Never use other people’s hearing aids and never allow others to use
yours, as this could damage your hearing.
Never use your hearing aids in environments where there may be explo-
sive gases, such as in mines, etc.
Keep hearing aids, their parts, accessories and batteries away from chil-
dren.
Never try to open or repair the hearing aid yourself. Contact your hearing
care professional if you need to have your hearing aid repaired.
8

Your hearing aids contain radio communication technology. Always ob-
serve the environment in which you are using them. If any restrictions ap-
ply, you must take precautions to comply with these.
Do not expose your hearing aids to extreme temperatures or high humid-
ity, and dry them quickly if they get wet, or if you perspire heavily.
Your hearing aids should be stored and transported within the temperature and
humidity ranges of -20°C to +55°C (-4°F to 131°F) and 10%-95% rH.
Storage and transportation up to 60°C (140°F) with 10%-95% rH can be accepted
in shorter periods (duration of max. of 2 weeks).
Your hearing aids are designed to operate from 0°C (32°F) to 50°C (122°F).
For more information about your hearing aids, visit: www.coselgi.com.
9

THEHEARINGAID
Indications for use
The hearing aids are indicated for individuals older than 36 months with a
range of hearing loss from minimal (10 dB HL) to severe (90 dB HL) and all
hearing loss configurations.
They are to be programmed by licensed hearing care professionals (audiol-
ogists, hearing aid specialists, otolaryngologists) who are trained in hearing
(re)habilitation.
Intended use
The hearing aids are intended as air conduction amplification devices to be
used in everyday listening environments. The hearing aids may be equipped
with the Zen program intended to provide a relaxing sound background (i.e.
music/noise source) for adults who desire to listen to such a background in
quiet.
The battery
Use a type 10 zinc-air battery for your hearing aid.
Always use a fresh, new battery that is precisely the kind recommended by
your hearing care professional.
10

NOTE
Check that the battery is completely clean and free of any residue before insert-
ing it in the hearing aid. Otherwise your hearing aid may not function as expec-
ted.
Never attempt to recharge your hearing aid batteries, as they could ex-
plode.
Never leave a flat battery in the hearing aids while storing them. It could
leak and ruin your hearing aid.
Dispose of used batteries as indicated on the packaging and take note of
the expiry date.
Low battery indication
When the battery is flat, a sound signal will play. If the battery drains sud-
denly there may however be no warning. We recommend carrying a spare
battery with you wherever you go.
Changing the battery
To change the battery, do as follows: Take the adhesive tab off the new
battery and make sure there is no
sticky substance left on it. Let it
"breathe" for 60 seconds.
11

Use the nail grip to gently swing the
battery door open and remove the
old battery.
Now place the new battery in the
drawer as shown. Close the drawer. If
it doesn't close easily, the battery is
not placed correctly.
If you are not using the hearing aid
for a few days, remove the battery.
NOTE
Avoid dropping your hearing aid - hold the hearing aid above a soft surface
while changing the battery.
Sound signals
Your hearing aid plays sounds to inform you that certain features have been
activated or that you have changed programs. These sounds may be spoken
messages or tones, depending on your needs and preferences.
Program 1 Message/one short beep
Program 2 Message/two short beeps
Program 3 Message or three short beeps
12

Program 4 Message/one short and one long beep
Program 5 Message/one long beep and two short beeps
Zen+ Message/tone
Ask your hearing care professional to turn these sounds signals off if you
don't need them.
Lost partner
(Only available in wireless 440-series)
Your hearing care professional can turn on a feature in your hearing aid that
warns you whenever it loses contact with the hearing aid in the opposite
ear. You will hear a spoken message in your ear.
How to tell right from left
The hearing aid for your right ear has a red mark. The hearing aid for your
left ear has a blue mark.
Turning the hearing aid on and off
To turn the hearing aid on, close the battery cover
and push it upwards. The hearing aid will play a
sound signal to indicate that it is on, unless your hear-
ing care professional has deactivated this function.
13

To turn off the hearing aid, push the battery cover
downwards.
NOTE
You can also cup the hearing aid in your hand to verify that it is turned on. If it's
on, it will whistle. Don't forget to turn off the hearing aid when it is not in use.
Putting on and removing your hearing aid
Close the battery lid completely. Hold the hearing aid
with your thumb and forefinger and insert it slowly into
your ear until you feel resistance.
Then use the tip of your forefinger to gently push the
hearing aid into your ear until it feels comfortable.
Pulling the outer ear upwards and backwards while you
insert the hearing aid can be helpful.
NOTE
If the hearing aid doesn't feel comfortable, or if it doesn't fit properly, causing
irritation, redness or the like, contact your hearing care professional.
14

Removing the hearing aid
Use the extraction cord to take the hearing aid out of
your ear.
NOTE
If you find it difficult to take out the hearing aid, move it carefully from side to
side while pulling on the extraction cord.
Sound adjustment
Your hearing aid adjusts the volume automatically according to your sound
environment.
If you have a remote control, you can also adjust the sound manually, de-
pending on your needs and preferences.
Each time you operate the volume control, you will hear a beep-tone unless
your hearing care professional has deactivated this function. When you
reach the maximum or minimum setting, you will hear a steady tone.
You can also mute your hearing aid if you need to. Do as follows:
●Keep pressing the lower part of the volume key on the remote control
until you can hear the steady sound
To turn the sound on again:
15

●Press the upper part of the volume key or
●Change program
Any adjustment of the volume will be cancelled when you turn off your
hearing aid or if you change program.
Programs
PROGRAMS USE
Master For everyday use
Music For listening to music
TV For listening to the TV
Comfort Attenuates background noise
Reverse focus Focus on sounds from behind.
Phone This program is designed for listening to
phone conversations
Zen Plays tones or noise for a relaxing sound
background
SPECIAL PROGRAMS USE
Compound programs The Master program in one ear and Zen, Re-
verse focus or Phone in the other
16

SMARTTOGGLE PROGRAMS USE
Zen+ This program is similar to Zen but allows you
to listen to different types of tones or noise
NOTE
Not all hearing aids can be used with a remote control.
If your needs change over time, your hearing care professional can easily
change your program selection.
To change programs, simply push the program key on your remote control.
17

CLEANING
Tools
You will receive the following cleaning tools with your hearing aid:
1. 2. 3. 4. 5.
1. Cloth
2. Brush
3. Long wax-removing tool
4. Short wax-removing tool
5. Battery magnet
Cleaning
Cleaning your hearing aid every day will make it more efficient and more
comfortable to wear.
The hearing aid Just wipe it with the a soft cloth (for exam-
ple the cloth you received from your hearing
care professional).
18

The sound outlet Remove any visible earwax from around the
sound outlet with the small brush or cloth. Nev-
er try to clean the wax guard.
NOTE
If you can't clean the sound outlet, contact your hearing care professional. Never
insert anything into the sound outlet as this can ruin your hearing aid.
The microphone openings Open the battery lid and turn the hearing aid
so the lid is facing downwards (see illustra-
tion). Guide the short wax removing tool (no.
4 ) through the microphone openings on the
lid from the inside (see illustration).
NOTE
If you suspect that earwax or dirt has got into the microphone inside the hearing
aid, contact your hearing care professional. Do not insert anything into the mi-
crophone.
19

The vent Short vent: clean the vent as far as the long end
of the waw removing tool (no. 3) can reach.
Long vent: clean the vent every day by passing
the long wax removing tool (no. 3) all the way
through the vent.
Leave the hearing aid open to ventilate it.
NOTE
It is important for the performance of your hearing aid that you keep the vent
clean and free of earwax, dirt or the like. Clean it every day after use and consult
your hearing care professional if the vent is blocked.
Dry your hearing aid quickly if it gets wet, or if you perspire heavily. Some
people use a special dehumidifier like Widex Dry-Go to help keep their hear-
ing aids dry and clean. Ask your hearing care professional if this is right for
you.
Do not use any kind of liquid or disinfectant to clean your hearing aid.
Clean and inspect your hearing aid every day after use to check that it is
not broken. If the hearing aid breaks while you are wearing it, leaving
small fragments in your ear canal, contact your doctor. Never try to take
out the fragments yourself.
20
This manual suits for next models
3
Table of contents
Other Coselgi Hearing Aid manuals

Coselgi
Coselgi EFFECT EBB3D User manual

Coselgi
Coselgi melodia CMe 15-M User manual

Coselgi
Coselgi MELODIA CMe15-BT User manual

Coselgi
Coselgi Melodia CMe15-BTE User manual

Coselgi
Coselgi THE COSELGI MOJO MBB2 BTE User manual

Coselgi
Coselgi melodia CMe 15-M User manual

Coselgi
Coselgi Vivace User manual

Coselgi
Coselgi EFFECT E-F2 User manual

Coselgi
Coselgi Effect Series User manual

Coselgi
Coselgi Vivace User manual