Cosori CAF-R121-SUS User manual

13-Quart Air Fryer Oven
User Manual
Questions or Concerns?
Mon–Fri, 9:00 am–5:00 pm PST/PDT

(We hope you love your new air fryer oven as much as we do)
Our helpful, in-house chefs are ready to assist
you with any questions you might have!
On behalf of all of us at COSORI,
CONTACT OUR CHEFS
Email: [email protected]
Toll-Free: (888) 402-1684
Mon-Fri, 9:00 am–5:00 pm PST/PDT
Thank you for
your purchase!
Happy cking!
our recipe gallery
www.cosori.com/recipes
explore
weekly, featured recipes
made exclusively by our in-house chefs
enjoy
the COSORI Cooks Community on Facebook
facebook.com/groups/cosoricooks
join

3
Table of Contents
Specifications
Specifications
Package Contents
Important Safeguards
Getting to Know Your Air Fryer Oven
Display
Controls
Before First Use
Cooking with Your Air Fryer Oven
Cooking Functions Quick Reference
Guide
Care & Maintenance
Troubleshooting
Warranty Information
Customer Support
3
3
4
8
9
10
12
12
15
27
28
30
31
Model CAF-R121-SUS
Power Supply AC 120V, 60Hz
Rated Power 1800W
Capacity Approx. 13 qt / 12 L,
8.5” Pizza
Temperature
Range 90°–450°F / 30°–230°C
Time Range 0–12 hr
Weight 15.4 lb / 7 kg
(including accessories)
Dimensions 14.2 x 13.0 x 14.6 in /
36.0 x 33.0 x 37.0 cm
Package Contents
1 x Air Fryer Oven
1 x Food Tray
1 x Air Fryer Tray
1 x Drip Tray
1 x Rotisserie Basket
1 x Rotisserie Fork Set
1 x Rotisserie Handle
1 x Recipe Book
1 x User Manual
1 x Quick Reference Guide
Download the free VeSync app to access
original recipes and video tutorials from
the COSORI chefs, interact with our online
community, and more!

4
Follow basic safety precautions when using your air fryer oven.
Read all instructions.
IMPORTANT SAFEGUARDS
Key Safety Points
General Safety
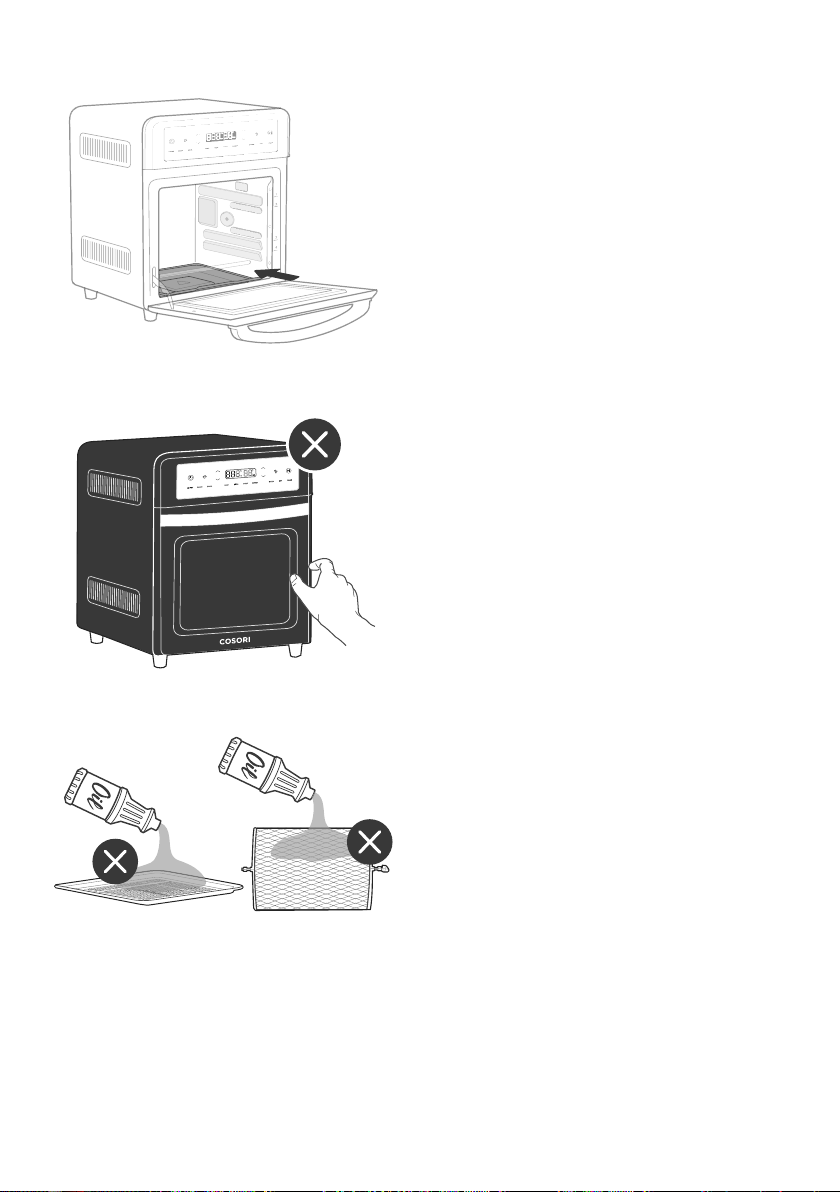
• Do not touch hot surfaces. Use
handle.
• The outside of the air fryer, including
the door, is hot during and after use.
• Always use heat-resistant gloves,
pads, or air fryer mitts when handling
hot materials, and when placing
items in or removing items from
the air fryer, including trays, racks,
accessories, or containers.
• Do not block any ventilation
openings. Hot steam is released
through openings. Keep your hands
and face clear of openings
• When the air fryer is not in use, and
before cleaning, tap to turn it o,
then unplug from outlet. Allow to
cool completely before putting on or
taking o parts.
• To protect against electric shock, do
not immerse the air fryer, cord, or
plug in water or liquid.
• Close supervision is necessary
when the air fryer is used by or near
children.
• Children should be supervised to
ensure that they do not play with the
air fryer.
• Do not use your air fryer if it is
damaged, not working, or if the
cord or plug is damaged. Contact
Customer Support (see page 31).
• Do not use third-party replacement
parts or accessories, as this may
cause injuries.
• Do not use outdoors.
• Do not place the air fryer or any of its
parts on a stove, near gas or electric
burners, or inside a heated oven.
• Be extremely cautious when
removing a tray, basket, or rack if it
contains hot oil, grease, or other hot
liquids.
• Do not clean with metal scouring
pads. Metal fragments can break o
the pad and touch electrical parts,
creating a risk of electric shock.
• Clean the drip tray after using.
Accumulated grease and crumbs can
overheat and catch fire.
• Do not store anything on top of
your air fryer while it is operating.
Do not store anything inside your
air fryer other than recommended
accessories.
• The air fryer is not intended to be
operated by means of an external
timer or separate remote-control
system.
READ AND SAVE THESE
INSTRUCTIONS

5
• To avoid risk of fire or electric
shock, do not place oversized foods
or metal utensils (except ocial
COSORI accessories) into the air
fryer.
• Do not place paper, cardboard, or
non-heat-resistant plastic into your
air fryer, or any materials which may
catch fire or melt.
• To avoid overheating, do not use
metal foil in the air fryer unless
directed. Use extreme caution
when using foil, and always fit
foil as securely as possible. If the
foil contacts the air fryer’s heating
elements, this can cause overheating
and risk of fire.
• Do not cover the drip tray or any part
of the air fryer with metal foil, except
for the food tray and air fryer tray as
directed.
• Never put baking or parchment
paper into the air fryer without food
on top. Air circulation can cause
paper to move and touch heating
elements.
• Always use heat-safe containers.
Be extremely cautious if using
containers that aren’t metal or glass.
• Keep your air fryer away from
flammable materials (curtains,
tablecloths, walls, etc.). Use on a flat,
stable, heat-resistant surface away
from heat sources or liquids.
• Immediately turn o and unplug
your air fryer if you see dark smoke
coming out. Food is burning. Wait for
smoke to clear before opening the air
fryer door.
• When unplugging the air fryer, be
cautious of hot surfaces.
While Cooking
Note: See Care & Maintenance
for instructions on how to clean
accessories (page 27).
• Only use as directed in this manual.
Do not use air fryer for any purpose
other than its intended use.
• This air fryer is not intended for use
by persons (including children) with
reduced physical, sensory, or mental
capabilities, or lack of experience
and knowledge, unless they have
been given supervision or instruction
concerning use of the air fryer by a
person responsible for their safety.
• Do not allow children to clean or
perform maintenance on the air fryer.
• Keep the air fryer and its cord out of
reach of children.
• Not for commercial use. Household
use only.

6
• This air fryer uses a short power-
supply cord to reduce the risk of
entangling or tripping.
• Your oven has a polarized plug (one
prong is wider than the other), which
fits into a polarized outlet only one
way. If the plug does not fit, reverse
the plug. If it still does not fit, do not
use the plug in that outlet. Do not
alter the plug in any way.
• Do not let the power cord (or any
extension cord) hang over the edge
of a table or counter, or touch hot
surfaces.
• The cord should be arranged so that
it will not drape over the countertop
or tabletop where it can be pulled
on by children or tripped over
unintentionally.
• If the power supply cord is damaged,
it must be replaced by Arovast
Corporation or similarly qualified
persons in order to avoid an electric
or fire hazard. Please contact
Customer Support (page 31).
Power & Cord Extension Cords
Electromagnetic Fields (EMF)
• Longer extension cords are available
and may be used if care is exercised
in their use.
• If a longer extension cord is used:
• The marked electrical rating of the
cord set or extension cord should
be at least as great as the electrical
rating of the oven.
• The cord should be arranged
so that it will not drape over the
countertop or tabletop where it
can be pulled on by children or
tripped over unintentionally.
This air fryer complies with all
standards regarding electromagnetic
fields (EMF). If handled properly and
according to the instructions in this
user manual, the appliance is safe
to use based on scientific evidence
available today.

7
Place drip tray inside with handle
facing out.
DO NOT fill with oil.
This is not a deep fryer.
CAUTION: HOT
SAVE THESE INSTRUCTIONS

8
GETTING TO KNOW YOUR
AIR FRYER OVEN
A. Air Fryer Tray
B. Food Tray
C. Rotisserie Slots
D. Housing
E. LED Display
F. Rotisserie Basket
G. Handle
H. Door
I. Heating Elements
J. Drip Tray
K. Power Cord
L. Rotisserie Fork Set
M. Rotisserie Shaft
N. Rotisserie Handle
A B D
K NJ L MIG H
FEC

9
DISPLAY
Power
Button
Increase/
Decrease
Temperature
Increase/
Decrease Time
Light
Button
Hour Indicator
Celsius/Fahrenheit
Indicators
Rotisserie
Button
Start/Pause Button
Cooking Functions
Status Messages
Minute IndicatorTime
Display
Temperature
Display
< 1 minute
≥ 1 hour
< 1 hour
Minutes
Seconds
Hours
Cook Time
Remaining
Display
Format
< 1 minute Seconds
< 1 hour Minutes
≥ 1 hour Hours
“PrE” Air fryer is preheating*
“Add Food” Air fryer is preheated and
you can add food
“End” Cooking function has
ended
“L1–L7” Indicates toast darkness
level ranging from L1 to L7
“OPEN” Door is open
*Preheating is automatically included in the Air Fry,
Roast, Bake, and Pizza cooking functions.

10
Power Button
Light Button
ROTISSERIE Button
• Tap to turn the air fryer on/o.
• While the air fryer is cooking or paused,
tap to cancel cooking. The air fryer will
return to standby.
• Press and hold for 10 seconds to reset the
air fryer to factory settings and restore all
default cooking function settings.
• Tap to turn the interior light on/o.
• If not manually turned o, the light will
turn o automatically after 1 minute.
• Light turns on when the door is opened
and also in the last 30 seconds of a
cooking function.
• Tap to turn rotisserie rotation on/o.
• Rotisserie rotation is only available
when using the Air Fry or Roast cooking
functions.
• Rotation turns o automatically when a
cooking function finishes.
CONTROLS
Increase/Decrease
Temperature
• Tap and to adjust the
temperature setting.
• Temperature will adjust in increments
of 5°F. Press and hold to adjust in
increments of 10°F.
• Press and hold and at the
same time for 5 seconds to switch
temperature units from Fahrenheit to
Celsius.

11
Note: You cannot turn o “press and hold”
sounds or error alert sounds.
Note: When you open the air fryer door
during cooking, the air fryer will pause
cooking automatically, and the interior light
will turn on. When you close the air fryer
door, the air fryer will resume cooking and
the interior light will turn o again.
Note: Not all cooking functions can exceed 1
hour of cooking time.
Air Fry, Roast, Broil, Bake, Pizza,
Reheat, Warm
All times (tap
button)
1-minute
increments
All times (press and
hold button)
10-minute
increments
Dehydrate
< 10 hours
(tap button)
0.5-hour
increments
< 10 hours (press
and hold button) 1-hour increments
≥ 10 hours 1-hour increments
Proof
< 1 hour
(tap button)
1-minute
increments
< 1 hour (press and
hold button)
10-minute
increments
≥ 1 hour
(tap button)
0.5-hour
increments
≥ 1 hour (press and
hold button) 1-hour increments
≥ 10 hours 1-hour increments
Time Increment Chart
Increase/Decrease Time
START/PAUSE Button
• Tap and to adjust the time
setting.
• Time will adjust in increments of 1 or 10
minutes, or 0.5 or 1 hour, depending on
the cooking function (see chart).
• Press and hold to adjust time in higher
increments (see chart).
• To turn selection sounds on/o, press and
hold and at the same time for
5 seconds.
• Starts or pauses a cooking function.
• Tap during cooking to switch cooking
functions.
• Tap during preheating to skip the
preheating stage. Preheating is
automatically included in the Air Fry,
Roast, Bake, and Pizza cooking functions.

12
Setting Up Test Run
1. Remove all packaging around and inside
the air fryer.
2. Place on a stable, level, heat-resistant
surface, away from anything that can be
damaged by heat.
3. Wash all accessories and clean the air
fryer’s interior (see page 27). Dry and
place accessories back in air fryer.
1. Make sure there is no food or packaging
in the oven and plug it in.
2. Tap AIRFRY, then tap to begin
preheating.
3. Tap again to skip the preheating
stage and the display will show the timer
counting down.
BEFORE FIRST USE
A test run will help you become familiar
with your air fryer, make sure it’s working
correctly, and clean it of possible residues.
COOKING WITH YOUR AIR FRYER OVEN
CAUTION:
• The outer surface of the air fryer,
including the oven door, is hot during
and after use. Temperature may be over
212°F. Do not touch hot surfaces. Use
handle.
• Always use heat-resistant gloves,
pads, or oven mitts when handling hot
materials, and when placing items in or
removing items from the air fryer.
Always make sure the drip tray is properly
in place at the bottom of the air fryer when
cooking. [Figure 1.1] The drip tray is not
intended to cook food on.
Using the Trays
Three trays are included with your air fryer:
the food tray, air fryer tray, and drip tray. The
cooking functions require dierent trays, so
make sure to use the correct tray. Follow the
recipe instructions or the suggestions given in
each function section.
Figure 1.1
Note: We recommend running the air fryer
for 30–60 minutes during the test run.
4. The air fryer will stop heating and beep
several times when finished.

13
1. Press the wire latch to open the door
on the side of the rotisserie basket.
[Figure 1.5]
2. Place food inside the basket and
close the door.
3. Use the rotisserie handle to place
the basket inside the air fryer oven,
securing both ends of the rotisserie
shaft into the rotisserie slots.
Cooking Greasy Foods
Rotisserie Handle
Rotisserie Basket
When cooking with oil or air frying greasy
food such as beef, chicken, or pork, place
the air fryer tray on the food tray (or insert
the food tray underneath the air fryer tray)
to prevent oil from dripping on the heating
elements. [Figure 1.3]
The rotisserie handle is used to place the
rotisserie basket or fork set into the rotisserie
slots in the air fryer oven. [Figure1.4]
Thehandle is also used to remove the
rotisserie basket and fork set after cooking
is finished.
The rotisserie basket is used for air frying
small foods, such as french fries, nuggets, or
Brussels sprouts.
Figure 1.3
Figure 1.5
Figure 1.4
Tray Positions
Each cooking function has a recommended
tray position with slots that you can slide
a tray into (the food tray or air fryer tray).
The standard recommended positions
are indicated on the front of the air fryer
[Figure1.2]. The four positions are numbered
1, 2, 3, and 4, from top to bottom.
Figure 1.2

14
• To reset one function:
• To reset all functions:
a. Tap the respective and
buttons to adjust temperature and/
or time.
b. For Toast, tap the and
buttons on the right side of
the display to change the toast
darkness level.
3. Press and hold the and
buttons on the right side of
the display at the same time for
5seconds until the air fryer beeps
1time.
1. When the air fryer is not cooking or
is paused, tap the cooking function
you want to reset.
2. Without making any changes,
press and hold the right and
buttons at the same time for
5seconds until the air fryer beeps
1time.
1. When the air fryer is not cooking
or is paused, press and hold
for 10seconds. This will reset all
cooking functions.
Cooking Functions
Customizing Cooking Functions
1. When the air fryer is not cooking or
is paused, tap the cooking function
you want to change.
2. Select the settings you want to set as
default.
• You can customize a cooking function’s
default settings, including time and
temperature.
• To change a function’s default settings:
Cooking functions are programmed with
an ideal time and temperature for cooking
certain foods. For more information on each
cooking function, see its individual section,
or the Cooking Functions Quick Reference
Chart (see page 15).
Figure 1.6
1. Slide the food item onto the
rotisserie shaft.
2. Place the rotisserie forks on either
side of the shaft and insert them
into the food item to secure it on the
shaft. Tighten the knobs on the forks
to secure them. [Figure 1.6]
Rotisserie Fork Set
The rotisserie fork set is used for rotating
roasts and is ideal for roasting a whole
chicken. Do not cook more than 4 pounds at
a time on the rotisserie fork set.
Note: When cooking a rotisserie chicken,
secure the legs and wings with butcher’s
twine so they do not hang loosely as the
chicken rotates.
3. Use the rotisserie handle to place the
food item inside the air fryer oven,
securing both ends of the rotisserie
shaft into the rotisserie slots.

15
Cooking Functions Quick Reference Chart
Name Use
Suggested
Accessory &
Position
Fan
Speed* Range
AIR FRY
• Cooks using intense heat
and maximized airflow
• Cook food such as french
fries and chicken wings
• Includes preheat
• Optional rotisserie function
Air fryer tray
at level 2 or 3
position
Rotisserie
basket in
rotisserie slots
High
• 180°–450°F /
80°–230°C
• 1 min–1 hr
ROAST
• Cook a variety of meats and
poultry
• Food will be tender and
juicy on the inside and well-
roasted on the outside.
• Includes preheat
• Optional rotisserie function
Food tray
at level 4
position
Rotisserie
basket or
fork set in
rotisserie slots
High
• 180°–450°F /
80°–230°C
• 1 min–1 hr
BROIL
• Cook open-faced
sandwiches, thin cuts
of meat (such as bacon),
poultry, fish, sausages, and
vegetables
• Brown the tops of
casseroles, gratins, and
desserts
Food tray at
level 1 position High
• 350°–450°F /
175°–230°C
• 1 min–30 min
BAKE
• Cook food evenly
throughout
• Bake cakes, muns, and
pastries
• Includes preheat
Food tray or
air fryer tray at
level 3 position
Low
• 180°–450°F /
80°–230°C
• 1 min–1 hr
PIZZA
• Melt and brown cheese and
toppings while crisping
crust
• Includes preheat
Air fryer tray at
level 2 position Low
• 180°–450°F /
80°–230°C
• 1 min–1 hr
TOAST • Toast or brown bread Air fryer tray at
level 4 position Low
• Darkness
Level 1–7
• 450°F / 230°C
• Time is
automatic
REHEAT
• Reheat leftovers without
overcooking or drying out
food
Food tray
at level 3
position
Low
• 120°–360°F /
60°–180°C
• 1 min–1 hr

16
KEEP WARM
(“WARM”)
• Keep food warm at the
recommended temperature
to prevent bacterial growth
(160°F or above)
Food tray or
air fryer tray at
level 4 position
Low
• 150°–230°F /
65°–110°C
• 1 min–1 hr
DEHYDRATE
(“DRY”)
• Evenly dry out food without
cooking
• Dry fruit or vegetable chips
Air fryer tray
at level 2 or 3
position
Low
• 100°–180°F /
40°–80°C
• 0.5 hr–12 hr
PROOF
• Precisely hold low
temperatures
• Proof bread, rolls, pizza, and
dough
• Make yogurt
Food tray or
air fryer tray at
level 4 position
Low
• 90°–120°F /
30°–50°C
• 30 min–12 hr
*Fan speed cannot be changed and is automatically set with each cooking function.
Note:
Tap
during preheating to skip the
preheating stage.
Preheating
1. Tap a cooking function that includes
preheat.
2. Tap to start the cooking function.
“PrE” will show on the display and the
air fryer will begin preheating.
The following cooking functions
automatically include preheat: Air Fry,
Roast, Bake, and Pizza.
3. When preheating is finished, the air
fryer will beep 3 times and “Add Food”
will show on the display.
4. Open the air fryer door and place food
inside, then close the door to start
cooking.

17
Air Fry Function (“AIR FRY”)
1. Tap AIR FRY to select the Air Fry
cooking function.
2. Optionally, customize the temperature
and time. You can do this anytime
during cooking (except during
preheating).
3. Tap to begin preheating. The
button will light up, and the display
will show “PRE”. When preheating is
finished, the air fryer will beep 3 times
and “Add Food” will show on the
display.
4. Place food in the air fryer tray or
rotisserie basket.
This function is ideal for cooking a variety
of food, including french fries and chicken
wings. Uses intense heat and maximized
airflow.
Heating Elements: Top and bottom heating
elements cycle on and o. If using the
rotisserie function, the bottom heating
elements are turned o.
Rack Position: Level 2 or 3
Fan Speed: High
a. Tap and to adjust the
temperature between 180°–450°F /
80°–230°C.
b. Tap and to adjust the
time between 1 min–1 hr.
a. Tap during preheating to skip
the preheating stage.
a. Avoid overfilling the air fryer tray, or
food may not air fry correctly.
b. When air frying fatty foods (such as
chicken wings), place the air fryer
tray on the food tray (or insert the
food tray underneath the air fryer
tray) to prevent oil from dripping on
the heating elements.
5. Insert at level 2 or 3 position.
6. Close the air fryer door to start cooking.
The display will show the timer
counting down.
7. The air fryer will stop heating and beep
several times when finished.

18
Note:
Use extreme caution when using foil, and
always fit foil as securely as possible. To avoid
overheating and risk of fire, make sure foil does not
contact the heating elements.
1. Tap ROAST to select the Roast cooking
function.
2. Optionally, customize the temperature
and time. You can do this anytime
during cooking (except during
preheating).
3. Tap to begin preheating. The
button will light up, and the display
will show “PrE”. When preheating is
finished, the air fryer will beep 3 times
and “Add Food” will show on the
display.
4. Place food inside the air fryer. Insert the
food tray at level 4 position.
5. Close the air fryer door to start cooking.
The display will show the timer
counting down.
6. The air fryer will stop heating and beep
several times when finished.
Roast Function (“ROAST”)
a. Tap and to adjust the
temperature between 180°–450°F /
80°–230°C.
b. Tap and to adjust the
time between 1 min–1 hr.
a. Optionally, use the rotisserie handle
to place the rotisserie basket or
rotisserie fork set in the designated
slots.
a. Tap during preheating to skip
the preheating stage.
This function is ideal for cooking a variety of
meats and poultry. Food will be tender and
juicy on the inside and well-roasted on the
outside.
Heating Elements: Top and bottom heating
elements cycle on and o. If using the
rotisserie function, the bottom heating
elements are turned o.
Rack Position: Level 4
Fan Speed: High

19
1. Place food on the food tray.
2. Insert the food tray at level 1 position.
3. Tap BROIL to select the Broil cooking
function.
4. Optionally, customize the temperature
and time. You can do this anytime
during cooking (except during
preheating).
Broil Function (“BROIL”)
a. Optionally, lightly grease the food
tray or line with foil to prevent food
from sticking.
b. Use extreme caution when using
foil, and always fit foil as securely as
possible. To avoid overheating and
risk of fire, make sure foil does not
contact the heating elements.
a. Tap and to adjust the
temperature between 350°–450°F /
175°–230°C.
b. Tap and to adjust the
time between 1 min–30 min.
a. Insert at mid position instead for:
• Bulky food that may touch the
upper heating elements
• Thicker food such as burger
patties
• Marinated food such as chicken
wings
• Food requiring a gentler broil
This function is ideal for cooking open-
faced sandwiches, thin cuts of meat (such
as bacon), poultry, fish, sausages, and
vegetables.
Can also be used to brown the tops of
casseroles, gratins, and desserts.
Heating Elements: Top heating elements
cycle on and o.
Rack Position: Level 1
Fan Speed: High
5. Tap to begin cooking. The display
will show the timer counting down.
6. The air fryer will stop heating and beep
several times when finished.

20
1. If using the air fryer tray, insert at level 3
position and close the air fryer door.
2. Tap BAKE to select the Bake cooking
function.
3. Optionally, customize the temperature
and time. You can do this anytime
during cooking (except during
preheating).
4. Tap to begin preheating. The
button will light up, and the display will
show “PrE”. When preheating is finished,
the air fryer will beep 3 times and “Add
Food” will show on the display.
5. Place food inside the air fryer. If using
the food tray, insert at mid position.
6. Close the air fryer door to start cooking.
The display will show the timer
counting down.
7. The air fryer will stop heating and beep
several times when finished.
Bake Function (“BAKE”)
This function cooks food evenly throughout.
Ideal for baking cakes, muns, brownies,
and pastries. Also ideal for cooking pre-
packaged frozen meals, including lasagna
and pot pies.
Heating Elements: Top and bottom heating
elements cycle on and o.
Rack Position: Level 3
Fan Speed: Low
a. Tap and to adjust the
temperature between 180°–450°F /
80°–230°C.
b. Tap and to adjust the
time between 1 min–1 hr.
a. Tap during preheating to skip
the preheating stage.
Note:
Use extreme caution when using foil, and
always fit foil as securely as possible. To avoid
overheating and risk of fire, make sure foil does not
contact the heating elements.
Other manuals for CAF-R121-SUS
1
Table of contents
Other Cosori Oven manuals

Cosori
Cosori CTO-R301S-SUSW User manual

Cosori
Cosori CO130-AO User manual

Cosori
Cosori CS125-AO User manual

Cosori
Cosori CO125-TO User manual

Cosori
Cosori CO130-AO-RXS User manual

Cosori
Cosori CO125-TO-RXS User manual

Cosori
Cosori CTO-R251S User manual

Cosori
Cosori CO130-AO User manual

Cosori
Cosori CO130-AO User manual

Cosori
Cosori CAF-R121-SUS User manual
Popular Oven manuals by other brands

Welbilt
Welbilt Convotherm maxx Cmx eT 6.10 ES operating instructions

Junker
Junker JB33UC.1 instruction manual

Alto-Shaam
Alto-Shaam 600-LVD Installation operation & maintenance

Silvercrest
Silvercrest SGB 1200 B5 operating instructions

Bosch
Bosch HBA514B 0 Series instruction manual

AEG
AEG BPK748380M user manual