manuals.online logo
Brands
  1. Home
  2. •
  3. Brands
  4. •
  5. Cossiga
  6. •
  7. Commercial Food Equipment
  8. •
  9. Cossiga DTGOR User manual

Cossiga DTGOR User manual

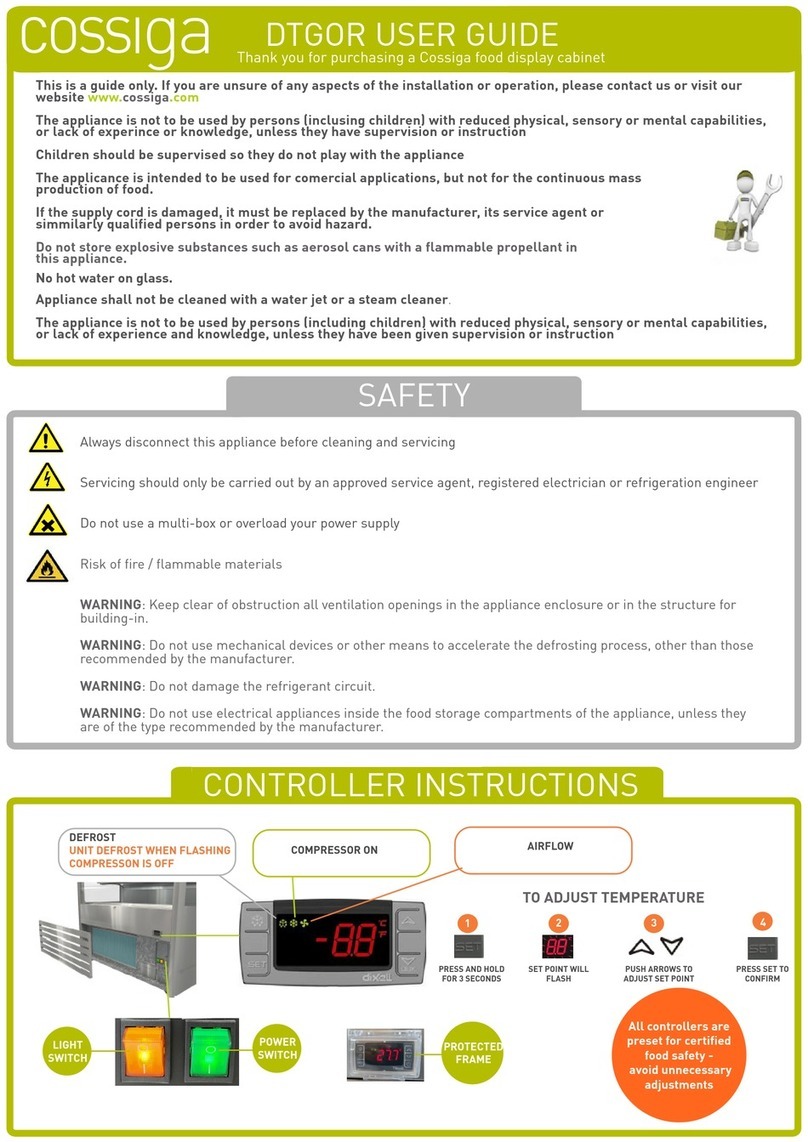
This is a guide only. If you are unsure of any aspects of the installation or operation, please contact us or
visit our website www.cossiga.com
The appliance is not to be used by persons (inclusing children) with reduced physical, sensory or mental
capabilities, or lack of experince or knowledge, unless they have supervision or instruction
Children should be supervised so they do not play with the appliance
The applicance is intended to be used for comercial applications, but not for the continuous mass
production of food.
If the supply cord is damaged, it must be replaced by the manufacturer, its service agent or
simmilarly qualified persons in order to avoid hazard.
Do not store explosive substances such as aerosol cans with a flammable propellant in
this appliance.
No hot water on glass.
Appliance shall not be cleaned with a water jet or a steam cleaner.
DTGOR USER GUIDE
Thank you for purchasing a Cossiga food display cabinet
COSSIga
SAFETY
Always disconnect this appliance before cleaning and servicing
Servicing should only be carried out by an approved service agent, registered electrician or refrigeration engineer
Do not use a multi-box or overload your power supply
Risk of fire / flammable materials
WARNING: Keep clear of obstruction all ventilation openings in the appliance enclosure or in the structure for
building-in.
WARNING: Do not use mechanical devices or other means to accelerate the defrosting process, other than those
recommended by the manufacturer.
WARNING: Do not damage the refrigerant circuit.
WARNING: Do not use electrical appliances inside the food storage compartments of the appliance, unless they
are of the type recommended by the manufacturer.
CONTROLLER INSTRUCTIONS
DEFROST
( RF OR RA UNITS)
UNIT DEFROST WHEN FLASHING
COMPRESSON IS OFF
COMPRESSOR ON
(RF OR RA UNITS)
HEATING ELEMENTS ON
AIRFLOW FAN ON
POWER
SWITCH
All controllers are
preset for certified
food safety -
avoid unnecessary
adjustments
TO ADJUST TEMPERATURE
2 3 4
PRESS AND HOLD
FOR 3 SECONDS
PRESS SET TO
CONFIRM
SET POINT WILL
FLASH
PUSH ARROWS TO
ADJUST SET POINT
4
14
LIGHT
SWITCH
PROTECTED
FRAME
SHELVES
Adjustable:
- Height
- Flat or Angled
To Adjust:
- Remove Racks
- LIFT up from back of
shelf arms at either end
LED LIGHTING
Can be disconnected from rear pillar by unplugging socket
LED are easily replaced:
- Slide old LED out and slide new one in
VENTILATION key to the efficient running and long life
A separation gap of 30mm to a wall is
required.
ALL SPECIFIC MODEL VENTILATION DRAWINGS ARE AVAILABLE ON OUR WEBSITE
VENTILATION MUST BE CORRECT FOR WARRANTY TO BE VALID
1. DRAIN TO BOTTLE - Manual
DRAINAGE OPTIONS
A 200mm gap above the unit is also
required to ensure proper hot air extract.
2. ELECTRONIC EVAPORATOR PAN
Air IN
must be separated
from
Air OUT
LOADING
Model Max Loading - Bottle/Can 330ml
Each Shelf Base Tray Total
DTGOR6 42 56 224
DTGOR9 72 91 379
DTGOR12 96 119 503
DTGOR15 126 147 651
Mechanical air flows, such as
diffusers and fans can disturb the air
curtain on open fronted units causing
failure
Mechanical airflow Environmental conditionsLocations to avoid
Close to shop front exterior
In an outside location
In direct sunlight
In a high wind
Near any source producing excessive heat
Service units more frequently in dusty or polluted areas
Heat from other equipment and natural
conditions, such as
direct sunlight straight on units, can
cause cooling to fail
A night blind is recommended to help the unit keep cool outside of operation hours.
CONDENSER CLEANING
Better Performance
Lower Power Consumption
Longer Cabinet Life
3. PUMP TO WASTE - UP TO 5 METRES
Brush up
and down
ONLY!
INSTALLATION
Your cabinet has been delivered fully assembled. Please check nothing has moved during transit.
REMOVE corner brackets.
Remove front grill.
LIFT with forks under centre of frame.
Check span of forks under unit to avoid
For more details, please visit our website.
TRANSPORT to required locationany
damage to components.
REMOVE front, side and corner pieces
and discard. PLACE corner braets and plywood
to form a ramp.
ROLL the unit off the pallet down the ramp.
Two or more people may be required
depending on the size of the unit.
Ensure cabinet is level
(door operation and drainage can
be affected )
Adjust feet using spanner to level
your cabinet No Multiboxes
CLEAN
ME!
Extreme care
required
due to
toppling risk!
R290 (Propane) is refrigerant grade propane with high purity and low Global Warming Potential (GWP).
Propane is highly flammable. Please observe caution and follow the safety maintenance requirement when servicing
equipment with R290.
Before the maintenance of R290 refrigeration products, safety inspection must be carried out to ensure that the risk of
ignition is minimized.
The maintenance area must be ventilated.
Fire extinguishing equipment (dry powder or carbon dioxide fire extinguisher)
shall be provided in the maintenance site
There should be enough space in the maintenance site. Open fire, electric spark and ≥470 ℃ heat source are
prohibited within 2m.
The key to maintaining your cabinets
SERVICING GUIDELINES
R290 REFRIGERANT
An electrical wiring diagram can be located under the hood of electrical box
LED driver and electrics can be located in the hood or electrical box
To access fans for service or repair:
Remove deck tray in cabinets and lift out
Remove stainless cover with screw drivers
This will allow access to fans and coil
Operation ambinet temperature ( Climate 4 ): 43 °C
ALWAYS DISCONNECT CABINET BEFORE SERVICING
Electrical diagrams
Exploded spare parts
Refrigerated parameters
Can be found on our website:
www.cossiga.com
Disconnect the power supply
to appliance.
Connect the compressor equipped
with the
venting hose to the piercing valves.
Discharge the R290 refrigerant into
a safe place or a refrigerant
recovery bottle.
Once the charge is removed, add
high-purity nitrogen through the
system for 10 seconds.
Purge nitrogen through the system
at 70 to 140 hPa, vacuum until
unit holds 40pa.
Vacuumize it with a vacuum pump for
15-20min before welding the
replacement parts of R290
refrigeration

This manual suits for next models

4

Other Cossiga Commercial Food Equipment manuals

Cossiga Linear Square Canopy User manual

Cossiga

Cossiga Linear Square Canopy User manual

Cossiga Linear Series User manual

Cossiga

Cossiga Linear Series User manual

Cossiga LS Series User manual

Cossiga

Cossiga LS Series User manual

Cossiga LINEAR Series User manual

Cossiga

Cossiga LINEAR Series User manual

Cossiga DTGOR Series User manual

Cossiga

Cossiga DTGOR Series User manual

Popular Commercial Food Equipment manuals by other brands

Hussmann R3B Installation & operation guide

Hussmann

Hussmann R3B Installation & operation guide

Diamond G77/PL4T-N installation instructions

Diamond

Diamond G77/PL4T-N installation instructions

Inoksan 700 Series instruction manual

Inoksan

Inoksan 700 Series instruction manual

Piper 1008-SS Installation and operating manual

Piper

Piper 1008-SS Installation and operating manual

Casselin CVR58L manual

Casselin

Casselin CVR58L manual

Viessmann Tecto MD5 user guide

Viessmann

Viessmann Tecto MD5 user guide

HURAKAN HKN-ISE10 manual

HURAKAN

HURAKAN HKN-ISE10 manual

Williams MRC10 operating manual

Williams

Williams MRC10 operating manual

disperator 500A-HK user manual

disperator

disperator 500A-HK user manual

Fri-Jado TDR P eco Series Service manual

Fri-Jado

Fri-Jado TDR P eco Series Service manual

Doughpro PROLUXE DP1350 Operation manual

Doughpro

Doughpro PROLUXE DP1350 Operation manual

Pitco RTG14 Service manual

Pitco

Pitco RTG14 Service manual

Duke HCSS-48-3 Installation and operation manual

Duke

Duke HCSS-48-3 Installation and operation manual

Proluxe DOUGHPRO DP2300CBE Operation manual

Proluxe

Proluxe DOUGHPRO DP2300CBE Operation manual

Bartscher 406.051 instruction manual

Bartscher

Bartscher 406.051 instruction manual

croydon RSDJ-256B01 B0 instruction manual

croydon

croydon RSDJ-256B01 B0 instruction manual

Dover Anthony 401 Service & installation instructions

Dover

Dover Anthony 401 Service & installation instructions

Diamond TG3N/LG manual

Diamond

Diamond TG3N/LG manual

manuals.online logo
manuals.online logoBrands
  • About & Mission
  • Contact us
  • Privacy Policy
  • Terms and Conditions

Copyright 2025 Manuals.Online. All Rights Reserved.