manuals.online logo
Brands
  1. Home
  2. •
  3. Brands
  4. •
  5. Costway
  6. •
  7. Dryer
  8. •
  9. Costway ES10085US User manual

Costway ES10085US User manual

Please give us a chance to make it right and do better !
Contact our friendly customer service department for help first.
Replacements for missing or damaged parts will be shipped ASAP !
US office: Fontana UK office: Ipswich
DE office: Hamburg
FR office: Saint Vigor d'Ymonville
PL office: Gdańsk
Contact Us!
Do NOT return this item. US:cs.us@costway.com
UK:cs.uk@costway.com
Shoe & Boot Dryer
ES10085US
USER’S MANUAL
THIS INSTRUCTION BOOKLET CONTAINS IMPORTANT SAFETY INFORMATION. PLEASE READ AND KEEP FOR FUTURE REFERENCE.
Before You Start
Please read all instructions carefully.
Retain instructions for future reference.
Separate and count all parts and hardware.
Read through each step carefully and follow the proper order.
We recommend that, where possible, all items are assembled
near to the area in which they will be placed in use, to avoid
moving the product unnecessarily once assembled.
Always place the product on a flat, steady and stable surface.
Keep all small parts and packaging materials for this product
away from babies and children as they potentially pose a serious
choking hazard.
02 03
INSTRUCTION MANUAL
SAVE THIS MANUAL FOR FUTURE REFERENCE
GENERAL SAFETY RULES
WARNING ! READ AND UNDERSTAND ALL INSTRUCTIONS
Failure to follow all instructions listed may result in electric shock, fire and
/ or serious personal injury
AREA OF USE:
● Keep surrounding area clean and well lit. Cluttered areas may cause
accidents.
● Do NOT operate in explosive atmospheres, such as in the presence of
flammable liquids, gases or dust.
● Household use Only.
Air Tube
Air Inlet
Base Drip Tray
Heat Switch
Ozone Switch
Bracket
Timer Knob
Main Body
Locking Button
04 05
ELECTRICAL SAFETY:
● Do NOT override the timer switch.
● Do NOT operate in standing water .
● Do NOT overload with garments.
● Do NOT cut-off or restrict air circulation.
● Do NOT expose to rain or snow.
● Use of attachments not recommended may result in a risk of fire,
electric shock, or injury to persons.
● To reduce risk of damage to electric plug and cord , pull by plug rather
than cord when disconnecting unit .
● Make sure cord is positioned so that it will not be stepped on , tripped
over or otherwise subjected to damage or stress.
● Two-wire cord can be used with 2-wire extension cord. Only round
jacketed extension cord should be used and we recommend that they be
listed by Underwriters Laboratories (U.L). If the extension cord is to be
used for indoor use. The letters “W” or “WA” on the cord jacket indicate
that the cord is suitable for outdoor use.
● An extension cord must have adequate wire size (AWG or American Wire
Gauge)for safety and to prevent loss of power and overheating. The
smaller the gauge number of the wire, the greater the capacity of the
cable; that is, 16 gauge has more capacity than 18 gauge. When using
more than 1 extension to make up the total length, be sure each
extension contains at least the minimum wire size.
● This appliance has a polarized plug (one blade is wider than the other).
To reduce the risk of electric shock ,this plug is intended to fit into a
polarized outlet only one way. If the plug does not fit fully into the
outlet, reverse the plug. If it still does not fit, contact a qualified
electrician. Do not attempt to modify the plug in any way.
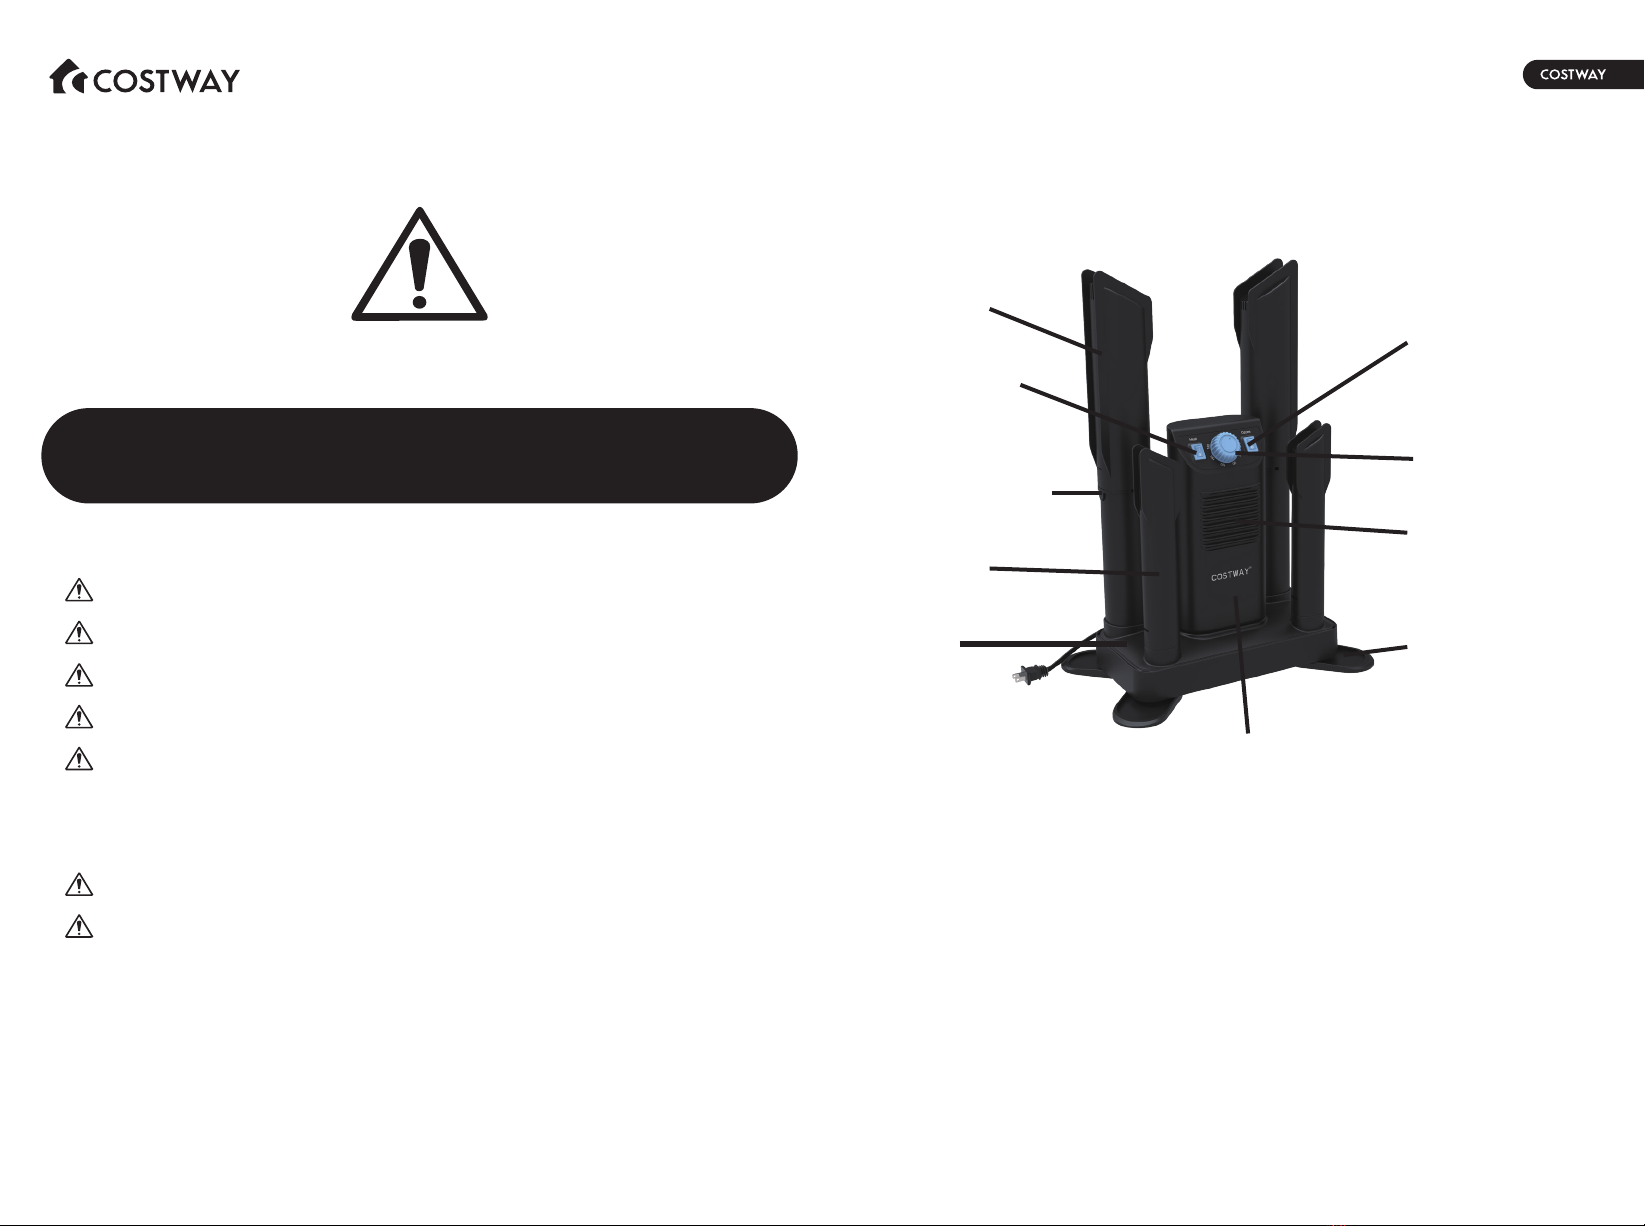
OPERATING INSTRUCTIONS:
1. Plug the boot dryer into any standard 120 Volt 60 Hz electrical outlet
2. Unfold the 4 anti-slip pads under the bottom base, and pull up the
upper tubes when drying boots up to 16” tall.The boot dryer dries boots
and gloves together or 2 pair of long boots and other types of shoes
simultaneously by pulling up the two upper stretchable tubes directly.
Push the two sides’ locking buttons simultaneously and slide down the
upper tubes if you wish to faster drying. Front two smaller tubes are
specially designed for drying kids shoes or boots or socks or gloves.
3. The upper tubes with anti-being pulled off system will prevent the tubes
falling put when pulling off the long boots after drying.
4. Carefully slide footwear onto drying tubes or drying nozzles, being
careful not to restrict air flow at the bottom or block air flow into the
lower assembly.
5. Select the heat or no heat setting by pressing the rocker switch at the
top of housing
6. Turn timer knob clockwise to the 180 minute mark to initially activate
the timer switch (please note as this is very important), then turn knob
counter-clockwise back to desired drying time.timer will auto off.
7. When turn on the UV/Ozone switch to sterilization, please do make sure
open all the windows or doors for good air circulation to avoid any
potential harm to your lung healthy. DONOT USE THE STERILIZATION
FUNCTION IN A CLOSED ROOM/CONFINED SPACE OR BED ROOM, KEEP
IT AWAY FROM THE KIDS OR DISABLE PEOPLES!
Optional function:
If your machine is made with UV/Ozone sterilization function,Please switch
ON the independent switch besides the Timer dial to turn ON the
UV/OZONE generator to produce the UV/OZONE for sanitizing your
shoes.if donot want UV/OZONE ,just turn OFF the switch independently for
drying function only.
CAUTION: PLEASE DONOT CLOSE TO THE MACHINE AND BREATH OVER
15MINS IF TURN ON THESTERILIZATION FUNCTION TO AVOID POTENITAL
HARM TO YOUR LUNGS.PLEASE KEEP AWAY FROM THE MACHINE AND
OPEN THE WINDOW OR DOOR FOR VENTILATION DURING OR AFTER
STERILIZATION.
▲ANNOUNCEMENT :
● The boot dryer generates a gentle breeze,a light wind that evenly dries
garments that will not damage your boots. It is not a hair dryer and is
not designed to force a powerful current of air through garments.
● The boot dryer only heats to a gentle temperature.It is not designed to
generate high heat as this would damage footwear.
SAVE THESE INSTRUSTIONS
HELPFUL TIPS:
1. The boot dryer creates a gentle breeze to dry garments gently, but it is
not a hair dryer that will not create a strong wind.
2. When placing gloves, mittens or children's boots and shoes onto the
drying tubes or drying nozzles, be sure not to pinch air circulation
3. Footwear should be dried after every use to help prevent bacteria and
fungus growth, the primary cause of odor.
4. Smaller footwear and garments will dry quicker than larger items.
5. Your energy efficient boot dryer heats to a gentle temperature of
around 122℉/50 ℃bases on room temperature of 25 ℃and uses
“Forced Air"technology quietly and quickly dries wet garments, but it
does not generate a forceful air stream that might possibly damage or
deform the shoes.
6. At first you may suspect the unit is not operating properly. We
recommend you place the back of you hand near the drying nozzles so
you will better feel the gently warmed air stream and to experience the
heat, place footwear and garments onto the dying nozzles for a period
of 30 minutes, then touch inside the garment to feel the gentle heat.
7. Use shoe stretcher or front two smaller tubes to dry Ski Boots or gloves
or socks.
8. The upper tubes stretched will be little shaking which is normal and
strong enough to hold any boots without any problem.
OPERATION TIME:
● Timer must tum past 1 hour to activate. For drying time less than 1
hour, turn timer knob clockwise past 1 hour mark and counter clockwise
back to desired time.
● 1 to 3 hours, but please avoid over-drying.
● Drying time varies depending upon extent of moisture as well as
temperature and humidity
● We recommend a minimum of 1 hour every time your shoes or boots
are used.
● While in operation, the unit although relatively quiet, produces minimal
noise. This is a normal condition and does not indicate a problem.
MAINTENANCE:
Use only mild soap and a damp cloth to clean the dryer. Never let any
liquid get inside the motor.
You can coil the cord to its specially designed cord coil system back of the
main body and slide down all upper tubes for easier storage.
IMPORTANT:
To assure product SAFETY and RELIABILITY, repairs and maintenance
(other than those listed in this manual) should be performed by qualified
service organizations, always using identical replacement parts.
06 07

This manual suits for next models

1

Other Costway Dryer manuals

Costway FP10218US User manual

Costway

Costway FP10218US User manual

Costway EP25006US User manual

Costway

Costway EP25006US User manual

Costway EP23597 User manual

Costway

Costway EP23597 User manual

Costway ES10166US User manual

Costway

Costway ES10166US User manual

Popular Dryer manuals by other brands

Electrolux Professional Lagoon TD6-7 user manual

Electrolux Professional

Electrolux Professional Lagoon TD6-7 user manual

Electrolux GLEQ642AS owner's guide

Electrolux

Electrolux GLEQ642AS owner's guide

Zanussi TD245 Instruction booklet

Zanussi

Zanussi TD245 Instruction booklet

Electrolux 864512 Brochure & specs

Electrolux

Electrolux 864512 Brochure & specs

Midea MDS70-V032_A0431-EU18-P1 Service manual

Midea

Midea MDS70-V032_A0431-EU18-P1 Service manual

Indesit IS60V Instruction booklet

Indesit

Indesit IS60V Instruction booklet

Frigidaire FAQE7072LA Product specifications

Frigidaire

Frigidaire FAQE7072LA Product specifications

Whirlpool 3LG57OlXP Use & care guide

Whirlpool

Whirlpool 3LG57OlXP Use & care guide

Sterling SDAA 25-100 user guide

Sterling

Sterling SDAA 25-100 user guide

Miele professional PT 7135 C quick start guide

Miele professional

Miele professional PT 7135 C quick start guide

Asko T411VD W U Series Instructions for use

Asko

Asko T411VD W U Series Instructions for use

Zanussi ZDH8333W user manual

Zanussi

Zanussi ZDH8333W user manual

GE Profile DPVH890EJ Installation information

GE

GE Profile DPVH890EJ Installation information

Miele TKR850 WP S operating instructions

Miele

Miele TKR850 WP S operating instructions

Maytag MDG25PN Service manual

Maytag

Maytag MDG25PN Service manual

Whirlpool LE7680XS Use & care guide

Whirlpool

Whirlpool LE7680XS Use & care guide

LG DLE2350W owner's manual

LG

LG DLE2350W owner's manual

Beko B3T43230 user manual

Beko

Beko B3T43230 user manual

manuals.online logo
manuals.online logoBrands
  • About & Mission
  • Contact us
  • Privacy Policy
  • Terms and Conditions

Copyright 2025 Manuals.Online. All Rights Reserved.