PRODUCT ASSEMBLY PRODUCT ASSEMBLY
285x210mm
PRODUCT ASSEMBLY PRODUCT ASSEMBLY
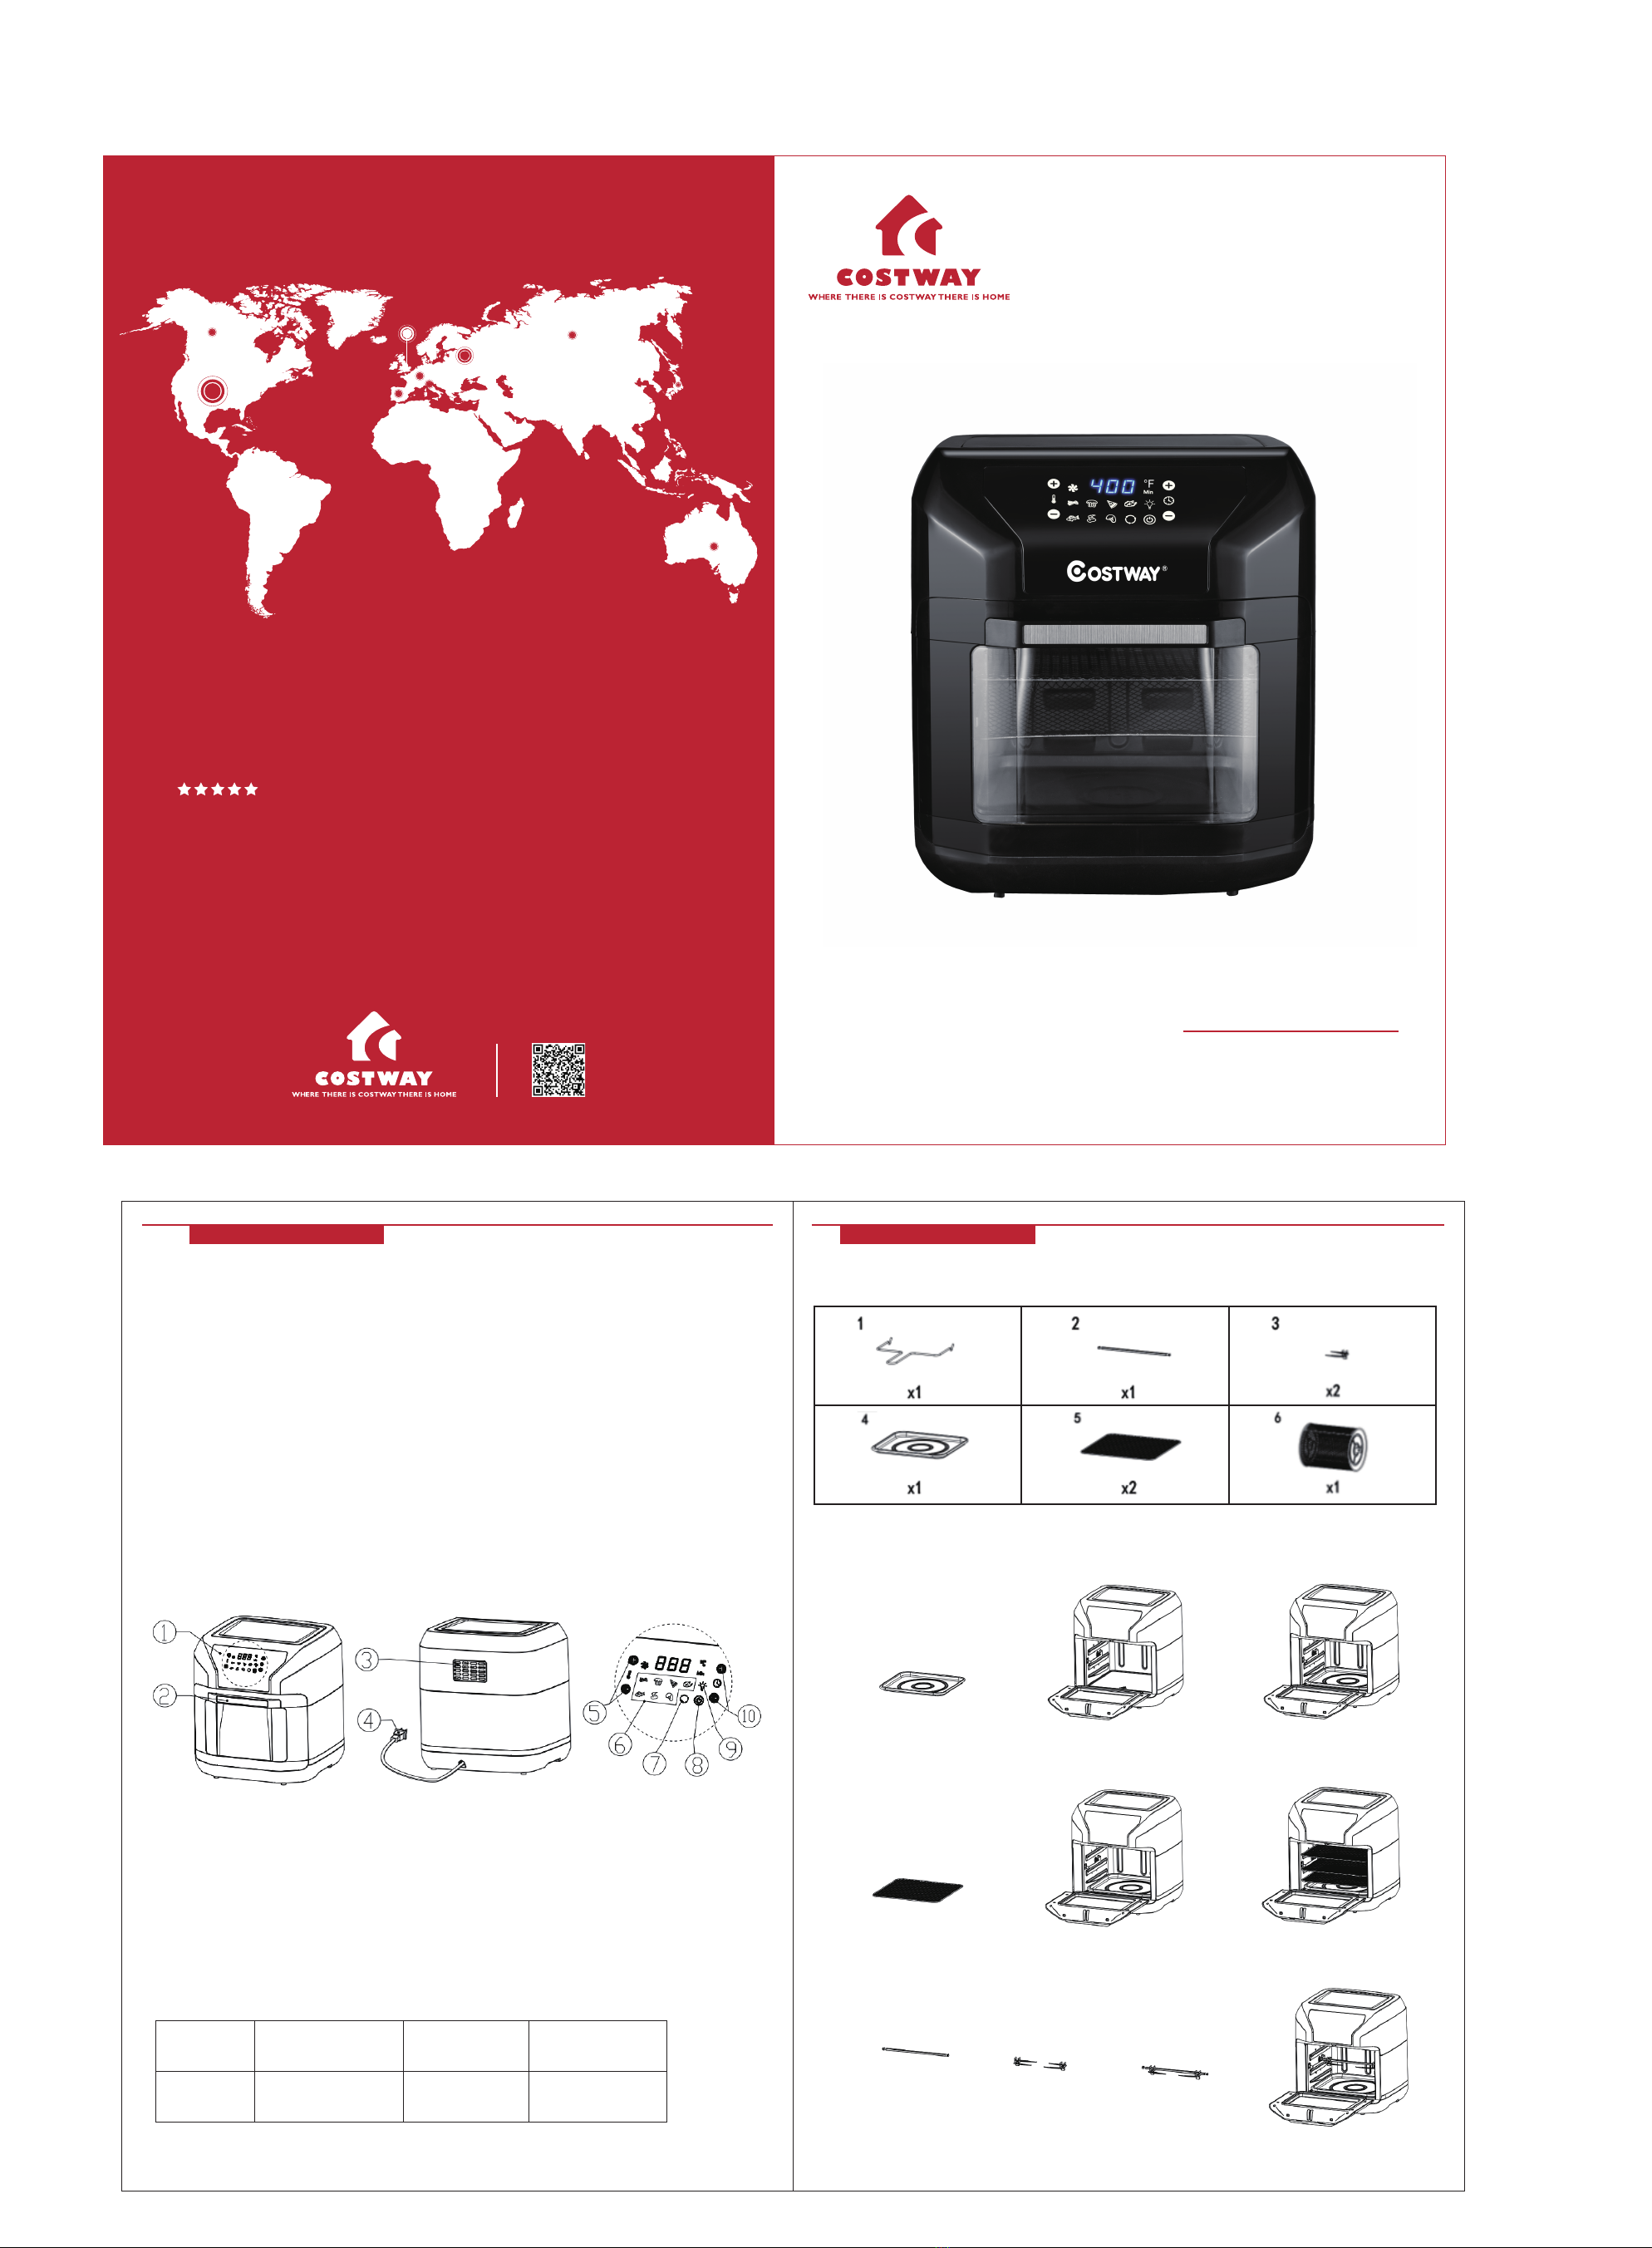
Rotisseries fork’s usage: Insert the fork into the Rotisseries shaft(for fixing foods), fasten them, then slid
it to the oven along the slide.When it slides into the end, push it to the left inside the sleeve.
Rotating mesh basket’s usage: Assemble the shaft to the basket, fixing it by screw, add foods to the basket, then
put it to the oven along the slide, when it slide into the end, push it to the left inside the sleeve.
Optional skewer rack’s usage: Slide both grill brackets into the axle, then fix them by screws, then assemble
BBQ needle to the brackets, then slide them to the end, push it to the left insidethe sleeve.
Warning
*Never immerse the housing (which contains electrical components and the heating elements) in water or
rinse it under the tap.
*To prevent electric shock, never let any water or other liquids enter the appliance.
*Always put the ingredients to be fried in the basket, to prevent them from coming into contact with the
heating elements.
*Do not cover the air inlet or outlet openings while the appliance is operating.
*Do not fill the pan with oil as this may cause a fire hazard.
*Never touch the inside of the appliance while it is operating.
*Do not use the appliance if the plug, the power cord or the appliance itself is damaged.
*Do not operate the appliance if the cord is strong bending, near high temperature or heavy loads etc, in case
of electric shock or fire caused by electric leakage.
*This appliance should not be used by children under the age of 15.
*Keep the appliance and its main cord out of the reach of children younger than 15 when the appliance is
switched on or is cooling down.
*Keep the main power cord away from hot surfaces.
*Do not plug in the appliance or operate the control panel with wet hands.
*Only connect the appliance to a grounded wall socket. Always make sure that the plug is inserted into the
wall socket properly.
*Never connect this appliance to an external timer switch in order to avoid a hazardous situation.
*Do not place the appliance on or near combustible materials such as a tablecloth or curtain.
*Do not place the appliance against a wall or against other appliances. Leave at least 5 inches of free space
on the back and sides and 5 inches free space above the appliance.
*Do not place anything on top of the appliance.
*Do not use the appliance for any other purpose than described in this manual.
*Do not let the appliance operate unattended.
*During hot air frying, hot steam is released through the air outlet openings.
*Keep your hands and face at a safe distance from the steam and from the air outlet openings. Also be careful
of hot steam and air when you remove the pan from the appliance.
*The accessible surfaces may become hot during use.
*Immediately unplug the appliance if you see dark smoke coming out of the appliance. Wait for the smoke
emission to stop before you remove the pan from the appliance.
Caution
*Place the appliance on a horizontal, even and stable surface.
*This appliance is intended for normal household use only.
*If the appliance is used improperly or for professional or semi-professional purposes or if it is not used
according to the instructions in the user manual, the warranty is invalidated and we refuse any liability for
damage caused.
*Always unplug the appliance after use.
*Let the appliance cool down for approximately 30 minutes before you handle or clean it.
*Make sure the ingredients prepared in this appliance come out golden-yellow instead or dark or brown.
*Remove burnt food. Do not fry fresh potatoes at a temperature above 350°F(to minimize the production of
acrylamide).
Before the first usage
1. Remove all packaging material.
2. Remove any stickers or labels from the appliance.
3. Thoroughly clean the accessories or inner body with some hot water, some washing liquid and a
non-abrasive sponge.
Note: You can also clean these parts in the dishwasher.
4. Wipe the inside and outside of the appliance with a moist cloth. This is an air fryer oven that works on hot
air. Do not fill the pan with full of oil or frying fat.
Prepare for use
1. Place the appliance on a stable, horizontal and level surface. Do not place the appliance on non
heat-resistant surfaces.
2. Do not put anything on top of the appliance. This disrupts the airflow and affects the hot air frying result.
Using the appliance
The air fryer can prepare a large range of ingredients. The recipe booklet included helps you get to know the
appliance more.
Hot air frying
1. Plug the appliance into a grounded wall socket.
2. Carefully prepare the certain accessories.
3. Put ingredients in the basket.
4. Put the certain accessories with ingredients to the oven.
5. Press the power button to activate the machine. Press the timer increase/decrease button to set the required
time. See the 'Suggested Settings section in this book to determine the right temperature for your foods.
Note: Long press the timer button to adjust the time more quickly.
6. Press the START/STOP button to start cooking. The display shows timer countdown from the set time.
7. During the frying, you can turn on light to monitor the foods situation inside.
8. Check if the ingredients are ready. If not, set for a few extra minutes for keeping frying.
9. Fetch the basket from the oven after finish the foods frying.
10.When a batch of ingredients is ready, the air fryer is instantly ready for preparing another batch.
11. Press the power off button to turn off the air fryer. Let cool before cleaning.
Tips
*Smaller ingredients usually require a shorter preparation time than larger ingredients.
*Shaking smaller ingredients halfway through the preparation time optimizes the end result and can help
prevent unevenly fried ingredients.
*Add some oil to fresh potatoes for a crispy result. Fry your ingredients in the air fryer within a few minutes
after you added the oil.
*Do not prepare extremely greasy ingredients such as sausages in the air fryer.
*Snacks that can be prepared in an oven can also be prepared in the air fryer.
*Use pre-made dough to prepare filled snacks quickly and easily Pre-made dough also requires a shorter
preparation time than homemade dough.
*You can also use the air fryer to reheat ingredients. To reheat ingredients, set the temperature to 300℉for
up to 10 minutes.
Making homemade fries
For the best results, we advise to use prebaked, frozen french fries. If you want to make homemade fries,
follow the simple tips below or use the recipe provided in the included Recipe Book.
1. Peel potatoes and cut into fries.
2. Soak the potato fries in a bowl for at least 30 minutes, take them out and dry them with kitchen paper.
3. Pour some olive oil in a bowl, put the fries on top and mix until they are coated with oil.
4. Remove the fries from the bowl with your fingers or a kitchen utensil so that excess oil stays behind in the
bowl. Place the fries in the basket.
Note: Do not tilt the bowl to put all the fries in the basket at once. Doing so may allow excess oil to fall into
the bottom of the pan.
Suggesting settings
The table below helps you to select the settings for the ingredients you want to prepare.
Note: keep in mind that these settings are suggestions. As ingredients differ in origin, size shape as well
we cannot guarantee the best setting for your ingredients becaus e the Rapid Air technology
instantly reheats the air inside the appliance pulling the pan briefly out of the appliance during hot air
frying barely disturbs the process.
AMOUNT TIME IN TEMP TEMP
IN LBS MINUTES (°F) (°C) NOTE EXTRAN FO
Thin Frozen French
Fries
0.7-1.5 12-16 400°F 200°C
Thick Frozen French
Fries
0.7-1.5 12-20 400°F 200°C
Homemade Potato Fries 0.7-1.8 18-25 360°F 180°C add ½tbsp of oil
Homemade Potato
Wedges
0.7-1.8 18-22 360°F 180°C add ½tbsp of oil
Hash Browns 0.5 15-18 360°F 180°C
Potato Gratin 1.0 18-22 360°F 180°C
Meat
Steak 0.2-1.0 8-12 360°F 180°C
°
°
Hamburger 0.2-1.0 7-14 360°F 180°C
Sausage Roll 0.2-1.0 13-15 400°F 180°C
°
°
Chicken Breast 0.2-1.0 10-15 360°F 180°C
Frozen Egg Rolls 0.2-1.0 8-10 400°F 180°C Use oven-ready
Frozen Chicken
Nuggets
0.2-1.0 8-10 400°F 200°C Use oven-ready
Frozen Fish Sticks 0.2-0.8 8-10 400°F 200°C Use oven-ready
Frozen Cheese Sticks 0.2-0.8 8-10 360°F 200°C Use oven-ready
Stuffed Vegetables 0.2-1.0 10 320°F 180°C
Cake 0.7 20-25 320°F 160°C Use an oven-safe dish
Quiche 0.9 20-25 360°F 160°C Use an oven-safe dish
Muffins 0.7 18-15 400°F 180°C Use oven-ready
°
°
A note of temperature setting
Desired temperature is fully adjustable up or down in increments of 10 degrees.
Fahrenheit at a time. This is the normal operation for the machine.
43
5 6