Costway FP10040 User manual

FP10040
If you're having difficulty, our friendly
customer team is always here to help.
THIS INSTRUCTION BOOKLET CONTAINS IMPORTANT SAFETY INFORMATION. PLEASE READ AND KEEP FOR FUTURE REFERENCE.
24-Inch Built-In Wall Oven
Four Encastrable
USA office: Fontana AUS office: Truganina
GBR office: Ipswich FRA office: Saint Vigor d'Ymonville
AUS:cs.au@costway.com
GBR:cs.uk@costway.com
FRA:cs.fr@costway.com

EN
Before You Start
Please read all instructions carefully.
Retain instructions for future reference.
Separate and count all parts and hardware.
Read through each step carefully and follow the proper order.
We recommend that, where possible, all items are assembled near to the area in
which they will be placed in use, to avoid moving the product unnecessarily once
assembled.
Always place the product on a flat, steady and stable surface.
Keep all small parts and packaging materials for this product away from babies
and children as they potentially pose a serious choking hazard.
FR
Veuillez lire attentivement toutes les instructions.
Conservez les instructions pour vous y référer ultérieurement.
Vérifiez toutes les pièces et les accessoires.
Lisez attentivement chaque étape et suivez l’ordre correct.
Nous recommandons que, dans la mesure du possible, tous les produits
soient assemblés à proximité de la zone où ils seront utilisés, afin d’éviter tout
déplacement inutile du produit une fois assemblé.
Placez toujours le produit sur une surface plane et stable.
Conservez toutes les petites pièces de ce produit et les matériaux d’emballage
hors de portée des bébés et des enfants, car ils pourraient présenter un risque
d’étouffement.
Avant de Commencer
WARNING
Hazards or unsafe practices which COULD result in severe
personal injury or death.
WARNING:
When properly cared for, your wall oven has been designed to be
safe and reliable. Read all instructions carefully before use. These
precautions will reduce the risk of burns, electric shock, fire and
injury to people. When using this kitchen appliance, basic safety
precautions must be followed; including those in the following
pages.
CAUTION
Hazards or unsafe practices which COULD result in minor
personal injury.
WARNING:
Read and understand all safety precautions. Failure to follow all
instructions described in this user manual may result in electric
shock, fire and/or serious personal injury. The warnings, cautions
and instructions discussed in this user manual cannot cover all
possible conditions and situations that may occur.
PRECAUTIONS
IMPORTANT SAFETY INSTRUCTIONS
EXPLANATION OF SYMBOLS
EN
02 03

• DO NOT use aluminum foil or protective liners to line any part of
the appliance, especially the oven bottom. Installing these liners
may result in risk of electric shock or fire.
• If materials inside an oven should ignite, keep door closed. Turn
FIRE SAFETY
off the appliance and disconnect the circuit at the circuit breaker
box.
• Use this appliance only for its intended purpose as described in
this manual. For example, NEVER use the appliance for warming
or heating the room. NEVER use the appliance for storage.
• ALWAYS have a working smoke detector near the kitchen.
• In the event that personal clothing or hair catches fire, drop and
roll immediately to extinguish flames. Smother flames from food
fires other than grease fires with baking soda.
• Have an appropriate fire extinguisher available, nearby, highly
visible and easily accessible near the oven.
• Smother flames with a close-fitting lid, cookie sheet, or metal
tray, then turn off the burner. Exercise caution to prevent burns. If
the flames do not go out immediately, evacuate and call the fire
department.
• NEVER pick up a flaming pan. You may be burned.
• DO NOT use water on grease fires.
• Smother the fire or flame. Or use dry chemical or foam-type
extinguishers.
• Use an extinguisher ONLY if:
1) You know you have a Class ABC extinguisher, and you already
know how to operate it.
2) The fire is small and contained in the area where it started.
3) The fire department is being called.
4) You can fight the fire with your back to an exit.
IMPORTANT:
Save this manual for the local electrical inspectors use.
• Have the installer show you the location of the circuit breaker or
fuse. Mark it for easy reference.
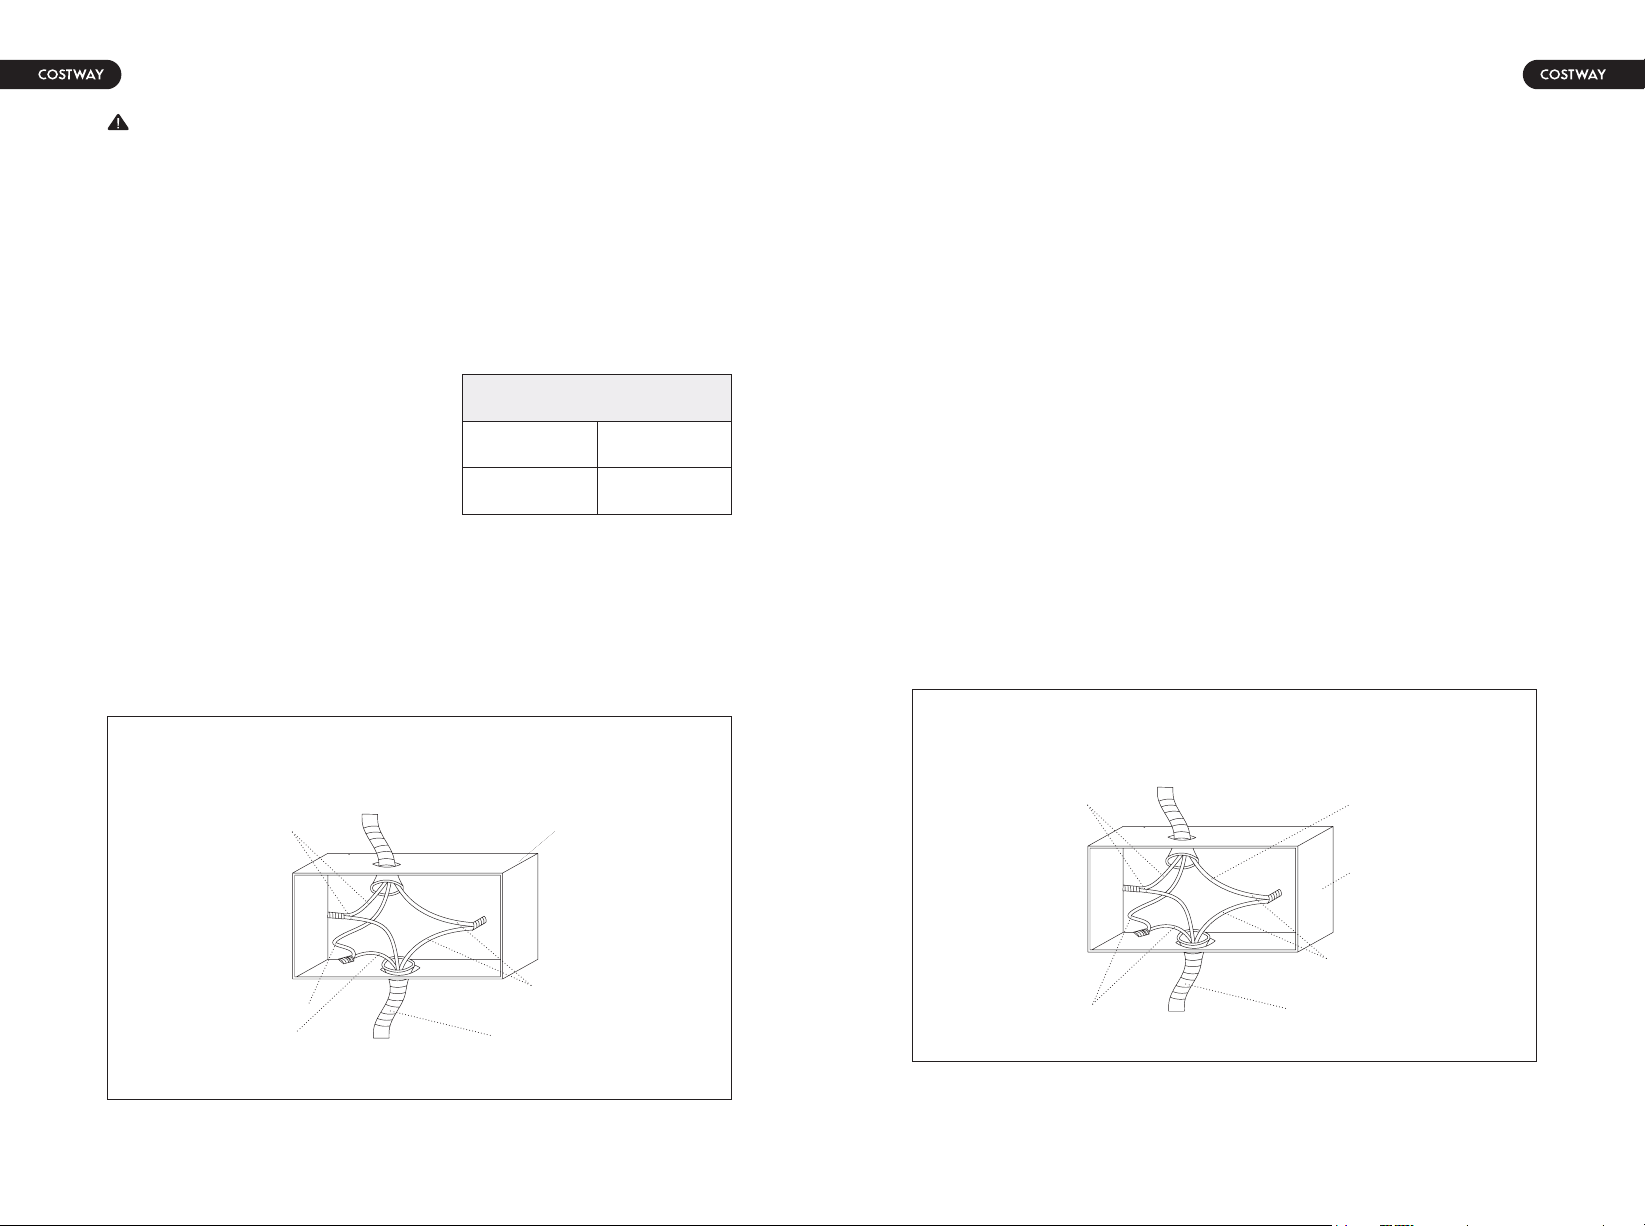
• Be sure your appliance is properly installed and grounded by a
qualified service personnel. Connect only to a properly grounded
outlet.
• This appliance is intended for normal family household use only.
It is not approved for outdoor use. If you have any questions, ask
qualified technician for help.
• DO NOT store or use corrosive chemicals, vapors, flammables or
nonfood products in or near this appliance. It is specifically
designed for use when heating or cooking food. The use of
corrosive chemicals in heating or cleaning will damage the
appliance and could result in injury.
• DO NOT operate this appliance if it is not working properly, or if it
has been damaged. Contact an qualified service personnel.
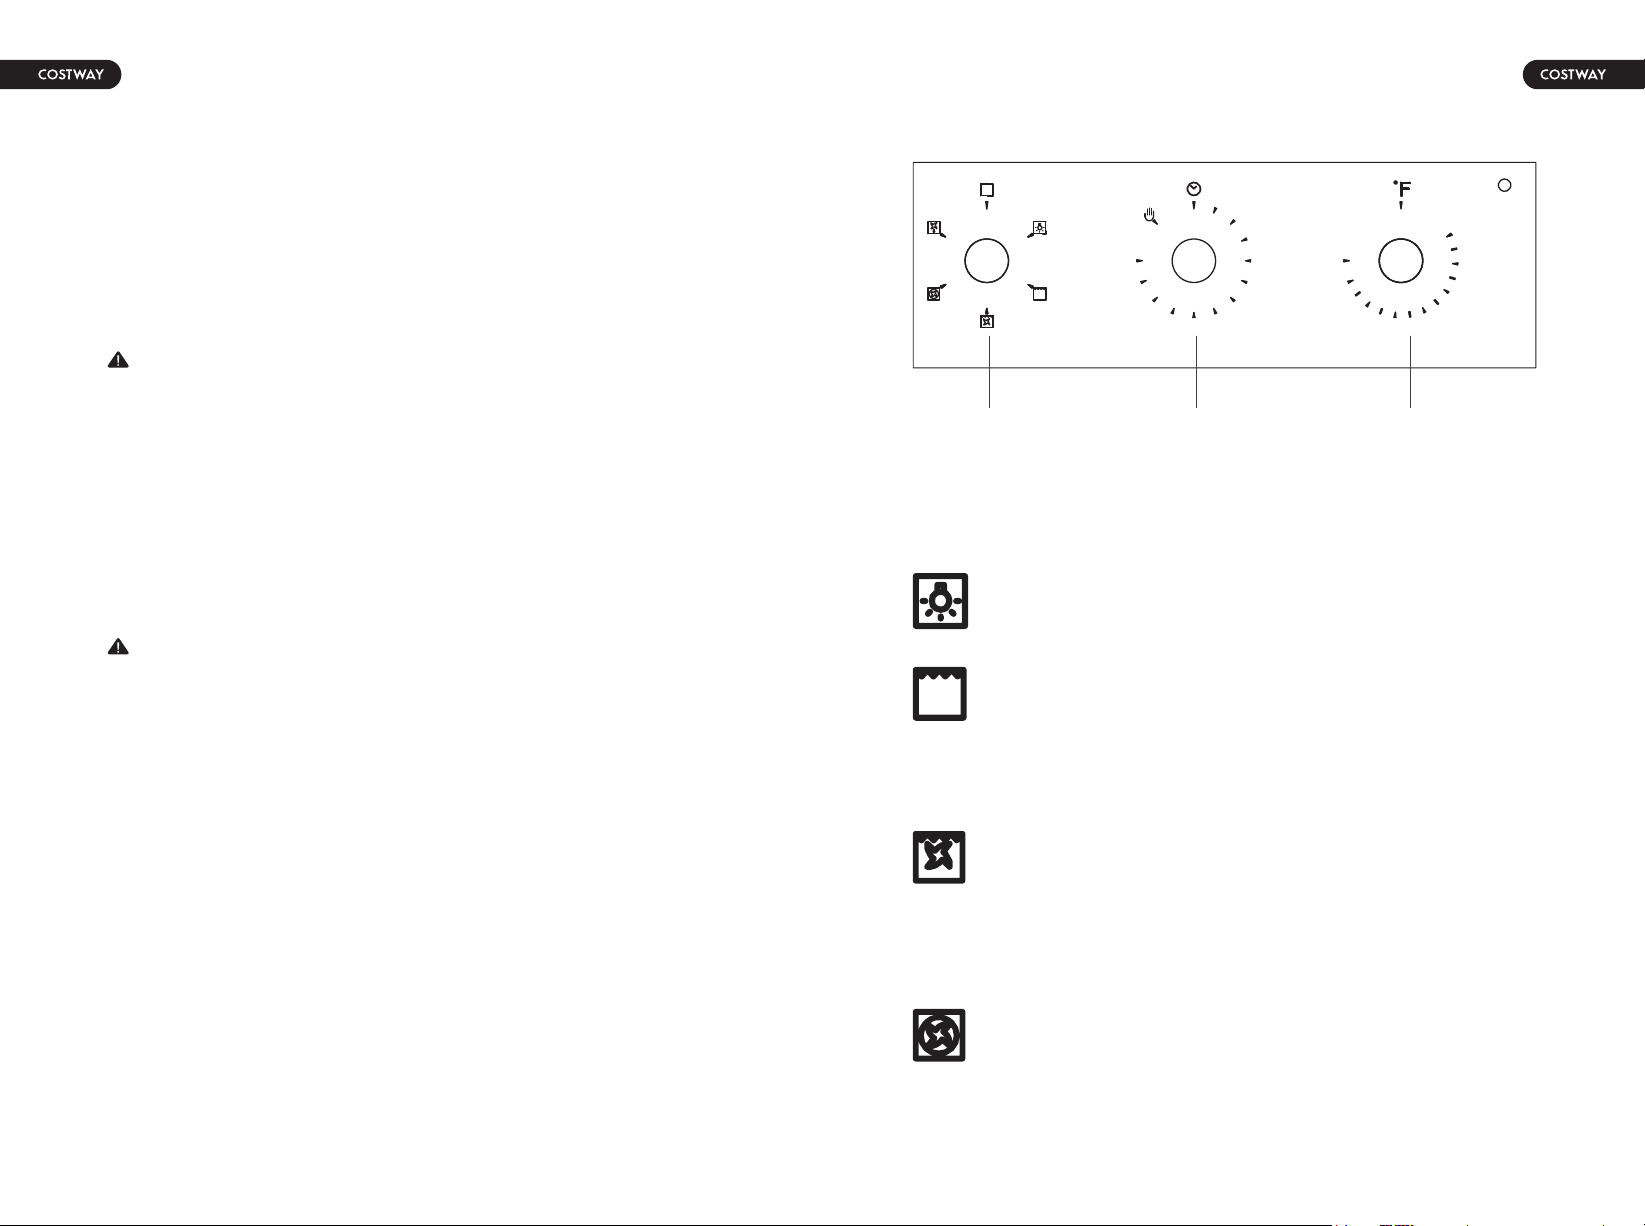
• DO NOT obstruct oven vents.
• DO NOT repair or replace any part of the appliance, unless
specifically recommended in this manual. Refer all servicing of this
appliance to a qualified service personnel.
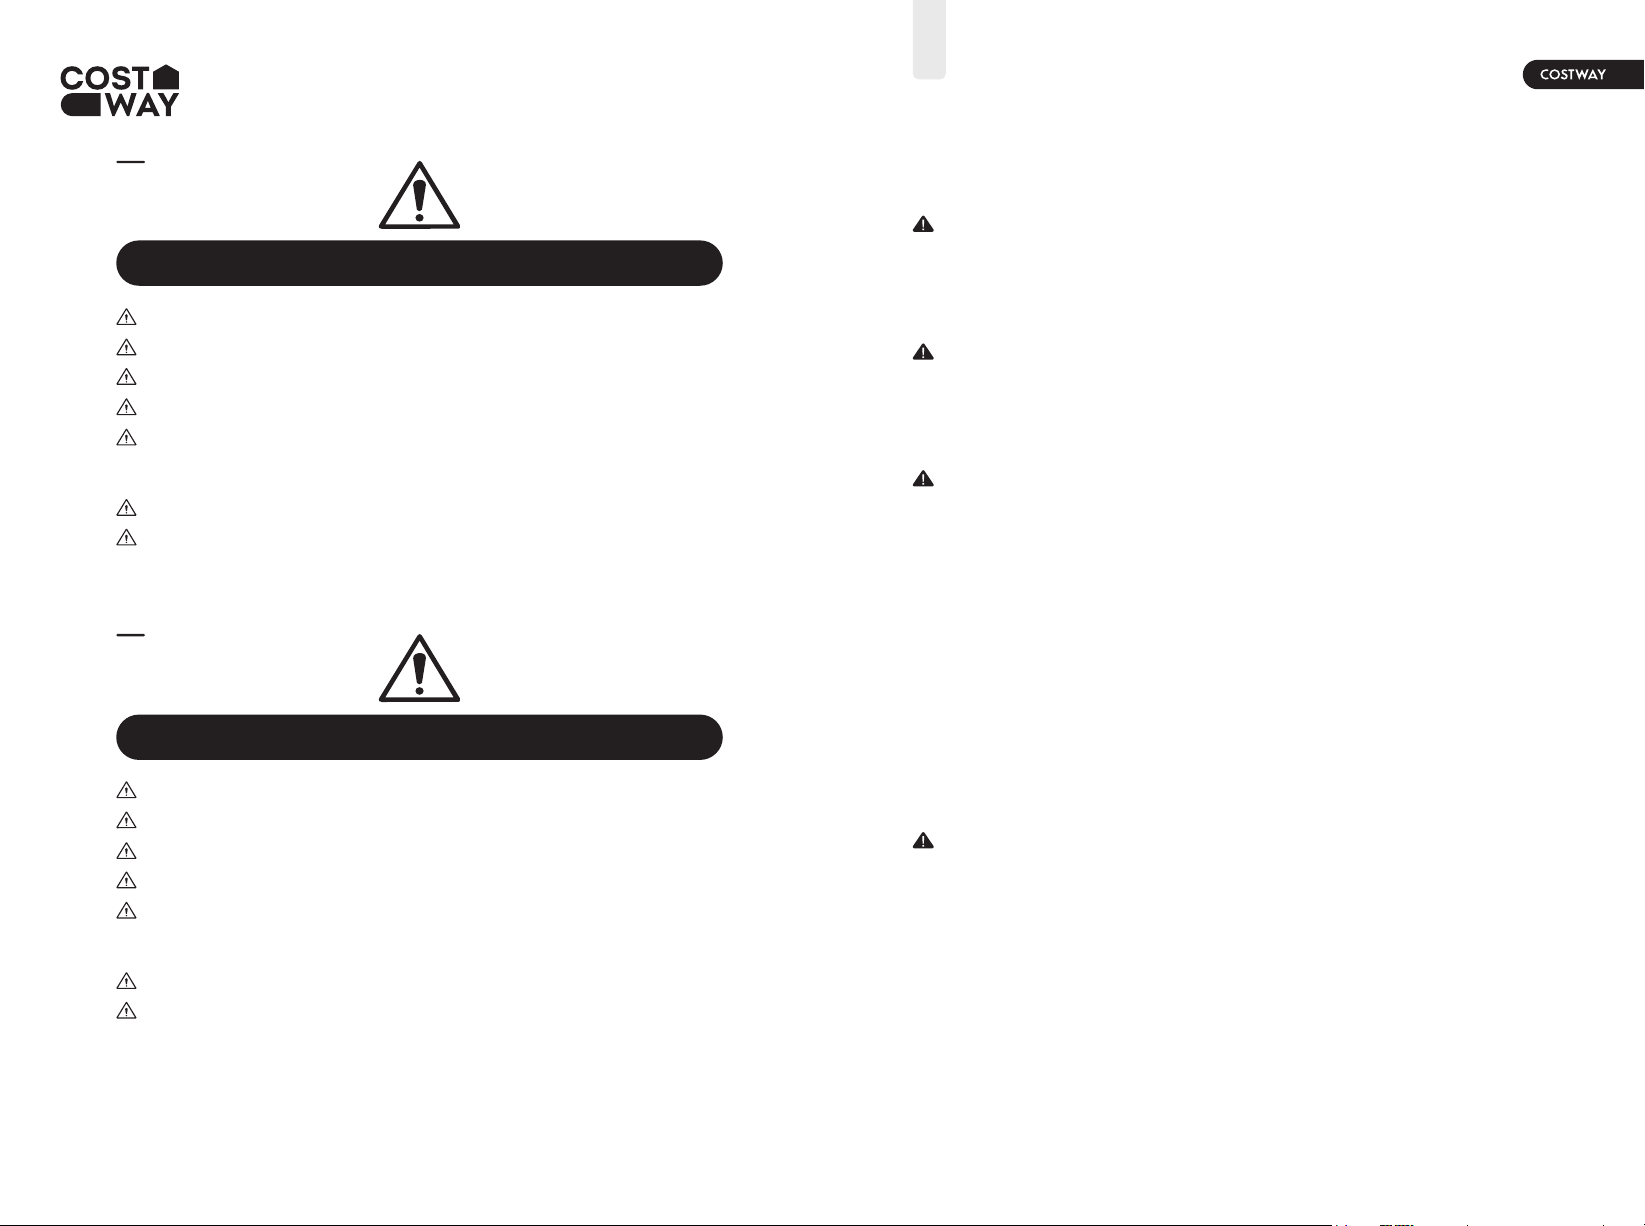
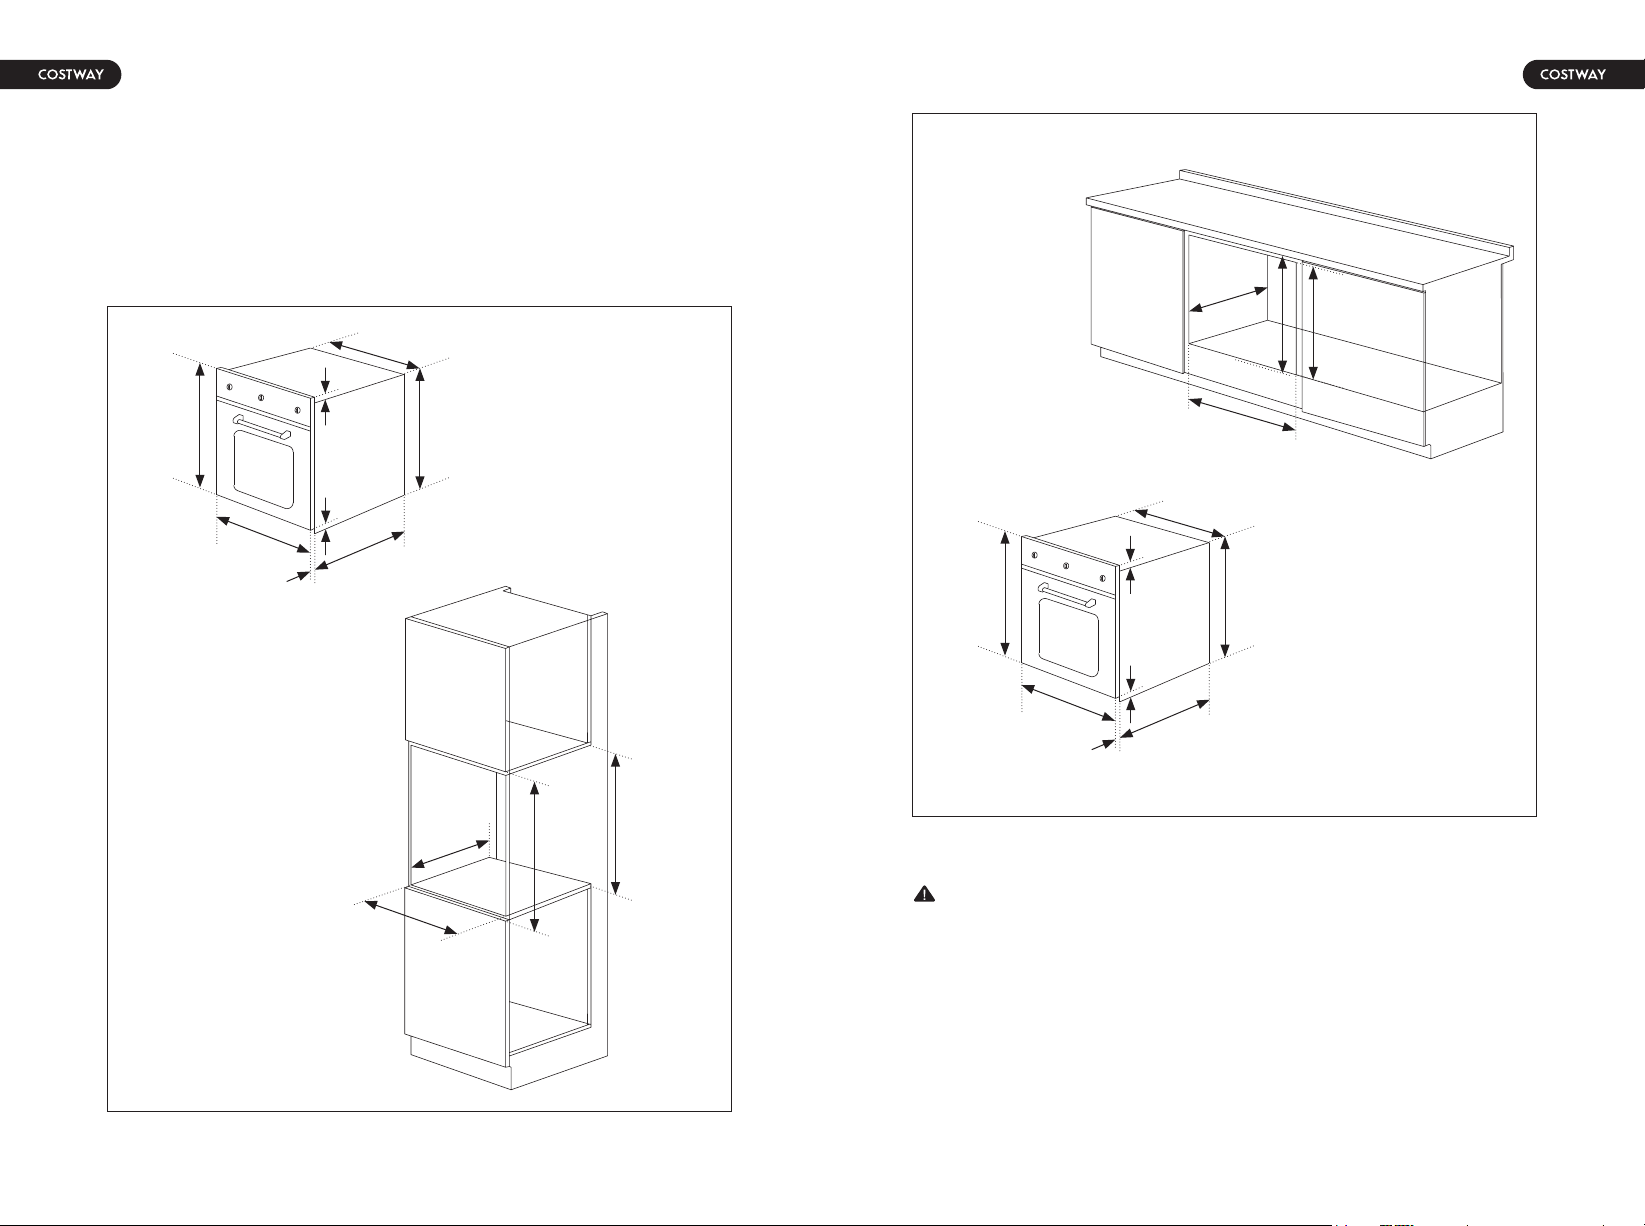
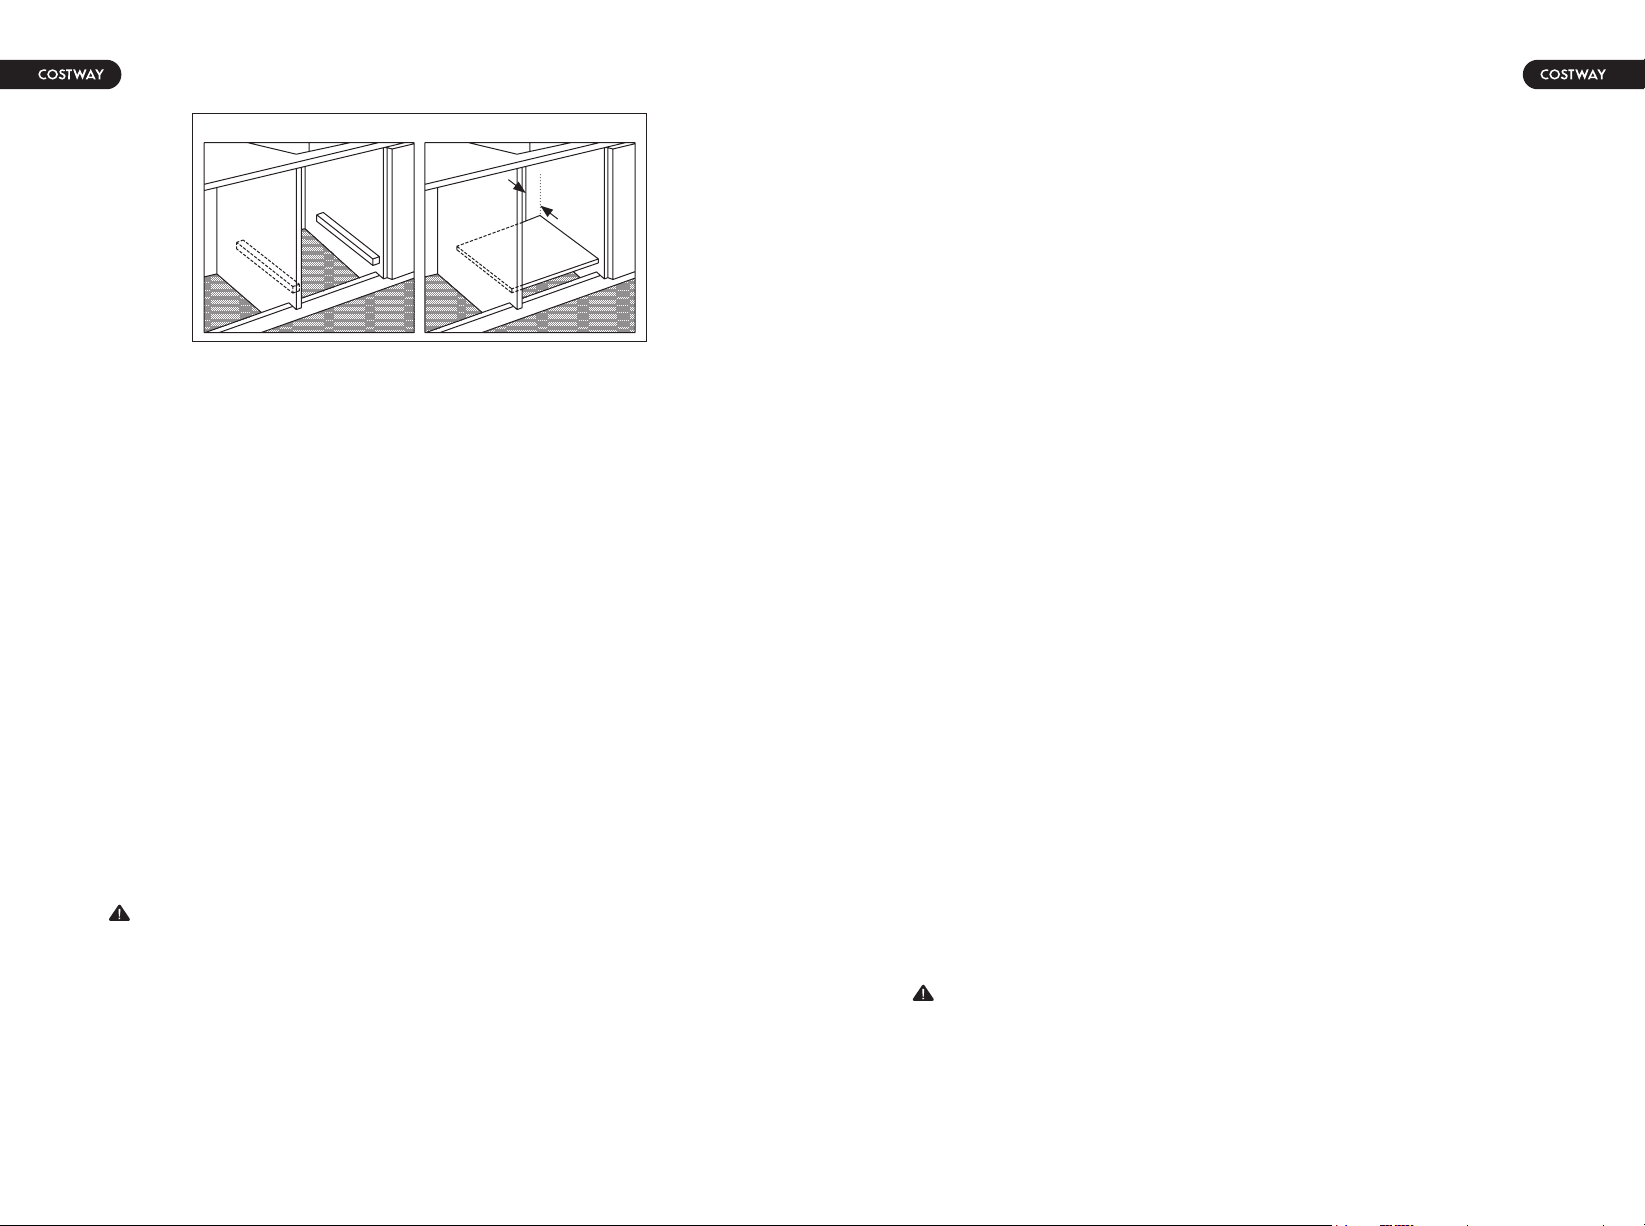
PROPER INSTALLATION AND MAINTENANCE
WARNING:
To reduce the risk of personal injury in the event of a grease
fire, observe the following.
04 05

• DO NOT touch heating elements or interior surfaces of oven.
Heating elements may be hot even though they are dark in color.
Interior surfaces of an oven become hot enough to cause burns.
During and after use, DO NOT touch, or let clothing, potholders, or
other flammable materials contact heating elements or interior
surfaces of oven until they have had sufficient time to cool. Other
surfaces of the appliance may become hot enough to cause burns.
Among these surfaces are oven vent openings, surfaces near
these openings and oven doors.
• Exercise caution when opening the appliance. Standing to the
side, open the door slowly and slightly to let hot air and/or steam
escape.
Keep your face clear of the opening and make sure there are no
children or pets near the unit. After the release of hot air and/or
steam, proceed with your cooking. Keep doors shut unless
necessary for cooking or cleaning purposes. DO NOT leave open
doors unattended.
• DO NOT heat or warm unopened food containers. Build-up of
pressure may cause the container to burst and cause injury.
• ALWAYS place oven racks in desired location while oven is cool.
If a rack must be moved while oven is hot, DO NOT let potholder
contact the heating elements.
• ALWAYS use dry potholders. Moist or damp potholders on hot
surfaces may result in burns from steam. DO NOT let potholder
touch hot heating elements. DO NOT use a towel or other bulky
cloth.
• Secure all loose garments before beginning. Tie long hair so that
it does not hang loose, and DO NOT wear loose fitting clothing or
hanging garments, such as ties, scarves, jewelry, or dangling
sleeves.
BURN PREVENTION
• When children become old enough to use the appliance, it is the
legal responsibility of the parents or legal guardians to ensure that
they are instructed in safe operation of the appliance by qualified
persons.
• DO NOT allow anyone to climb, stand, lean, sit, or hang on any
part of the appliance, especially a door, warming drawer or storage
drawer. This can damage the appliance, and the unit may tip over,
potentially causing severe injury.
• DO NOT allow children to use this appliance unless closely
supervised by an adult. Children and pets should not be left alone
or unattended in the area where the appliance is in use. They
should NEVER be allowed to play in its vicinity, whether or not the
appliance is in use.
• Items of interest to children should NOT be stored in an appliance,
in cabinets above an appliance or on the backsplash. Children
climbing on an appliance to reach items could be potentially cause
serious injury.
CHILD SAFETY
SAVE THESE INSTRUCTIONS
FOR FUTURE REFERENCE
06 07

a. Control Panel b. Cooling Vents c. Oven Interior Light
d. Top Central Heating Element e. Rack Position Guide
f. Convection Fan and Heating Element g. Oven Door
h. Door Handle i. Oven Rack j. Broiler Pan
k. Broiler Pan Rack
23.4”
(594mm) 23.8”(604mm)
with handle
23.4”
(594mm)
Figure 1
SPECIFICATIONS
Width
Height
Depth
Weight
Power Supply
Net / Usable Capacity
Gross / Total Capacity
Rated Power
23.4” (594 mm)
23.4” (594 mm)
23.8” (604 mm)
71 lbs. (32 kg)
240 V / 60 Hz
2.19 Cu. Ft.
2.47 Cu. Ft.
2300 W
PRECAUTIONS
PRODUCT PARTS & ACCESSORIES
i
j
k
c
b
e
g
a
f
h
d
Figure 1
WARNING:
Only a qualified service personnel in compliance with the
instructions provided must install the appliance. The manufacturer
declines all responsibility for improper installation, which may
harm persons and animals and damage property.
INSTALLATION INSTRUCTIONS
08 09

IMPORTANT:
Installation must be in compliance with the consumption
declaration. In order to ensure adequate ventilation, the back
panel of the cabinet unit must be removed. When installing the
oven, it is better to have it rest on two wooden strips. If the oven
rests on a continuous, flat surface, there must be an aperture of at
least 1 ¾” x 22” (45 x 560mm). (Refer to Figure 4.)
In order to ensure that the built-in appliance functions properly, the
cabinet containing it must be appropriate. The figures below and
the next page give the dimensions of the cut-out for installation in
a wall cabinet unit or under the counter. (Refer to Figure 2 and 3.)
LOCATION REQUIREMENTS
0.9" (23 mm)
23.4” (594 mm) 21.6”
(548mm)
21.1” (537 mm)
22.3”
(567.5 mm)
1.0”
(24 mm)
23.4”
(594mm)
0.4”
(10 mm)
22.0”
(558 mm)
22.5" - 23.0”
(575 mm
- 585 mm)
23.8”
(604mm)
22.5”
(570 mm)
Figure 2
Installation in a
Wall Cabinet Unit
Installation Under
the Counter
Figure 3
22.5”
(570 mm)
22.5" - 23.0”
(575 mm
- 585 mm)
23.8”
(604mm)
22.0”
(558 mm)
0.9" (23 mm)
23.4” (594 mm) 21.6”
(548mm)
21.1” (537 mm)
22.3”
(567.5 mm)
1.0”
(24 mm)
23.4”
(594mm)
0.4”
(10 mm)
10 11

• The panels of the adjacent cabinets must be made of
heat-resistant material. In particular, cabinets with a veneer
exterior must be assembled with glues which can withstand
temperatures of up to 212°F/100°C.
• In compliance with current safety standards, contact with the
electrical parts of the oven must not be possible once it has been
installed.
• All parts, which ensure the safe operation of the appliance, must
be removable only with the aid of a tool.
• To fasten the oven to the cabinet, open the door of the oven and
attach it by inserting the 4 wooden screws into the 4 holes located
on the perimeter of the frame.
ELECTRICAL INSTALLATION
1.8”
(45 mm)
Figure 2
WARNING: Electrical Shock Hazard
DO NOT use an extension cord.
• Failure to follow these instructions can result in death, fire, or
electrical shock.
• Any additions, changes or conversions required in order for this
appliance to satisfactorily meet the application needs must be
ELECTRICAL REQUIREMENTS
made by a qualified service personnel in accordance with the
manufacturer’s instructions and all codes and requirements of the
authority having jurisdiction. Failure to follow the instructions could
result in serious injury or property damage. The qualified service
personnel performing this work assumes responsibility for the
conversion.
• This appliance needs to be installed directly to the main (without
a plug). To do so, follow instructions in the “Three-Wire
Connection” section . If you wish to install this appliance directly to
the main (without a plug), it must be installed by a qualified service
personnel.
• DO NOT operate this appliance using a 2-prong adapter or an
extension cord. If a 2-prong wall receptacle is the only available
outlet, it is the personal responsibility of the consumer to have it
replaced with a properly grounded 3-prong or 4-prong wall
receptacle installed by a qualified service personnel. Severe shock
or damage to the range may occur if the range is not installed by a
qualified service personnel.
• This appliance features a pilotless electric ignition for energy
savings and reliability. It operates on a 208-240V/50-60Hz 12-15
Amp power supply.
• A separate circuit, protected by a 15 amp time delay fuse or
circuit breaker, is required.
• For personal safety, the appliance must be properly grounded.
WARNING:
It is the responsibility and obligation of the consumer to contact a
qualified service personnel to ensure the electrical installation is
adequate and conformance with all local codes and ordinances.
12 13

Refer to Figure 5. Where local codes allow the connection of
green ground wire from the oven to the branch circuit white neutral
wire (gray or white colored wire):
• If local codes permit, connect the green ground wire from the
oven to the branch circuit neutral wire (gray or white colored wire).
• Connect the red and black leads from the oven to the
corresponding leads in the junction box.
3-WIRE BRANCH CIRCUIT
Refer to Figure B:
• Disconnect ground from neutral at free end of conduit.
• Connect the green ground wire from the oven to the ground wire
in the junction box (bare or green colored wire).
• Connect the red and black leads from the oven to the
corresponding leads in the junction box.
4-WIRE BRANCH CIRCUIT
suitable conduit box (not furnished).
An appropriately sized, U-listed
conduit connector must be used to
correctly attach the 4-WIRE
BRANCH CIRCUIT Refer to Figure
B: conduit to the junction box.
IMPORTANT:
The power supply to the appliance must be cut off before any
adjustments or maintenance work is done on it. Air duct is
supposed to use in ventilation.
This oven is dual rated, designed to be connected to either
208/240V AC, 60Hz, 3-wire, two-phase power supply.
The electrical supply should be 3-wire two-phase AC. Install a
CIRCUIT REQUIRED
208V, 60Hz
12 AMP
240V,60Hz
15 AMP
Figure 5
Grounded Neutral
Cable from Power Supply
Red Wires
White or Gray Wire
Green Wire Cable from Oven UL Listed Conduit
Connector
Black Wires
junction box
Figure 6
Ungrounded Neutral
Cable from Power Supply
Red Wires
Bare or
Green Wire Cable from Oven UL Listed Conduit
Connector
Black Wires
White Wire
Junction box
14 15

This multi-function oven combines the advantages of traditional
convection ovens with those of the more modern fan assisted
models in a single appliance. It is an extremely versatile appliance
that allows you to choose easily and safely between different
cooking modes.
BEFORE USE
IMPORTANT:
The first time you use your appliance, we recommend that set the
thermostat to the highest setting and leave the oven on for about
half an hour with nothing in it, with the oven door shut. Then open
the oven door and let the room air in. The odor that is often
detected during this initial use is due to the evaporation of
substances used to protect the oven during storage and until it is
installed.
IMPORTANT:
Place the dripping pan provided on the bottom shelf of the oven to
prevent any sauce and/or grease from dripping onto the bottom of
the oven only when grilling food.
• For all other types of cooking, NEVER use the bottom shelf and
NEVER place anything on the bottom of the oven when it is in
operation because this could damage the enamel.
• ALWAYS place your cookware (dishes, aluminum foil, etc.) on the
grid provided with the appliance inserted especially along the oven
guides.
OPERATION INSTRUCTIONS
COOKING MODES
250
150
200
300
350
400
MAX
450
120
110
100
90 70
60
50
40
30
20
10
80
Oven Function
Selector Knob
Time Adjust
Knob
Temp Adjust
Knob
Oven Light: Turns the oven light on when selected
Broil: Best for melting cheese, toasting and browning. For
optimal results, use in conjunction with the Broil
temperature setting.
Convection Cooking: Utilizes the powerful heating
element surrounding the fan to evenly distribute heat
throughout the oven. This is great for multi-shelf cooking
because the fan ensures each rack is heated.
Fan Grill: Utilizes a high heat grilling element and fan to
circulate hot air throughout the oven Ideal for cooking large
cuts of meats so that they are moist inside and crisp on the
outside Use a thermometer to check the internal
temperature. It is recommended to set the temperature no
higher than 400°F/204.5°C.
16 17

1. Position the temperature knob between 150°F/65.5°C and
Max/Broil.
2. The top central heating element will come on.
PRACTICAL COOKING ADVICE
To use the timer, the buzzer must be wound up by turning the knob
one full turn clockwise, then turn it back to the desired time so that
the minutes on the knob match the reference mark on the panel.
The minute minder can be used independently of an oven cooking
function for a time period of up to 120 minutes. To set the timer,
turn the knob fully clockwise until it stops and then turns it back
anticlockwise to the required time. The time period that has been
set will expire when the control knob reaches zero, a brief audible
signal will sound.
Important: If you have the oven or grill in use whilst the timer is
counting down. When the countdown ends, the oven will continue
to heat. You must turn off the oven/grill using the oven function
and temperature control knob. If you have the oven or grill in use
whilst the timer is counting down. When the countdown ends, the
oven or grill will stop to work, another will continue to heat. You
must turn off the oven/grill using the oven function and
temperature control knob.
TIMER
Defrost: Circulates air at room temperature to defrost food
For foods such as meat, fish, and bread, Convection
Cooking Mode, set between 175°F~225°F/79.5°C~107°C,
can be used to accelerate the Defrosting process.
Broil
1. Position the temperature knob between 150°F/65.5°C and
400°F/204.5°C.
2. The top central heating element and fan will come on.
3. This combination of features increases the effectiveness of the
unidirectional thermal radiation of the heating element through
forced circulation of the air throughout the oven.
4. This helps prevent food from burning on the surface, allowing
the heat to penetrate right into the food.
5. Excellent results are achieved with kebabs made with meats
and vegetables, sausages, ribs lamb chops, chicken in a spicy
sauce, quail, and pork chops.
6. The "Fan Grill" mode is also ideal for cooking fish steaks like
swordfish and stuffed cuttlefish.
Fan Grill
1. Position temperature knob between 150°F/65.5°C and 475°F/
246°C.
2. The rear heating element and fan will come on, guaranteeing
delicate heat distributed uniformly throughout the oven.
Convection Cooking
3. The extremely high and direct temperature of the heating
element makes it possible to brown the surface of meats and
roasts while locking the juices in to keep them tender.
4. The "Broil" mode is also highly recommended for dishes that
require a high temperature on the surface like beef steaks, veal,
rib steak, filets, and hamburgers.
18 19

NOTE: When cooking is done, the fan stays on until the oven
cools down sufficiently.
1. Position the temperature knob to any temperature.
2. The fan in the oven will circulate the air at room temperature
around the food.
3. This is recommended for defrosting of any type of food, but in
particular for delicate types of food which do not require heat, such
as ice cream cakes, cream or custard desserts, and fruitcakes.
4. By using the fan, the defrosting time is approximately halved. In
case of meat, fish and bread, it is possible to accelerate the
process using the “Convection Cooking” and setting the
temperature between 175°F/225°F and 79.5°C/107°C.
Defrost
In order to cool down the exterior of the appliance, this model is
equipped with a cooling fan, which comes on automatically when
the oven is hot. When the fan is on, a normal flow of air can be
heard exiting between the oven door and the control panel.
Cooling Ventilation
3. The "Convection Cooking" mode is also ideal for baking and
cooking delicate foods, especially cakes that need to rise and for
the preparation of certain tartlets on 3 shelves at the same time.
Here are a few examples: cream puffs, sweet and savory biscuits,
savory puffs, Swiss rolls and small portions of vegetables au
gratin.
WARNING:
To avoid the risk of electric shock, ALWAYS ensure the appliance
is turned off and completely cool before cleaning or doing any sort
of maintenance.
NOTE: ALWAYS follow label instructions on cleaning products.
CAUTION
• To avoid possible burns, use care when cleaning the appliance.
• DO NOT attempt to clean the appliance whenever the oven or
burner heads are still hot.
• To avoid possible burns, DO NOT attempt any of the following
cleaning instructions before turning off all of the surface burners
and allowing them to cool.
CLEANING
• For general cleaning, use hot, soapy water and a cloth.
• For more difficult soils and built-up grease, apply a liquid
detergent directly onto the soil. Rinse with a damp cloth and dry.
• DO NOT use steel wool or acidic cleaners on the knobs as they
can scratch.
Control Knobs
• Clean stainless steel with hot, soapy water and a dishcloth.
Rinse with clean water and a cloth.
Stainless Steel Exterior
CARE AND MAINTENANCE
20 21

• Clean the glass door using non-abrasive products or sponges
and dry it with a soft cloth.
• Use glass cleaner. Apply glass cleaner to soft cloth or sponge,
not directly on panel.
Glass Door Exterior
• This appliance DOES NOT have a self-cleaning feature.
• Use an appropriate cleaning product designed specifically to
clean the inside of ovens.
• The soap should be rinsed away and the interior dried
thoroughly.
• Avoid using abrasive detergents (for example cleaning powders,
etc) and abrasive sponges for dishes or acids (such as lime scale
– remover, etc) as these could damage the enamel.
• If the grease spots and dirt are particularly tough to remove, use
a special product for oven cleaning, following the instructions
provided on the packet.
• NEVER use a steam cleaner for cleaning inside of oven.
• If you use your oven for an extended period of time,
condensation may form. Dry it using a soft cloth.
• There is a rubber seal surrounding the oven opening which
Oven Interior
• DO NOT use cleaners with high concentrations of chlorides or
chlorines. DO NOT use harsh scrubbing cleaners. Only use
kitchen cleaners that are especially made for cleaning stainless
steel.
NOTE: ALWAYS follow label instructions on cleaning products.
WARNING:
• Make sure oven is cool and power to the oven has been turned
off REPLACING OVEN INTERIOR LIGHT before removing the
door. Failure to do so could result in electrical shock or burns.
• The oven door is heavy and fragile. Use both hands to remove
the oven door. The door front is glass. Handle carefully to avoid
breaking.
Removing Oven Door
• To remove the element, support one side with your hand while
removing the retainer with the other.
• When cleaning, make sure not to apply excessive force on the
element as it is fragile.
• Reposition the element and secure the retainer back in place.
• DO NOT use the oven with the grill element hanging down – it
must be repositioned after cleaning.
Interior Lower Grill Element
guarantees its perfect functioning. Check the condition of this seal
on a regular basis. If necessary, clean it and avoid using abrasive
products or objects to do so. It is recommend to avoid using the
oven until it has been repaired.
• NEVER line the oven bottom with aluminum foil, as the
consequent accumulation of heat could compromise the cooking
and even damage the enamel.
22 23

NOTE: If the door does not come
away from oven easily, DO NOT
force it.
• Grasp only the sides of the oven door. DO NOT grasp the handle
as it may swing in your hand and cause damage or injury.
• Failure to grasp the oven door firmly and properly could result is
personal injury or product damage.
• To avoid injury from hinge bracket snapping closed, be sure that
both levers are securely in place before removing the door. Also,
DO NOT force door open or closed. The hinge could be damaged
and injury could result.
Follow these instructions:
1. Open the door fully. (Refer to Figure 7.)
2. Lift up and push the small levers located on the two hinges all
the way back. (Refer to Figure 8.)
3. While holding the door on each side, shut the door until it
touches the levers. Then continue closing the door until it is about
4 inches (10cm) from being fully closed.
4. Pull the door towards you, pulling it out of its seat. The door will
gently come away from the oven. (Refer to Figure 9.)
5. To replace
the door,
perform the
reverse of the
above
procedure.
Figure 7 Figure 8
Figure 9
WARNING: Electrical Shock Hazard
Failure to follow these instructions can result in death, fire, or
electrical shock.
1. Disconnect the oven from the power supply by means of the
omni-polar switch used to connect the appliance to the electrical
mains, or unplug the appliance if the plug is accessible.
2. Remove the glass cover of the light bulb holder turning
counter-clockwise. (Refer to Figure 10.)
3. Replace the old light bulb with a new oven-safe light bulb with
the following characteristics:
• Voltage: 208-240V
• Wattage: 25W
• Type: E14
4. Put the glass cover back
and reconnect the oven to
the main power supply.
REPLACING OVEN INTERIOR LIGHT
WARNING: Electrical Shock Hazard
Failure to follow these instructions can result in death, fire, or
electrical shock.
1. Before moving your oven, or
performing maintenance,
disconnect it from the power
supply.
TRANSPORTING
Figure 10
Figure 11
24 25

2. To avoid damage to the oven vent, use transpotation that is
wide enough to hold the entire bottom of the unit. (Refer to Figure
11.)
TROUBLESHOOTING
Will not
operate or
turn on.
No power
Household fuse is
blown or circuit
breaker is tripped.
Verify that the electrical wires
are connected to the mains
properly. Refer to “Electrical
Installation” section.
Replace the fuse or reset the
circuit breaker.
Oven will not
operate.
Cooling fan
runs during
baking and
broiling.
Oven controls are
set incorrectly.
No problem
Make sure the oven is on and
set on the correct cooking
mode.
It is normal for the fan to
automatically run while the
oven is in use and for some
time after to cool.
Oven
temperature
too high or too
low.
Oven was not
preheated.
Allow the oven to preheat so it
is at the proper temperature
when your food goes in.
Racks are
positioned incor-
rectly.
Try changing the rack position.
Batter is not evenly
distributed.
Check that the batter is level
in the pan.
Problem Possible Causes Solutions
Improper cook time
was being used.
Oven door was
opened while
cooking.
Adjust the cook time.
Oven peeking releases oven
heat and can result in longer
cook times.
Baked items
are too brown
on the bottom.
Pie crust
edges are
browning
early.
Oven rack is placed
too low.
Temperature is too
hot.
Move rack to a higher position
in the oven.
Use aluminum foil to cover the
edge of the crust and/or
reduce baking temperature.
Oven light
does not
work.
Oven makes
clicking noise.
Display
flashes.
Light bulb is loose
or defective.
Tighten or replace the bulb.
Switch operating
light is broken.
Contact a qualified technician.
No problem This is the sound of the
heating element turning on
and off and is normal.
Power outage or
surge
Reset the clock. If the oven
was in use, reset it.
Oven
temperature
too high or too
low.
26 27

AVERTISSEMENT
Dangers ou pratiques dangereuses qui POURRAIENT entraîner
des blessures corporelles graves ou la mort.
AVERTISSEMENT:
Lorsqu'il est correctement entretenu, votre four mural a été conçu
pour être sûr et fiable. Lisez attentivement toutes les instructions
avant utilisation. Ces précautions réduiront le risque de brûlures,
d'électrocution, d'incendie et de blessures. Lors de l'utilisation de
cet appareil de cuisine, des précautions de sécurité de base
doivent être suivies ; y compris ceux des pages suivantes.
ATTENTION
Dangers ou pratiques dangereuses qui POURRAIENT entraîner
des blessures corporelles mineures.
AVERTISSEMENT:
Lisez et comprenez toutes les précautions de sécurité. Le
non-respect de toutes les instructions décrites dans ce manuel
d'utilisation peut entraîner un choc électrique, un incendie et/ou
des blessures corporelles graves. Les avertissements, attentions
et instructions abordés dans ce manuel d'utilisation ne peuvent
pas couvrir toutes les conditions et situations possibles qui
peuvent se produire.
PRÉCAUTIONS
INSTRUCTIONS DE SÉCURITÉ
IMPORTANTES
EXPLICATION DES SYMBOLES
FR
IMPORTANT:
Conservez ce manuel pour l'usage des inspecteurs électriques
locaux.
• Demandez à l'installateur de vous indiquer l'emplacement du
disjoncteur ou du fusible. Marquez-le pour une référence facile.
• Assurez-vous que votre appareil est correctement installé et mis
à la terre par un personnel de service qualifié. Connectez
uniquement à une prise correctement mise à la terre.
• Cet appareil est destiné à un usage domestique familial normal
uniquement. Il n'est pas homologué pour une utilisation en
extérieur. Si vous avez des questions, demandez de l'aide à un
technicien qualifié.
• NE PAS entreposer ni utiliser de produits chimiques corrosifs, de
vapeurs, de produits inflammables ou de produits non alimentaires
dans ou à proximité de cet appareil. Il est spécialement conçu
pour être utilisé lors du chauffage ou de la cuisson des aliments.
L'utilisation de produits chimiques corrosifs pour le chauffage ou le
nettoyage endommagera l'appareil et pourrait entraîner des
blessures.
• NE PAS utiliser cet appareil s'il ne fonctionne pas correctement
ou s'il a été endommagé. Contactez un personnel de service
qualifié.
• NE PAS obstruer les évents du four.
• NE PAS réparer ou remplacer une pièce de l'appareil, sauf si
cela est spécifiquement recommandé dans ce manuel. Confiez
tout entretien de cet appareil à un personnel de service qualifié.
INSTALLATION ET ENTRETIEN CORRECTS
28 29

• Étouffez les flammes avec un couvercle hermétique, une plaque
à biscuits ou un plateau en métal, puis éteignez le brûleur. Faites
preuve de prudence pour éviter les brûlures. Si les flammes ne
s'éteignent pas immédiatement, évacuez et appelez les pompiers.
• NE PAS utiliser de papier d'aluminium ou de doublures de
protection pour tapisser toute partie de l'appareil, en particulier le
fond du four.
L'installation de ces revêtements peut entraîner un risque
d'électrocution ou d'incendie.
• Si des matériaux à l'intérieur d'un four s'enflamment, gardez la
porte fermée. Éteignez l'appareil et débranchez le circuit au
niveau du boîtier du disjoncteur.
• Utilisez cet appareil uniquement aux fins pour lesquelles il a été
conçu, tel que décrit dans ce manuel. Par exemple, NE JAMAIS
utiliser l'appareil pour réchauffer ou chauffer la pièce. NE JAMAIS
utiliser l'appareil pour le stockage.
• Ayez TOUJOURS un détecteur de fumée fonctionnel près de la
cuisine.
• Si des vêtements personnels ou des cheveux prennent feu,
laissez-les tomber et roulez-les immédiatement pour éteindre les
flammes. Étouffez les flammes des feux d'aliments autres que les
feux de graisse avec du bicarbonate de soude.
• Ayez à disposition un extincteur approprié, à proximité, bien
visible et facilement accessible près du four.
SÉCURITÉ INCENDIE
IMPORTANT:
Pour réduire le risque de blessure en cas d'incendie de graisse,
respectez les consignes suivantes.
• NE JAMAIS ramasser une casserole enflammée. Vous pourriez
être brûlé.
• NE PAS utiliser d'eau sur les feux de graisse.
• Étouffer le feu ou la flamme. Ou utilisez des extincteurs à poudre
ou à mousse.
• Utilisez un extincteur UNIQUEMENT si:
1) Vous savez que vous avez un extincteur de classe ABC et vous
savez déjà comment le faire fonctionner.
2) Le feu est petit et contenu dans la zone où il s'est déclaré.
3) Les pompiers sont appelés.
4) Vous pouvez combattre le feu avec votre dos à une sortie.
• NE PAS toucher les éléments chauffants ou les surfaces
intérieures du four. Les éléments chauffants peuvent être chauds
même s'ils sont de couleur foncée. Les surfaces intérieures d'un
four deviennent suffisamment chaudes pour provoquer des
brûlures. Pendant et après l'utilisation, NE PAS toucher ou laisser
les vêtements, les maniques ou d'autres matériaux inflammables
entrer en contact avec les éléments chauffants ou les surfaces
intérieures du four jusqu'à ce qu'ils aient eu suffisamment de
temps pour refroidir. D'autres surfaces de l'appareil peuvent
devenir suffisamment chaudes pour provoquer des brûlures. Parmi
ces surfaces figurent les ouvertures de ventilation du four, les
surfaces proches de ces ouvertures et les portes du four.
• Soyez prudent lors de l'ouverture de l'appareil. Debout sur le
côté, ouvrez lentement et légèrement la porte pour laisser
s'échapper l'air chaud et/ou la vapeur. Gardez votre visage éloigné
de l'ouverture et assurez-vous qu'il n'y a pas d'enfants ou
d'animaux domestiques à proximité de l'appareil. Après le
dégagement d'air chaud et/ou de vapeur, poursuivez votre cuisson.
PRÉVENTION DES BRÛLURES
30 31

Gardez les portes fermées à moins que cela ne soit nécessaire à
des fins de cuisson ou de nettoyage. NE PAS laisser les portes
ouvertes sans surveillance.
• NE PAS chauffer ou réchauffer des récipients alimentaires non
ouverts. L'accumulation de pression peut faire éclater le récipient
et causer des blessures.
• Placez TOUJOURS les grilles du four à l'endroit désiré lorsque le
four est froid. Si une grille doit être déplacée alors que le four est
chaud, NE PAS laisser la manique entrer en contact avec les
éléments chauffants.
• Utilisez TOUJOURS des maniques sèches. Des maniques
humides ou mouillées sur des surfaces chaudes peuvent
provoquer des brûlures dues à la vapeur. NE PAS laisser la
manique toucher les éléments chauffants chauds. NE PAS utiliser
une serviette ou un autre tissu volumineux.
• Fixez tous les vêtements amples avant de commencer. Attachez
les cheveux longs afin qu'ils ne pendent pas et NE PAS porter de
vêtements amples ou de vêtements suspendus, tels que des
cravates, des foulards, des bijoux ou des manches pendantes.
• Lorsque les enfants deviennent assez grands pour utiliser
l'appareil, il est de la responsabilité légale des parents ou des
tuteurs légaux de s'assurer qu'ils sont formés à l'utilisation en toute
sécurité de l'appareil par des personnes qualifiées.
• NE PAS laisser personne grimper, se tenir debout, s'appuyer,
s'asseoir ou se suspendre à une partie quelconque de l'appareil,
en particulier une porte, un tiroir-réchaud ou un tiroir de
rangement. Cela peut endommager l'appareil et l'appareil peut
basculer, causant potentiellement des blessures graves.
SÉCURITÉ DES ENFANTS
• NE PAS permettre aux enfants d'utiliser cet appareil à moins
d'être étroitement surveillés par un adulte. Les enfants et les
animaux domestiques ne doivent pas être laissés seuls ou sans
surveillance dans la zone où l'appareil est utilisé. Ils ne doivent
JAMAIS être autorisés à jouer à proximité, que l'appareil soit utilisé
ou non.
• Les articles intéressants pour les enfants ne doivent PAS être
rangés dans un appareil, dans des armoires au-dessus d'un
appareil ou sur le dosseret. Les enfants grimpant sur un appareil
pour atteindre des objets pourraient potentiellement causer des
blessures graves.
CONSERVEZ CES INSTRUCTIONS
POUR RÉFÉRENCE ULTÉRIEURE
23.4”
(594mm) 23.8”(604mm)
Avec poignée
23.4”
(594mm)
Figure 1
SPÉCIFICATIONS
32 33

Largeur
Hauteur
Profondeur
Poids
Source de courant
Capacité nette/utilisable
Capacité brute/totale
Puissance nominale
594 mm (23.4’’)
594 mm (23.4’’)
604 mm (23.8’’)
32 kg (71 lbs)
240V/60Hz
62L (2.19 Cu.Ft.)
70L (2.47 Cu.Ft.)
2300W
a. Panneau de commande b. Évents de refroidissement
c. Éclairage intérieur du four d. Élément chauffant central
supérieur e. Guide de positionnement de grille
PIÈCES ET CARACTÉRISTIQUES
PIÈCES & ACCESSOIRES DU PRODUIT
i
j
k
c
b
e
g
a
f
h
d
Figure 1
Afin d'assurer le bon fonctionnement de l'appareil encastrable, le
meuble qui le contient doit être adapté.
Les figures ci-dessous et la page suivante donnent les dimensions
de la découpe pour une installation dans une armoire murale ou
sous le comptoir. (Reportez-vous aux figures 2 et 3.)
EXIGENCES D'EMPLACEMENT
f. Ventilateur de convection et élément chauffant
g. Porte de four h. Poignée de porte i. Grille de four
j. Lèchefrite k. Grille de lèchefrite
AVERTISSEMENT:
Seul un personnel de service qualifié conformément aux
instructions fournies doit installer l'appareil. Le fabricant décline
toute responsabilité en cas d'installation incorrecte pouvant
blesser des personnes et des animaux et endommager des biens.
INSTRUCTIONS D'INSTALLATION
0.9" (23 mm)
23.4” (594 mm) 21.6”
(548mm)
21.1” (537 mm)
22.3”
(567.5 mm)
1.0”
(24 mm)
23.4”
(594mm)
0.4”
(10 mm)
Figure 2
34 35

22.0”
(558 mm)
22.5" - 23.0”
(575 mm
- 585 mm)
23.8”
(604mm)
22.5”
(570 mm)
Figure 2
Installation dans une
Armoire Murale
Figure 3
22.5”
(570 mm)
22.5" - 23.0”
(575 mm
- 585 mm)
23.8”
(604mm)
22.0”
(558 mm)
1.8”
(45 mm)
Figure 2
IMPORTANT:
IL'installation doit être conforme à la déclaration de
consommation. Afin d'assurer une ventilation adéquate, le
panneau arrière de l'appareil en armoire doit être retiré.
Lors de l'installation du four, il est préférable de le faire reposer
sur deux lattes de bois. Si le four repose sur une surface continue
et plane, il doit y avoir une ouverture d'au moins 1 ¾" x 22" (45 x
560 mm). (Reportez-vous à la figure 4.)
Installation sous le
Comptoir
0.9" (23 mm)
23.4” (594 mm) 21.6”
(548mm)
21.1” (537 mm)
22.3”
(567.5 mm)
1.0”
(24 mm)
23.4”
(594mm)
0.4”
(10 mm)
36 37

• Les panneaux des armoires adjacentes doivent être en matériau
résistant à la chaleur. En particulier, les armoires avec un
extérieur en placage doivent être assemblées avec des colles
pouvant supporter des températures allant jusqu'à 100°C/212°F.
• Conformément aux normes de sécurité en vigueur, le contact
avec les parties électriques du four ne doit pas être possible une
fois celui-ci installé.
• Toutes les pièces qui assurent le fonctionnement sûr de l'appareil
ne doivent être démontables qu'à l'aide d'un outil.
• Pour fixer le four au meuble, ouvrez la porte du four et fixez-le en
insérant les 4 vis à bois dans les 4 trous situés sur le pourtour du
cadre.
AVERTISSEMENT: Risque de Choc Électrique
• NE PAS utiliser de rallonge.
• Le non-respect de ces instructions peut entraîner la mort, un
incendie ou un choc électrique.
• Tous les ajouts, modifications ou conversions nécessaires pour
que cet appareil réponde de manière satisfaisante aux besoins de
l'application doivent être effectués par un personnel de service
qualifié conformément aux instructions du fabricant et à tous les
codes et exigences de l'autorité compétente. Le non-respect des
instructions peut entraîner des blessures graves ou des
dommages matériels. Le personnel de service qualifié effectuant
ce travail assume la responsabilité de la conversion.
• Cet appareil doit être installé directement sur le secteur (sans
prise). Pour ce faire, suivez les instructions de la section
«Connexion à Trois Fils ». Si vous souhaitez installer cet appareil
EXIGENCES ÉLECTRIQUES
directement sur le secteur (sans prise), il doit être installé par un
personnel de service qualifié.
• NE PAS faire fonctionner cet appareil à l'aide d'un adaptateur à 2
broches ou d'une rallonge. Si une prise murale à 2 broches est la
seule prise disponible, il est de la responsabilité personnelle du
consommateur de la faire remplacer par une prise murale à 3 ou 4
broches correctement mise à la terre et installée par un personnel
de service qualifié. Des chocs graves ou des dommages à la
cuisinière peuvent survenir si la cuisinière n'est pas installée par
un personnel de service qualifié.
• Cet appareil est doté d'un allumage électrique sans veilleuse
pour des économies d'énergie et une grande fiabilité. Il fonctionne
sur une alimentation 208-240V/50-60Hz 12-15 Amp.
• Un circuit séparé, protégé par un fusible temporisé de 15
ampères ou un disjoncteur, est requis.
• Pour votre sécurité personnelle, l'appareil doit être correctement
mis à la terre.
IMPORTANT:
L'alimentation électrique de l'appareil doit être coupée avant toute
intervention de réglage ou d'entretien sur celui-ci. Le conduit d'air
est censé être utilisé dans la ventilation.
INSTALLATION ÉLECTRIQUE
AVERTISSEMENT:
Il est de la responsabilité et de l'obligation du consommateur de
contacter un personnel de service qualifié pour s'assurer que
l'installation électrique est adéquate et conforme à tous les codes
et ordonnances locaux.
38 39
Table of contents
Languages:
Other Costway Oven manuals