4
www.costway.com
5
www.costway.com
LOCATION
•Two people should be used when moving the
appliance.
•Remove interior and exterior packaging prior to
installation. Wipe the outside of the appliance
with a soft, dry cloth and the inside with a
lukewarm wet cloth.
•Place the appliance on a floor that is strong
enough to support it when it is fully loaded.
•Do not place the appliance in direct sunlight or
near sources of heat, such as a stove or heater,
as this can increase electrical consumption.
Extreme cold ambient temperatures may also
cause the appliance to perform improperly.
•Do not use the appliance near water, for
example in a wet basement or near a sink.
•This appliance is intended for household use
only. It is not designed for outside installation,
including anywhere that is not temperature
controlled (garages, porches, vehicles, etc.).
•Before connecting the appliance to a power
source, let it stand upright for approximately
6 hours. This will reduce the possibility of a
malfunction in the cooling system from handling
during transportation.
•This appliance is 44.9cm (17.6 inches) wide
by 67.6cm (26.6 inches) high by 47cm (18.5
inches) deep. Make sure that you leave the
minimum amount of space between the
appliance and all surrounding walls and vents.
•Allow 12.7 cm (5 inches) of space between the
back of the appliance and the wall. Allow 5
cm (2 inches) between the sides and top of the
appliance and any walls or counter tops.
•This appliance is intended for free-standing
installation only and is not intended to be
built into a cabinet or counter. Building in this
appliance can cause it to malfunction.
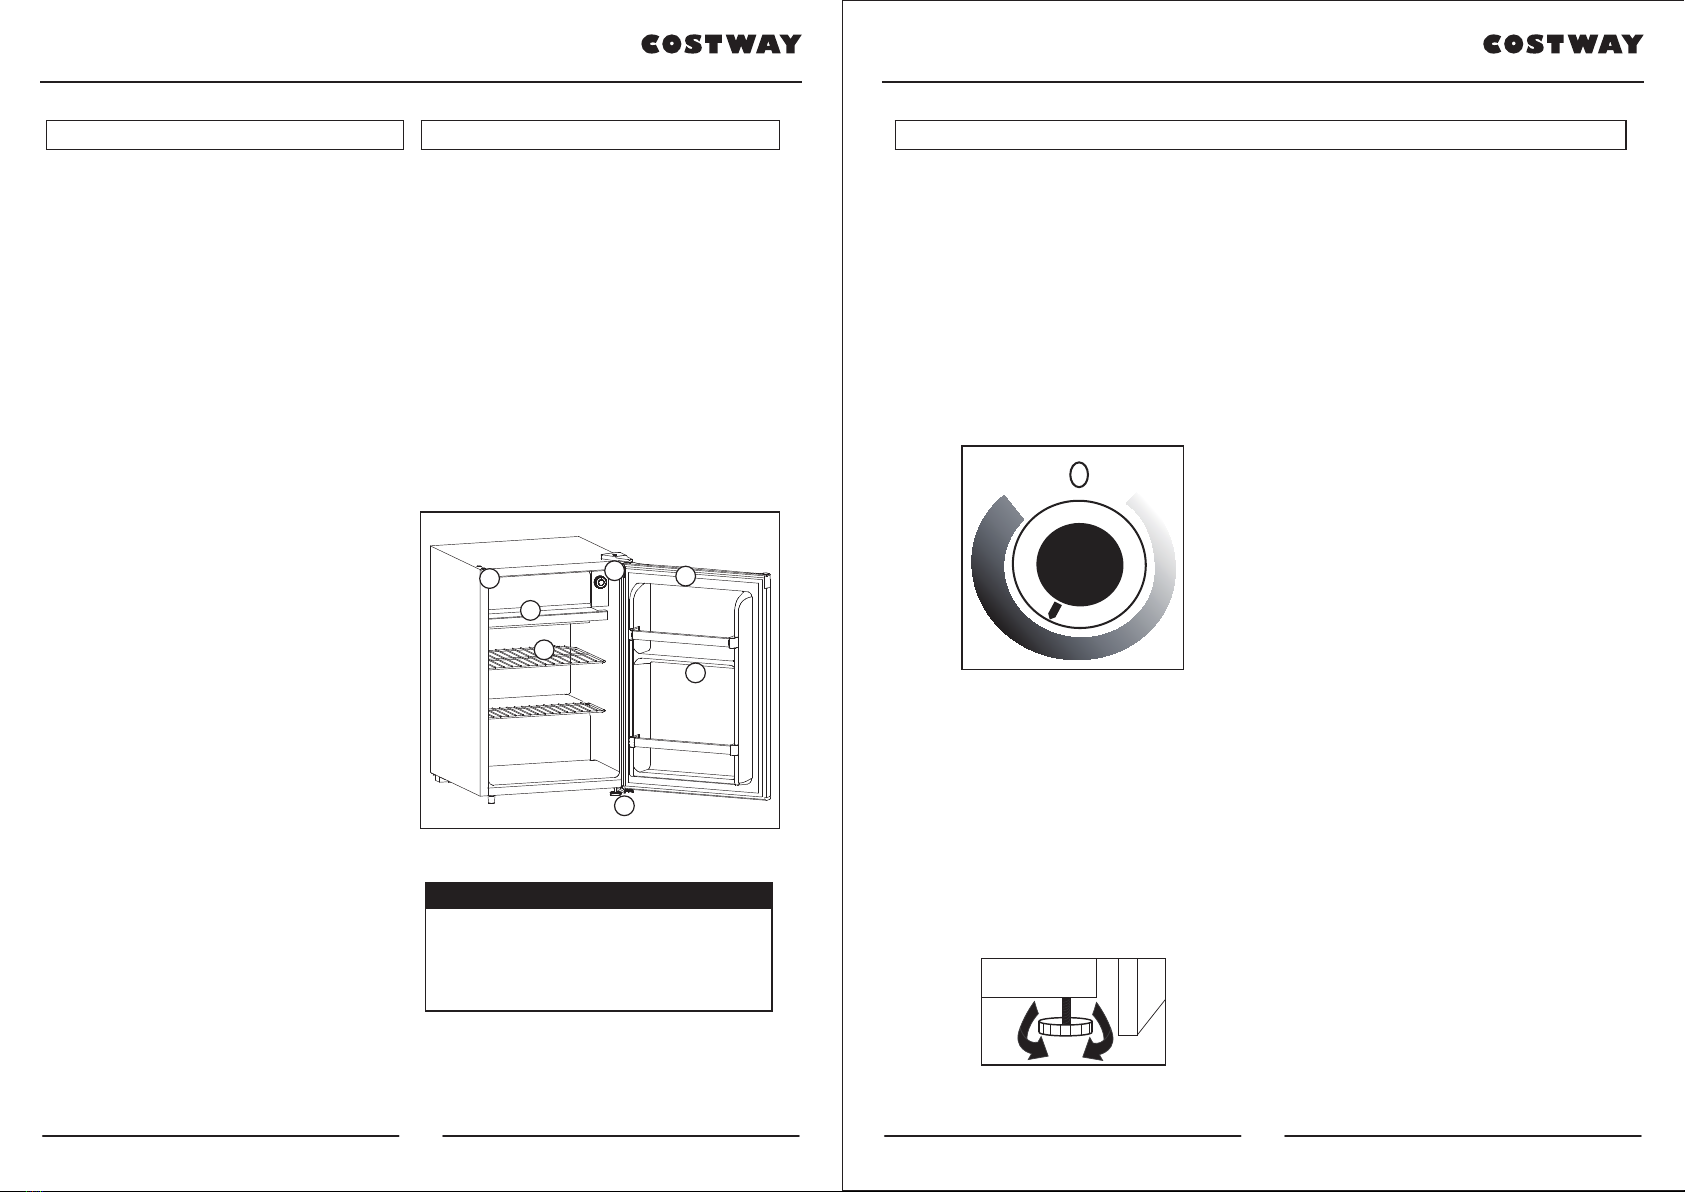
FEATURES
1. Freezer Compartment with Door
2. Thermostat Dial and Push Button Defrost
3. Drip Tray
4. Wire Shelves
5. Magnetic Gasket: Tight fitting door seal keeps
all the cooling power locked inside.
6. Bottle Rack: For tall, small and medium cans or jars.
7. Leveling Leg: Adjust so the unit is level.
INSTALLATION INSTRUCTIONS OPERATING INSTRUCTIONS
TEMPERATURE SELECTION
The temperature of the appliance can be adjusted
by turning the thermostat dial.
The thicker, darker part of the blue line is the
coldest setting.
The thinner, lighter part of the blue line is the
warmest setting.
The “O” position will turn off the cooling function.
Internal temperature of the appliance can vary
based on ambient temperature, the quantity of items
stored and how frequently the door is opened.
LEVELING INSTRUCTIONS
There is an adjustable leg on the bottom of the
appliance that can be turned up or down to ensure
that the appliance is level.
1. Turn the leveling leg counter-clockwise as far as
it will go, until the top of the foot is touching the
bottom of the cabinet.
2. Slowly turn the leveling leg clockwise until the
appliance is level.
OPERATING INSTRUCTIONS
DEFROSTING THE APPLIANCE
This refrigerator is equipped with a “Push Button”
defrost system. To activate the defrost cycle, push
the red defrost button located on the center of
the thermostat dial. The defrost cycle is initiated
immediately.
When defrosting is complete, the red button will
release and the refrigerator will resume normal
operating conditions.
Note: If the red defrost button is pressed
accidentally, it is not possible to manually deactivate
the defrost cycle. The defrost cycle must be allowed
to run its course.
Defrosting the refrigerator should take place
whenever ice build-up inside the freezer
compartment reaches 6 mm (1/4”) thick. Defrosting
may take a few hours, depending on the amount of
accumulated ice and ambient indoor temperature.
To speed up the defrosting process, remove all
frozen foods from the freezer section and leave the
door open for a short period of time.
Monitor the refrigerator closely during the defrosting
process to avoid water spilling and causing damage
to flooring or counter tops.
Important: Remember to close the refrigerator
door before the defrost cycle terminates and
normal operating conditions resume. The drip tray
should be in position directly below the freezer
compartment to catch condensed water during
defrosting.
Note: Never use sharp or pointed instruments to
remove ice from the freezer compartment. The
freezer compartment contains refrigerated gas
lines and if accidentally pierced it will render the
refrigerator inoperable and void the manufacturers
warranty. Do not allow the refrigerator to continue
operation if the freezer compartment is pierced.
12
3
4
5
6
7
IMPORTANT
Ensure that the door is fully closed when the
appliance is in operation. Failure to fully close
the door can lead to excessive condensation
and potential water damage to flooring under
the appliance. We will not be responsible for
damages from misuse.