County Materials Corporation Summit Stone Instruction sheet

3
Custom Outdoor Fireplace with
Optional Arch Modification
Note: When reviewing
installation guidelines, plan for
any modifications before starting
construction of fireplace.
Note: The outdoor fireplace kit shown is constructed with Summit Stone “B” (7-1/4” x 10-7/8”)
units. Other Summit Stone unit sizes can also be used. For added design flexibility, any of the
other five sizes of Summit Stone landscape units can be substituted. Refer to the Summit Stone
Fireplace Kit Material Calculation Worksheet for units required if using multiple sizes.
1
Summit Stone®
Tumbled Landscape Units
ww
ww
w
w
w.
w.
w
w.
co
co
co
co
o
unun
u
u
u
ty
ty
ma
ma
tete
ri
ri
ri
ri
ri
alal
s.s.
s.
s.
s.
co
co
co
c
c
m
©2015 County Materials Corporation
Summit Stone®
Standard Outdoor Fireplace
Installation Guidelines
4
(Est. Weight: 8000 lbs.)
The Summit Stone Standard
Outdoor Fireplace consists of
320 Summit Stone Units and the
following Package of Components:
1) (14) Summit Stone special cut units
(/ & /)
2) (2) Summit Stone special cut
lintel pad units (left and right)
3) (5) 6" Concrete Block and
(5) 3" Concrete Soaps for base
4) (75) 2 /" thick Fire Brick for the
firebox
5) (1) 10 lb. pail of Heat Stop II
refractory clay for adhering fire brick
6) (1) 47" x 3/"x 3/" steel lintel
31
5
4
6
22
The Summit Stone Standard Outdoor Fireplace
Package of Components Includes:
Note: Adhesive is sold separately. Approximately 10-12
tubes of adhesive will be used, depending on the quantity
applied per Summit Stone unit.
Summit Stone®Standard Outdoor Fireplace
2
Standard Outdoor Fireplace Installation Guidelines
Concrete Pad Preparation
Before beginning any outdoor fireplace project, make sure to check
with your local building inspector regarding open fire regulations in
your area.
It is recommended that any Summit Stone fireplace be installed on a 5"
thick concrete pad with rebar reinforcement and proper footings. The
pad should extend at least 6" beyond all sides of the proposed fireplace.
Note: The fireplace weighs approximately 8,000 lbs., including Summit
Stone units, steel lintel, firebrick and incidental block.
©2015 County Materials Corporation
St
an
da
rd
O
ut
do
or
F
ir
ep
la
ce
I
nsta
ll
at
io
n
Gu
id
el
in
es
Summit Stone®
Tumbled Landscape Units

7
6" (at least)
firebox area
front
back
base course 6" (at least)
6" (at least)
6" (at least)
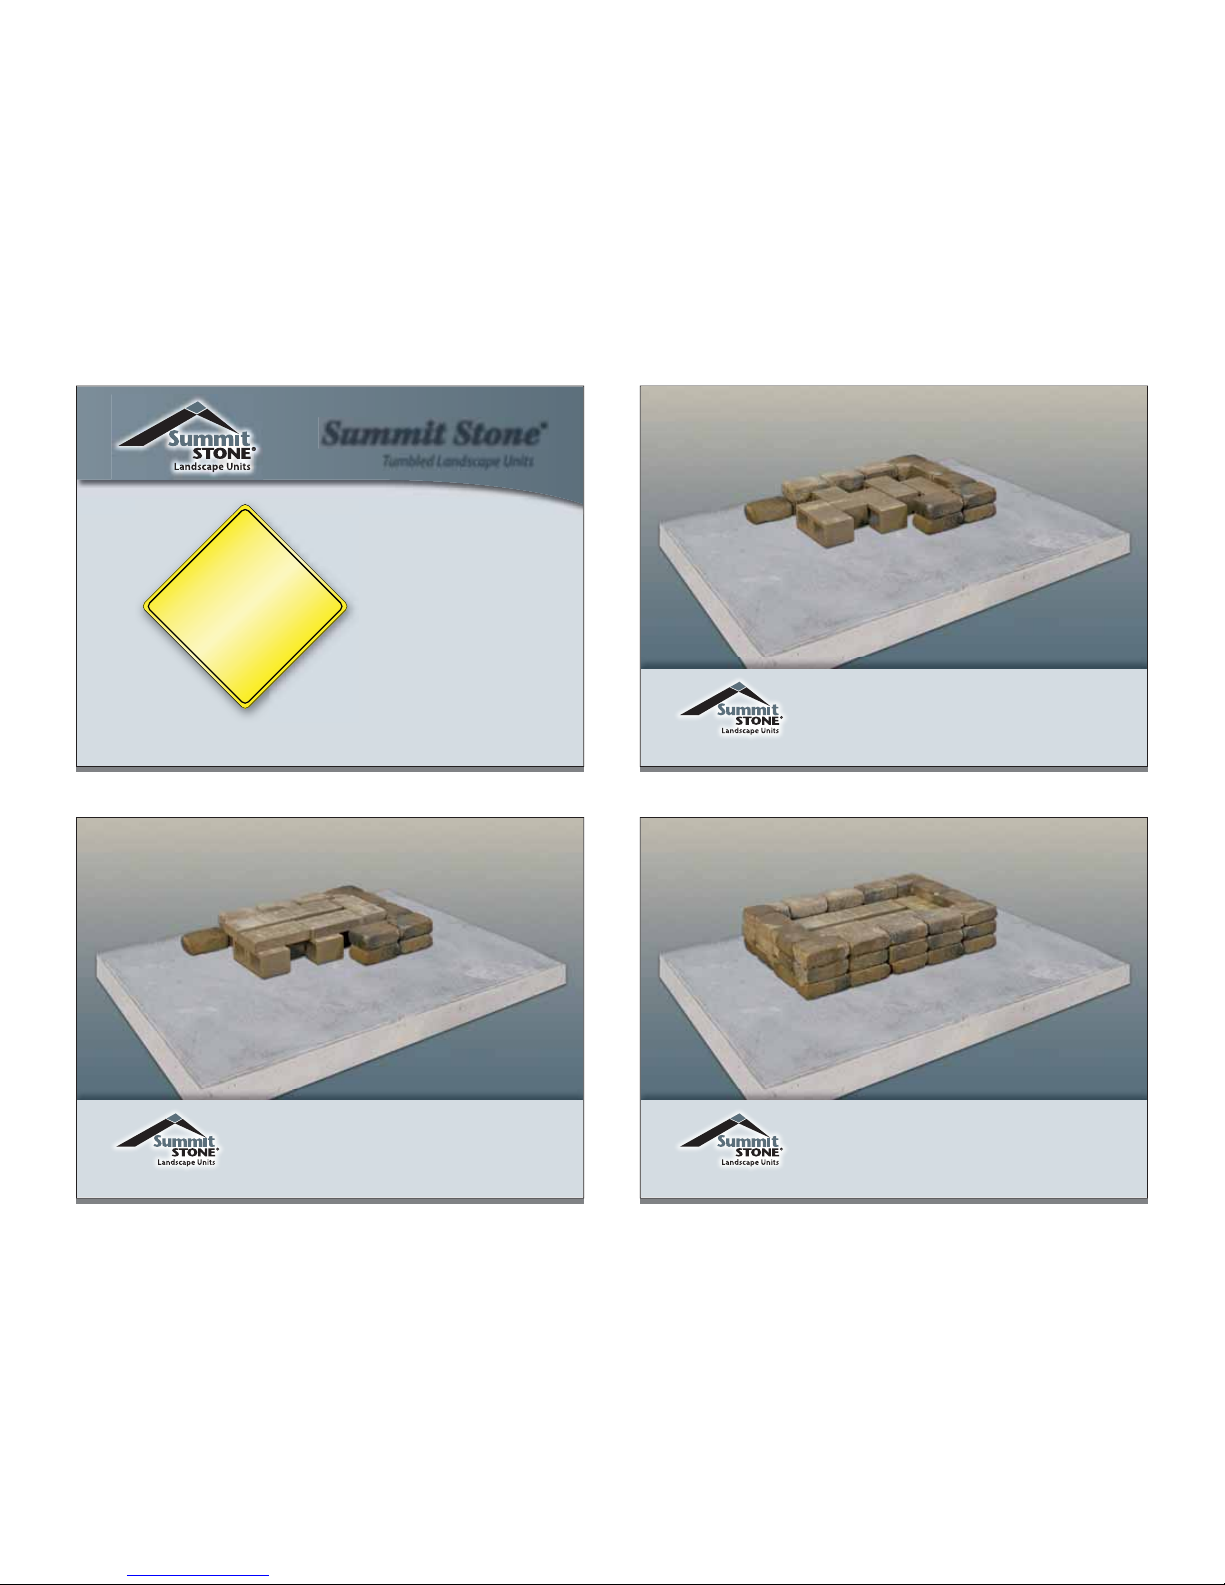
Once the concrete pad is constructed and cured,
begin installing the base course of the firebox.
Align the firebox in the center of the pad and
slightly closer to the back.
5
79/" H x 84/" W x 54/" D
(grate not included)
Completed Summit Stone
Standard Outdoor Fireplace
8
Concrete Adhesive
Apply recommended landscape
adhesive to secure each Summit
Stone unit. See your Summit Stone
sales representative for information.
Note: Landscape adhesive should
only be used with Summit Stone units,
not on fire brick.
Concrete Adhesiv
e
Summit Stone®
Tumbled Landscape Units
6
Concrete base must be a minimum 5" thick
and rebar reinforced
Recommended Practices:
Base Preparation
6" (min.)
11
Install 3" concrete soaps, supplied with the
components, laying them on their sides on
top of the 6" concrete block for added filler.
9
CAUTION
Safety Gear Required!
Note: Always wear
appropriate safety gear
when cutting concrete
units. Cutting should occur
away from the fireplace
area to avoid stains from
dust or residue.
Summit Stone®
Tumbled Landscape Units
12
Install Summit Stone units around the firebox
three courses high. This is the elevation for the
fireplace hearth.
10
Install and glue Summit Stone units laid on their
sides to form the perimeter of the firebox. Place, but
do not glue, the 6" concrete block supplied with the
components on their sides inside the firebox as a base.
15
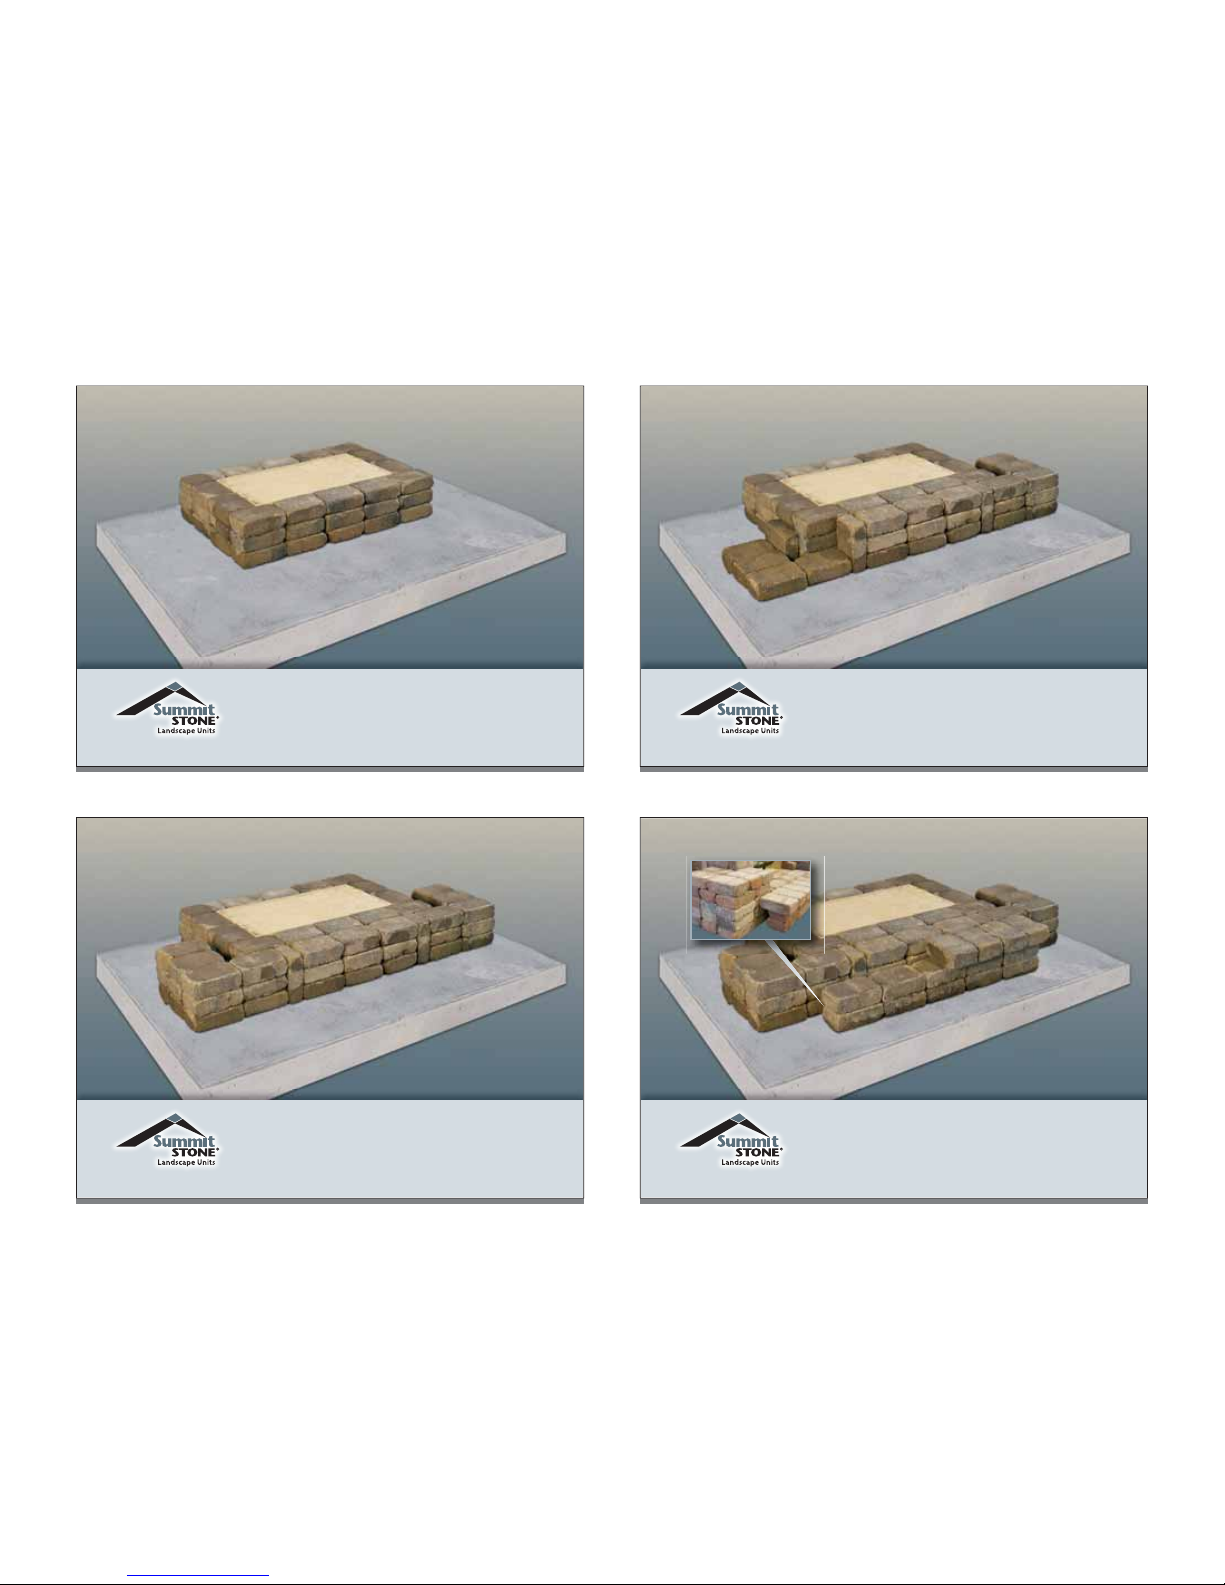
Continue installing front hearth, firebox walls
and pillars as shown in successive pictures.
13
Install, but do not glue, fire brick to fit inside
the firebox (this will allow rainwater drainage of
firebox). It may be necessary to cut fire brick to
properly fit the interior of the firebox.
16
Note: Allow room for a 1/" gap between the
bottom row of the firebox and the front hearth.
This will help balance the Summit Stone units laid
perpendicular on the top of the hearth.
14
Construct and glue the front hearth and side
pillars on each front corner of the firebox using
Summit Stone units.

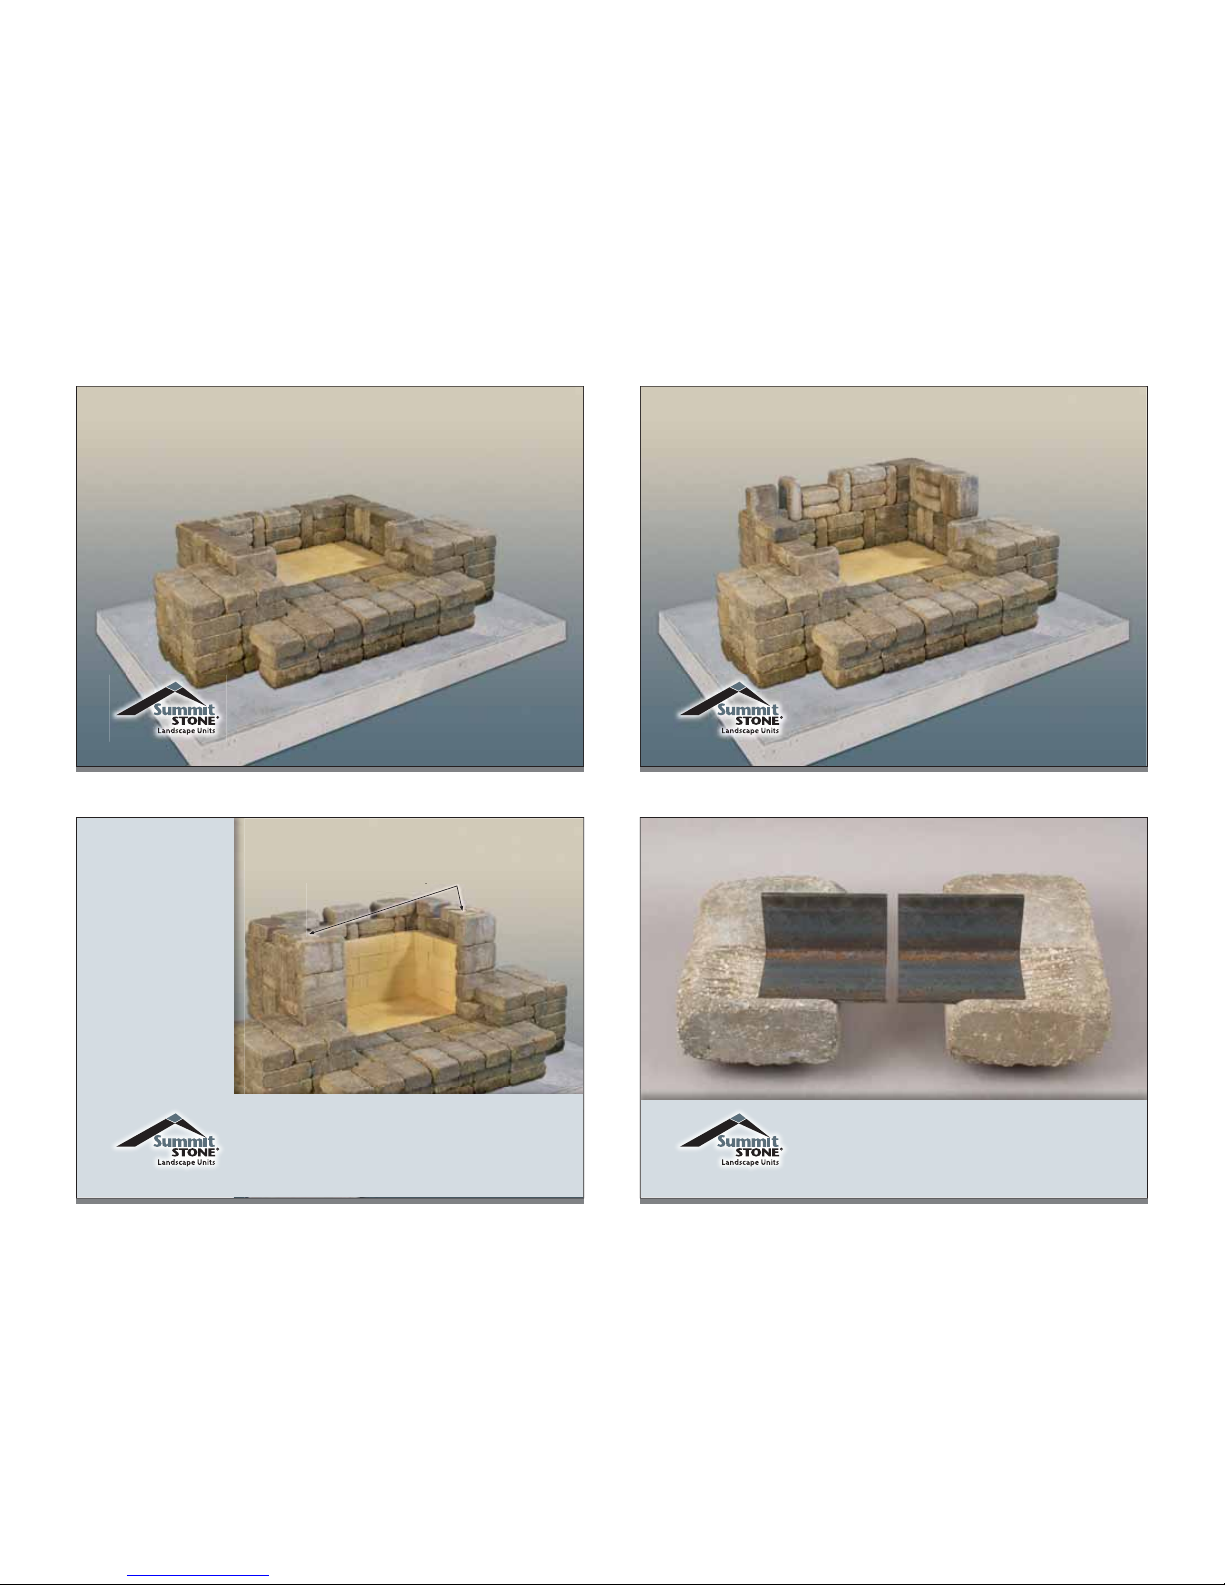
19
17
If your fireplace plan will include an optional front
arch, you will need to make slight installation
modifications on the firebox front walls and side
pillars. You cannot complete the side pillars until
the front arch is in place. Refer to the procedures for
Installing an Optional Front Arch explained later in this
guide for complete instructions.
Optional Front Arch
Modification
20
18
Continue installing units to complete firebox
walls following typical fireplace installation
procedures.
23
Firebox Liner
Installation
Line the sides and
back of the firebox
with fire brick
stacked on their
sides (6) rows high.
It is recommended
that the special
Heat Stop II
refractory adhesive,
supplied with
the components,
should only be used to adhere the surfaces
of fire brick to each other. Do not adhere
fire brick to the Summit Stone units.
left and right
special cut lintel pad units
pp
p
p
21
24
Make sure the two specially cut left and right
Summit Stone lintel units are placed properly
on both sides of the firebox (top front) to
accommodate the lintel.
22
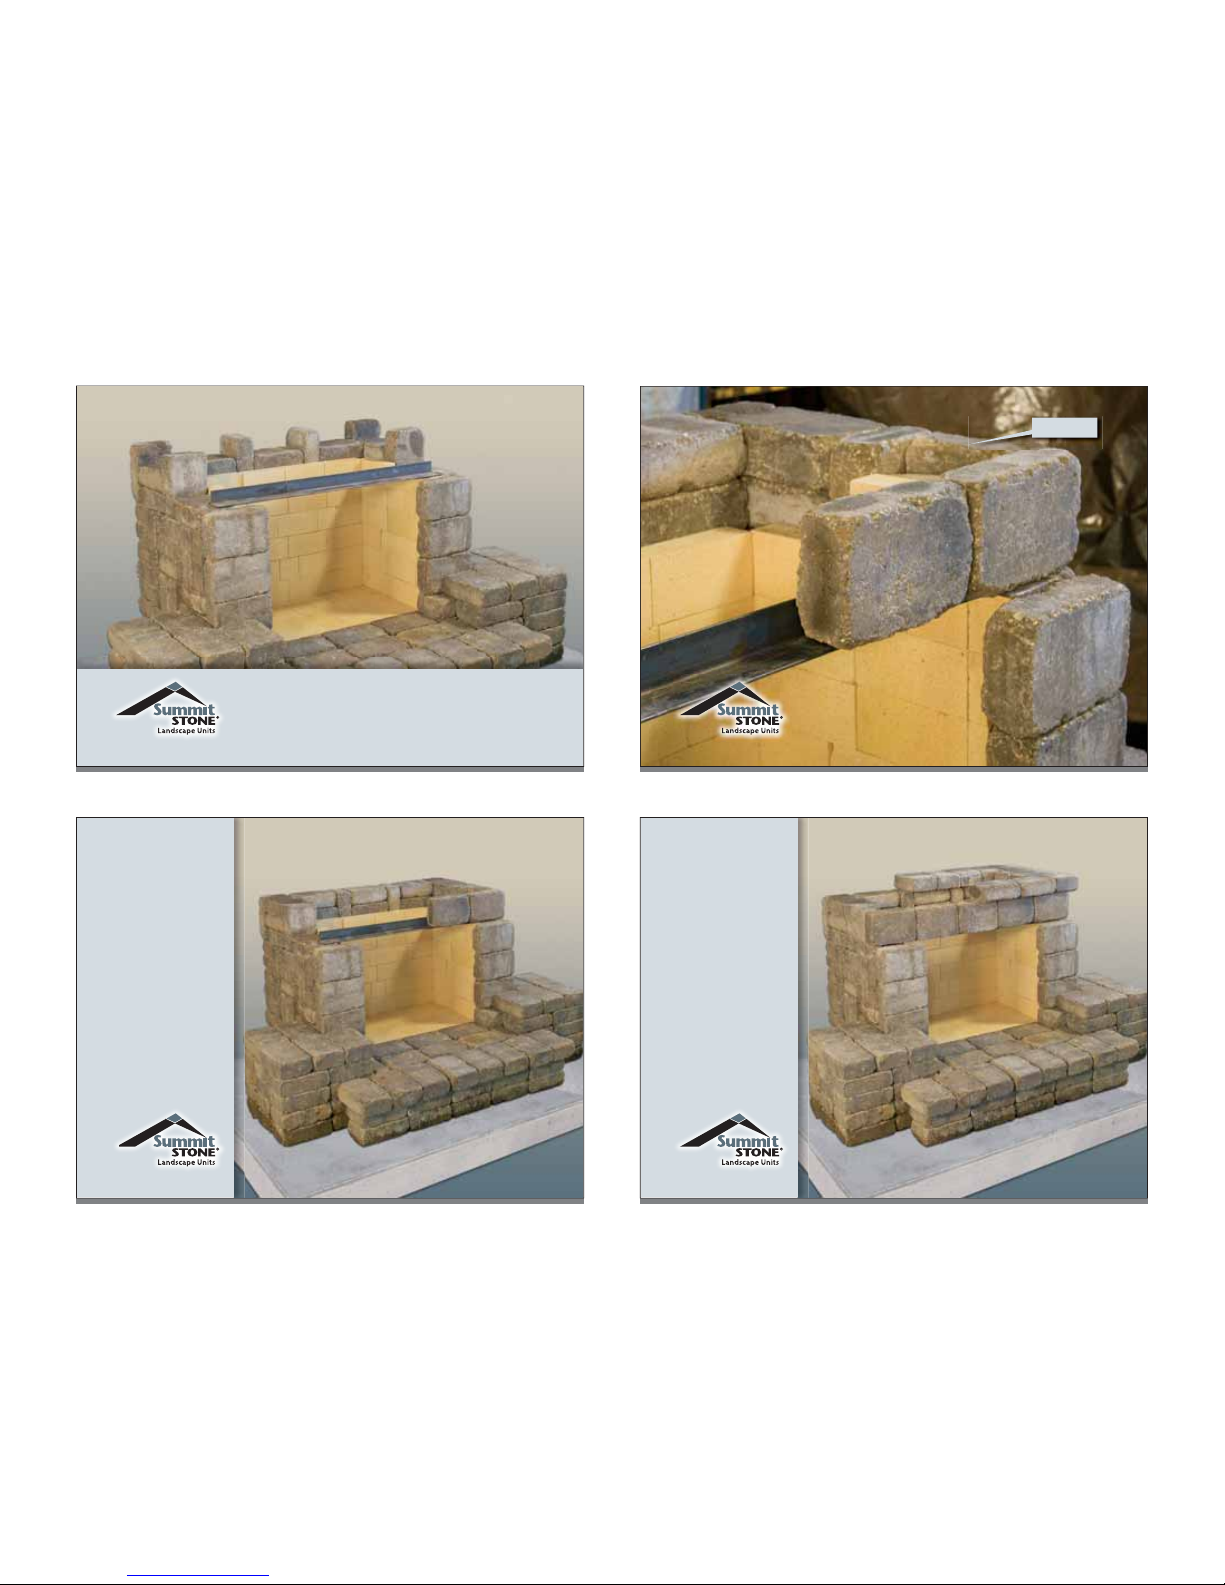
27
Continue
installing and
gluing Summit
Stone units to
complete the
firebox walls
above the lintel
and around the
sides and back.
25
Install steel lintel, supplied with the components,
across the top of the firebox at the front to
support units above.
28
Install Summit
Stone units laid
flat around the
top perimeter
of the firebox to
serve as the base
of the chimney.
26
/ cut unit

31
Completed Summit
Stone Standard
Outdoor Fireplace
29
1/"
Continue
installing
courses to
the top of the
chimney. Step
units in or out
1/" on each
side as shown
on successive
courses for
a tapered
chimney.
Note: Step units in or out 1/" on ALL 4 SIDES as shown
on successive courses for a tapered chimney. Stepping
units in or out by 1/"on each side equals one third of a
Summit Stone unit. This keeps alignment proportionate
and eliminates extra cutting of units.
32
Note: An arch feature will require approximately
(35) additional Summit Stone units, depending on the
arch design. You will also need the following materials:
• (1) ½" Plywood sheet (4' x 8')
• Diamond blade saw for cutting concrete
• Saws for wood
• (2) 2" x 4" Wood spacers
• Nails
• (15-20) Wood shims
Optional Front Arch
Modification
30
Because of
tapering, the
chimney will
require using
the specially
cut / and /
Summit Stone
units supplied
with the
components.
If you run short of
/ cut units, simply use
two / cut units glued
together. Hide one
behind the other when
placing them in the
chimney course.
35
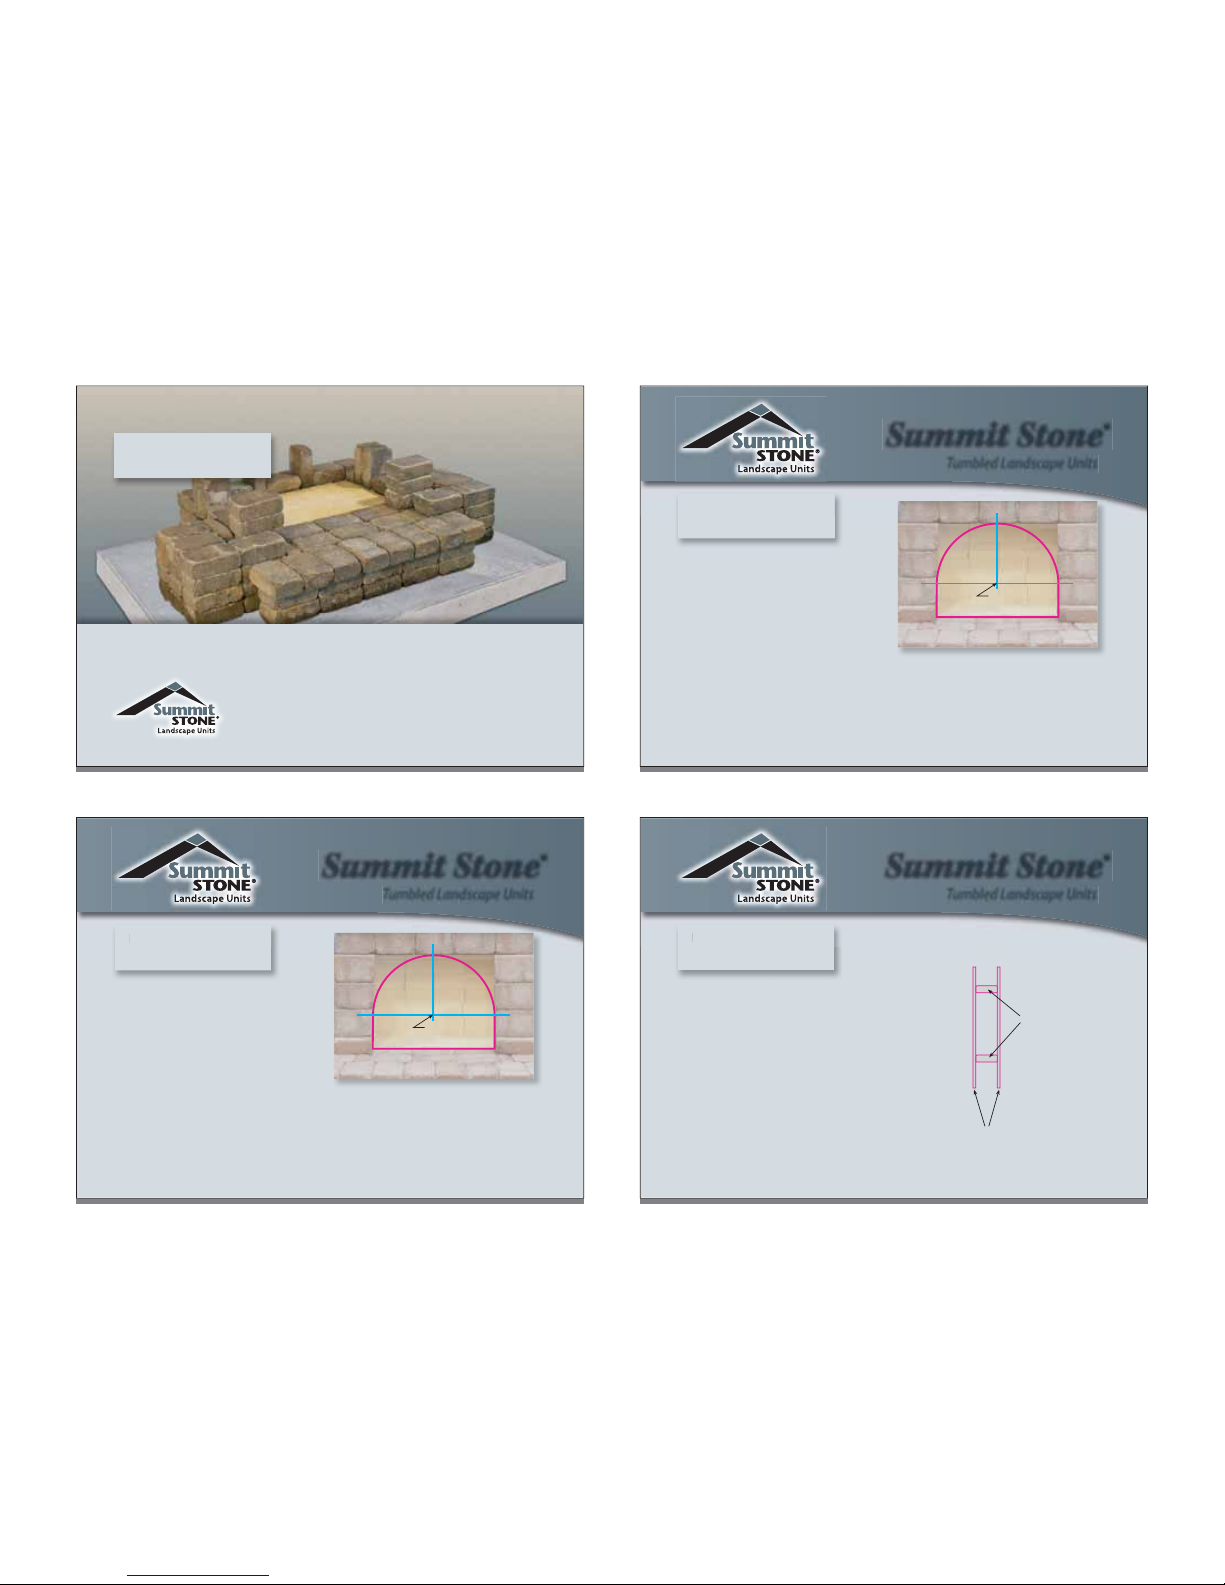
Measure the fireplace opening
to determine the center point
of the arch. Using sheets of
plywood, measure and cut
them to represent the opening
template. Using the center point
of the firebox as a reference,
mark and cut desired arch from
plywood. Cut two identical
plywood templates to serve as
center point
of the arch
the arch support that will hold up
the Summit Stone units.
Installing an
Optional Front Arch
Insta
ll
ing an
Summit Stone®
Tumbled Landscape Units
33
To accommodate a front arch on your fireplace, stack
and glue (3) Summit Stone units on each side of the
hearth, laying them flat on top of each other.
Once these units are in place, continue installation
as directed for the back and sidewalls of the firebox,
interior fire brick and steel lintel. Instructions for
completing the arch will follow.
Installing an
Optional Front Arch
36
Nail 2" x 4" spacer boards
between the plywood templates
to hold them together.
Insert the plywood arch template
inside the fireplace opening
resting on the hearth.
plywood templates
2" x 4" spacers
end view
Installing an
Optional Front Arch
end view
Insta
ll
ing an
Summit Stone®
Tumbled Landscape Units
34
After the row of Summit Stone
units has been installed on the
steel lintel, you will complete
the top of the arch using
additional Summit Stone units
and pieces as directed.
center point
of the arch
Installing an
Optional Front Arch
Insta
ll
ing an
Summit Stone®
Tumbled Landscape Units

39
CAUTION
Safety Gear Required!
Summit Stone®
Tumbled Landscape Units
Note: Always wear
appropriate safety gear
when cutting concrete
units. Cutting should occur
away from the fireplace
area to avoid stains from
dust or residue.
37
Summit Stone®
Tumbled Landscape Units
Alternate placement of
Summit Stone units and
wood shims on each side of
the arch, working toward the
center. Do not glue any units
until the proper spacing is
determined.
position of
wood shims
plywood
templates
Installing an
Optional Front Arch
40
Summit Stone®
Tumbled Landscape Units
Replace wood shims with
(2) cut Summit Stone wedges
per space. Glue all units and
wedges in place around
the arch.
replace wood shims with
(2) Summit Stone wedges
plywood
templates
Installing an
Optional Front Arch
38
Summit Stone®
Tumbled Landscape Units
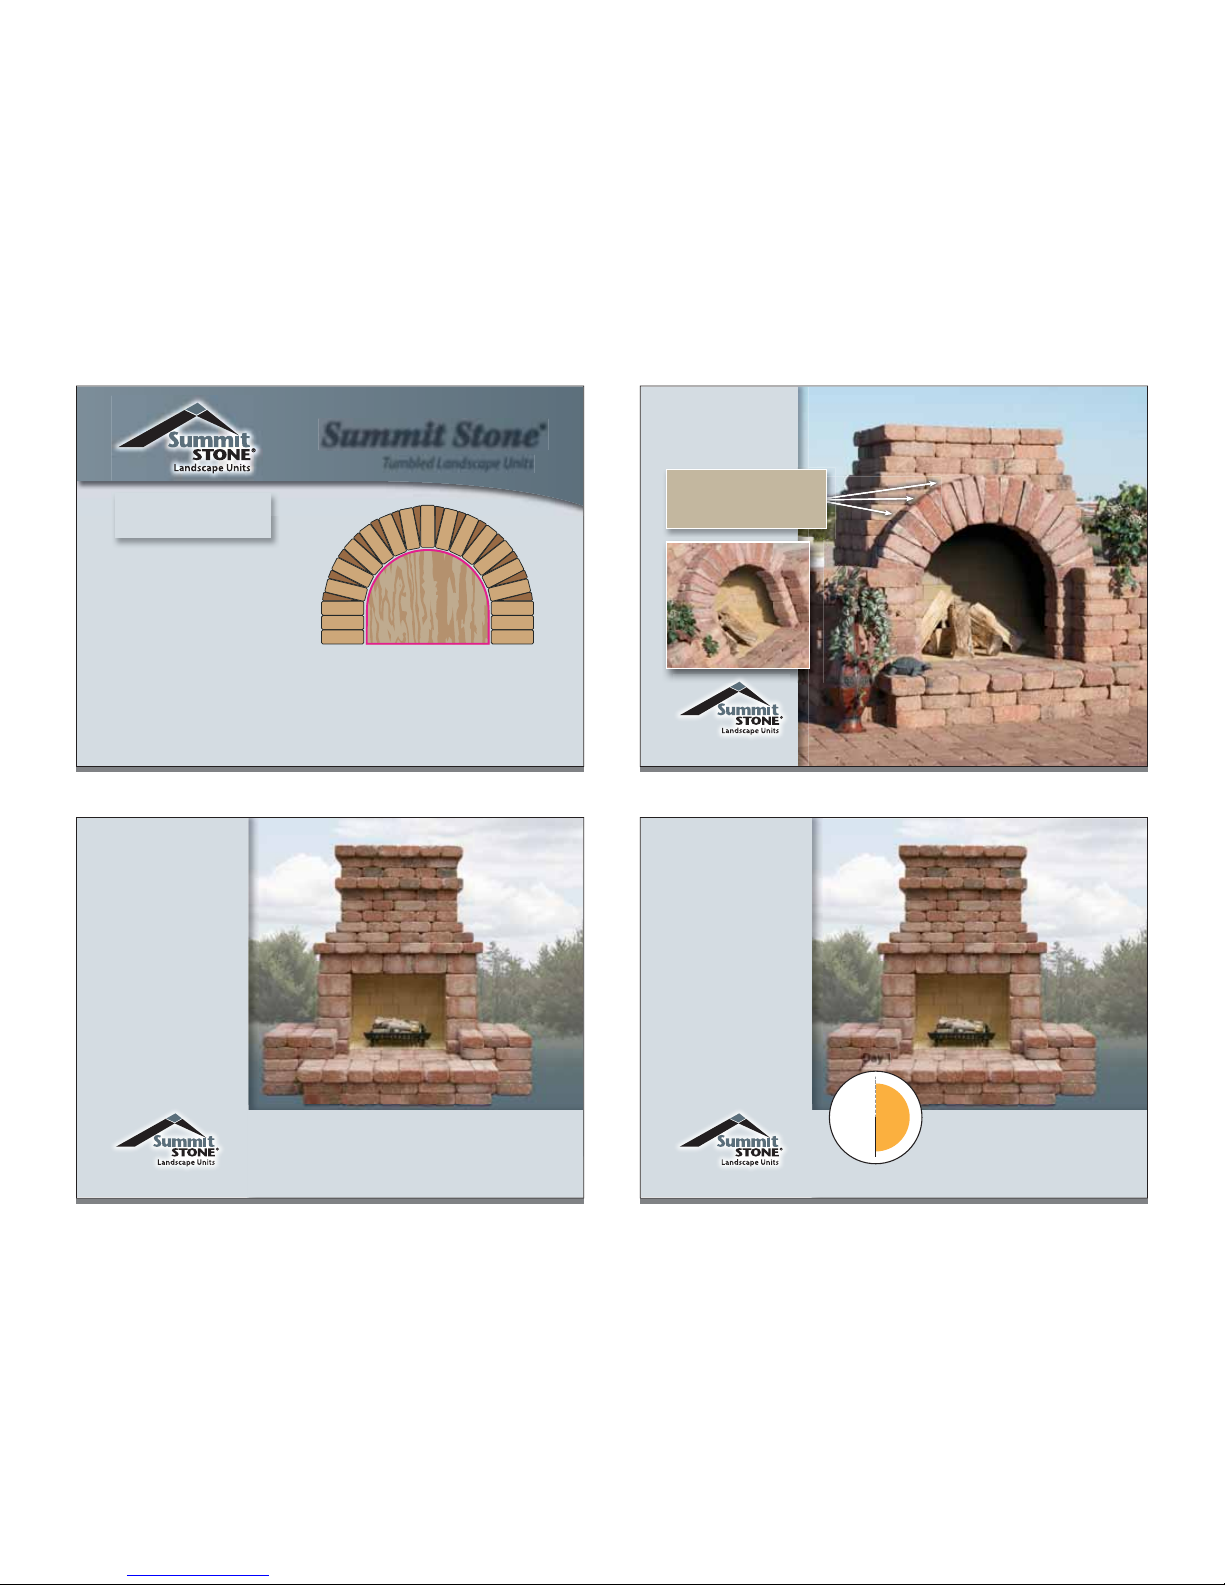
Cutting of Summit Stone units will be
necessary to create wedge pieces. The
arch will require (2) cut wedges placed
between each full Summit Stone unit.
approximate
cut line positions
Summit Stone wedges
(2) per space
Installing an
Optional Front Arch
43
Seasoning an
Outdoor Fireplace
(30-60-90 Rule)
The industry
recommends a
gradual seasoning
for any outdoor
wood burning
fireplace.
After the Summit
Stone Outdoor
Fireplace
construction is completed, follow these
guidelines for the 30-60-90 Rule.
41
Summit Stone®
Tumbled Landscape Units
Do not remove plywood
template or continue
installation of chimney units
until the glue has dried
completely.
When ready, install
chimney units according
to the guidelines. It may be
necessary to cut the front row
plywood
templates
of chimney units to fit around
the arch and maintain a stepped
out appearance.
Installing an
Optional Front Arch
44
30
min.
Seasoning an
Outdoor Fireplace
(30-60-90 Rule)
Build a small wood
fire in the fireplace
that will burn for
approximately
30 minutes and
extinguish itself.
Let the unit cool
completely for a
minimum of
one day.
Day 1
42
Custom Outdoor
Fireplace with
Optional Arch
Note: The first rows of the chimney
need to be laid straight up, so the
arch can be secured to it.

47
Proper installation
and seasoning
techniques will
preserve the
beauty and
integrity of a
Summit Stone
Outdoor Fireplace
for years of
enjoyment.
0520_1215
Disclaimer: This is a basic outdoor fireplace kit design. Outdoor fireplaces should
always be constructed by a knowledgeable professional. Location, chimney height, flue
size and prevailing winds can affect the performance of an outdoor fireplace. County
Materials cannot guarantee the performance or structural integrity of this fireplace.
Use only industry accepted materials, cements and adhesives when constructing an
outdoor fireplace. Always observe building codes and local bylaws.
45
60
min.
Seasoning an
Outdoor Fireplace
(30-60-90 Rule)
After sitting for
one day, start a fire
capable of burning
for 60 minutes. Let
the fire extinguish
itself and allow
the unit to cool
completely for a
minimum of
one day.
Day 2
46
90
min.
Seasoning an
Outdoor Fireplace
(30-60-90 Rule)
On Day 3, build
a fire capable of
burning for 90
minutes. Let the
fire burn out and
allow the unit to
cool completely.
Day 3
Popular Outdoor Fireplace manuals by other brands


The Fireplace
The Fireplace JETMASTER 700 D installation instructions

Superior
Superior VRE4543EN Installation and operation instructions

Napoleon
Napoleon PATIOFLAME GPFN Installation and operation instructions

Endless Summer
Endless Summer Dakota GAD19101ES owner's manual

Vermont Castings
Vermont Castings ODGSR36A Homeowner's installation and operating manual

FEUERHAND
FEUERHAND PYRON user manual