manuals.online logo
Brands
  1. Home
  2. •
  3. Brands
  4. •
  5. Cove
  6. •
  7. Dishwasher
  8. •
  9. Cove DW2450 User manual

Cove DW2450 User manual

CONTENTS
1 Diverter valve
TOOLS REQUIRED
In lb torque wrench
T-20 Torx bit
Flat-blade screwdriver
1/4" Socket
3/8" Combination wrench or socket
Soapy water
Wet vacuum
Towels
Adjustable hot air gun (low/high settings)
WARNING
Turn off the power and water to the product before starting
this procedure.
CAUTION
Do not use power tools when performing this repair. Use
caution when removing and installing screws into plastic
components.
TIP: After power and water are disconnected, use a wet
vacuum to remove the water from the sump. Put a towel
under the wash pump and drain pump connections to
collect water.
UNINSTALL THE UNIT
Uninstall the unit from the opening.
REMOVE THE BOTTOM RACK
1Open the door.
2Pull the bottom rack forward.
3Lift the bottom rack from the unit.
REMOVE THE LOWER SPRAY ARM
1Rotate the lower spray arm coupler
counterclockwise.
2Lift the lower spray arm and coupler out of the unit.
REMOVE THE SUMP FILTER SCREEN AND FINE FILTER
1Turn the fine filter counterclockwise to unlock the
sump filter screen.
2Lift the sump filter screen and fine filter from the unit.
DW2450 and DW2450WS Diverter Valve
Replacement
www.coveappliance.com 800.222.7820
827984 REV. A 08/2019 Page 1 of 5 *827984$REV.$A*
REMOVE WATER FROM THE SUMP
Use a wet vacuum to remove water from the sump.
REMOVE THE DOOR PANEL
1Open the door.
2Use a 1/4" socket to remove the outer door panel
screws.
TIP: Use of a magnetic socket helps to prevent the
screws from falling into the unit.
3Close the door halfway.
4Pull the door panel up and out of the keyhole slots.
REMOVE THE KICKPLATE
Pull the kickplate forward off of the unit.
REMOVE THE LOWER FRONT COVER
1Use a 1/4" socket to remove the screws from the
lower front cover.
2Rotate the lower front cover forward, and remove it
from the unit.
REMOVE THE UPPER FRONT COVER
1Use a 1/4" socket to remove the screws from the
upper front cover.
2Remove the wire harness retention clip from the
upper front cover.
DW2450 and DW2450WS Diverter Valve
Replacement
www.coveappliance.com 800.222.7820
Page 2 of 5
3Remove the upper front cover from the unit.
REMOVE THE FLOAT SWITCH AND FLOAT
1Disconnect the wire connector from the float switch.
2Remove the float switch from the float bracket.
3Remove the wire harness from the float bracket's
wire retainer.
4Use a 3/8" combination wrench to remove the float
bracket nuts from the studs.
5Remove the float bracket from the unit.
6Remove the float from the unit.
REMOVE THE WASH PUMP
1Disconnect the wash pump wire connectors.
2Use pliers to compress the spring clamp on the
suction hose between the sump and wash pump.
Slide the spring clamp toward the wash pump.
3Remove the wash pump suction hose from the sump.
4Use a flat-blade screwdriver to loosen the plastic
ratchet clamp on the hose between the wash pump
outlet and the diverter valve.
5Remove the wash pump outlet hose from the diverter
valve.
6Remove the wash pump from the unit.
REMOVE THE DIVERTER VALVE
1Use a T-20 Torx bit to remove the screws, inside the
sump, that hold the diverter valve to the sump.
TIP: Use extreme caution to avoid dropping these
non-magnetic screws into the sump. The sump will
need to be removed to retrieve the screws.
2Pull the diverter valve down until it disengages from
the sump.
3Route the diverter valve to the right over the door
cables and rear leveling leg screw.
DW2450 and DW2450WS Diverter Valve
Replacement
www.coveappliance.com 800.222.7820
Page 3 of 5
4Remove the diverter valve from the unit.
5Remove the two diverter valve O-rings from the
sump.
INSTALL THE DIVERTER VALVE
TIP: Make sure that the two O-rings from the old diverter
valve are removed from the sump.
1Lubricate the new O-rings with soapy water.
2Install the new O-rings onto the diverter valve.
TIP: The O-rings are square in cross-section. Be
careful not to roll or rotate them when assembling
the unit.
3Insert the diverter valve into the sump. Use a wedge
below the diverter valve to hold the diverter valve in
place.
4Use a Torx bit screw starter to install the mounting
screws into the diverter.
5Use a T-20 Torx bit to tighten the mounting screws to
13 in lb.
INSTALL THE WASH PUMP
1Install the wash pump into the unit. Make sure the
pump's rubber foot contacts the floor of the unit.
2Attach the wash pump suction hose to the bottom of
the sump.
3Use pliers to position the spring clamp around the
hose.
4Attach the wash pump discharge hose to the diverter
valve.
5Position the plastic ratchet clamp around the diverter
valve's wash pump connection.
6Tighten the plastic ratchet hose clamp.
7Connect the wash pump wire connectors.
REMOVE WATER FROM THE BASE
Remove any water that spilled into the base of the
unit.
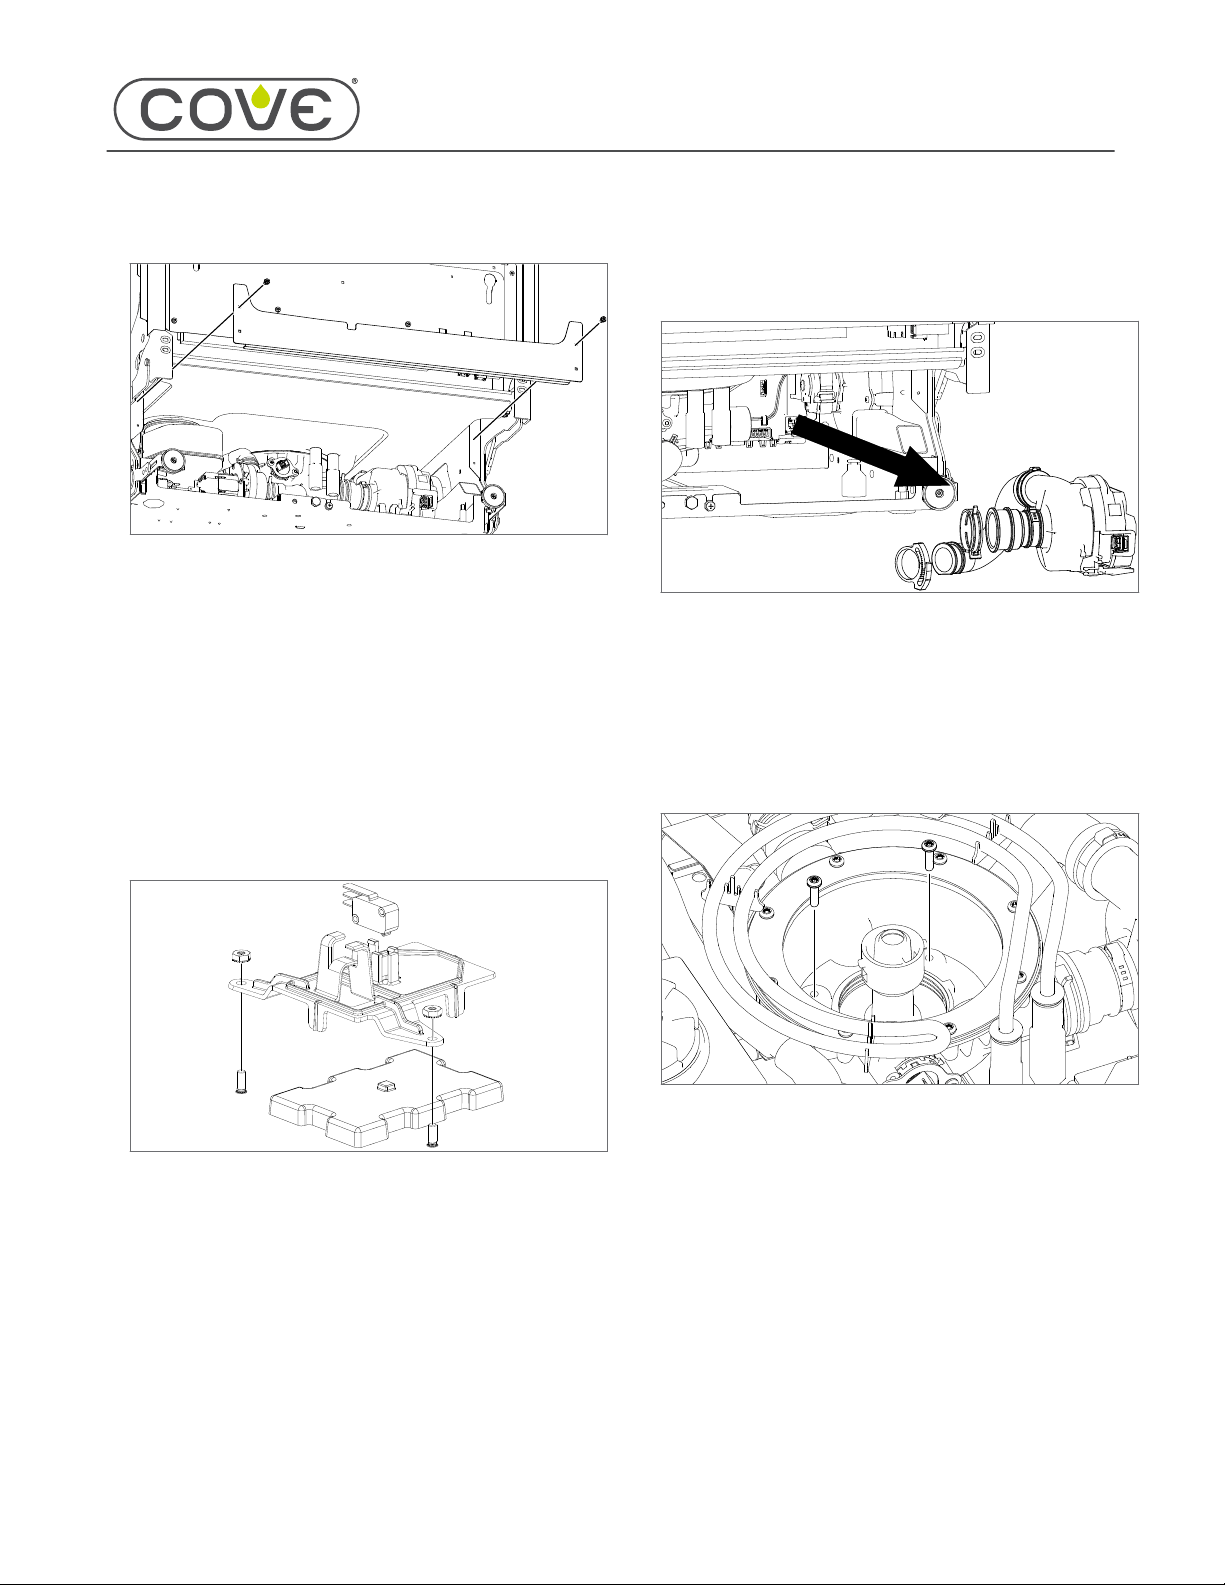
INSTALL THE FLOAT AND FLOAT SWITCH
TIP: The tab on the center of the float faces up.
1Place the float on the floor of the unit.
2Place the float bracket over the float.
3Use a 3/8" combination wrench to install the nuts onto
the float bracket.
4Install the wire harness into the float bracket's wire
retainer.
5Install the float switch into the float bracket.
6Connect the wire connector to the float switch.
TEST THE DIVERTER VALVE
1Connect the unit to water.
2Connect the unit to power.
3Run a normal cycle.
4Check that there are no leaks from any connection
on the diverter valve or sump.
5Listen for the change in position of the diverter valve
when the wash pump initially starts (the diverter valve
rotates during this time).
6If there are no leaks and the diverter valve is
operating, cancel the cycle.
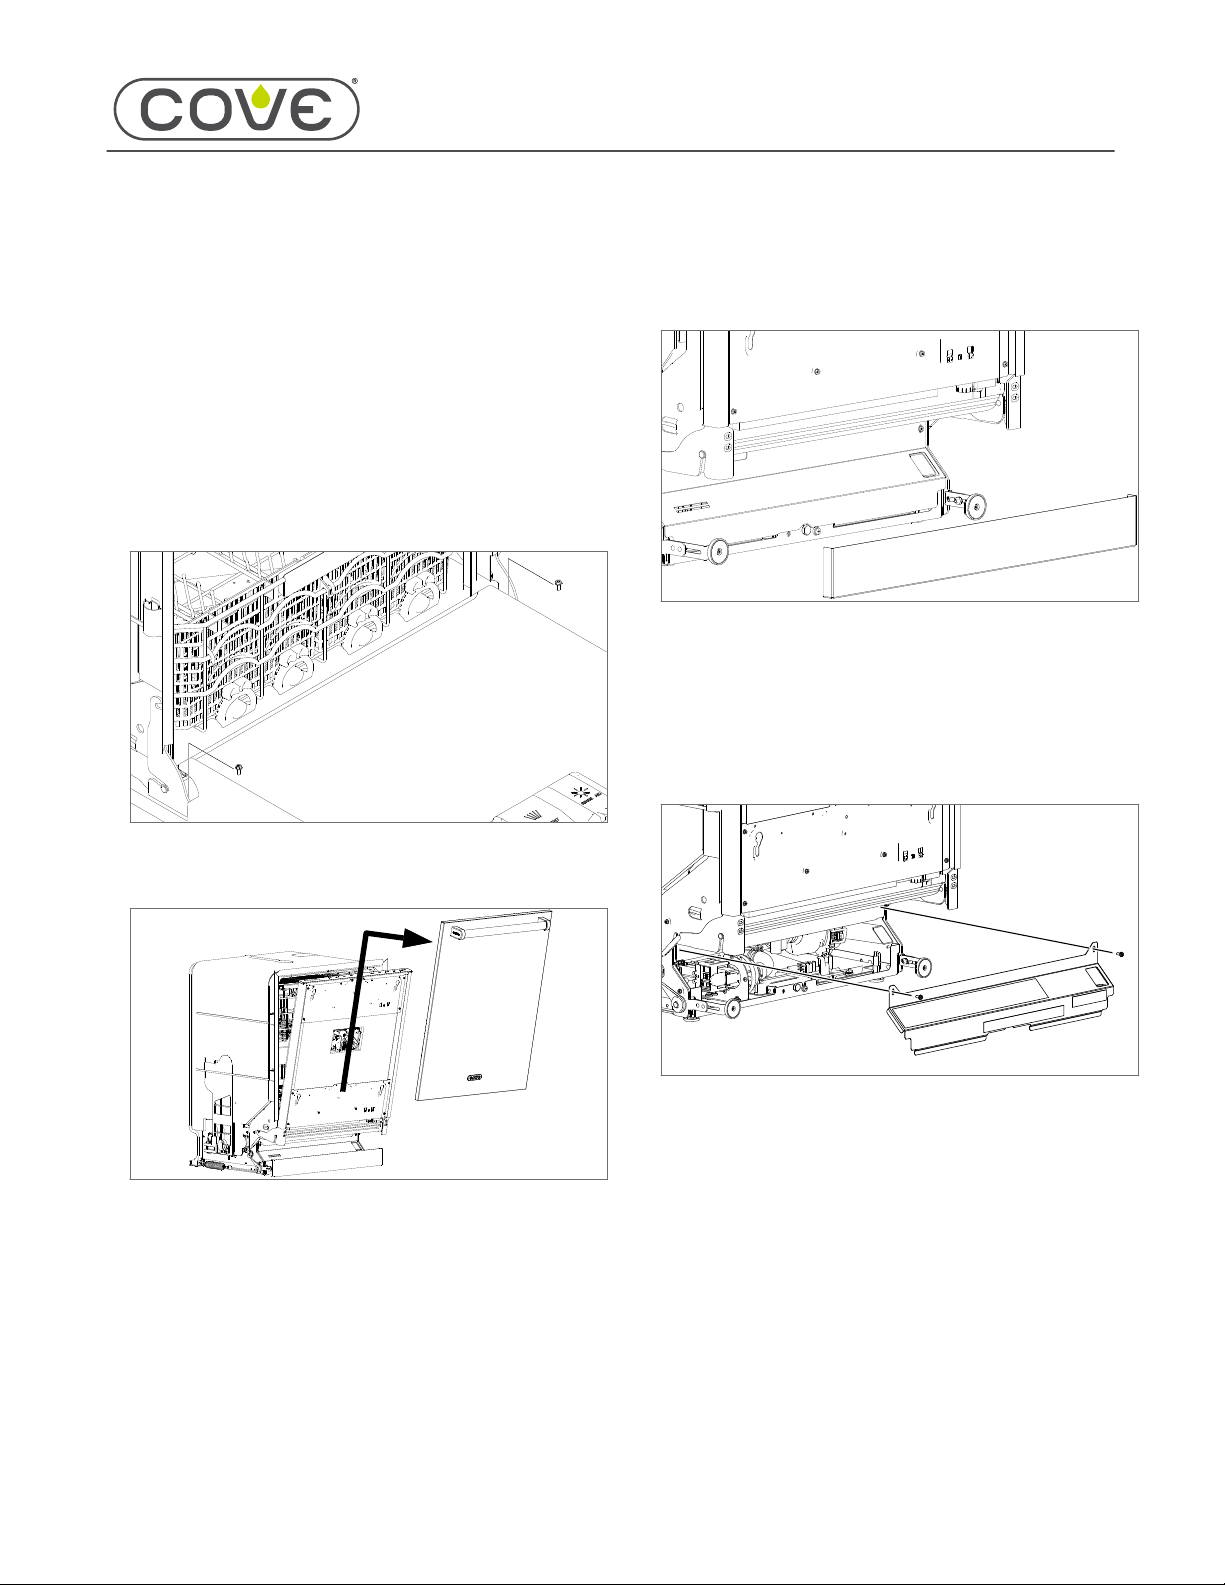
INSTALL THE UPPER FRONT COVER
1Insert the wire harness retention clip into the upper
front cover.
2Install the upper front cover onto the unit.
3Use a 1/4" socket to install the upper front cover
mounting screws.
INSTALL THE LOWER FRONT COVER
1Install the lower front cover onto the unit.
DW2450 and DW2450WS Diverter Valve
Replacement
www.coveappliance.com 800.222.7820
Page 4 of 5
2Use a 1/4" socket to install the lower front cover
mounting screws, torqued to 23.5 in lb.
INSTALL THE KICKPLATE
Install the kickplate onto the unit.
INSTALL THE DOOR PANEL
1Install the door panel pins into the keyhole slots.
2Push the door panel in and down, locking the door
panel in place.
3Open the door.
4Use a 1/4" socket to install the door panel mounting
screws.
INSTALL THE SUMP FILTER SCREEN AND FINE FILTER
1Install the sump filter screen and fine filter over the
sump post.
2Turn the fine filter clockwise to tighten it.
INSTALL THE LOWER SPRAY ARM
1Install the lower spray arm and coupler onto the
sump post.
2Rotate the coupler until the lower spray arm drops
onto the post.
3Rotate the coupler clockwise to lock in the lower
spray arm.
INSERT THE BOTTOM RACK
1Set the bottom rack onto the track on the open door.
2Slide the bottom rack into the dishwasher.
DW2450 and DW2450WS Diverter Valve
Replacement
www.coveappliance.com 800.222.7820
Page 5 of 5

Other manuals for DW2450

7

This manual suits for next models

1

Other Cove Dishwasher manuals

Cove DW2450 User manual

Cove

Cove DW2450 User manual

Cove DW2450 User manual

Cove

Cove DW2450 User manual

Cove DW2450 User manual

Cove

Cove DW2450 User manual

Cove DW2450 Guide

Cove

Cove DW2450 Guide

Cove DW2450 User manual

Cove

Cove DW2450 User manual

Cove DW2450 User manual

Cove

Cove DW2450 User manual

Cove DW2450 User manual

Cove

Cove DW2450 User manual

Popular Dishwasher manuals by other brands

Asko 1400 - installation instructions

Asko

Asko 1400 - installation instructions

Fisher & Paykel DW60FC1 Service manual

Fisher & Paykel

Fisher & Paykel DW60FC1 Service manual

Infiniton DIW-3724IXH instruction manual

Infiniton

Infiniton DIW-3724IXH instruction manual

Lamona FLM8600 User instructions

Lamona

Lamona FLM8600 User instructions

GE GDT530 SEries owner's manual

GE

GE GDT530 SEries owner's manual

Danby Silhouette DDW2405W installation instructions

Danby

Danby Silhouette DDW2405W installation instructions

GE GSD6900J10BB installation instructions

GE

GE GSD6900J10BB installation instructions

Hotpoint DWF60 User and installation instructions

Hotpoint

Hotpoint DWF60 User and installation instructions

Midea MDWB1W instruction manual

Midea

Midea MDWB1W instruction manual

Hotpoint Ariston LDF 1235 operating instructions

Hotpoint Ariston

Hotpoint Ariston LDF 1235 operating instructions

Bosch SHPM78ZO5N/01 operating instructions

Bosch

Bosch SHPM78ZO5N/01 operating instructions

AEG FAVORIT 76520 VI user manual

AEG

AEG FAVORIT 76520 VI user manual

Smeg lvs367sx instruction manual

Smeg

Smeg lvs367sx instruction manual

Hotpoint LFT 114 Instruction booklet

Hotpoint

Hotpoint LFT 114 Instruction booklet

Hotpoint FDM 554 Instruction booklet

Hotpoint

Hotpoint FDM 554 Instruction booklet

Gorenje GI62040X user manual

Gorenje

Gorenje GI62040X user manual

Maidaid Halcyon AMH50 User's installation guide

Maidaid Halcyon

Maidaid Halcyon AMH50 User's installation guide

Ignis AKL 446 Quick use guide

Ignis

Ignis AKL 446 Quick use guide

manuals.online logo
manuals.online logoBrands
  • About & Mission
  • Contact us
  • Privacy Policy
  • Terms and Conditions

Copyright 2025 Manuals.Online. All Rights Reserved.