Covid RXB-A320 User manual

1723 W. 4th Street Tempe Arizona 85281
USER MANUAL
HDBT Receiver - RXB-A320 & RXB-B320
Covid HDBase-T Receiver for HDMI
with Built in Audio de-embedding, IR,
and RS232 control pass through

1723 W. 4th Street Tempe Arizona 85281
USER MANUAL
Page 1
HDBT Receiver - RXB-A320 & RXB-B320
Contents
Introduction.................................................................................................................................2
Package Contents ........................................................................................................................2
Key Features ...............................................................................................................................2
Panel Description.........................................................................................................................3
Connection and Installation ...........................................................................................................4
Technical Specifications ................................................................................................................4
Preparing a RS232 Cable .............................................................................................................5-6
Safety Information........................................................................................................................7
Warranty ....................................................................................................................................7

1723 W. 4th Street Tempe Arizona 85281
USER MANUAL
Page 2
HDBT Receiver - RXB-A320 & RXB-B320
Introduction
The RXB-320 is part of Covid’s expanding line of HDBase-T products. The RXB-320 offers an all in one solu-
tion when audio stripping is needed on the receiving end. This is done by the integrated audio de-embedder
which offers a 3.5mm TRS stereo line level connection to run to celling amps or any other audio need. The
RXB-320 also offers bidirectional IR and Rs232 control when paired with a compatible transmitter. Single
side connections for HDMI, Control, and Power that provides for cleaner wiring and rack mounting solutions.
The RXB-320 supports local or remote powering options thru POC or PoH PD standards.
Package Contents
•1×RXB-320
•1×24V 1A DC power adapter
•2×Wall mounting tabs
Key Features
• Supports HDMI up to 1080p@60Hz 48bit up to 230ft over one Cat5e/6/7 cable
•Support HDMI 4Kx2K and 3D
•HDCP Compliant
•All connections on one side for easier installation
•Bi-directional RS-232,IR
•Power units from either TX or RX side with wall power supply (PoC) or power with PoE PD;
•Status LED for all connections on front.
•Integrated audio de-embedder

1723 W. 4th Street Tempe Arizona 85281
USER MANUAL
Page 3
HDBT Receiver - RXB-A320 & RXB-B320
1. Act: This green LED will blink showing that the device is functioning normal on both the receiver
and the transmitter.
2. Pwr: This red LED indicator will show solid when the product is receiving power.
3. HDMI: This green LED solid status shows that the HDCP link is present between the source and the
display. A blinking condition indicates there is not a HDCP connection, and an off condition shows
a problem between the device and the source/destination in the HDMI connections.
4. HDBT: This green LED solid illumination shows that all connections are good and the source and display
are powered on. A blinking condition shows that the RJ45 connection is present, but there is no
source-to-display connection. No illumination shows that there is no connection thru the RJ45
category cable.
Panel Description
Front Panel
1. Power: Connect to DC adapter here to power up device
2. HDBaseT: Connect HDBaseT source here
3. HDMI Output: Connect to display
4. AUD OUT: Audio de-embedded, 3.5mm connector
5. RS232: Connect to a display for control
6. IR: Connect to IR emitter and sensor
123456

1723 W. 4th Street Tempe Arizona 85281
USER MANUAL
Page 4
Connection and Installation
HDBT Receiver - RXB-A320 & RXB-B320
Video
HDMI Compliance HDMI 3D, 4K
HDCP Compliant Yes
Distance 230ft. (70m) on 1080p@60Hz
Max Resolution 4K*2K
Connectors
TX Connectors (1) HDMI, (1)Rj45(HDBT),(2)IR,(1)RS232
RX Connectors (1) HDMI, (1)Rj45(HDBT),(2)IR,(1)RS232, (1)3.5mmTRS
Mechanical
Dimensions 111 x 75 x 25 mm(L/W/H)
Net Weight 1.06lbs[480g]
Package Size 255 x 140 x 90 mm(L/W/H)
Gross Weight 1.676lbs[760g]
Power
Power Supply 24V 1A DC
Environmental
Operation Temperature 32~131°F [0~55°C]
Storage Temperature -4~185°F [-20~85°C]
Relative Humidity 5~95% RH [no condensation]
Technical Specifications
Audio De-embedding Feature
Unique to the RXB-320 is the ability to extract the audio from the HDMI input through a 3.5mm TRS on the
RX side of the signal chain. The output is a stereo unbalanced signal that can be sent to an external amplifier.

1723 W. 4th Street Tempe Arizona 85281
USER MANUAL
Page 5
HDBT Receiver - RXB-A320 & RXB-B320
Preparing a RS232 Cable
What you will need:
•Two conductor cables with ground
•Wire strippers
•Screwdriver (flat head)
•3.5mm captive screw connector
•Heat gun and heat shrink (optional)
•Multimeter (optional)
Start by stripping the outer jacket of the cable back by about 1 inch like what is shown in Step 1. Once the
outer jacket is removed, you can optionally add heat shrink around the conductors and over the exposed drain
wire like in the picture of step 2. Next, strip the ends of the conductors back about 3/16” in order to make
good contact inside of the captive screw connector. The final step is to attach the captive screw connector to
the end of the cable according to the pinout.
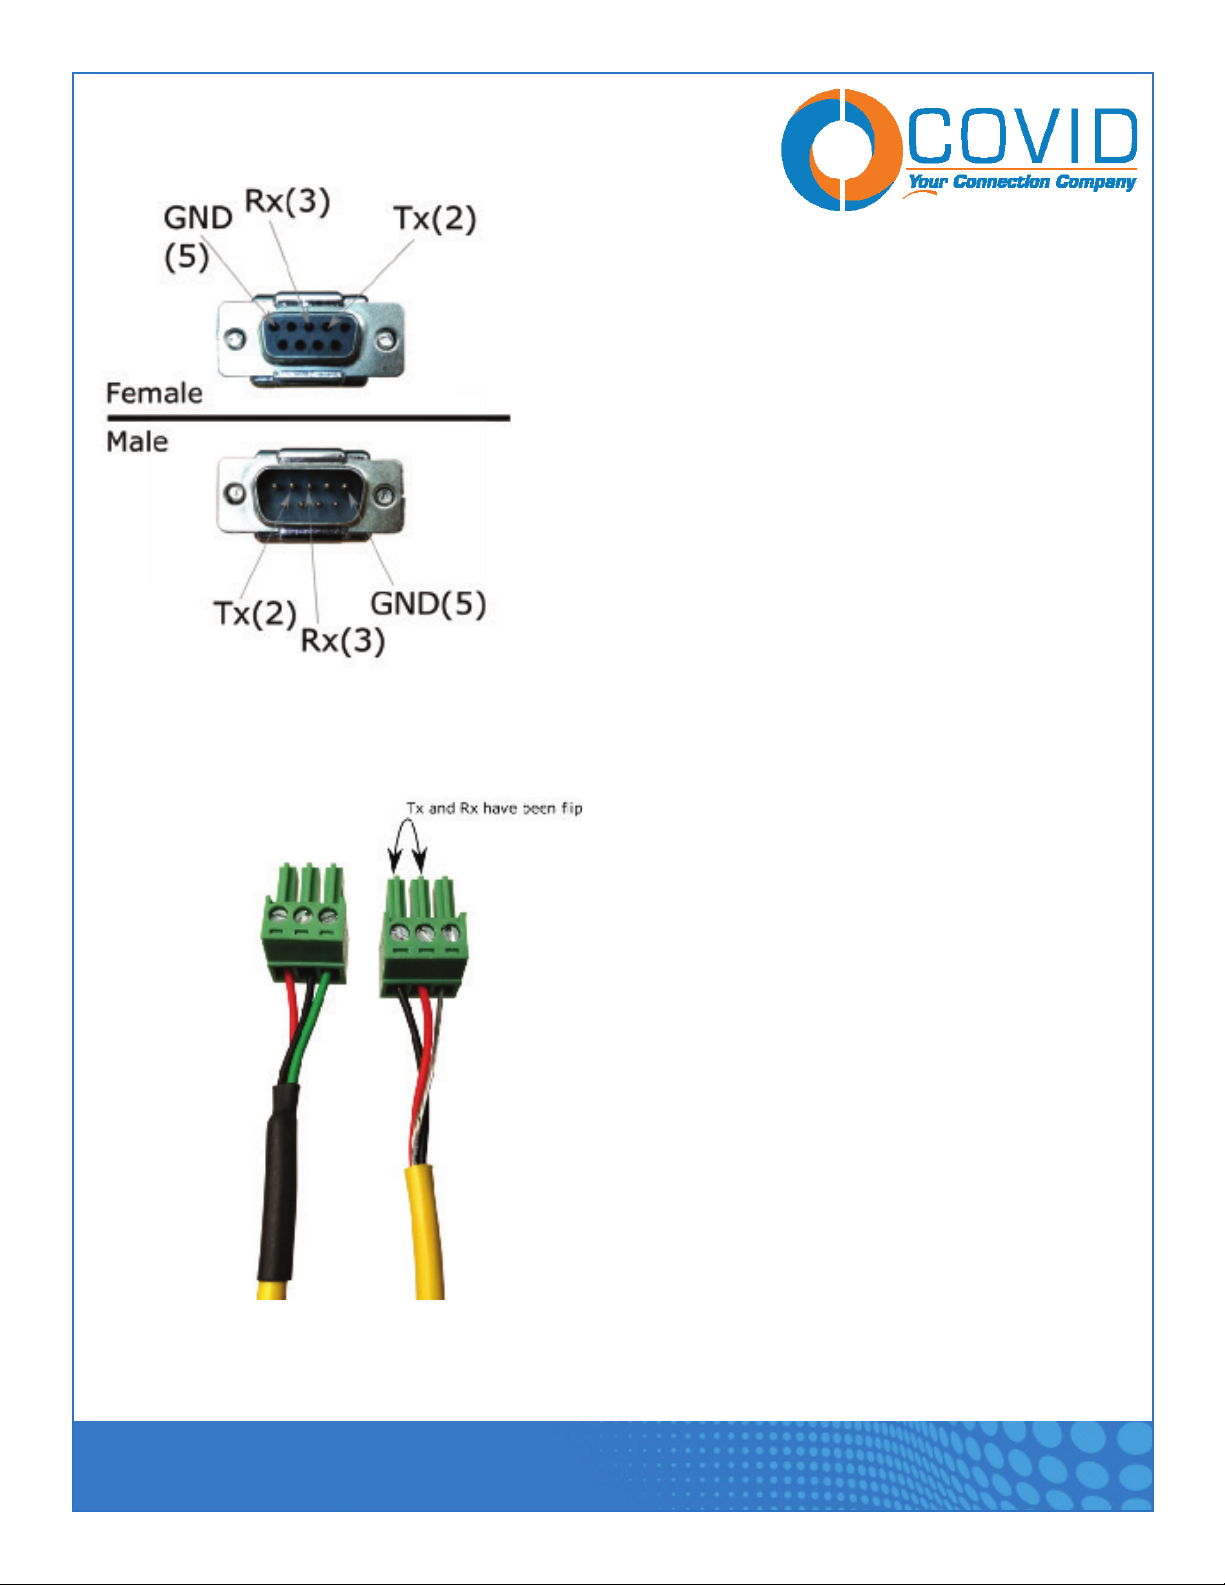
If you do not know which conductor to use for each pin, use a multimeter to determine how the cable was
built and then compare it with the image below of the male and female DB9 connectors. The conductors that
are connected to the pins with the labels Tx, Rx, and shield should be connected to their respective positions
on the terminal block. A word of caution, the pinout used in these images is for connecting to a RS232 DTE
device. If you are connecting to a DCE device, simply switch the Tx and Rx pins on one end of the cable.

1723 W. 4th Street Tempe Arizona 85281
USER MANUAL
Page 6
HDBT Receiver - RXB-A320 & RXB-B320
If you are connecting the SB3M to another Covid device with RS232 communications, the cable must be
appropriately pinned out. In order for the devices to communicate, the Tx and Rx pins must be switched on
only one end of the connector. The image below demonstrates how this can be done with two terminal block
connectors.

1723 W. 4th Street Tempe Arizona 85281
USER MANUAL
Page 7
HDBT Receiver - RXB-A320 & RXB-B320
To reduce the risk of electric shock, do not expose this product to rain or moisture.
Do not modify the power supply. Doing so will void the warranty and safety features, and may
result in personal harm.
If the power supply does not fit into your local power socket, seek professional assistance.
This equipment should be installed near the socket outlet and the device should be easily
accessible in the case it requires disconnection.
Safety Information
!
!
!
!
Warranty
Parts and labor warranty time is three year and from the date of original shipment. This warranty shall be
void if a serial number has been removed from the product.
Upon determination of a legitimate defect covered by this warranty and at COVID’s sole discretion, user
should bear the transport cost during the warranty.
If product is out of warranty then repair charge is required. Out of warranty repairs will only be made after
cost has been approved by Customers and proper financial arrangements are made. Customer must cover
round trip shipment expenses.
This manual suits for next models
1
Table of contents
Other Covid Receiver manuals
Popular Receiver manuals by other brands

Johnson Controls
Johnson Controls Tyco HSM2HOST installation manual

IKONNIK
IKONNIK KNNA1004 quick start guide

Presentation Switchers
Presentation Switchers EX200 user guide

Panasonic
Panasonic CT-32XF55 operating instructions

Schluter Systems
Schluter Systems LIPROTEC LT EBR 1 operating instructions

Sokkia
Sokkia GCX2 operating manual