Covidien Genius 2 User manual
GeniusTM
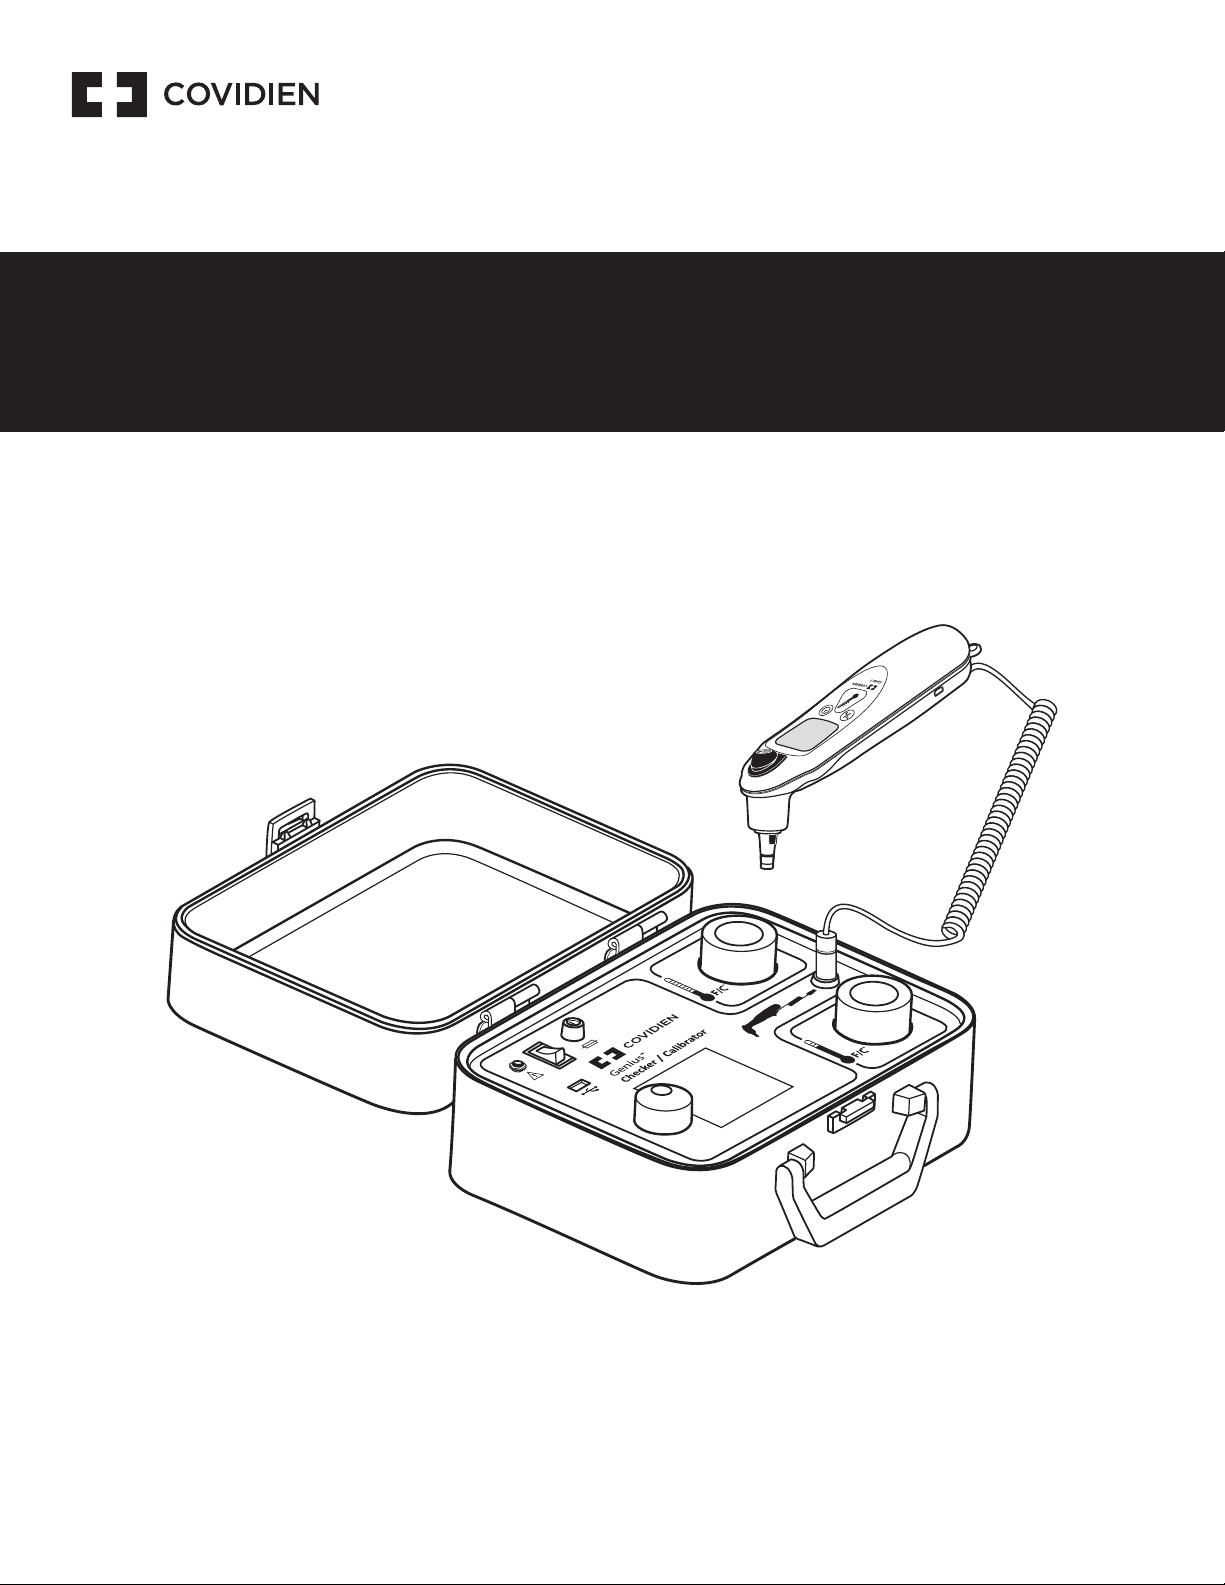
Thermometer Checker/Calibrator
Operating Manual
For use with Model Genius™ 2 & Genius™ 3 Tympanic Thermometers

Table of Contents
Page
Section I - Functional Description................................................................................................................................................... 1
Section II - Precautions and Warnings ........................................................................................................................................... 2
Section III - Icon Identification........................................................................................................................................................ 3
Section IV - Required Equipment.................................................................................................................................................... 4
Section V - System Setup.................................................................................................................................................................. 4
Section VI - Operational Procedure................................................................................................................................................. 5
Installation of USB Flash Drive (Optional)...................................................................................................................................... 5
Apply Power.................................................................................................................................................................................. 5
Start-up Screen ............................................................................................................................................................................. 5
Recalibration Due Screen............................................................................................................................................................... 5
Reminder Screen........................................................................................................................................................................... 5
AmbientTemperature ................................................................................................................................................................... 5
Main Menu.................................................................................................................................................................................... 5
Preferences.................................................................................................................................................................................... 5
Time Format.................................................................................................................................................................................. 5
Date Format .................................................................................................................................................................................. 5
Language Selection....................................................................................................................................................................... 5
Set User/Site Information.............................................................................................................................................................. 6
Set Date andTime ......................................................................................................................................................................... 6
Check Calibration........................................................................................................................................................................... 6
Section VII - Error Messages............................................................................................................................................................. 9
Section VIII - Checker/Calibrator Specifications.......................................................................................................................... 10
Section IX - Cleaning Instructions................................................................................................................................................. 11
Section X - Troubleshooting........................................................................................................................................................... 11
Section XI - Customer Service ........................................................................................................................................................ 12
Section XII - Warranty..................................................................................................................................................................... 12
Section XIII - Electromagnetic Conformity Declaration............................................................................................................. 13
This product contains software solely owned by Covidien. Covidien grants the user a non-exclusive, limited license to use the software
according to the operating instructions. A copy of the license can be obtained from Covidien.
en
GeniusTM Checker/Calibrator Table of Contents
1
Section I - Functional Description
This manual describes the operation of the Genius™ Checker/Calibrator.This device has been developed to check the accuracy of the Genius™ 3
TympanicThermometer and automatically recalibrate the thermometer, if necessary. In addition, the Genius™ Checker/Calibrator has the
capability to generate a test report for each thermometer tested and save it to a USB flash drive.
The Genius™ Checker/Calibrator will work with all Genius™ 3Thermometer software revisions.
The Genius™ Checker/Calibrator contains two independently controlled infrared calibration targets that are similar to factory calibration targets.
These“blackbody”targets are designed to have efficient radiative heat transfer and produce infrared radiation that approximates the human ear
at temperatures of 32.22 °C (90.0 °F) and 40.55 °C (105.0 °F).
In addition to supporting the Genius™ 3 TympanicThermometer, the Genius™ Checker/ Calibrator also fully supports the
Genius™ 2 Tympanic Thermometer. Throughout this document, where a Genius™ 3 Thermometer is noted, the caution, warning
or instruction also applies to a Genius™ 2 Thermometer unless otherwise noted.
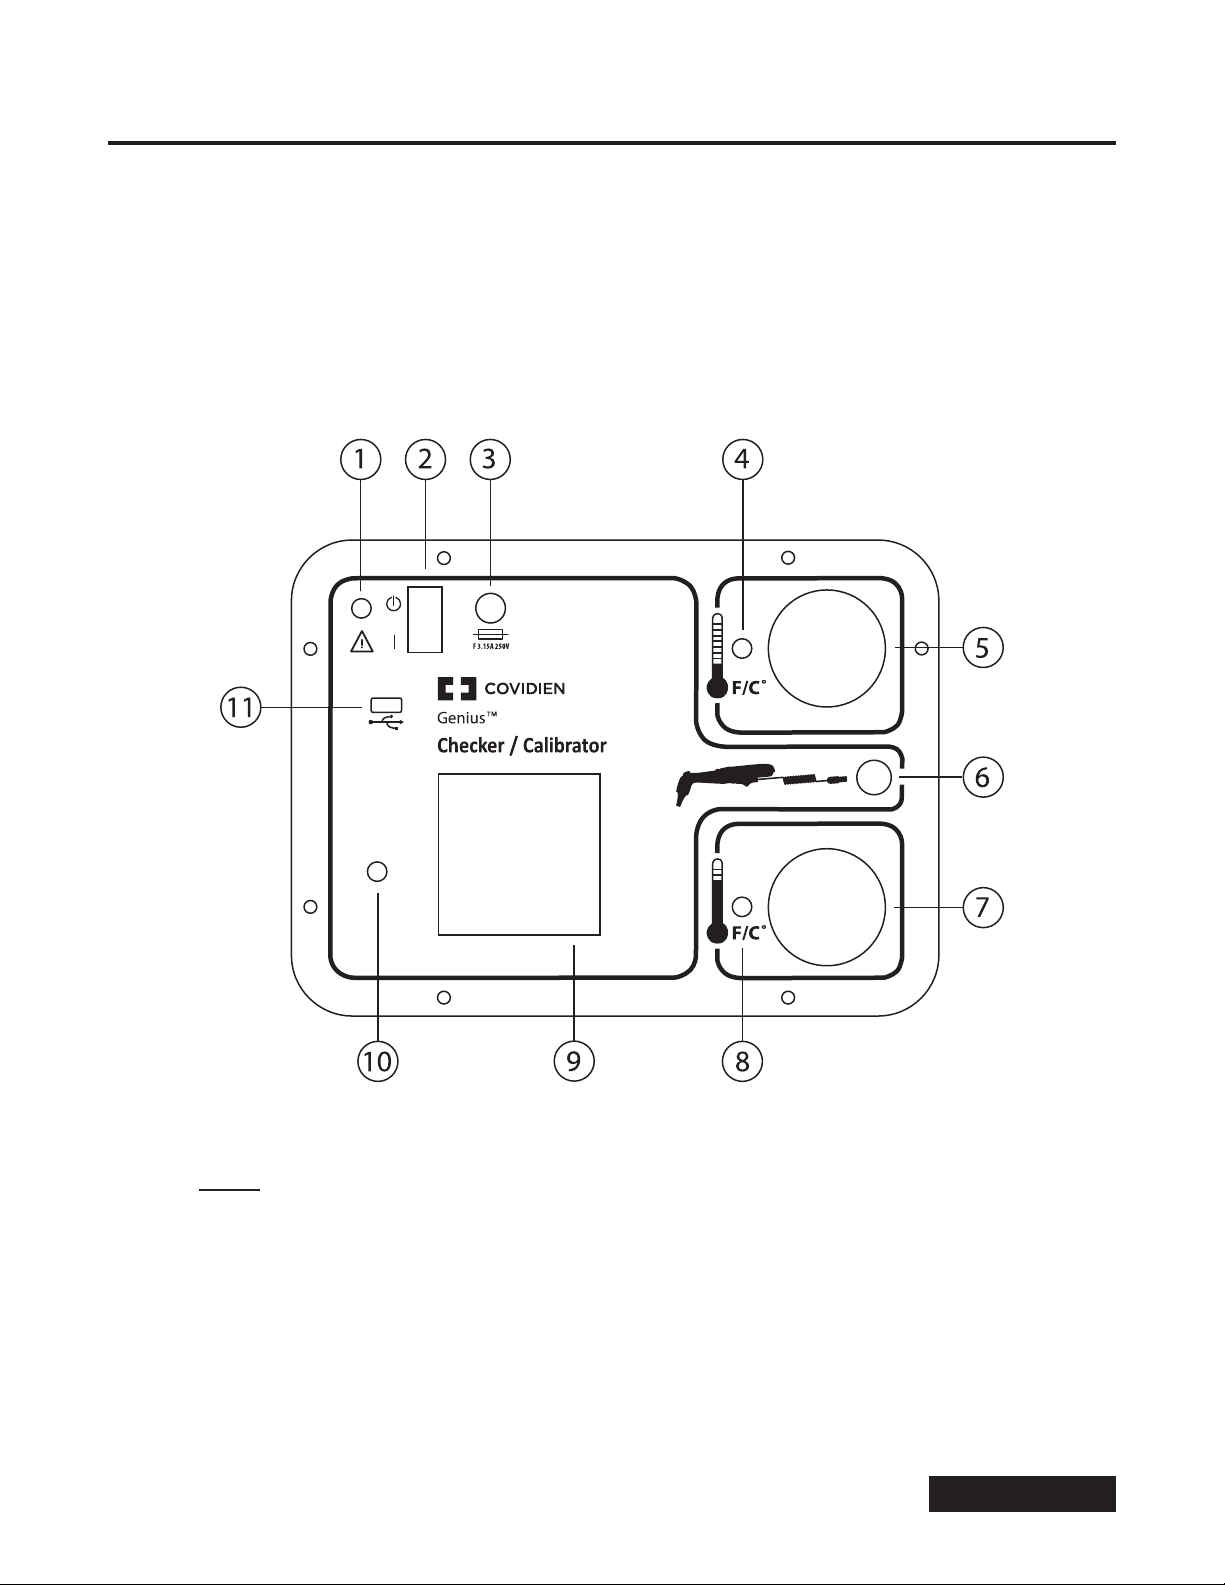
Figure 1 - Front Panel Layout
Legend
1 Power Connector 7 HighTemperatureTarget
2 Power Switch 8 HighTemperatureTarget LED
3 Fuse Holder 9 LCD Display
4 LowTemperatureTarget LED 10 Encoder Knob
5 LowTemperatureTarget 11 USB port
6 Genius™Thermometer Connector

GeniusTM Checker/Calibrator Table of Contents
2
Section II - Precautions and Warnings
Warning:
• The Genius™ Checker/Calibrator is designed to be used in a clinical setting by personnel with basic metrology or biomedical training.
• The Genius™ Checker/Calibrator is designed to be operated as specified in this manual. Protection provided by the safety devices in
the Genius™ Checker/Calibrator may be impaired if the device is not used in accordance with the directions contained in this manual.
• The Genius™ Checker/Calibrator enclosure is not waterproof. Avoid spilling liquid of any kind onto the front panel of the device.
Likewise, the Genius™ Checker/Calibrator is powered from an AC power source. Avoid the potential for contact between liquid and any
external surface of the device while connected to the mains source.
• This device should not be used in the presence of flammable anesthetics.There is risk of an explosion in the presence of these anesthetics.
• Use only the supplied power module with this device.
• To maintain Electromagnetic Compatibility (EMC) conformance, use a USB flash drive that is CE marked and meets EN55032 standard.
• The Genius™ Checker/Calibrator may only be used indoors, in an area free from drafts and wide ambient temperature swings.
• The USB port on the front panel is intended to be used with only a USB Flash memory drive with a minimum capacity of 128MB
and maximum capacity of 8GB. No other USB devices should be inserted into the USB port.The USB flash memory drive should be
installed prior to device power-up.
Caution:
• The surface quality of the interior of the reference blackbody targets is critical to their operation as efficient infrared radiators. Care should
be exercised when working near the entrance to the blackbody targets to ensure that no contact is made with the surface inside the
rubber flaps. If interior of the blackbody targets is suspected to be dirty or damaged, unit should be sent to a service center for evaluation.
• In the event of a blown fuse, replace the fuse with a fuse that exactly matches the rated voltage, current, and form factor as specified
in the Genius™ Checker/Calibrator Specifications section of this manual. Make sure the device is disconnected from the AC power
source before changing a blown fuse.
• Aside from fuses, there are no user-serviceable components in this device. Do not remove the front panel. Refer servicing to qualified
service personnel.
• When prompted to insert the Genius™ 3Thermometer into one of the blackbody targets, there is a 60 second window of time to
accomplish the insertion. If the time delay exceeds this period, the procedure will be terminated.
• Prior to checking/calibrating a Genius™ 3Thermometer, ensure that the thermometer lens is clean. Effective cleaning will ensure that
the calibration tolerances are correctly verified. Refer to the cleaning instructions in the Genius™ 3Thermometer operating manual.
• All probe covers utilized with this device should be new, clean, Genius™ Probe Covers, still attached to the cassette. Use of covers that
have been touched, handled incorrectly, previously used, damaged or faulty, those with wrinkles, holes, or other defects, could cause
inaccurate results. Use of other branded probe covers could cause inaccurate results and/or damage to the thermometer and the
checker/calibrator unit.
• To ensure accurate results, let the Genius™ Checker/Calibrator warm up after power-up for at least 15 minutes before use. Make sure
that the Genius™ 3Thermometers, probe covers and the Genius™ Checker/Calibrator have had enough time to equilibrate to room
temperature before proceeding. Allow a longer warm up period if the device or thermometers were at the extreme limits of allowed
ambient temperature.The portability of the Genius™ Checker/Calibrator will allow for relocation of the device to areas that meet the
ambient temperature requirements.
• Do not put or rest the Genius™ 3Thermometer on the surface of the Genius™ Checker/Calibrator at any time. The thermal sensors
inside the thermometer probe tip will detect the heat transferred from the blackbody targets through the front panel surface.This
will cause instability of the thermometer sensors, which will produce erroneous temperature readings.
• In the event that the Genius™ Checker/Calibrator is dropped, return the unit to the factory for re-calibration.
• Ensure that there are no foreign objects such as old probe covers inside the blackbody targets prior to checking a thermometer.
• The case of the Genius™ Checker/Calibrator should remain closed when not in use to prevent damage to the unit and to prevent the
blackbody targets from getting soiled due to dust.
• If the USB flash drive is installed after performing a calibration check, an error message may occur when attempting to write the
report file if the operator does not wait for the USB flash drive to complete initialization. If the Genius™ Checker/Calibrator is powered
off, all internal memory (not yet saved to the USB flash drive) will be lost.
• This equipment is not intended for use in residential environments and may not provide adequate protection to radio reception in
such environments.
GeniusTM Checker/Calibrator Table of Contents
3
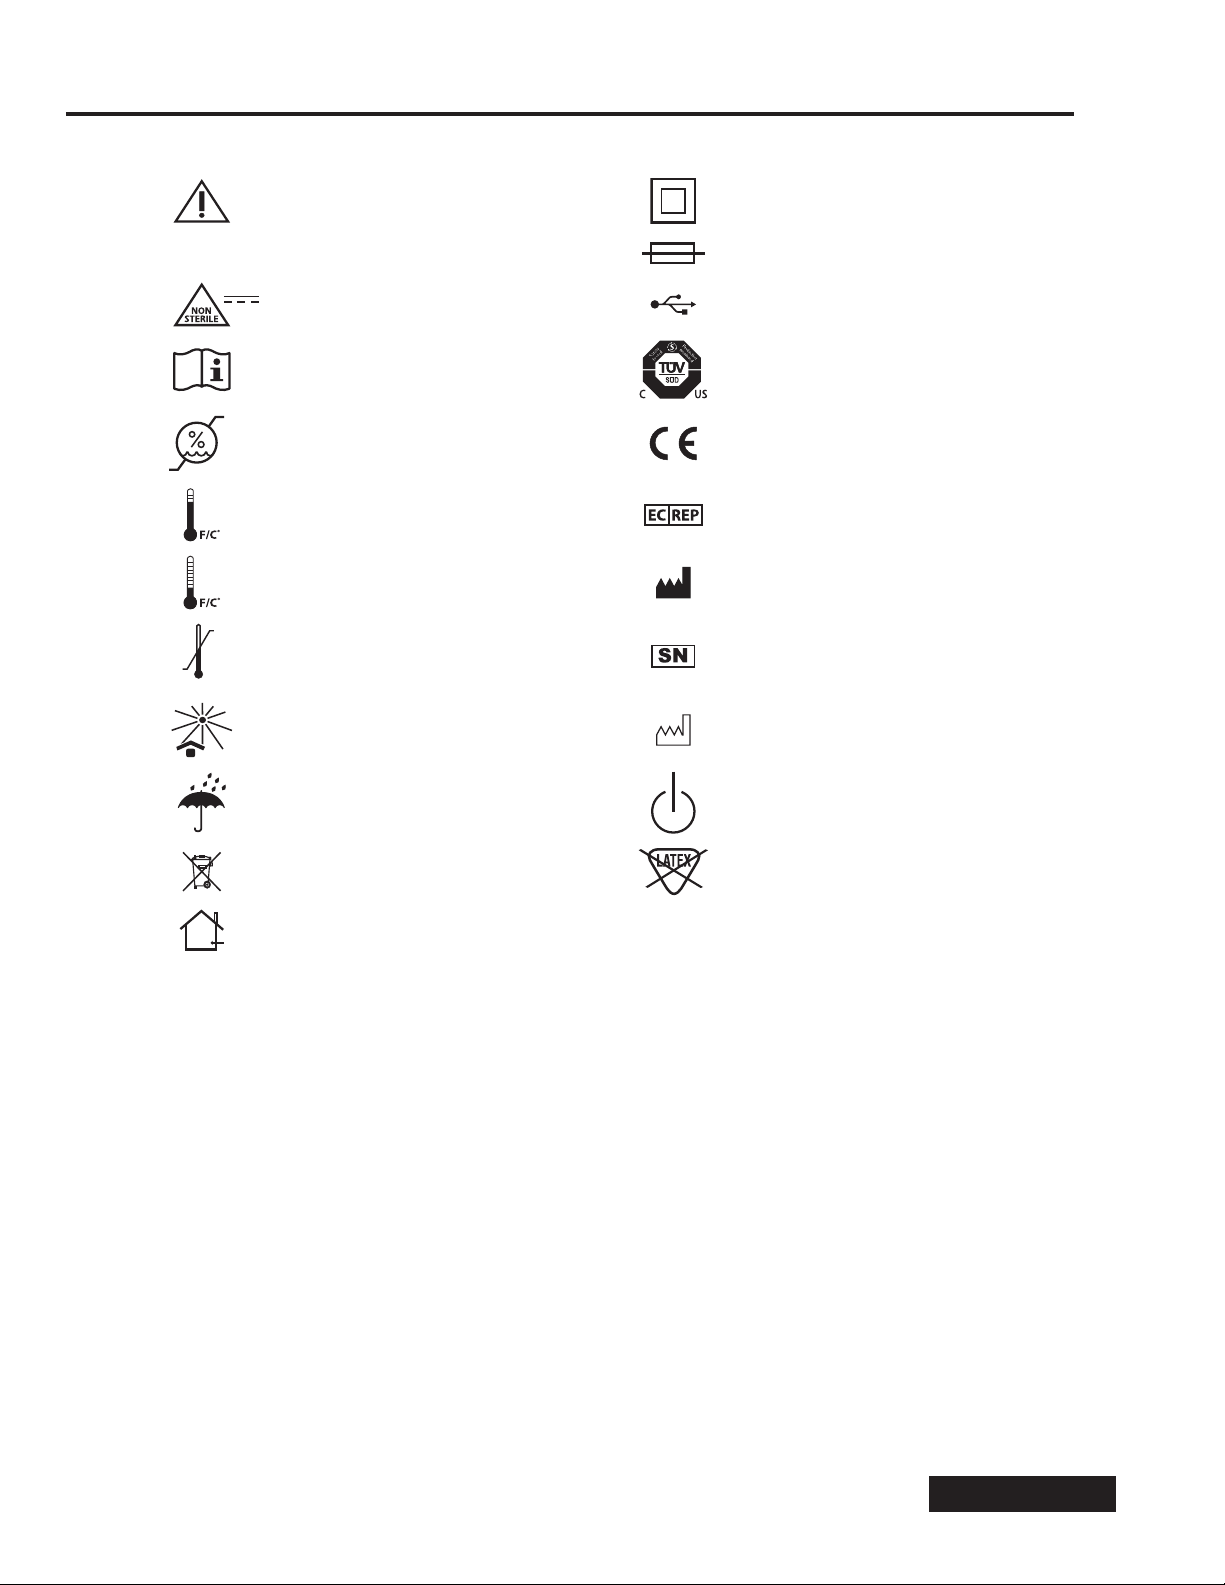
Section III - Icon Identification
Connection for 12VDC 2.5A input Class II equipment
12V 2.5A Input rating Fuse
Non-Sterile USB Port
Caution, consult accompanying
documents TÜV mark (SÜD)
0%
85%
Humidity limitation CE Mark
HighTemperatureTarget Authorized representative in the
European Community
LowTemperatureTarget Manufacturer
-13°F
-25°C
131°F
55°C Temperature limit Serial number
Keep away from sunlight Date of Manufacture
Keep dry Standby Power
WEEE (Waste from electrical and
electronic equipment) Not made with natural
rubber latex
Caution for indoor use only
GeniusTM Checker/Calibrator Table of Contents
4
Section IV - Required Equipment
1. Genius™ Checker/Calibrator
2. Power module with AC adapter
3. Probe cable
4. Operator’s Manual
5. Genius™ 3Thermometers to be tested
6. 8 Genius™ Disposable Probe Covers, part 303030.
For calibration check only, 2 probe covers are required.
If recalibration is required, 6 additional probe covers are needed.
7. Small Phillips screwdriver
Section V - System Setup
The following actions should precede use of the Genius™ Checker/Calibrator:
1. Connect the correct AC plug adapter for your country to the power module.
2. Connect the power module cable to the power jack on the front panel.
3. Connect the power module to an AC power outlet.
4. Turn the unit on via the switch on the front panel.
5. Let the Genius™ Checker/Calibrator unit warm up for at least 15 minutes.
6. Set aside a cassette with new Genius™ probe covers.
7. Let the Genius™ 3Thermometers equilibrate to the room temperature.
8. Prepare the Genius™ 3Thermometers by thoroughly cleaning the lenses prior to use. Refer to the Genius™ 3Thermometer
operating manual for cleaning instructions.
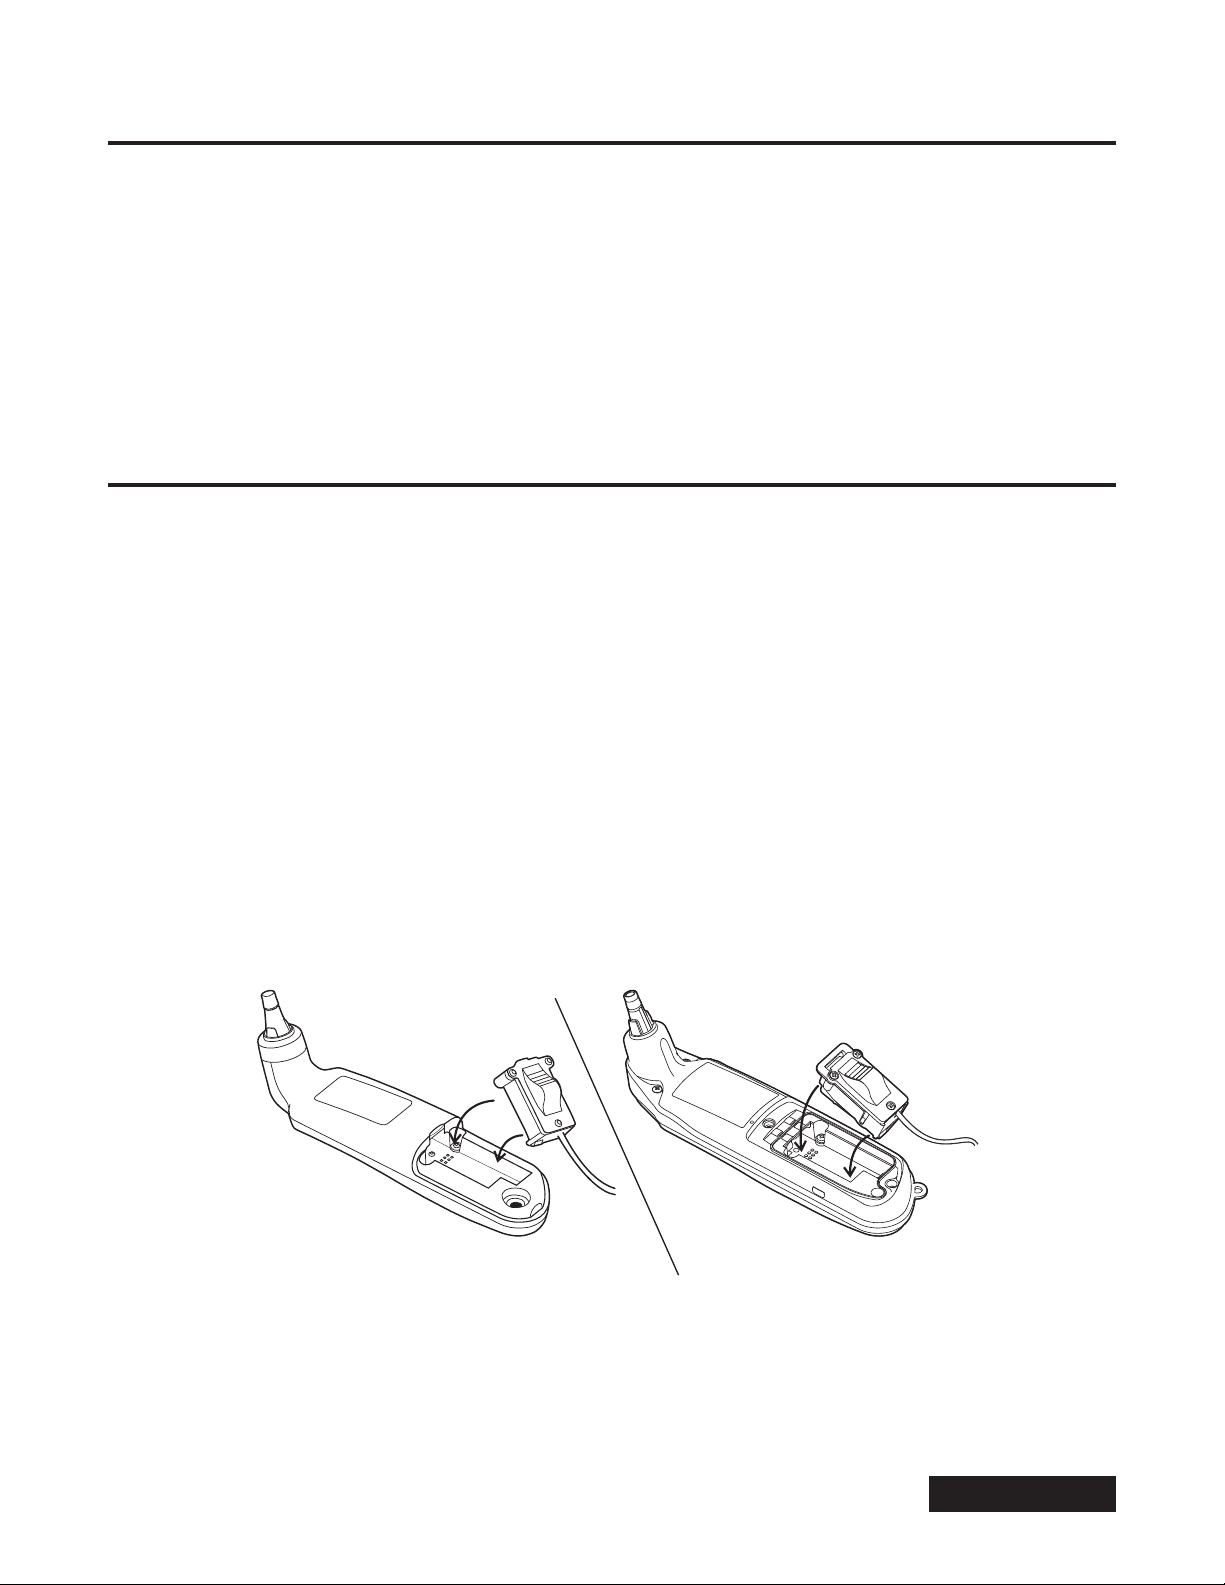
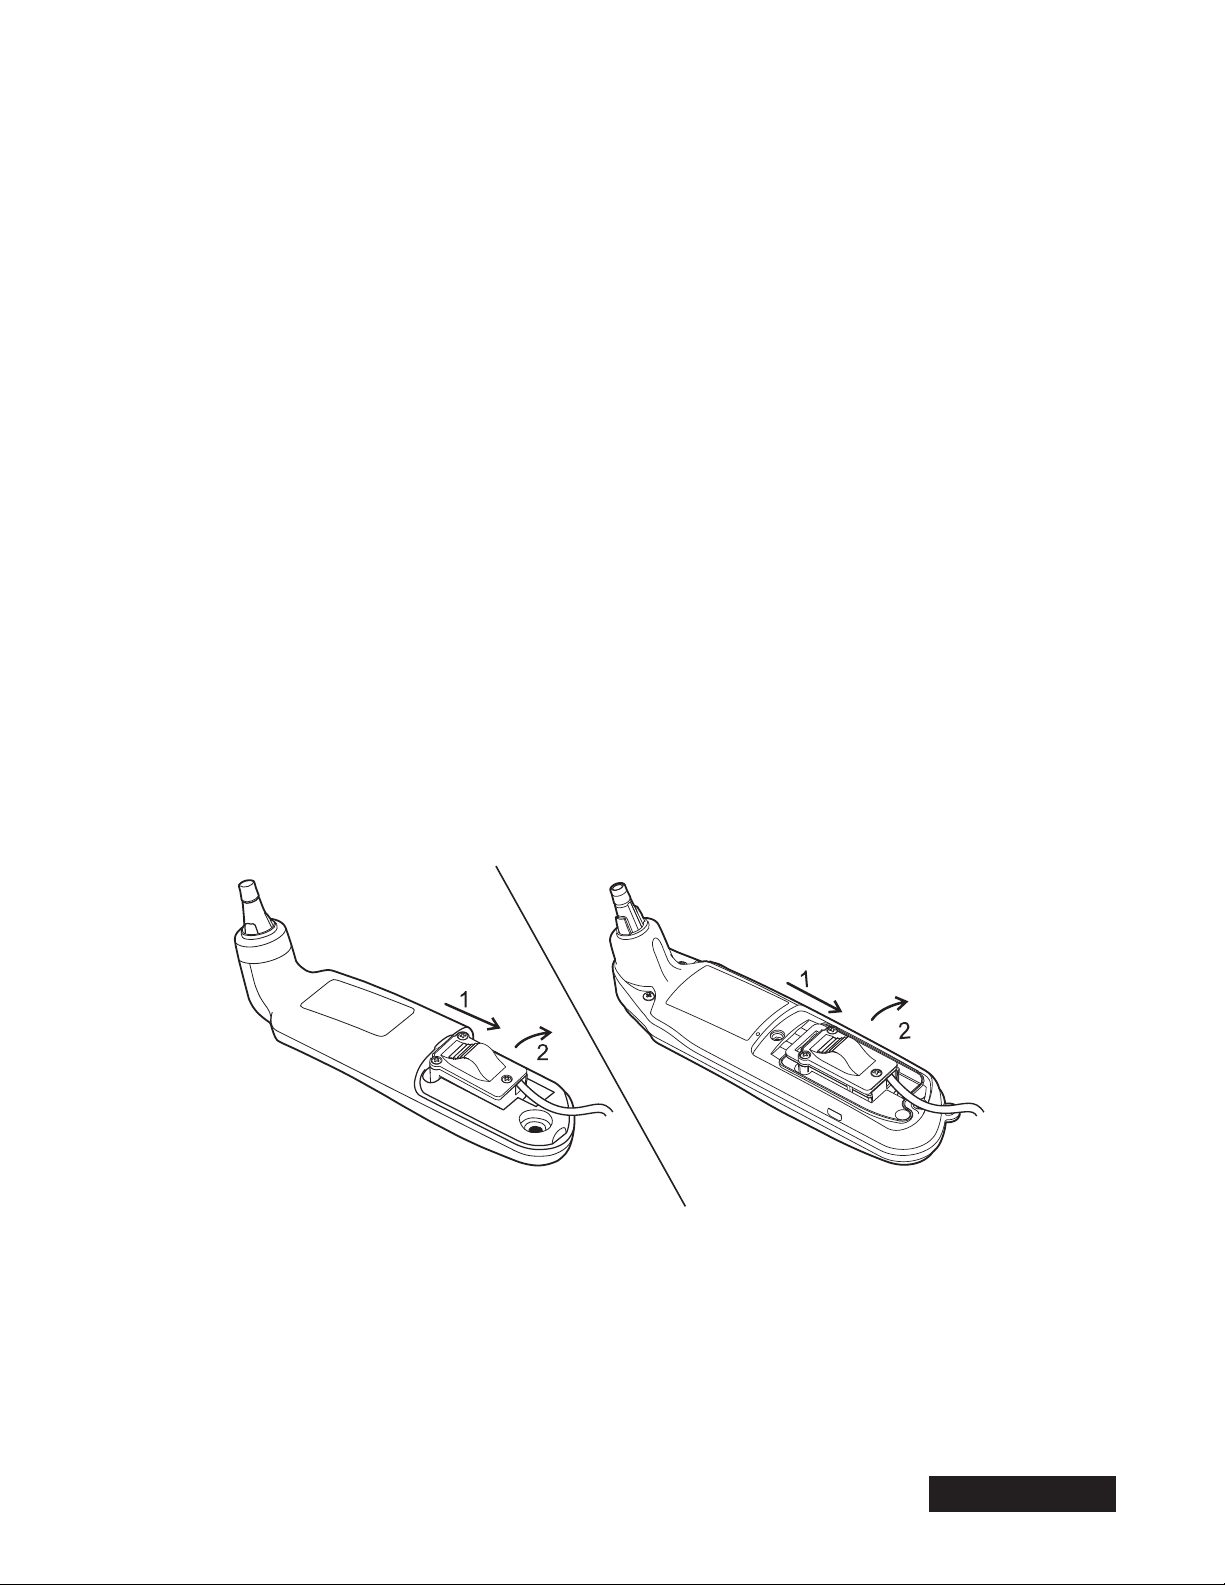
9. Remove the battery compartment access panel by using a small Phillips screwdriver. Remove all three AAA batteries.
10. Connect the probe cable round connector to the front panel of the Genius™ Checker/Calibrator.
11. Connect the other end of the probe connector into the battery compartment.The connector will snap into place where the
batteries were. Do not move forward until connector is secure. Refer to Figure 2.
Genius™ 2
1
1
22
Genius™ 3
Figure 2 - Insertion of Probe Connector into Genius™ 2 or Genius™ 3 Battery Compartment

GeniusTM Checker/Calibrator Table of Contents
5
Section VI - Operational Procedure
The following procedure will describe the steps required to operate the Genius™ Checker/Calibrator. In order to facilitate familiarity with the product, it
would be advisable to use this section of the manual during the calibration check of the first few thermometers.
Installation of USB Flash Drive (Optional)
Install a USB flash drive into the USB port located on the front panel if a report file written to the USB flash drive is desired. If the USB flash drive is installed
after performing a calibration check, an error message may occur when attempting to write the report file if the operator does not wait for the USB flash
drive to complete initialization. If the Genius™ Checker/Calibrator is powered off, all internal memory (not yet saved to the USB flash drive) will be lost.
Apply Power
Make sure the AC-adapter end of the power module is plugged into a 100-240VAC outlet. Connect the power module to the front panel power connector.
Apply power to the Genius™ Checker/Calibrator by using the power switch on the front panel.
Start-up Screen
The first screen on the LCD display is the Initialization Screen, which displays the software revision and date of the Genius™ Checker/Calibrator. If there is an
internal problem during initialization, an Error screen will be displayed (See Section VII).
Recalibration Due Screen
An optional screen will appear if the Genius™ Checker/Calibrator is overdue or due very soon for recalibration.The Genius™ Checker/Calibrator is overdue if
it has been more than 1 year since its last calibration, and a reminder will appear if it is due for recalibration within 1 month.This is a reminder to the user
to return the Genius™ Checker/Calibrator to a customer service center for recalibration.
Reminder Screen
The next screen on the LCD display is a reminder to let the Genius™ Checker/Calibrator warm-up for at least 15 minutes after applying power. This will let
the infrared blackbody targets warm up to the proper temperatures. To exit this screen, press the encoder knob.
Ambient Temperature
The next screen on the LCD display has important instructions to use the Genius™ Checker/Calibrator in an environment free from drafts and within the
ambient temperature operating range.To exit this screen, press the encoder knob.
Main Menu
The Main Menu screen is displayed next.This screen has four menu options:
Check Calibration
Preferences
Set User/Site Information
SetTime/Date
To enter any menu option, use the encoder knob to scroll over and highlight the desired menu option, then press the encoder knob.
Preferences
When the Preferences screen is entered, the following choices are available:
Time Format
Date Format
Language
Back
Use the encoder knob to scroll over and highlight the desired menu option, then press the encoder knob.
Time Format
Two time format options are available: 12-hour and 24-hour.The currently selection option has an asterisk“*”character to the left of the option.To select
a time format, highlight the option and press the encoder knob. This selects the highlighted option as the new time format and returns to the Main Menu
screen. Choosing“Back”returns to the Main Menu without changing the format.
Date Format
Three date format options are available: MM/DD/YYYY, DD/MM/YYYY andYYYY/MM/DD. The currently selection option has an asterisk“*”character to the
left of the option.To select a date format, highlight the option and press the encoder knob. This selects the highlighted option as the new date format and
returns to the Main Menu screen. Choosing“Back”returns to the Main Menu without changing the format.
Language Selection
The Language Selection screen lists the available languages for the LCD screen text.To select a language, scroll over the selection and it will be highlighted.
Press the encoder knob to complete the selection and return to the Main Menu screen.The selected language will be stored in non-volatile memory and
will continue to be used next time the unit is powered on.

GeniusTM Checker/Calibrator Table of Contents
6
Set User/Site Information
The Set User/Site Information screen is used to enter the operator’s name and the organization and/or site information.
This information will be written to the test report file.
To enter the information, use the encoder knob to scroll through the alphabet for a given letter position in the operator name or site information.When the
correct letter is shown, press the encoder knob to select the letter and advance to the next letter position.
To enter a space, just press the encoder knob when a space or blank letter is shown in that letter position.The user name can be up to 20 characters long.
Use the encoder knob to scroll to the organization field and enter a name for the site in a similar manner. To exit the menu, scroll to the DONE text and press
the encoder knob.
Set Date and Time
The Set Date andTime screen menu option is used to setup the date and time that is used on the test report.The time and date are internally stored and
automatically updated when the unit is powered up.
To enter time, use the encoder knob to select the hours and minutes. Note: the time is setup using the currently selected time format: 12 hour clock format
using AM/PM, or a 24 hour clock format, where 1PM is entered as 13:00 etc.When the value is correct, push the encoder knob to move to the next field of
the time and then to the date field.The date field is setup using a MMDDYYYY, DDMMYYYY orYYYYMMDD format depending on the currently selected
date format. After the last field of the date is entered, the next encoder push will exit this menu and return to the Main Menu. Note: the time and date are
shown at the bottom of the Main Menu.
Check Calibration
This menu option performs the calibration check of a Genius™ 3Thermometer, and if required, automatically recalibrates the thermometer using a series of
step-by-step screens. Before entering this menu option, make sure that the required equipment listed in Section IV is available.This includes a cassette with
unused (new) probe covers.
Step 1:
Warm up of infrared blackbody targets. This screen is displayed while the targets are checked for proper temperature. Both the LowTarget and the High
Target are checked, and when they are at the correct temperature, the screen will change to“OK”for each target.There is a prompt to press the encoder
knob to continue to the next screen. If either target cannot reach the correct temperature, an Error message screen will be displayed. If this happens, check
to be sure the Genius™ Checker/Calibrator is within the correct ambient (room) temperature range, and has been given at least 15 minutes of warm up time
since power was switched on.
Step 2:
Inspect the Genius™ 3 Thermometer that will be tested. Ensure that the thermometer lens is not scratched and is free from ear wax and/or other
contaminants. If the thermometer lens is‘‘dirty’’, clean the lens according to the instructions in the Genius™ 3Thermometer operating manual.The
confirmation screen will be shown, asking for confirmation that the Genius™ 3 Thermometer’s lens is clean. If lens is not clean, failed calibration may occur
or the unit may be calibrated incorrectly.
Step 3:
Connect the Genius™ 3Thermometer to the Genius™ Checker/Calibrator by plugging the round end of the thermometer interface cable into the round
connector socket on the Genius™ Checker/Calibrator front panel (refer to Figure 2). Open the battery door of the thermometer by using a small Phillips
screwdriver. Remove the batteries and set aside. Connect the other end of the thermometer probe cable into the battery compartment, making sure the
connector‘‘snaps’’into place securely. Refer to Figure 2 in SectionV. Press the scan button on the Genius™ 3Thermometer, so that it is powered on and ready
to communicate with the Genius™ Checker/Calibrator. If the Genius™ Checker/Calibrator is unable to initiate communication with the thermometer, an
informational message will be shown prompting the user to ensure that there is no probe cover present on the thermometer tip and that the scan button
has been pressed.
Note: A new, clean, Genius™ probe cover must be used prior to every target insertion. Finger oils on previously used probe covers or reused probe covers
that have been heated by Genius™ Checker/Calibrator target can cause erroneous readings which may result in a failed calibration check or an inaccurate
calibration.Therefore, it is extremely important that a new probe cover is used each time.
Step 4:
Press the encoder knob to continue, and then install a new Genius™ probe cover onto the Genius™ 3Thermometer. Make sure to use a cover that is held in
the cassette. Once the cover is on the thermometer, do not point the probe tip at any object, including hands, fingers or LCD display, as this will cause an
inaccurate temperature reading. Inspect the probe cover to make sure it is fully seated (no space between the cover and the tip base) and no holes, tears, or
wrinkles are present in the plastic film.When the cover is on, insert the probe tip into the Low temperature target, which will have a blinking LED indicator
next to it. Make sure that the probe tip is fully inserted into the target well. Refer to Figure 3a for proper insertion. In order to avoid a time-out error, insert
the covered probe tip into the target within 60 seconds from the time the encoder knob is pressed.

GeniusTM Checker/Calibrator Table of Contents
7
Figure 3a - Proper Insertion of Genius™ Probe Tip into Low Temperature Target
Step 5:
The insertion of the probe tip into the target will automatically be detected and the screen display will change to“Press Genius Scan Button.”Press the
Genius™Thermometer scan button while it is inserted into the Low temperature target.The Genius™ 3Thermometer will output 3 short beeps as it takes
the temperature of the blackbody target. After the temperature is taken, the next screen will display.
Step 6:
Withdraw the thermometer from the Low temperature target and eject the probe cover.The screen display will change to“Install a new probe cover. Then
insert Genius in High Target Next To Blinking LED.”Again, use a new Genius™ probe cover from the cassette and be careful not to point the probe tip at any
object, including hands, fingers or LCD display. Inspect the probe covers to make sure it is fully seated (no space between the cover and the tip base) and
no holes, tears, or wrinkles are present in the plastic film.When the cover is on, insert the probe tip into the High temperature target, which will have a
blinking LED indicator next to it. Make sure that the probe tip is fully inserted into the target well.
Figure 3b - Proper Insertion of Genius™ Probe Tip into High Temperature Target
Step 7:
The insertion of the probe tip into the High target will automatically be detected and the screen display will change to“Press Genius Scan Button.”Press the
scan button on the Genius™Thermometer while it is inserted into the High temperature target.The Genius™ 3Thermometer will output 3 short beeps as it
takes the temperature of the blackbody target. After the temperature is taken, the next screen will display. Refer to Figure 3b.
GeniusTM Checker/Calibrator Table of Contents
8
Step 8:
If the Genius™ 3Thermometer is within specified accuracy limits, a Results screen will be displayed showing the thermometer serial number along with an
indication that the thermometer passed calibration check. If the Genius™ 3Thermometer is found to be outside the specified accuracy limits , the display
will indicate to the user that the Genius™ Checker/Calibrator is entering into a calibration sequence that requires the user to repeat Steps 4 through 7
three more times in order to gather recalibration data. Following the last pass through Steps 4 through 7, the Genius™ Checker/Calibrator will attempt to
recalibrate the Genius™ 3Thermometer. If the recalibration is successful, a Results screen will be displayed showing the thermometer serial number along
with an indication that the thermometer passed calibration. If the recalibration is unsuccessful or the thermometer is unable to be calibrated, a Results
screen will be displayed showing the thermometer serial number along with an indication that the thermometer failed calibration.
Step 9:
After the pass/fail Results screen has been displayed, press the encoder knob to display a second Results screen containing the target temperatures, the
Genius™ 3Thermometer readings, and the target versus thermometer variances.
Step 10:
The next screen will display“Write report to USB drive?”and displayYes and No below. If a report is desired, insert a flash drive into the front panel USB
port. Note: allow about 30 seconds after insertion for the USB flash drive to initialize. Use the encoder knob to scroll to eitherYes or No and press the
encoder knob to make a selection. If No is selected, the screen returns to the Main Menu. IfYes is selected, a report is written to the USB flash drive, using
the thermometer serial number for filename and .TXT as the file extension. The file contains the test results as well as other information such as serial
number, date, time, user name, and organization.This file is a simple ASCII text file and is only available in English.This file can be read by Microsoft
Windows® operating system and Microsoft Windows® notepad and sent to a printer. After the file is written, the display will show“Push knob to continue.”
Press the encoder knob to return to the Main Menu.
If the thermometer fails recalibration, reattempt calibration by repeating the Check Calibration steps. If the thermometer persistently fails recalibration,
the thermometer should be returned for service.
Step 11:
After completing a calibration check/recalibration, remove the probe connector from the battery compartment by pulling straight back on the connector
and rotating up and out of the thermometer as shown in Figure 4.Then reinstall the 3 AAA batteries, observing the proper polarity orientation. Finally,
reinstall the battery compartment cover and tighten the screw or screws.
Step 12:
Remove USB flash drive and power connector from the Genius™ Checker/Calibrator front panel before closing the lid.The lid should be closed when the
Genius™ Checker/Calibrator is not in use.
Genius™ 2
Genius™ 3
Figure 4: Probe Connector removal

GeniusTM Checker/Calibrator Table of Contents
9
Section VII - Error Messages
The error messages will have a number associated with them, such as Error 1, etc.The following is an explanation of the errors:
Error 1: Internal Error
This error is an indication of a problem within the Genius™ Checker/Calibrator. If this error persists after cycling power off and back on,
return the unit for factory servicing.
Error 2: Unable to communicate with Genius™ Thermometer.
This error is an indication of either a lack of communication or a miscommunication between the Genius™ 3Thermometer and the
Genius™ Checker/Calibrator. Check both ends of the thermometer probe cable, especially the end that connects inside the battery
compartment.The pins in the thermometer probe cable can lose spring action if they are bent or damaged.
After inspecting the probe cable, re-attempt the calibration check. If the problem persists, try a different Genius™ 3Thermometer,
if available. If this does not resolve the problem, return the unit for factory servicing, along with the thermometer cable and the
Genius™ 3Thermometer that indicated this error.
Error 3: Timeout
This error is an indication that the operator took too long to perform an operation.This error might be seen when connecting to the
Genius™ 3Thermometer, or while installing a probe cover on the thermometer.The timeout is set for one minute.
Try repeating the operation that gave this error.
Error 4: Target Out of Range
This error is an indication that one of the blackbody targets is not within the range of temperature allowed. Check that the unit is
being operated within the allowed ambient temperature operating range. Refer to Section VIII. If operating within the specified
ambient conditions does not eliminate the error, the blackbody target(s) may be damaged. Return the unit for factory servicing.
Error 5: USB Flash Drive Write Error
This error is an indication of a problem when writing the report file to a USB flash drive. Check that the write protect switch on the
USB drive is in the“off ”position. Make sure that there is sufficient free space on the drive, and that security or encryption features are
not in use.
Error 6: Ambient Temperature Out of Range
This error is an indication that the ambient temperature is not within the specified range for performing an accurate recalibration.
Check that the unit is being operated within the allowed ambient temperature operating range. Refer to SectionVIII.
Error 7: Wrong Target
This error is an indication that the Genius™ 3Thermometer has been inserted into wrong target or was inserted into the target
prematurely. Please take care to follow the instructions on the screen and not perform steps prior to the instructions being displayed.
Error 8: Genius™ Thermometer Hardware Error
This error is an indication that a hardware error has been detected in the Genius™ 3Thermometer, and the thermometer cannot be
calibrated.The Genius™ 3Thermometer should be returned to the factory for service.The Calibrator provides the option for a report to
be written to a USB drive, following the error screen.
Error 9: Genius™ Thermometer readings Not Consistent
This error is an indication of the temperature readings received from the Genius™ 3Thermometer not being consistent.Try repeating
the check/calibrate operation taking care to not point the probe tip at any heat source, including hands, fingers or LCD display once
the cover is on the thermometer.
Error 10: Removal From Target
This error is an indication of the Genius™ 3Thermometer being removed from the blackbody target before the temperature reading is
completed. Ensure that the thermometer tip remains inserted in the target until after the temperature reading is finished.
The Error screen will be displayed for 60 seconds before returning to the Main Menu.To exit the Error screen sooner, press the
encoder knob.

GeniusTM Checker/Calibrator Table of Contents
10
Section VIII - Checker/Calibrator Specifications
Temperature Set Points
Low Target . . . . . . . . . . . . . . . . . . . . . . . . . . . . . . . . . . . . . . . . . . . . . . . . . . . . . . . 32.22 °C +/- 0.3 °C (90.0 °F +/- 0.5 °F)
High Target . . . . . . . . . . . . . . . . . . . . . . . . . . . . . . . . . . . . . . . . . . . . . . . . . . . . . . .40.55 °C +/- 0.3 °C (105.0 °F +/- 0.5 °F)
Target Temperature Accuracy . . . . . . . . . . . . . . . . . . . . . . . . . . . . . . . . . . . . . . . . . . . . . . . Initial Limit +/- 0.03 °C (0.05 °F)
. . . . . . . . . . . . . . . . . . . . . . . . . . . . . . . . . . . . . . . . . . . . . . . . . . . . . . . . . . . . . . . . . .Post 6 months +/- 0.06 °C (0.10 °F)
Genius™ 2 Thermometer Accuracy After Recalibration*
Readings between 36.0 °C and 39.0 °C (96.8 °F and 102.2 °F). . . . . . . . . . . . . . . . . . . . . . . . . . . . . . . . . +/- 0.2 °C (+/- 0.4 °F)
Readings less than 36.0 °C (96.8 °F) or greater than 39.0 °C (102.2 °F) . . . . . . . . . . . . . . . . . . . . . . . . . . . +/- 0.3 °C (+/- 0.5 °F)
Genius™ 3 Thermometer Accuracy After Recalibration*
Readings between 33.0 °C and 42.0 °C (91.4 °F and 107.6 °F). . . . . . . . . . . . . . . . . . . . . . . . . . . . . . . . . +/- 0.3 °C (+/- 0.5 °F)
Warm-upTime Before Use . . . . . . . . . . . . . . . . . . . . . . . . . . . . . . . . . . . . . . . . . . . . 15 minutes (from non-extreme ambient)
Ambient Temperature Operating Range . . . . . . . . . . . . . . . . . . . . . . . . . . . . . . . . . . . . . . . . . . . . . .21.1-26.7 °C (70-80 °F)
Relative Humidity Operating Range. . . . . . . . . . . . . . . . . . . . . . . . . . . . . . . . . . . . . . . . . . . . . 50 +/- 20%, non-condensing
Altitude Range. . . . . . . . . . . . . . . . . . . . . . . . . . . . . . . . . . . . . . . . . . . . . . . . . . . . . . . . . . Up to 2000 meters (6563 feet )
Storage Temperature Range. . . . . . . . . . . . . . . . . . . . . . . . . . . . . . . . . . -25 °C - 55 °C (-13 °F - 131 °F ) 85% RH non-condensing
Approximate Size
Length . . . . . . . . . . . . . . . . . . . . . . . . . . . . . . . . . . . . . . . . . . . . . . . . . . . . . . . . . . . . . . . . . . . . . . . 31.1 cm (12.25”)
Depth. . . . . . . . . . . . . . . . . . . . . . . . . . . . . . . . . . . . . . . . . . . . . . . . . . . . . . . . . . . . . . . . . . . . . . . . . 15.9 cm (6.25”)
Width. . . . . . . . . . . . . . . . . . . . . . . . . . . . . . . . . . . . . . . . . . . . . . . . . . . . . . . . . . . . . . . . . . . . . . . . 26.0 cm (10.25”)
Weight . . . . . . . . . . . . . . . . . . . . . . . . . . . . . . . . . . . . . . . . . . . . . . . . . . . . . . . . . . . . . . . . . . . . . . . . .3.3 kg (7.2 lbs )
Power Requirements. . . . . . . . . . . . . . . . . . . . . . . . . . . . . . . . . . . . . . . . . . . . . . . . . . . . . . . . . . . . . . . . . .12VDC 2.5A
Fuse Requirements . . . . . . . . . . . . . . . . . . . . . . . . . . . . . . . . . . . . . . . . . . . . . . . . . . . . . .Schurter FSF 5 x 20mm Fast Blow
. . . . . . . . . . . . . . . . . . . . . . . . . . . . . . . . . . . . . . . . . . . . . . . . . . . . . . . . . . . . . . . . . Low Breaking Capacity 250V, 3.15A
Power Module with AC adapter . . . . . . . . . . . . . . . . . . . . . . . . . . . . . . . . . . . . . . . . . . Cincon Electronics, Model TR30RAM120
. . . . . . . . . . . . . . . . . . . . . . . . . . . . . . . . . . . . . . . . . . . . . . . . . . . . .Input: 100-240VAC 0.8-.4A 47-63Hz, Output: 12VDC 2.5A
Recommended Checker/Calibrator Calibration Interval . . . . . . . . . . . . . . . . . . . . . . . . . . . . . . . . . . . . . . . . . . . . OneYear
Pollution Degree . . . . . . . . . . . . . . . . . . . . . . . . . . . . . . . . . . . . . . . . . . . . . . . . . . . . . . . . . . . . . . . . . . . . . . . . . . 2
Installation Category . . . . . . . . . . . . . . . . . . . . . . . . . . . . . . . . . . . . . . . . . . . . . . . . . . . . . . . . . . . . . . . . . . . . . . . II
. . . . . . . . . . . . . . . . . . . . . . . . . . . . . . . . . . . . . . . . . . . . . . . . . . . . . . . . . . . . . . . . . . . . . . . . . . . . . Indoor Use Only
*Post recalibration accuracy using the Genius™ Checker/Calibrator may not necessarily be equivalent to factory calibration
GeniusTM Checker/Calibrator Table of Contents
11
Section IX - Cleaning Instructions
Caution: Do not immerse the checker/calibrator, cables, or power cord in water or other cleaning solution; clean using a damp
(not wet) cloth. Failure to follow cleaning procedures described herein could result in hazards to users.
As with any AC powered electrical device, care must be taken to prevent liquid from entering the Genius™ Checker/Calibrator to avoid electrical
shock hazard, fire hazard, or damage to electrical components.
General Cleaning Instructions
Cleaning of the Genius™ Checker/Calibrator may be performed as follows:
• First, unplug the Genius™ Checker/Calibrator from power source. Never clean the device while connected to the mains supply.
• A mild detergent should be used for general cleaning of outside surfaces. Also, a cloth damped with isopropyl alcohol can be used to clean
the unit. Do not use abrasives or solvents. Avoid excess moisture around the target assemblies and the electrical connectors.
• Do not attempt to clean the target below the rubber flaps.
• Do not clean the target nests or flaps with alcohol.
• If target is suspected to be dirty or damaged, contact customer service to have the unit sent to a service facility.
If there is any doubt about the compatibility of a cleaning agent with part of this equipment or its materials contact
Covidien customer service (See Section XI).
Section X - Troubleshooting
Some of the common problems are as follows:
Problem Probable Cause Corrections
Genius™ Checker / Calibrator will not
power up Genius™ Checker / Calibrator not receiving AC power Check AC power connections
Blown fuse Replace fuse
Test report does not write to USB
flash drive USB flash drive not formatted Use PC or laptop to format flash drive
USB flash drive write protected Use PC or laptop to turn off write protection
USB flash drive does not contain enough free memory space Use PC or laptop to delete unnecessary items or use different USB flash drive
USB flash drive incompatible with Genius™ Checker/Calibrator Use different USB flash drive
Genius™ Checker / Calibrator has not had enough time to detect the
newly inserted USB flash drive Retry write process
Multiple Genius™Thermometers
fail recalibration Probe cover stuck in one of the blackbody targets Remove probe cover from blackbody target using small needle-nose pliers or
hemostats. Do not scratch the interior surface of the target.
Dirty probe cover Use a new probe cover for each reading. Do not re-use a probe cover.
Probe covers should never be touched by hand.
Dirty thermometer lens Clean the thermometer lens per the instructions in the Genius™ operating manual.
Genius™Thermometer not seated correctly Ensure that the Genius™Thermometer is completely seated in the target and at the
proper angle.
Genius™Thermometers, probe covers, and/or checker/calibrator not
at room temperature. Ensure that the Genius™Thermometers, probe covers, and/or checker/ calibrator
have had enough time to equilibrate to room temperature before proceeding.
Error 2 or Error 3 repeatedly appears Residue present on pins of connector on the cable or on the pads of
Genius™Thermometer board in battery compartment, interfering
with electrical contact.
Clean pins of cable connector or pads of thermometer board with a cotton
swab dipped in isopropyl alcohol. Allow the isopropyl alcohol to evaporate fully
before continuing.
Error 6 repeatedly appears while testing
the same Genius™Thermometer Potential power consumption issue with Genius™Thermometer Repeat calibration check / recalibration with a different Genius™Thermometer and
return problem thermometer for factory servicing.
Genius™Thermometer seems to read high
or low following a successful recalibration Probe cover reused during calibration check / recalibration Repeat calibration check / recalibration using a new probe cover prior to every
target insertion during the process.

GeniusTM Checker/Calibrator Table of Contents
12
Section XI - Customer Service
The Genius™ Checker/Calibrator requires factory calibration and inspection once a year. Notify and return the device to Covidien on or before the
calibration date for the Genius™ Checker/Calibrator. The Genius™ Checker/Calibrator will display a message one month prior to the calibration
date as a reminder.
Caution: There are no serviceable parts inside, return to factory for service.
In the event that it is necessary to return a unit for repair, please observe the following:
1. Contact Covidien as shown below, or your local customer service representative for an Authorized Return Number and shipping instructions.
2. Ship insured parcel to your local service contact or the appropriate location below.
United States
Covidien
2824 Airwest Blvd.
Plainfield, IN 46168
1-800-448-0190
EMEA Covidien EMEA Customer Care &
Supply ChainSolution Management &
Operation Excellence
Earl Bakkenstraat 10, Heerlen,
6422 PJThe Netherlands
Outside US & Canada
Covidien
Unit 2Talisman Business Center, London Road
Bicester, OX266HR, UK
1+44-1869-32806
Parts Listing
Please contact your local customer service center or sales representative for the parts listed below.
Description
Genius™ Checker/Calibrator. . . . . . . . . . . . . . . . . . . . . . . . . . . . . . . . . . . . . . . . . . . . . . . . . . . . . . . . . . .303097
Refurbished Genius™ Checker/Calibrator . . . . . . . . . . . . . . . . . . . . . . . . . . . . . . . . . . . . . . . . . . . . . . . . . . .303096
Section XII - Warranty
Covidien warrants the Genius™ Checker/Calibrator to be free of defects in materials and workmanship under normal use and service for a period
of 1 year from the date of delivery by Covidien to the first purchaser. Liability hereunder is limited to repair or replacement, at Covidien’s option,
at Covidien service facility for any product, which shall under normal use and service, appear to Covidien to have been defective in material or
workmanship.This warranty shall not apply to, and Covidien shall not be responsible for, any loss arising in connection with the purchase of any
product that has been repaired by anyone other than Covidien or its authorized representative, or which has been subject to misuse, neglect,
or accident, or which has been used otherwise than in accordance with the instructions furnished by Covidien. Covidien neither assumes nor
authorizes any representative or other person to assume for it any liability other than as expressly set forth herein.
Covidien disclaims all other warranties, expressed or implied, including any implied warranty of merchantability or fitness for a
particular purpose or application other than as expressly set forth in the product labeling. In no event will Covidien be liable for any
incidental, indirect, or consequential damages in connection with the purchase or use of this product.

GeniusTM Checker/Calibrator Table of Contents
13
Section XIII - Electromagnetic Conformity Declaration
The Genius™ Checker/Calibrator has been built and tested according to IEC/EN61010-1 and EN61326-1 standards.
This product has been tested to the requirements of CAN/CSA-C22.2 No. 61010-1, third edition, including Update 2, or a later version of the same
standard incorporating the same level of testing requirements.
The Genius™ Checker/Calibrator is intended for use in the electromagnetic environment specified below.The user of the equipment should assure
that it is used in such an environment.
Emissions Test Compliance Electromagnetic Environment -Guidance
Conducted and Radiated Emissions
(EN61326-1) Group 1, Class A The Genius™ Checker / Calibrator is suitable for all locations other
than residential environments and those directly connected to a low
voltage power supply network which supplies power to buildings
used for domestic purposes (residential).There is a possibility of radio
frequency interference origination from operation of class A equipment
in certain environments.
Harmonic Current
(EN61000-3-2) Class A
Voltage Fluctuation and Flicker
(EN61000-3-3) Complies
Radiated Disturbance Immunity
(EN61000-4-3) Complies
Conducted Disturbance Immunity
(EN61000-4-6) Complies
Power Frequency Magnetic Field
Immunity (EN61000-4-8) Complies
Voltage Dips and Interrupts
Immunity (EN61000-4-11) Complies
Electrical Fast Transient/Bursts
Immunity (EN61000-4-4) Complies
Surge Immunity (EN61000-4-5) Complies
Electrostatic Discharge
(EN61000-4-2) Complies

Manual No. HP112002
COVIDIEN, COVIDIEN with logo and Covidien logo are U.S. and internationally
registered trademarks of Covidien AG.
Microsoft and Windows are either registered trademarks or trademarks of
Microsoft Corporation in the United States and other countries.
Other brands are trademarks of a Covidien company.
©2012 Covidien.
Made in USA.
Covidien llc, 15 Hampshire Street, Manseld, MA 02048 USA.
Covidien Ireland Limited, IDA Business & Technology Park, Tullamore.
REV 09/2019
Not made with natural rubber latex
Ce produit n’est pas fait de latex de caoutchouc naturel
Nicht aus Naturlatex hergestellt
Non contiene lattice di gomma naturale
No fabricado con látex de caucho natural
Ej tillverkad av naturgummilatex
Niet vervaardigd met natuurlijke rubberen latex
Não foi fabricado com látex de borracha natural
Ei valmistettu luonnonkumilateksista
Ikke fremstillet af naturligt gummilatex
Δεν είναι φτιαγμένο από φυσικό ελαστικό λατέξ
Není vyrobeno za použití přírodního latexu
Nem tartalmaz természetes gumilatexet
При изготовлении натуральный латекс не используется
Nie zawiera naturalnego lateksu
Doğal kauçuk lateks ile üretilmemiştir
Ikke laget av naturgummilateks

GeniusTM
Vérificateur/calibreur de thermomètre
Manuel d’utilisation
Pour une utilisation avec les modèles Genius™ 2 et Genius™3 des Thermomètres tympaniques

Table des matières
Page
Section I – Description fonctionnelle............................................................................................................................................. 1
Section II – Précautions et avertissements................................................................................................................................... 2
Section III – Description des icônes................................................................................................................................................ 3
Section IV – Matériel requis ............................................................................................................................................................ 4
Section V – Configuration du système........................................................................................................................................... 4
Section VI – Procédure opérationnelle.......................................................................................................................................... 5
Installation de la clé USB (Facultatif)............................................................................................................................................. 5
Brancher........................................................................................................................................................................................ 5
Ecran de démarrage ...................................................................................................................................................................... 5
Recalibration Due Screen (Message indiquant un réétalonnage à effectuer)................................................................................. 5
Ecran Rappel ................................................................................................................................................................................. 5
Température ambiante.................................................................................................................................................................. 5
Menu principal.............................................................................................................................................................................. 5
Préférences.................................................................................................................................................................................... 5
Time Format (Format horaire)....................................................................................................................................................... 5
Date Format (Format de date)....................................................................................................................................................... 5
Sélection de la langue................................................................................................................................................................... 6
Définir les informations sur l’utilisateur/site ................................................................................................................................. 6
Régler la date / heure.................................................................................................................................................................... 6
Contrôler l’étalonnage................................................................................................................................................................... 6
Section VII – Messages d’erreur ...................................................................................................................................................... 9
Section VIII – Caractéristiques de l’appareil de vérification/calibrateur ............................................................................... 10
Section IX – Instructions de nettoyage........................................................................................................................................ 11
Section X – Dépannage................................................................................................................................................................... 12
Section XI – Service client.............................................................................................................................................................. 13
Section XII – Garantie..................................................................................................................................................................... 13
Section XIII – Déclaration de conformité électromagnétique ................................................................................................. 14
Ce produit contient un logiciel détenu uniquement par Covidien. Covidien accorde à l’utilisateur une licence limitée et non exclusive lui
permettant d’utiliser le logiciel en fonction des instructions de fonctionnement. Il est possible de se procurer un exemplaire de cette licence
auprès de Covidien.
fr

Genius ™ Vérificateur/calibreur de thermomètre Table des matières
1
Section I – Description fonctionnelle
Ce manuel décrit le fonctionnement de l’appareil de vérification/calibrateur Genius™. Cet instrument a été développé pour vérifier la précision du
thermomètre auriculaire Genius™ 3 et réétalonne automatiquement le thermomètre, si nécessaire. De plus, l’appareil de vérification/calibrateur
Genius™ peut générer un rapport de test pour chaque thermomètre testé et l’enregistrer sur une clé USB. L’appareil de vérification/calibrateur
Genius™ fonctionnera avec toutes les versions logicielles de thermomètres Genius™ 3.
L’appareil de vérification/calibrateur Genius™ contient deux cibles d’étalonnage infrarouges contrôlées indépendamment qui sont similaires aux
cibles d’étalonnage usine. Ces cibles « corps noir » sont conçues pour offrir un transfert thermique radiatif efficace et produire un rayonnement
infrarouge proche de l’oreille humaine à des températures de 32,22° C et 40,55° C.
Compatible avec le thermomètre tympanique Genius™ 3, le Vérificateur/Étalonneur Genius™ l’est aussi entièrement avec le
thermomètre tympanique Genius™ 2. Tout au long de ce document, lorsque le thermomètre Genius™ 3 est mentionné, la mise
en garde, l’avertissement ou les instructions s’appliquent également à un thermomètre Genius™ 2, sauf indication contraire.
Figure 1 – Disposition du panneau avant
Légende
1 Prise d’alimentation 7 Cible haute température
2 Interrupteur d’alimentation 8 DEL cible haute température
3 Porte-fusibles 9 Affichage à cristaux liquides
4 DEL cible basse température 10 Bouton de commande
5 Cible basse température 11 Port USB
6 Connecteur du thermomètre Genius™

Genius ™ Vérificateur/calibreur de thermomètre Table des matières
2
Section II – Précautions et avertissements
Avertissement :
• LeVérificateur/Étalonneur Genius™ est conçu pour être utilisé en milieu clinique par du personnel ayant une formation de base en métrologie ou
en biomédecine.
• L’appareil de vérification/calibrateur Genius™ est conçu pour être utilisé comme indiqué dans ce manuel. La protection fournie par les dispositifs
de sécurité dans l’appareil de vérification/calibrateur Genius™ peut être mise à mal si le dispositif n’est pas utilisé conformément aux instructions
contenues dans ce manuel.
• Le boîtier de l’appareil de vérification/calibrateur Genius™ n’est pas étanche. Eviter de renverser du liquide, de quelque nature que ce soit, sur le
panneau avant de l’instrument. De même, l’appareil de vérification/calibrateur Genius™ est alimenté depuis une source c.a. Eviter tout contact
potentiel entre du liquide et toute surface externe de l’instrument lorsque ce dernier est relié au secteur.
• Cet instrument ne doit pas être utilisé en présence d’anesthésiques inflammables. Ces anesthésiques génèrent un risque d’explosion.
• Utiliser uniquement le module d’alimentation fourni avec cet instrument
• Pour maintenir le respect de la compatibilité électromagnétique (CEM), utiliser une clé USB marquée CE et conforme à la norme EN55032.
• L’appareil de vérification/calibrateur Genius™ ne peut être utilisé qu’en intérieur, dans une zone à l’abri des courants d’air et d’importantes
variations de la température ambiante.
• Le port USB sur le panneau avant est destiné à être utilisé uniquement avec une clé USB à mémoire Flash d’une capacité minimale de 128 Mo et
maximale de 8 Go. Aucun autre périphérique USB ne doit être inséré dans ce port USB. La clé USB doit être installée avant la mise sous tension
de l’instrument.
Mise en garde
• La qualité de la surface de l’intérieur des cibles corps noir de référence est essentielle à leur fonctionnement en tant que radiateurs infrarouges
efficaces. Lorsque l’on travaille à proximité de l’entrée des cibles corps noir, il est impératif de s’assurer qu’aucun contact n’est réalisé avec la surface
à l’intérieur des rabats en caoutchouc. Si l’intérieur des cibles du corps noir est suspecté d’être sale ou endommagé, le dispositif doit être retourné à
un centre de service pour évaluation.
• Si un fusible vient à griller, le remplacer par un fusible correspondant exactement à la tension nominale, à l’intensité et aux dimensions spécifiées
dans la section Caractéristiques de l’appareil de vérification/calibrateur Genius™ de ce manuel. Avant de changer un fusible grillé, s’assurer que
l’instrument est déconnecté de la source d’alimentation c.a.
• Hormis les fusibles, il n’y a aucun composant qui peut être réparé par l’utilisateur dans cet équipement. Ne pas retirer le panneau avant. Confier
l’entretien à un technicien qualifié.
• Après avoir été invité à insérer le thermomètre Genius™ 3 dans une des cibles corps noir, l’utilisateur dispose de 60 secondes.
La procédure est interrompue si ce délai est dépassé.
• Avant de vérifier/d’étalonner un thermomètre Genius™ 3, s’assurer que la lentille du thermomètre est propre. Un nettoyage efficace assurera que les
tolérances d’étalonnage sont correctement vérifiées. Se reporter aux instructions de nettoyage du manuel d’utilisation du thermomètre Genius™ 3.
• Tous les embouts de sonde utilisés avec cet équipement doivent être des embouts de sonde Genius™ neufs et propres et restés fixés sur la cassette
en plastique. L’utilisation d’embouts qui ont été touchés, manipulés de façon incorrecte, déjà utilisés, endommagés ou défectueux, ou qui
présentent des pliures, des trous ou d’autres défauts, peut causer des résultats imprécis. L’utilisation d’embouts de sonde d’une autre marque peut
entraîner des résultats inexacts et/ou endommager le thermomètre et l’unité de vérification/étalonnage.
• Pour obtenir des résultats précis, préchauffez leVérificateur/Étalonneur Genius™ après la mise sous tension pendant au moins 15 minutes avant
utilisation. S’assurer qu’un délai suffisant a été accordé aux thermomètres Genius™ 3, aux embouts et à l’appareil de vérification/calibrateur
Genius™ pour s’équilibrer à la température ambiante avant de poursuivre. Accorder une période de réchauffement supérieure si l’appareil ou les
thermomètres se trouvaient aux limites extrêmes de la température ambiante autorisée. La portabilité de l’appareil de vérification/calibrateur
Genius™ permettra un repositionnement de l’appareil dans des zones répondant aux exigences de température ambiante.
• Ne jamais placer ou poser le thermomètre Genius™ 3 sur la surface de l’appareil de vérification/calibrateur Genius™. Les capteurs thermiques à
l’intérieur de l’extrémité de la sonde du thermomètre détectent la chaleur transmise des cibles corps noir via la surface du panneau avant. Cela
entraîne une instabilité des capteurs du thermomètre, qui produisent alors des valeurs de température erronées
• Dans l’éventualité où l’appareil de vérification/calibrateur Genius™ tomberait, retourner l’unité à l’usine pour un nouvel étalonnage.
• S’assurer qu’il n’y a pas d’objets étrangers tels que d’anciens embouts de sonde à l’intérieur des cibles du corps noir avant de faire la vérification
du thermomètre.
• Le boîtier duVérificateur/Étalonneur Genius™ doit rester fermé lorsqu’il n’est pas utilisé pour éviter d’endommager le dispositif et pour éviter la
salissure des cibles du corps noir due à la poussière.
• Si la clé USB à mémoire Flash est installée après avoir effectué un contrôle d’Étalonnage, un message d’erreur peut apparaître lors de la tentative
d’écriture du fichier de rapport si l’opérateur n’attend pas que la clé USB ait terminé son initialisation. Si leVérificateur/Étalonneur Genius™ est mis
hors tension, toute la mémoire interne (non encore enregistrée sur la clé USB à mémoire Flash) sera effacée.
• Cet équipement n’est pas destiné à être utilisé dans des environnements résidentiels et pourrait ne pas assurer une protection adéquate contre les
fréquences radioélectriques dans de tels environnements.
Other manuals for Genius 2
4
This manual suits for next models
1
Table of contents
Languages:
Other Covidien Measuring Instrument manuals


Popular Measuring Instrument manuals by other brands

National Instruments
National Instruments PXIe-4162 Getting started guide

Irradian
Irradian PR203 user guide

Ocean Insight
Ocean Insight OCEAN ST Installation & operation manual

LSI LASTEM
LSI LASTEM Sphensor PRMPA0401 user manual

Kaise
Kaise SK-7810 instruction manual

PCE Instruments
PCE Instruments PCE-MFI 400 user manual


