cowfish VanTenna User manual


PREFACE AND COPYRIGHT
Cowsh Technologies Pty Ltd reserves the right to revise this publication
and to make changes in the content hereof without obligation to notify any
person or organization of such revisions or changes.
Manual Revision V1.1
Cowsh Technologies and the Cowsh logo are trademarks or registered
trademarks of Cowsh Technologies Pty Ltd in Australia. VanTenna and
the VanTenna logo are trademarks or registered trademarks of Cowsh
Technologies Pty Ltd in Australia. All other company or product names
mentioned herein are trademarks or registered trademarks of their respective
companies.
Copyright © 2021 Cowsh Technologies Pty Ltd.
All rights reserved. This publication may not be reproduced, in whole or in
part, without prior expressed written permission from Cowsh Technologies
Pty Ltd.
Page 2

Page 2
Table of Contents
PREFACE AND COPYRIGHT 2
PACKAGE CONTENT 4
INTRODUCTION 5
HARDWARE OVERVIEW 6
INSTALLING THE VANTENNA - MODEL A 7
INSTALLING THE WALL PLATE (OPTIONAL) 9
INSTALLING THE VANTENNA - MODEL B 12
USING THE VANTENNA 13
FREQUENTLY ASKED QUESTIONS 14
TECHNICAL SPECIFICATIONS 15
PRODUCT WARRANTY 16
Page 3

PACKAGE CONTENT
Page 4
VanTenna unit TV Cable
(optional)
Wall Plate
(optional)
10 metre Coax Cable
(optional)

Page 4
INTRODUCTION
The Cowsh VanTenna is the next generation of caravan TV antennas. This
antenna provides you with reception for AM/FM radio and TV signal from
every direction, regardless of the orientation your Caravan or Motorhome
is parked in. No need to wind up an antenna and attempt to point it in
the direction of the best signal, only to nd out that you can’t get half the
channels due to poor signal strength. No need to wind it down in bad
weather or storms and no breaking of the antenna when travelling over
corrugated roads as there are no hinges or moving parts. Simply turn the unit
on and scan for TV channels on your TV. The VanTenna does all the work for
you.
The VanTenna is specically designed to be compatible with HDTV signal in
Australia (DVB-T) and AM/FM radio. The VanTenna also comes with a built
in high gain and low noise amplier. This amplier has a highly advanced
3G/4G/5G lter to provide clean, super low noise HD picture and sound
quality. The VanTenna enables you to receive more free local TV channels
with an enhanced reception range and provides better quality signal over
conventional caravan TV antennas.
Page 5

HARDWARE OVERVIEW
VanTenna unit
Wall Plate/Power Supply (optional)
Page 6

Page 6
INSTALLING THE VANTENNA - MODEL A
Before choosing a location for the VanTenna, contact your caravan dealer or
manufacturer. Your caravan may be pre-wired or have a reinforced area built
in for this system. We recommend having the VanTenna system installed by
your caravan manufacturer or a registered caravan repair centre.
Before mounting the antenna, determine a location for the wall plate/power
supply. Keep in mind the following:
• A coaxial cable will have to run from the wall plate/power supply to the
antenna and from the wall plate/power supply to each television.
• An additional coax cable will have to run from the AM/FM antenna to the
radio (coax not provided).
• Coax cables will have to be routed through the roof directly into the
perimeter of the antenna. Failure to install correctly could cause damage to
the antenna and possibly the caravan or motorhome.
• A 12V connection must be made to the back of the wall plate/power
supply.
Then, choose a location for the antenna that meets the following
requirements:
1. Offers enough support for a secure installation.
2. Maintains adequate clearance from the edge of the roof and any
obstructions:
a. clearance distance of 600 mm needed from the side of antenna to the
front of the vehicle.
b. clearance distance of 500 mm needed from the side of antenna to the
nearest obstruction.
Careful consideration should be given to the best mounting position for the
VanTenna. The strength of television signals can be reduced signicantly once
the line of sight distance is exceeded. The VanTenna should be mounted as
high as possible and as far away as possible from any other roof mounted
obstructions to ensure the best reception.
Page 7

To mount the VanTenna unit complete the following steps:
1. Check with your caravan manufacturer to determine what type of screws
are suitable for your roof.
2. After selecting a suitable location on the roof of the caravan for the
VanTenna, drill a 20mm hole (at minimum) for two coax cables. One coax
cable is for the television signal (supplied) and the second coax cable is
for the FM signal (not supplied).
3. Run the TV coax cables from the VanTenna location to the wall plate /
power supply.
4. (Optional) Run the AM/FM coax cable to your AM/FM unit.
5. Connect the coax cables to the VanTenna unit.
6. Clean the roof at the location of installation and ensure that the area is
dry. This will allow for better adhesion of the sealing compound and will
prevent leaks.
7. Place the VanTenna at the selected location, ensuring that that cables
freely move into the roof cavity and that the hole in the base of the
VanTenna aligns with the hole in the roof of the caravan. Failure to align
these hole will cause damage to your coax cables and potential leaks.
8. Lift up the VanTenna and apply a liberal amount of approved non-
hardening sealing compound on the bottom of the VanTenna and place
the VanTenna on the roof. Ensure that that the hole on the VanTenna
base is aligned to the hole in the roof.
9. Secure the VanTenna to the roof with four screws.
10. Run a solid bead of sealant over the mounting screws and around the
perimeter of the VenTenna base. This will help to prevent leaks.
Page 8

Page 8
INSTALLING THE WALL PLATE (OPTIONAL)
Do not connect high current devices such as hair dryers to this receptacle.
Maximum current rating of the receptacle is 5A at 12V. The power supply
should be turned off when connecting cables/wires.
1. Choose a location for the wall plate. The wall plate may be ush mounted
to your wall. The wall plate is also compatible with most standard
electrical boxes. To mount, cut a hole in the wall to t the wall plate or
electrical box.
2. Drill holes on the wall according to the screw locations of the wall plate or
your electrical box.
3. Turn the wall plate around to the back side of the unit.
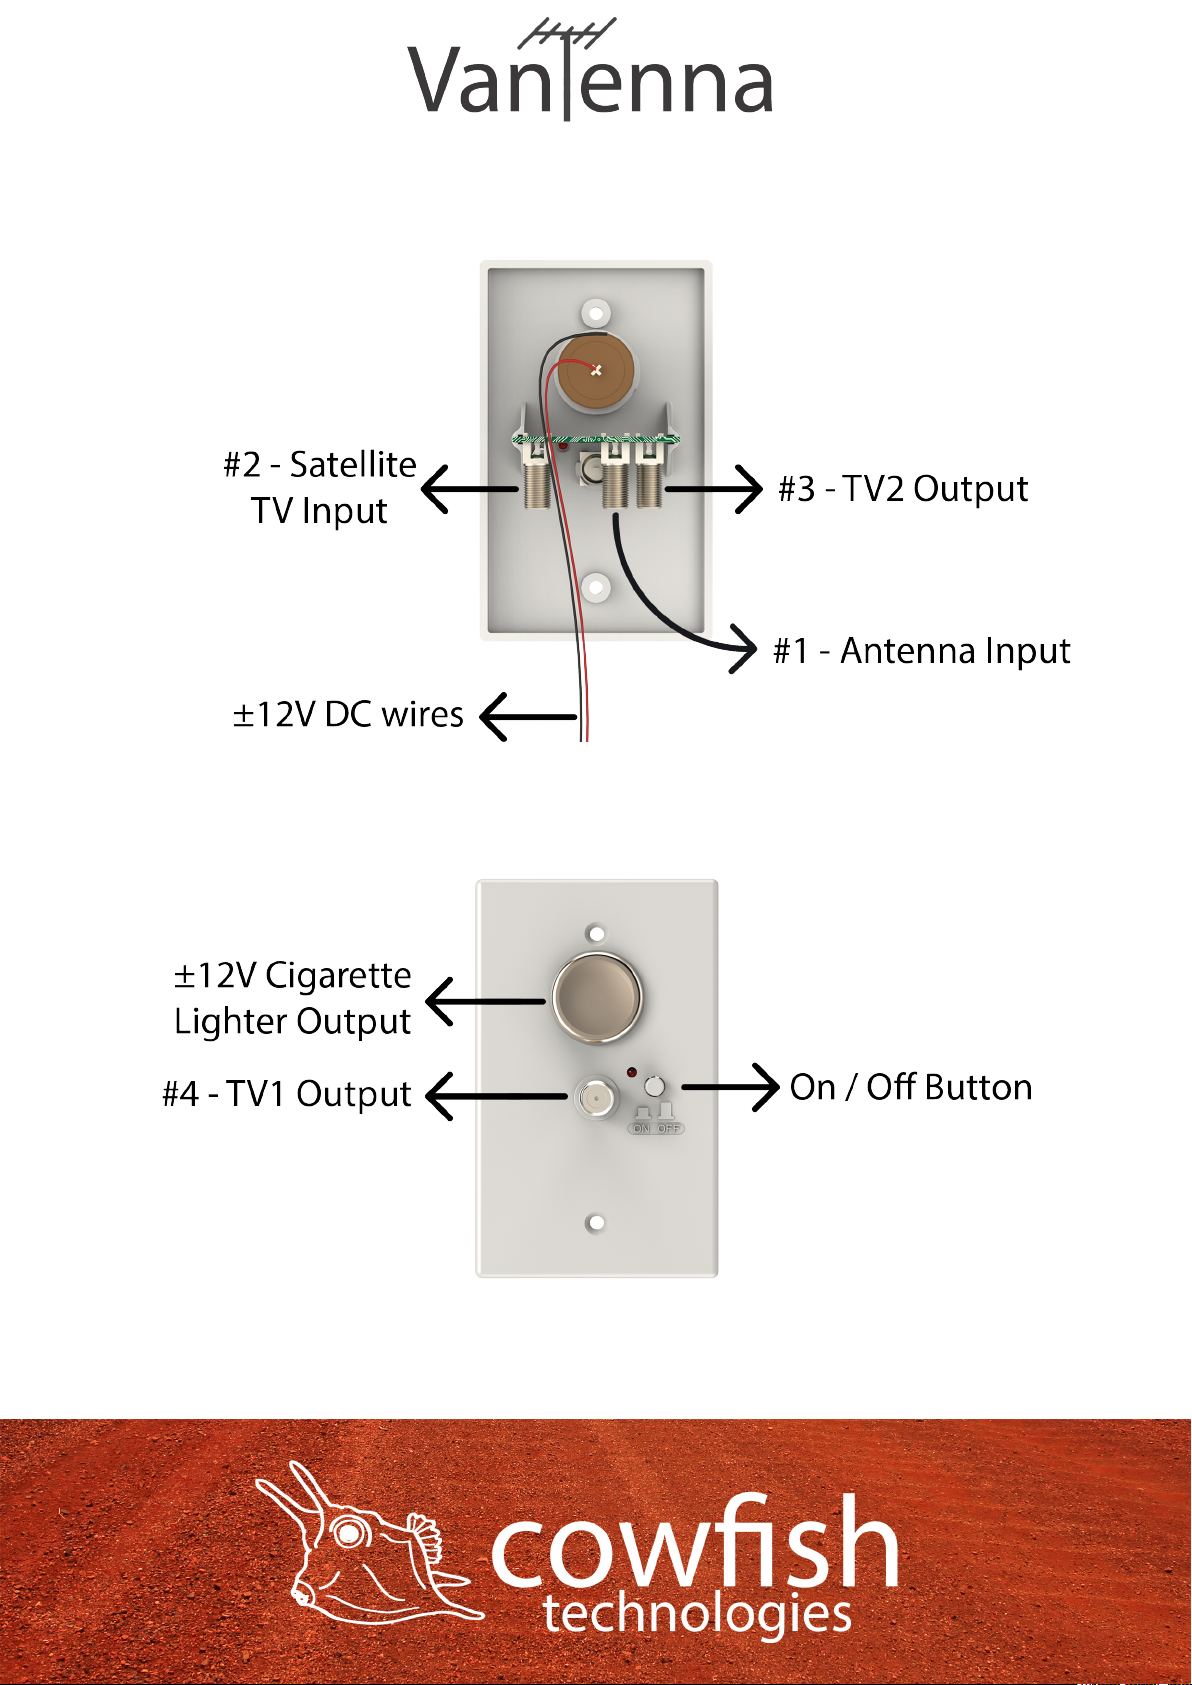
4. Connect the black & red DC wires to your 12V power source. Use as a
minimum 14 AWG wire.
5. Connect the antenna coaxial cable to “ANTENNA INPUT” F connector (#1)
and tighten until nger tight. (The coax cable is to be routed through the
ceiling and wall to the chosen wall plate location).
6. (OPTIONAL) Connect the Satellite TV cable to “SATELLITE TV INPUT” F
connector (#2) and tighten until nger tight.
7. (OPTIONAL) If you have a second television outlet in your caravan, for
instance an external entertainment hatch, connect the secondary TV outlet
cable to “TV2 OUTPUT” F connector (#3) and tighten until nger tight.
8. Turn the wall plate to the front side.
9. Fix the wall plate to the wall with the supplied screws.
10. Connect the TV cable to “TV1 OUTPUT” F connector (#4) and tighten until
nger tight. Connect the other end of the TV cable to the “Antenna In”
coax port on your TV.
11. Press the “ON” switch on the front of the wall plate/power supply, and
conrm that the light turns on.
Page 9
Page 10

Page 11

INSTALLING THE VANTENNA - MODEL B
Before choosing a location for the VanTenna, contact your caravan dealer
or manufacturer. Your caravan may have a reinforced area built in for this
system. We recommend having the VanTenna system installed by your
caravan manufacturer or a registered caravan repair centre.
Choose a location for the antenna that meets the following requirements:
1. Offers enough support for a secure installation.
2. Maintains adequate clearance from the edge of the roof and any
obstructions:
a. clearance distance of 600 mm needed from the side of antenna to the
front of the vehicle.
b. clearance distance of 500 mm needed from the side of antenna to the
nearest obstruction.
Careful consideration should be given to the best mounting position for the
VanTenna. The strength of television signals can be reduced signicantly once
the line of sight distance is exceeded. The VanTenna should be mounted as
high as possible and as far away as possible from any other roof mounted
obstructions to ensure the best reception.
To mount the VanTenna unit complete the following steps:
1. Check with your caravan manufacturer to determine what type of screws
are suitable for your roof.
2. Clean the roof at the location of installation and ensure that the area is
dry. This will allow for better adhesion of the sealing compound and will
prevent leaks.
3. Place the VanTenna at the selected location. Apply a liberal amount
of approved non-hardening sealing compound on the bottom of the
VanTenna and place the VanTenna on the roof.
4. Secure the VanTenna to the roof with four screws.
5. Run a solid bead of sealant over the mounting screws and around the
perimeter of the VenTenna base. This will help to prevent leaks.
6. Connect the pre existing coax cable to the side of the VanTenna unit.
Page 12

Page 12
USING THE VANTENNA
Once you have securely installed your VanTenna, you don’t have to worry
about it anymore. You don’t need to gure out where to point the antenna or
re-adjust it if the wind blew too hard. Just install it once and forget it.
The next step is to scan for channels on your TV. You will need to scan for
channels every time there’s a change in your location. That means you have
to rescan every time you move your caravan, RV, motorhome or camper.
Scanning (or rescanning) for channels is mostly an automated process. All you
have to do is the following simple steps.
1. Ensure your TV is connected to the VanTenna.
2. Ensure that the VanTenna is powered on.
3. Press the “Menu” button on your remote control. If you don’t have a
remote, your TV should have a built-in “Menu” button.
4. Find and select the “Channel Scan” option in your TV’s menu. This option is
sometimes labeled “Rescan,” “Tune,” or “Auto-tune.”
5. If you can’t nd the “Channel Scan” option, dig through the TV’s “Settings,”
“Tools,” “Channels,” or “Options” menu. On some TVs, you have to press
the “Input” button and go to “Antenna.”
When scanning is complete, your TV will either display how many channels
are available or drop you back into a broadcast.
If you’re having trouble nding the “Channel Scan” option on your TV, then
it’s time to consult the TV manufacturers manual. You can usually nd a
manual by searching the web for the TV’s make and model along with the
word “manual.”
Page 13

FREQUENTLY ASKED QUESTIONS
What is an omni directional antenna?
Omni directional antennas are antennas that receive signals equally from all
directions.
Can the VanTenna receive signals from multiple TV towers at the same
time?
Yes, your VanTenna will receive signals equally from all directions, meaning
that you can pick up TV channels from multiple towers at the same time.
This means that you will be able to watch all available channels in your area,
regardless of which TV tower is sending the channel signal.
Do I need to adjust the VanTenna when I set up my caravan or
motorhome at a new location?
No you don’t need to gure out where to point the antenna or re-adjust it in
any way. All you have to do is rescan for TV channels on your TV set.
What is the range of the VanTenna?
The VanTenna effectively receives TV up to 140 kilometres. Reception range is
dependent on the terrain, physical obstructions and the power output of the
transmitter tower.
Page 14

TECHNICAL SPECIFICATIONS
Frequency Range:
AM: 520-1719KHz (model A only)
FM: 88-108MHz (model A only)
VHF: 87.5-230MHz
UHF: 470-862MHz
Receiving Range: AM/FM/DAB/VHF/UHF
Antenna Gain: 36dB
Noise Figure: <4.5dB
Max Output Level: 102dBμV
Impedence: 75Ω
Power: DC 12V 150mA
Size: 302x302x302mm
Page 15

PRODUCT WARRANTY
At Cowsh Technologies Pty Ltd (Cowsh) we want our customers to be
completely satised with their purchase. Our goods come with guarantees
that cannot be excluded under the Australian Consumer Law. You are entitled
to a replacement or refund for a major failure and for compensation for any
other reasonably foreseeable loss or damage. You are also entitled to have
the goods repaired or replaced if the goods fail to be of acceptable quality
and the failure does not amount to a major failure.
Warranty Conditions
Cowsh offers the following warranty in relation to its goods.
The benets of this warranty are in addition to any rights and remedies
imposed by Australian State and Federal legislation that cannot be excluded.
Nothing in this warranty is to be interpreted as excluding, restricting or
modifying any State or Federal legislation applicable to the supply of goods
and services which cannot be excluded, restricted or modied.
Cowsh warrants to the original purchaser that, subject to the exclusions and
limitations below, all parts of the manufacture and assembly of the goods
carried out by Cowsh will be free from defects in materials and workmanship
for a period of 12 months from the date of purchase (Warranty Period).
This warranty is not transferable to a subsequent customer if the goods are
sold by the original customer during the Warranty Period.
If a defect appears in Cowsh’s manufacture or assembly of the goods before
the end of the Warranty Period and Cowsh nds the goods to be defective
in materials or workmanship, Cowsh will, in its sole discretion, either repair
or replace the goods or the defective part of the goods free of charge, or
provide a credit or exchange.
Cowsh reserves the right to replace defective parts of the goods with parts
and components of similar quality, grade and composition where an identical
part or component is not available. Goods presented for repair may be
replaced by refurbished goods of the same type rather than being repaired.
Refurbished parts may be used to repair the goods.
Where your rights under the Australian Consumer Law or this warranty do
not apply, we may provide you with an indicative cost estimate to repair the
goods.
Page 16

Damaged goods
If any goods arrive damaged, please contact Cowsh as soon as possible so
a Return Authority Number can be arranged for the goods to be inspected.
Goods must be returned within a reasonable time. The acceptance of the
goods delivered shall be deemed for all purposes to have taken place 30
days* from the date of delivery.
If a purchaser receives a product that is damaged in transit from Cowsh, the
purchaser should: Refuse to accept delivery of the product; Direct the courier
to “Return goods to sender”; and Notify the Cowsh Customer Service or
Warranty Department immediately.
No goods will be accepted for return until a Return of Goods Authority
Number has been supplied to you. Goods must be returned in the condition
received by you with all original packaging, accessories and/ or manuals.
Returns and repairs
Goods returned for repair or credit will be assessed and repaired or replaced
within a reasonable time. Credits will normally be processed within 14 days*
of your goods being returned to Cowsh’s nominated warehouse. Where
goods have been assessed to be repairable under the manufacturers’
warranty, you may be supplied with details of an authorised repairer. You may
also be provided with an indicative repair and/ or replacement time, which
may vary due to reasons beyond our control, or the repairer’s reasonable
control, such as part availability and incorrect fault description. Cowsh does
not take any responsibility for any repairs and/ or replacements carried out
without our prior written consent.
Where goods are assessed to have been damaged by misuse or accident, no
credit will be issued and no further action will be entered into. Where your
rights under the Australian Consumer Law or any manufacturer’s warranty do
not apply, we may provide you with an indicative cost estimate to repair the
goods.
If a replacement item is required, Cowsh will require the location of the
caravan and owners for the next 14 days to allow for pick, pack and postage.
If the owners are traveling, Cowsh require next major town or city location.
Otherwise, the warranty procedure as in place at present will remain.
Page 17

Replacement item warranty
Should a replacement item be supplied by Cowsh ‘under warranty’ due to
damage or product failure of original item purchased, Cowsh will warrant the
replacement item for the remaining warranty period only of the original item
warranty.
Warranty Claims
If a fault covered by warranty occurs, the customer must rst contact the
Cowsh Customer Service or Warranty Department.
Any warranty claim must be accompanied by proof of purchase, full details of
the alleged defect (including clear photos), and appropriate documentation
(such as historical and maintenance records).
The customer must make the goods available to Cowsh or its authorised
repair agent for inspection and testing.
If such inspection and testing nds no defect in the goods, the customer
must pay Cowsh’s usual costs of service work and testing. The customer
must bear the cost of the transport of the goods to and from Cowsh or the
authorised repair agent, and all insurance of the goods.
Goods returned for repair or credit will be assessed and repaired or replaced
within a reasonable time.
Credits will normally be processed within 14 days* of your goods being
returned to Cowsh’s nominated warehouse. Where goods have been
assessed to be repairable under this warranty, you may be supplied with
details of an authorised repairer. You may also be provided with an indicative
repair and/ or replacement time, which may vary due to reasons beyond
our control, or the repairer’s reasonable control, such as part availability and
incorrect fault description. Cowsh does not take any responsibility for any
repairs and/ or replacements carried out without our prior written consent.
If a replacement item is required, Cowsh will require the location of the
caravan and owners for the next 14 days to allow for pick, pack and postage.
If the owners are traveling, Cowsh require next major town or city location.
Limitations
Cowsh makes no express warranties or representations other than set out in
this warranty.
The repair or replacement of the goods or part of the goods is the absolute
limit of Cowsh’s liability under this express warranty.
Page 18

This page has intentionally been left blank
Page 19
Table of contents
Popular Antenna manuals by other brands


Wireless Extenders
Wireless Extenders zBoost YX500 Series installation guide

M2 Antenna Systems
M2 Antenna Systems 6M5XHG manual

ETS-Lindgren
ETS-Lindgren 3182 user manual

Williams Sound
Williams Sound ANT 033 Manual and user guide

Altelix
Altelix PRO Series Assembly instructions

M2 Antenna Systems
M2 Antenna Systems 48.5-4 Assembly manual