CoWorkr WorkPoint User manual

©CoWorkr, an R-Zero Subsidiary: WorkPoint V4 Documentation V1.0
CoWorkr - WorkPoint Sensor Manual
11 APRIL 2022
Above Furniture-Mount and Ceiling-Mount WorkPoint Sensors

2
PURPOSE //
Information on how to use CoWorkr’s WorkPoint Sensor
DEFINITIONS //
WorkPoint Sensor
CoWorkr “Workpoints” are battery-powered occupancy sensors that use passive
infrared sensors for detecting human activity. While WorkPoints are traditionally used
to provide high-res occupancy data on workstations, these devices may also be
used to monitor small meeting spaces where the number of occupants is not
needed.
•WorkPoints are always “on” meaning, if there’s a battery in the device, they’re
sending out data. All sensors will ship to installers with batteries installed.
•WorkPoints include a double-stick backing that allows for a simple installation.
•WorkPoints have a Label with an ID and barcode
WorkPoint Versions:
V4 - Version 4 (2019+) "Motion" WorkPoint Sensor that uses a digital passive
infrared sensing
DEVICE SETTINGS & CONFIGURATION //
CoWorkr WorkPoints do not have any configurable elements to the physical devices.
They simply carry out the instructions provided by the firmware. Otherwise, the
devices are able to turn on and off as well as send a notification.
Powering On/Off:
WorkPoints do not have an on/off switch. To power on a WorkPoint, simply insert the
battery. To power off, remove the battery.
Notifications:

3
To send a notifications packet from the WorkPoint, press the button using a pinhole
press tool. This will illuminate the LED and force the device to advertise a packet.
FIRMWARE AND FLASHING //
CoWorkr WorkPoints ship pre-flashed with the latest firmware. For updates to the
firmware, the device must be attached to an installer’s computer using a JTAG
connector, wherein the firmware revision can be flashed onto the device. Firmware
updates are not commonly done on production devices.
INSTALLATION //
Install Overview
Sensors are installed in locations specified by CoWorkr. Sensors have an ID that is
used to find where each device should be installed on a provided, pre-designed floor
plan that is issued by CoWorkr.
Use the (included) floor plans to locate each sensor. Sensors are typically ordered
numerically so the installer should be able to make a continuous path through the
floor plan while installing sensors in the order of the devices in the box.
Use the floor plans to plan how you will deploy yourself or your team to make the
best use of your time.
Desk and Room WorkPoint Sensors are installed based on the installation type (on
furniture or ceiling) that is shown on the floor plan. Desk WorkPoints are black and
have a smaller opening that helps narrow the field of view of the space. Room
WorkPoints (white) have a spherical field of view that maximizes the sensing area.
4
Desks and WorkStations
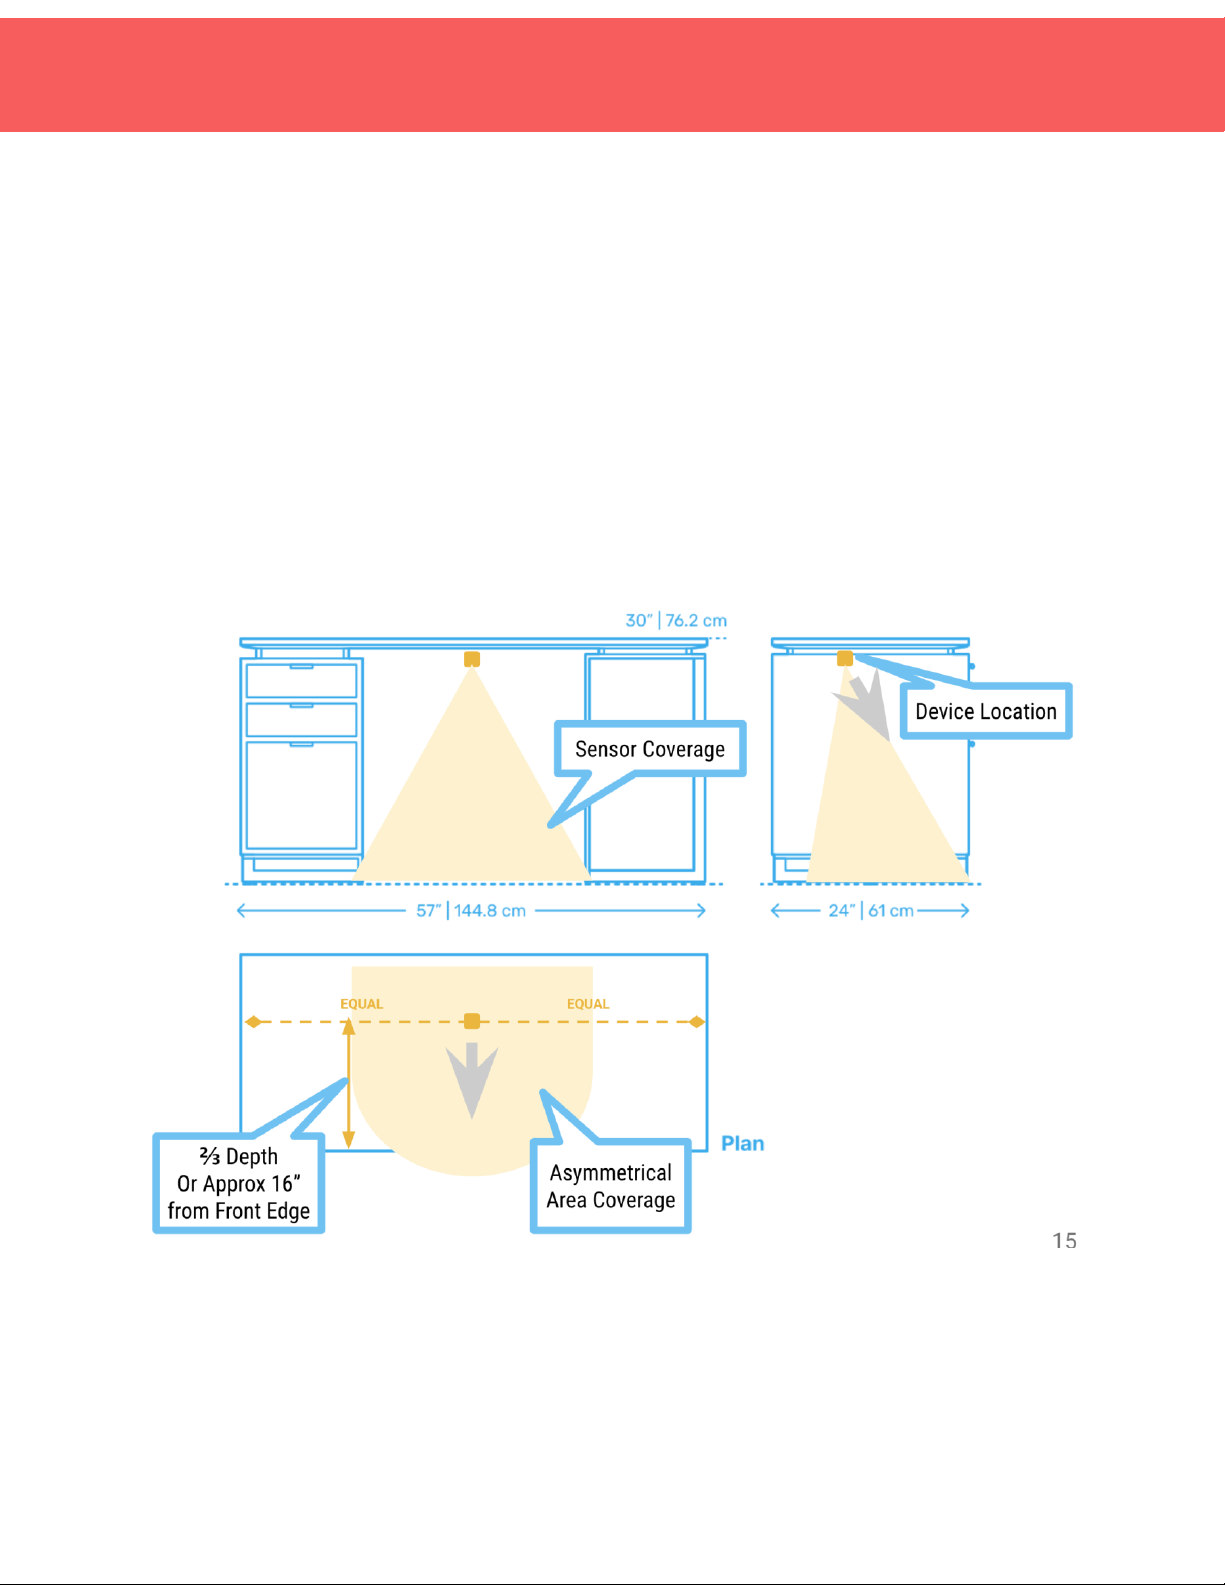
Furniture Type 1: Standard Workstation
Install Desk Sensor using the drawings to the right and checklist below as guidelines
for specific placement.
❏Center the sensor on the seated or standing position on the desk. This is
typically in the middle.
❏Position the sensor roughly ⅔back from the front edge of the table top.
5
❏Orient the Sensor so the arrow on the black case is facing the front edge of the
desk.
❏Wipe the surface free of any oils
❏Peel off the adhesive backing
❏Stick the sensor to the location and hold in place, applying pressure, for at
least 10 seconds.
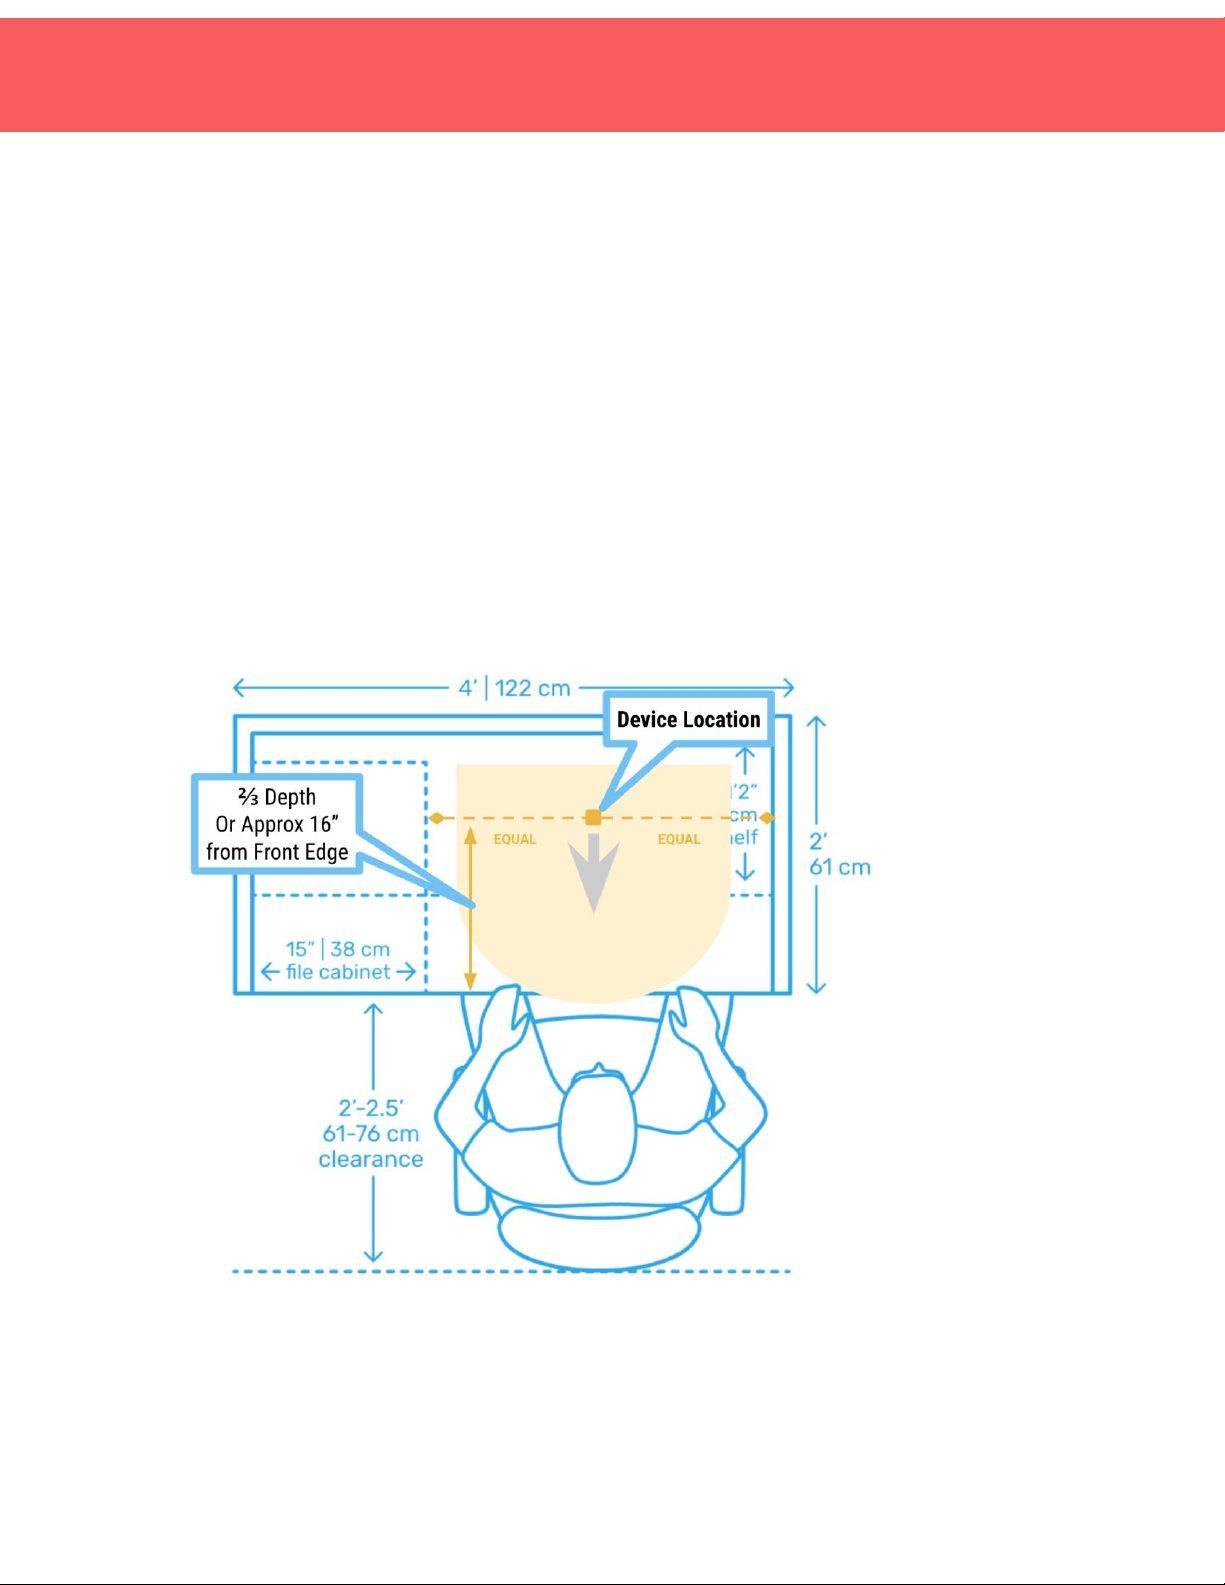
Furniture Type 2: Offset Workstation
Install Desk Sensor using the drawings to the right and checklist below as guidelines
for specific placement.
❏Center the sensor on the seated or standing position on the desk. For offset
seat, center on where the chair most likely will be located.
6
❏Position the sensor roughly ⅔back from the front edge of the tabletop.
❏Orient the Sensor so the arrow on the black case is facing the front edge of the
desk.
❏Wipe the surface free of any oils
❏Peel off the adhesive backing
❏Stick the sensor to the location and hold in place, applying pressure, for at
least 10 seconds.
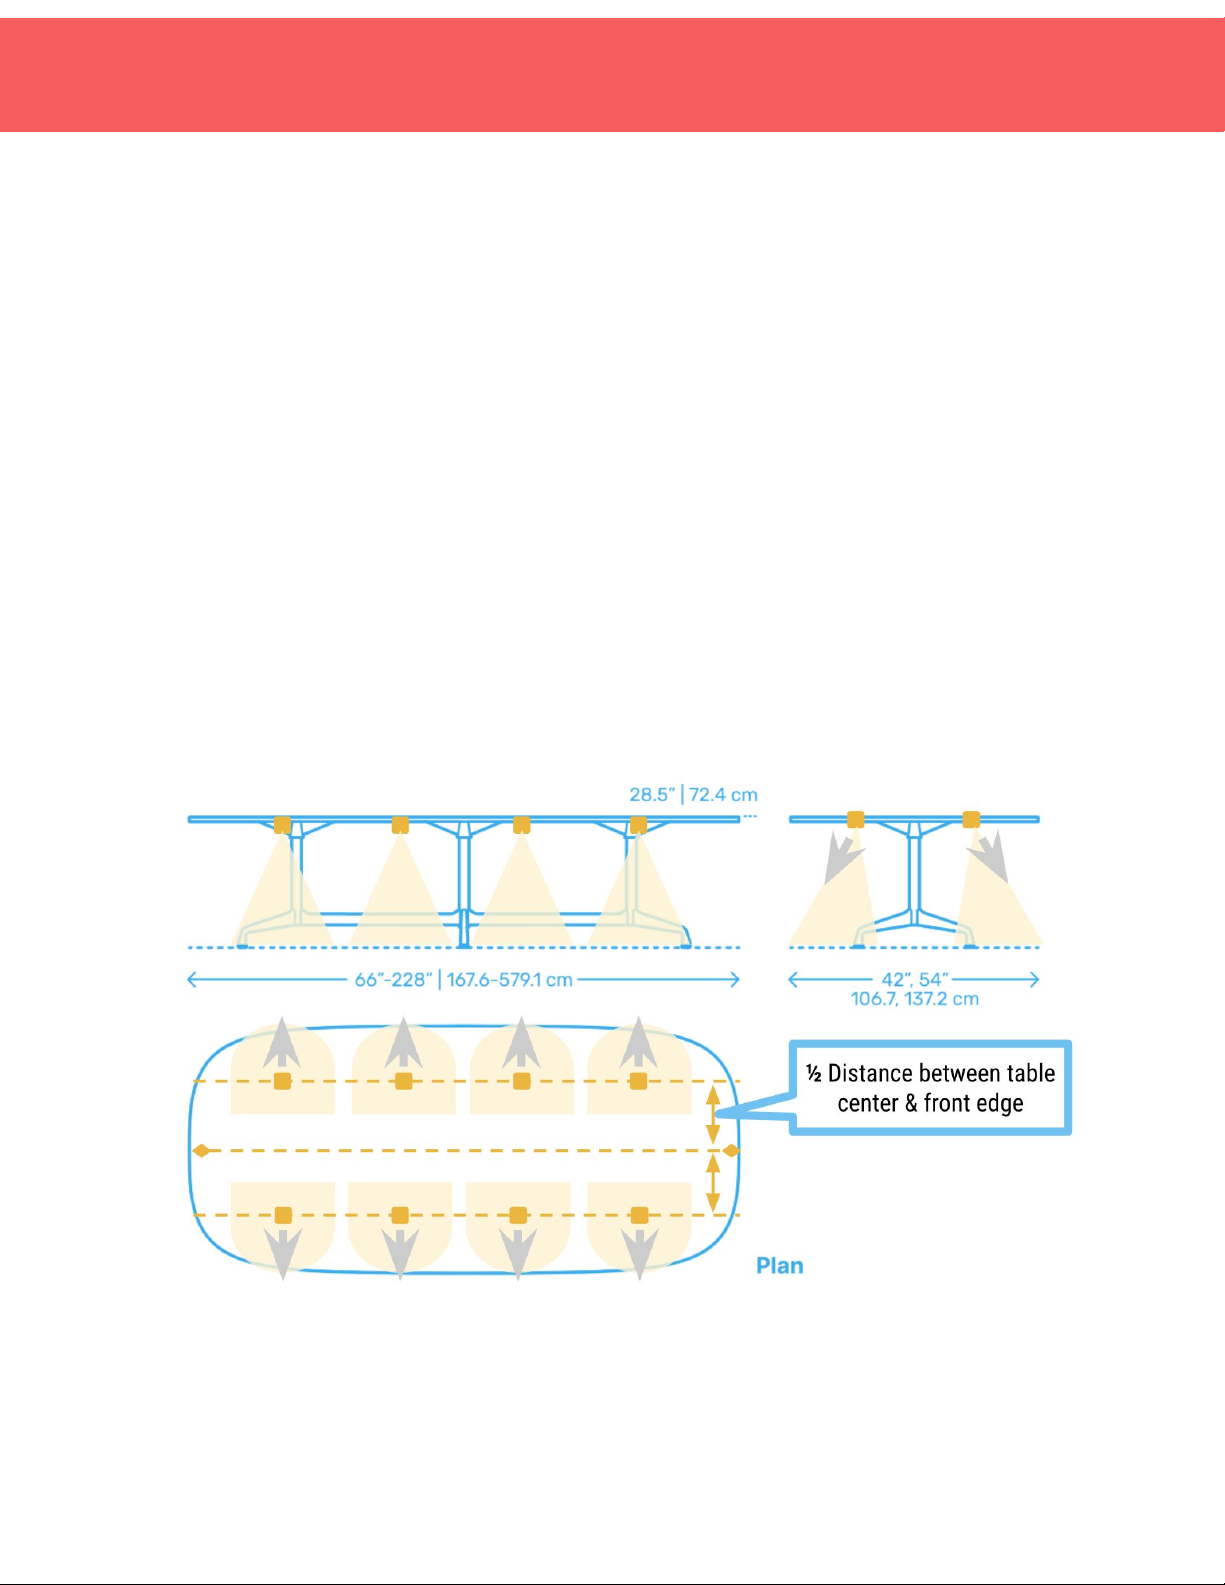
Furniture Type 3: Standard Meeting Table
Install Desk Sensor using the drawings to the right and checklist below as guidelines
for specific placement.

7
❏Center the sensor on the seated or standing position each location of the
table. This should be based on the number of chairs.
❏Position the sensor roughly ½ way between the front edge and the middle of
the table.
❏Orient the Sensor so the arrow on the black case is facing the front edge of the
desk.
❏Wipe the surface free of any oils
❏Peel off the adhesive backing
❏Stick the sensor to the location and hold it in place, applying pressure, for at
least 10 seconds.
Furniture Type 4: Banquets/Booths
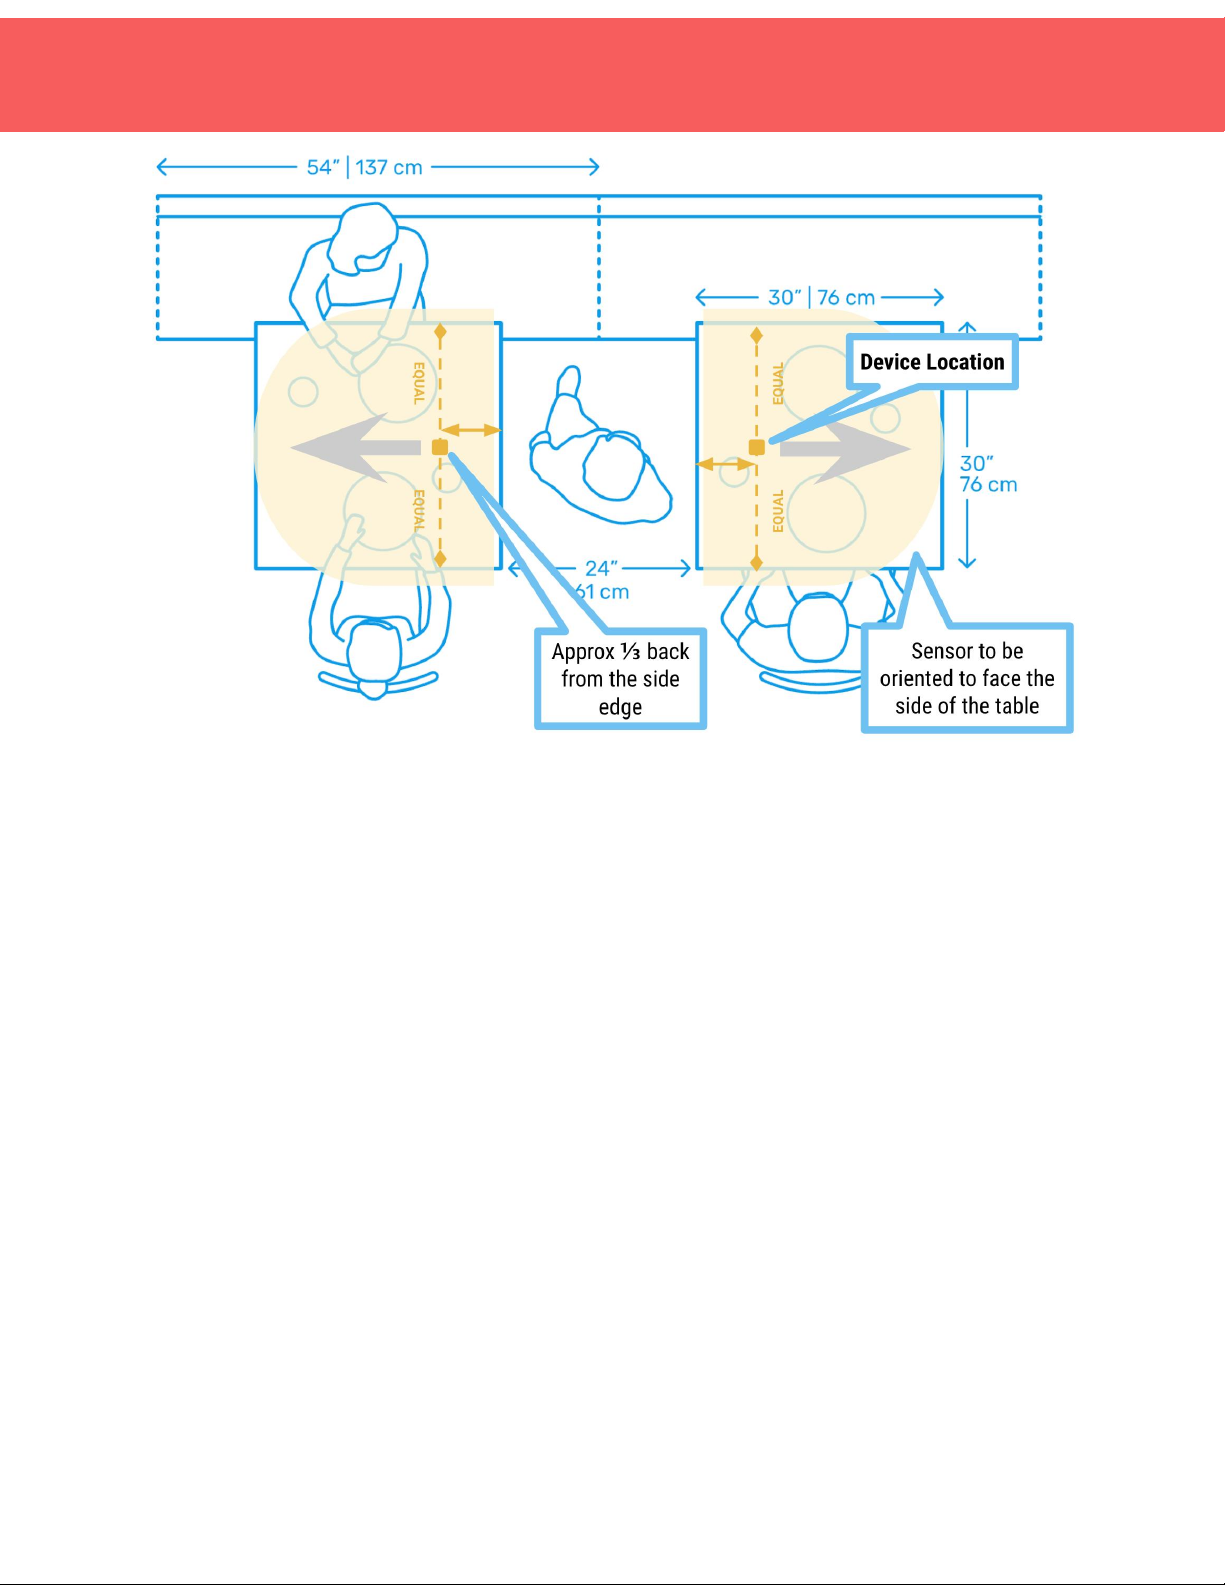
8
Install Desk Sensor using the drawings to the right and checklist below as guidelines
for specific placement.
❏Center the sensor on the seated or standing position on the desk. For offset
seat, center on where the chair most likely will be located.
❏Position the sensor roughly ⅔back from the front edge of the table top.
❏Orient the Sensor so the arrow on the black case is facing the front edge of the
desk.
❏Wipe the surface free of any oils
❏Peel off the adhesive backing
❏Stick the sensor to the location and hold it in place, applying pressure, for at
least 10 seconds.

9
Rooms
Using a WorkPoint Sensor with a Room Case, install the device by sticking it to the
ceiling, facing downwards. Any movement in the entire room will trigger an
occupancy reading. If a room is longer than 10 ft (3m) we suggest using 2
WorkPoints.
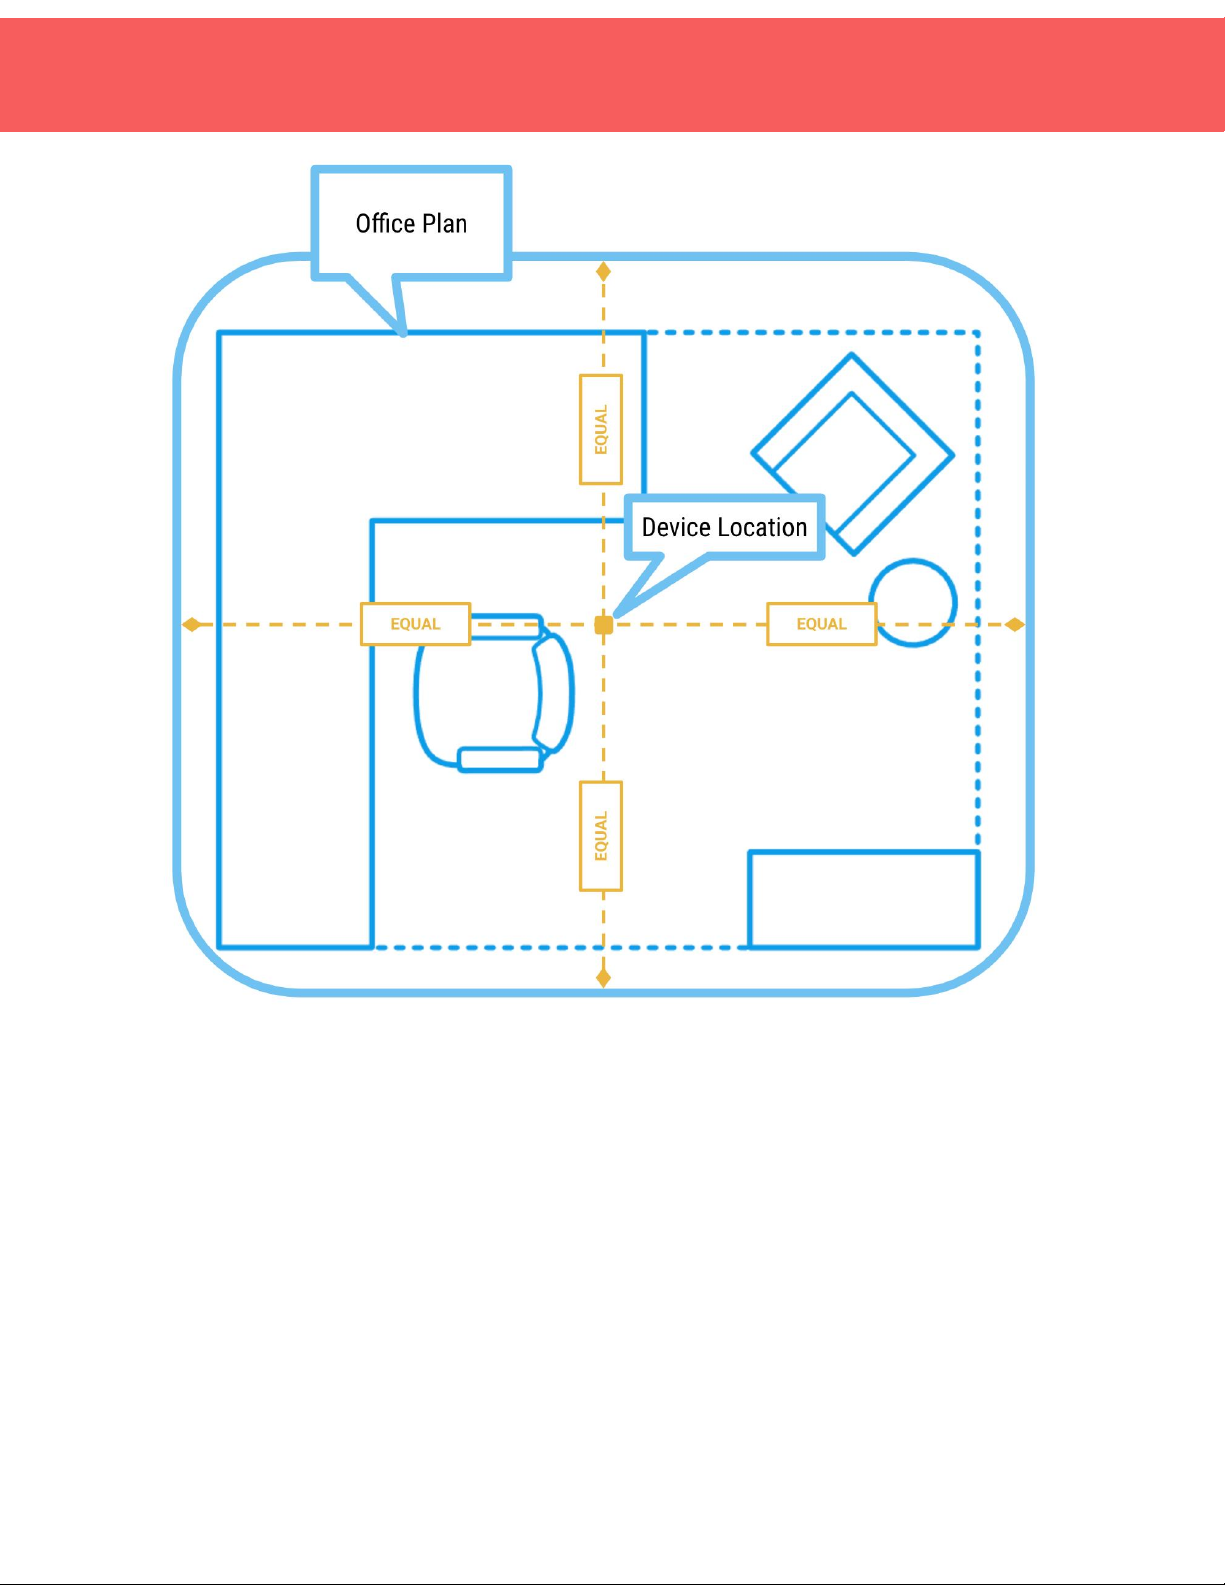
Room Type 1: Standard Room with Gypsum, Metal, or Wood Ceiling
10
Install the Room Sensor using the drawings to the right and checklist below as
guidelines for specific placement.
❏Center the sensor on the space. The sensor location on the plan should
indicate if the sensor is centered on the room or above a specific area of the
room.
❏No Orientation of the Sensor is required (it’s spherical)
❏Wipe the surface free of any oils
❏Peel off the adhesive backing
❏Stick the sensor to the location and hold in place, applying pressure, for at
least 10 seconds.
11
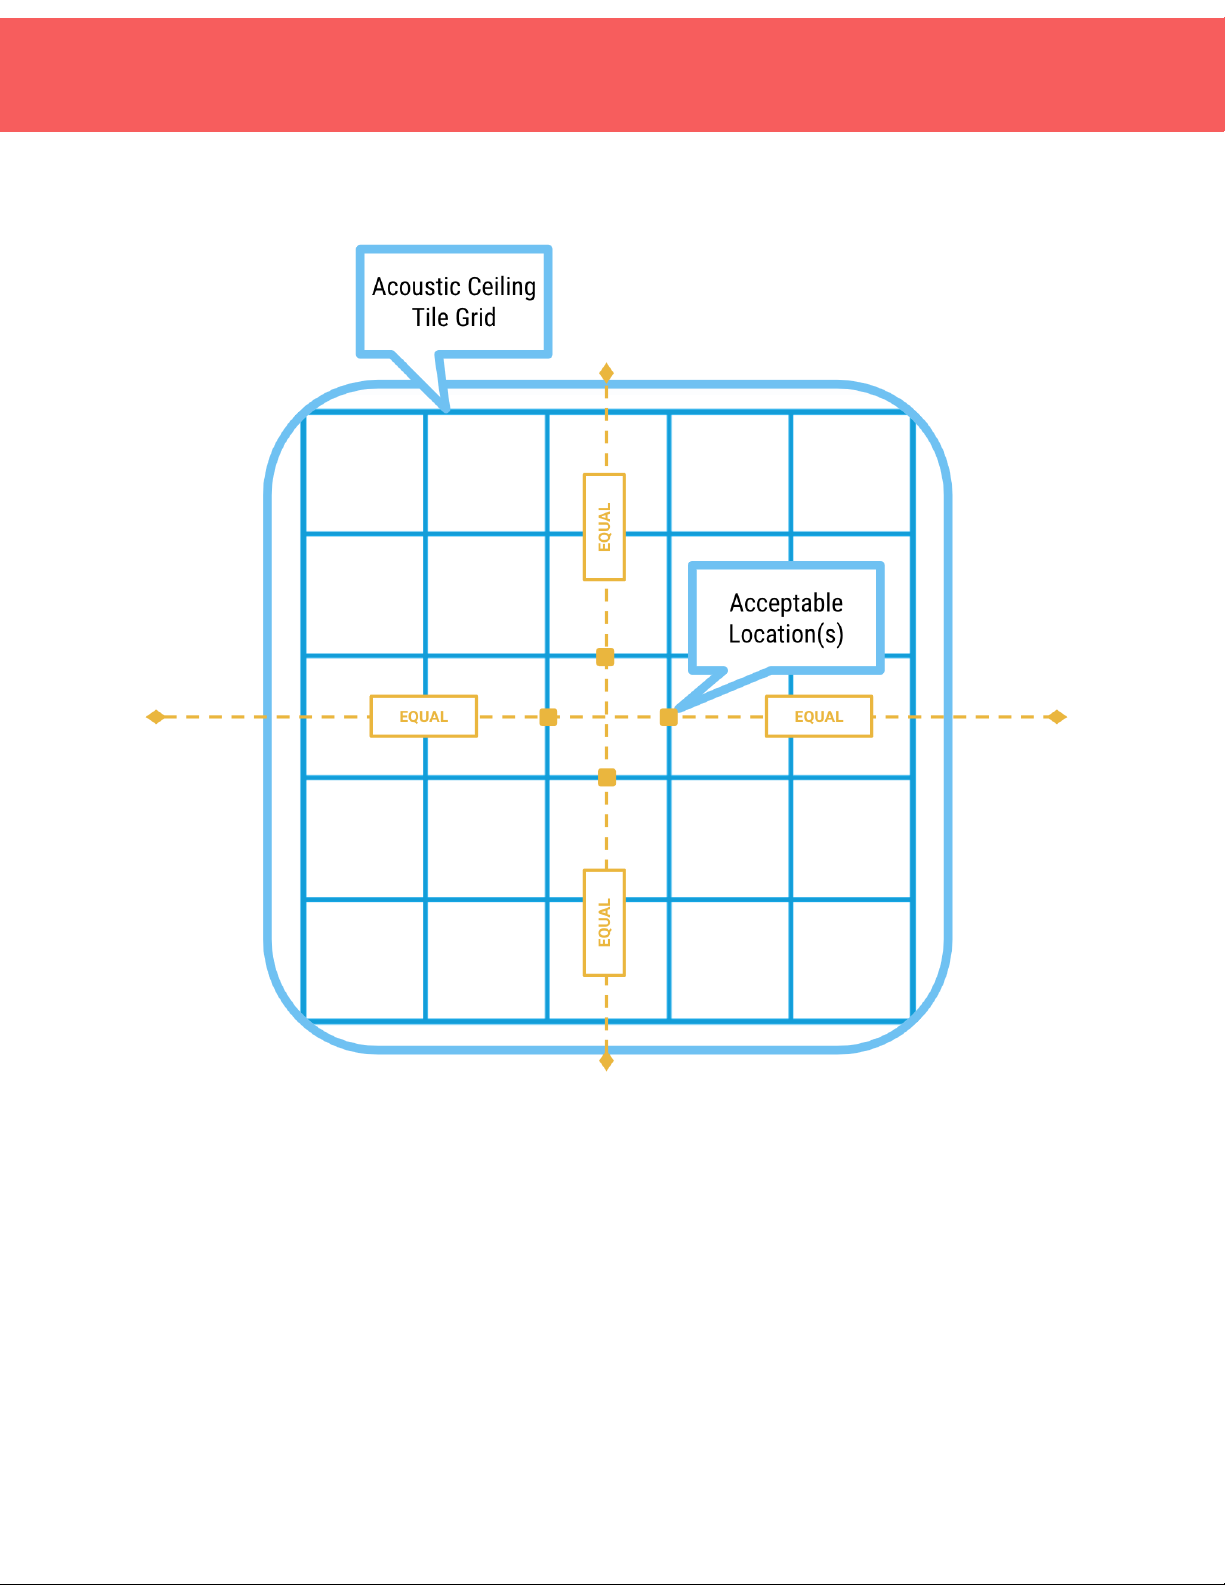
Room Type 2: StandardRoom on ACT Frame
Install the Room Sensor using the drawings to the right and checklist below as
guidelines for specific placement.
❏Center the sensor on the space. The sensor location on the plan should
indicate if the sensor is centered on the room or above a specific area of the
room.
❏Locate the Sensor on the ACT Frame. This may be slightly off-center of the
room.
❏Do not Mount Sensors to ACT Tiles

12
❏No Orientation of the Sensor is required (it’s spherical)
❏Wipe the frame free of any oils
❏Peel off the adhesive backing
❏Stick the sensor to the frame and hold in place, applying pressure, for at least
10 seconds.
FREQUENTLY ASKED QUESTIONS //
My WorkPoint isn’t responding when I press the notification button, what’s wrong?
●Was this WorkPoint previously assigned to another FloorPlan? The WorkPoint
will need to be “Recycled” from its previous FloorPlan before it will show up on
a new FloorPlan. Once it is recycled, it will show up on the new FloorPlan’s list of
unassigned devices.
●If it’s not being used at another location, try opening the device to manually
press the button on the board.
●If manually pressing the button doesn’t result in the LED illuminating, check the
battery.
●If replacing the battery does not work, please contact @CoWorkr and we’ll
send you a replacement.
A WorkPoint is showing offline on our FloorPlan, what can I do?
●If it’s a single WorkPoint amongst multiple other online WorkPoints, it’s likely the
battery. Remove the WorkPoint from its case and try replacing the battery. If
swapping the battery does not resolve the issue, please contact CoWorkr and
we’ll send you a replacement.
●If multiple WorkPoints are offline:
●The WorkPoints may be out of range of the nearest Hub, try moving a
Hub closer or a WorkPoint closer to the Hub to test its connection.

13
Sometimes a WorkPoint’s signal may be blocked depending on its
installed location. Please reach out to CoWorkr via chat or email
●The nearest Hub may be offline. Check the nearest Hub on the FloorPlan
to ensure it is online.
Will Motion WorkPoints detect workers walking by a desk?
●If installed under a desk (at a depth of at least 18" from the front edge) using
the desk case, WorkPoint Sensors' vision will not reach the area in which
people walk. It is always possible that sensors may detect a person brushing
up against a desk when passing by. These short-term occupancy events are
filtered out in the data.
Can WorkPoint Sensors pick up workers on the other side of glass walls or
windows?
●No, the majority of glass used for partition walls will not allow WorkPoint
Sensors to capture objects in motion on the opposite side. Other clear
materials, such as polycarbonate or acrylic, may allow for partial detection of
motion but the device’s sensitivity will be greatly reduced.
Are WorkPoint Sensors dangerous to human health?
●WorkPoint Sensors use Bluetooth Low Energy (BLE) to communicate. The
output power of CoWorkr Bluetooth Low Energy devices is so low, the FCC does
not require them to be tested for Specific Absorption Rate (SAR), a measure of
the rate at which energy is absorbed by the human body when exposed to RF
radiation, including microwave radiation. Cellphones and laptops, on the other
hand, must pass strict SAR testing requirements, since they operate at higher
power levels.
How do I know if WorkPoint Sensors are collecting data?
●WorkPoint Sensors are always on. As long as the battery is charged, the device
will broadcast data. It may appear that a WorkPoint Sensor is offline, however,
if the connection to CoWorkr’s cloud (your Hub) has been disconnected or
powered off.

14
FCC Statement
This equipment has been tested and found to comply with the limits for a Class B
digital device, pursuant to part 15 of the FCC Rules. These limits are designed to
provide reasonable protection against harmful interference in a residential
installation. This equipment generates, uses and can radiate radio frequency energy
and, if not installed and used in accordance with the instructions, may cause harmful
interference to radio communications. However, there is no guarantee that
interference will not occur in a particular installation. If this equipment does cause
harmful interference to radio or television reception, which can be determined by
turning the equipment off and on, the user is encouraged to try to correct the
interference by one or more of the following measures:
• Reorient or relocate the receiving antenna.
• Increase the separation between the equipment and receiver.
• Connect the equipment into an outlet on a circuit different from that to which
the receiver is connected.
• Consult the dealer or an experienced radio/TV technician for help.
Caution: Any changes or modifications to this device not explicitly approved by
manufacturer could void your authority to operate this equipment.
This device complies with part 15 of the FCC Rules. Operation is subject to the
following two conditions: (1) This device may not cause harmful interference, and (2)
this device must accept any interference received, including interference that may
cause undesired operation.
RF Exposure Information
The device has been evaluated to meet general RF exposure requirement. The device can be used in
portable exposure condition without restriction.
Table of contents


