Coyote C1PZ40WY User manual
www.CoyoteOutdoor.com
Model Numbers: C1PZ40WY, C1PZ40WMB, C1PZ40WC
FOR OUTDOOR USE ONLY
IMPORTANT: Read and obey all instructions and warnings before using this product! Use of this
product, as with any similar outdoor cooking appliances, will involve risks from hot temperatures
and from exposure to smoke and fumes. Please exercise caution and common sense.
To Installer or Person Assembling Oven:Leave this manual with the oven for future reference.
To Consumer: Keep this manual for future reference as it contains important Warnings and
Instructions.
Proposition 65: CALIFORNIA PROPOSITION 65 - WARNING: This product can expose you to Carbon
Monoxide, which is on the list of substances known by the state of California to cause cancer, birth
defects or reproductive harm. For more information go to: www.p65warnings.ca.gov. California law
requires businesses to warn customers of potential exposure to such substances. To minimize
exposure to these substances, always operate this unit according to the Use and Care Manual,
ensuring you provide good ventilation when cooking with gas.
COYOTE OUTDOOR LIVING, INC.
40” Duomo Wood Fired Pizza Oven
Use and
Care Manual
PUT SERIAL NUMBER LABEL HERE

2
Welcome and Congratulations
Congratulations on your purchase of our new Duomo Pizza Oven by Coyote Outdoor Living. With
Coyote, you can be confident you have chosen a high quality, innovative and stylish product from a
company that cares about you.
We encourage you to, please take a moment to register your Duomo Pizza Oven at:
www.CoyoteOutdoor.com. If you have any questions, please call Customer Support at 855-520-1559.
Please read this manual carefully to understand all the instructions for how to install, operate, and
maintain your oven for safety and for optimum performance and longevity.
We know you will enjoy your new Coyote pizza oven and we thank you for choosing our product.
Welcome to the Coyote family!
Scan this QR code for additional information on the Duomo Pizza Oven by Coyote Outdoor Living.
Read and save these instructions.
Obey all warnings and instructions.
This manual provides specific operating instructions for your pizza oven model. Use your pizza oven
only as instructed in this manual. These instructions are not meant to cover every condition or
situation that may occur. Consumers must practice common sense and caution when installing,
operating, and maintaining their appliances. If you lose this manual, download a replacement copy
from our website at www.CoyoteOutdoor.com or call Customer Support at 855-520-1559.

3
Table of Contents
Welcome and Congratulations............................................................................................................... 2
Before You Start ..................................................................................................................................... 4
How to Guide for Removing the Crate ........................................................................................... 4
Installation Guide ................................................................................................................................... 5
Product Dimensions ....................................................................................................................... 5
Location .......................................................................................................................................... 5
Overhead Obstruction and Surroundings ...................................................................................... 6
Clearance to Combustibles............................................................................................................. 6
Clearance to Non-Combustibles..................................................................................................... 6
General Safety Instructions .................................................................................................................... 7
Fire Safety............................................................................................................................................... 8
Using The Oven....................................................................................................................................... 9
How to Light the Oven.................................................................................................................... 9
How to Manage the Temperature................................................................................................ 10
How to Extinguish the Fire ...........................................................................................................10
Maintenance and Cleaning...................................................................................................................11
Troubleshooting ................................................................................................................................... 12
Limited Warranty..................................................................................................................................13
Parts Listing .......................................................................................................................................... 15

4
How to Guide for Removing the Crate
To uncrate the oven you will need: a Power Drill,
Philips Head bit, and a cutting tool.
Instructions:
•Using a cutting tool, carefully cut the two
straps that wrap the crate.
•Remove the (4) screws from the top cover
using a power drill ready with a Phillips
head bit. Once the screws are removed
the top will be free to lift.
•Next, remove the sides of the crate by
removing the remaining screws located on
the bottom area of the side walls. There
will be a total of (10) screws. Once the
screws are removed the sides will be free
to lift.
Tips:
Keep these points in mind when removing the
crate and installing the pizza oven:
•The pizza oven is HEAVY. We recommend using four people to remove it from the pallet.
•Be very careful not to place any items directly on the surface of the dome. This part cannot
be replaced if it gets damaged.
•Mark the specific area you want to place the pizza oven. This will help with minimal lifting
and adjusting of the pizza oven.
You should have received the following items in your packaging:
☐Oven (including 6 bricks)
☐Door
☐Chimney
☐Chimney Cap
☐Toolset: Peel, Turning Peel, Ash Rack, Brush
☐Owner’s Manual
Before You Start
5
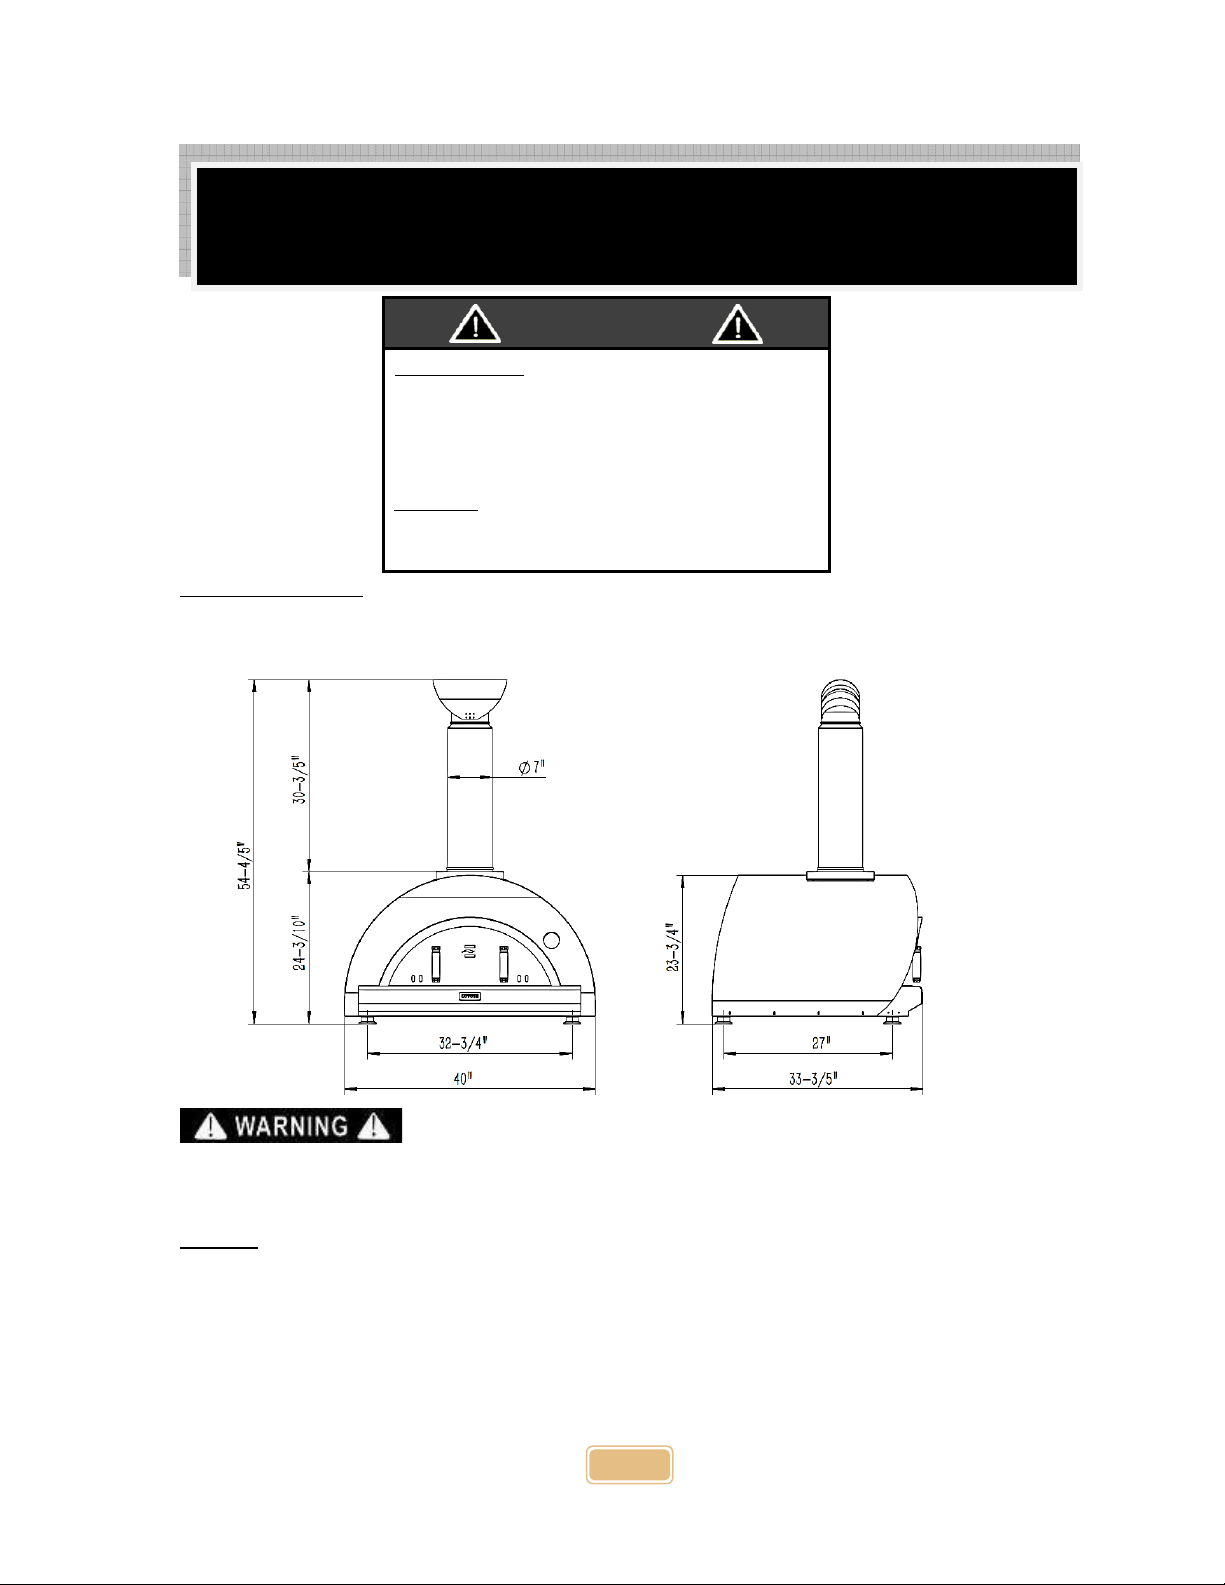
Product Dimensions
The following dimensions are intended for you to use as a reference for installation.
The following guidelines are for reference only. You must consult local
building and fire regulations regarding the safe distance from buildings, partitions, and coverings
such as pergolas and roofs.
Location
Place the oven on a flat, even, level, and stable surface away from combustible materials.
•If you install the oven on an island, the countertop must be stone, concrete, or any other
non-combustible material.
•If you intend to move the oven around, please log onto www.coyoteoutdoor.com for a
compatible cart or workstation.
Installation Guide
FOR OUTDOOR USE ONLY:
NEVER
operate oven
in enclosed areas, as this could lead to carbon monoxide
buildup which could result in injury or death.
DO NOT
use your oven
in garages,
breezeways, sheds, or any enclosed area.
NOT FOR USE BY CHILDREN.
If these
instructions are ignored by the owner, a hazardous fire
or explosion could result in
physical injury, death, or property damage!
NO CHEMICALS:
NEVER
store or use gasoline or other flammable liquids or vapors in the vicinity
of this or any other appliance.
WARNING
6
Overhead Obstruction and Surroundings
•This wood-fired pizza oven is for outdoor use only in a well-ventilated area. Do not install it
for use indoors or in any enclosed area.
•Install your oven where smoke will not infiltrate your home or homes nearby.
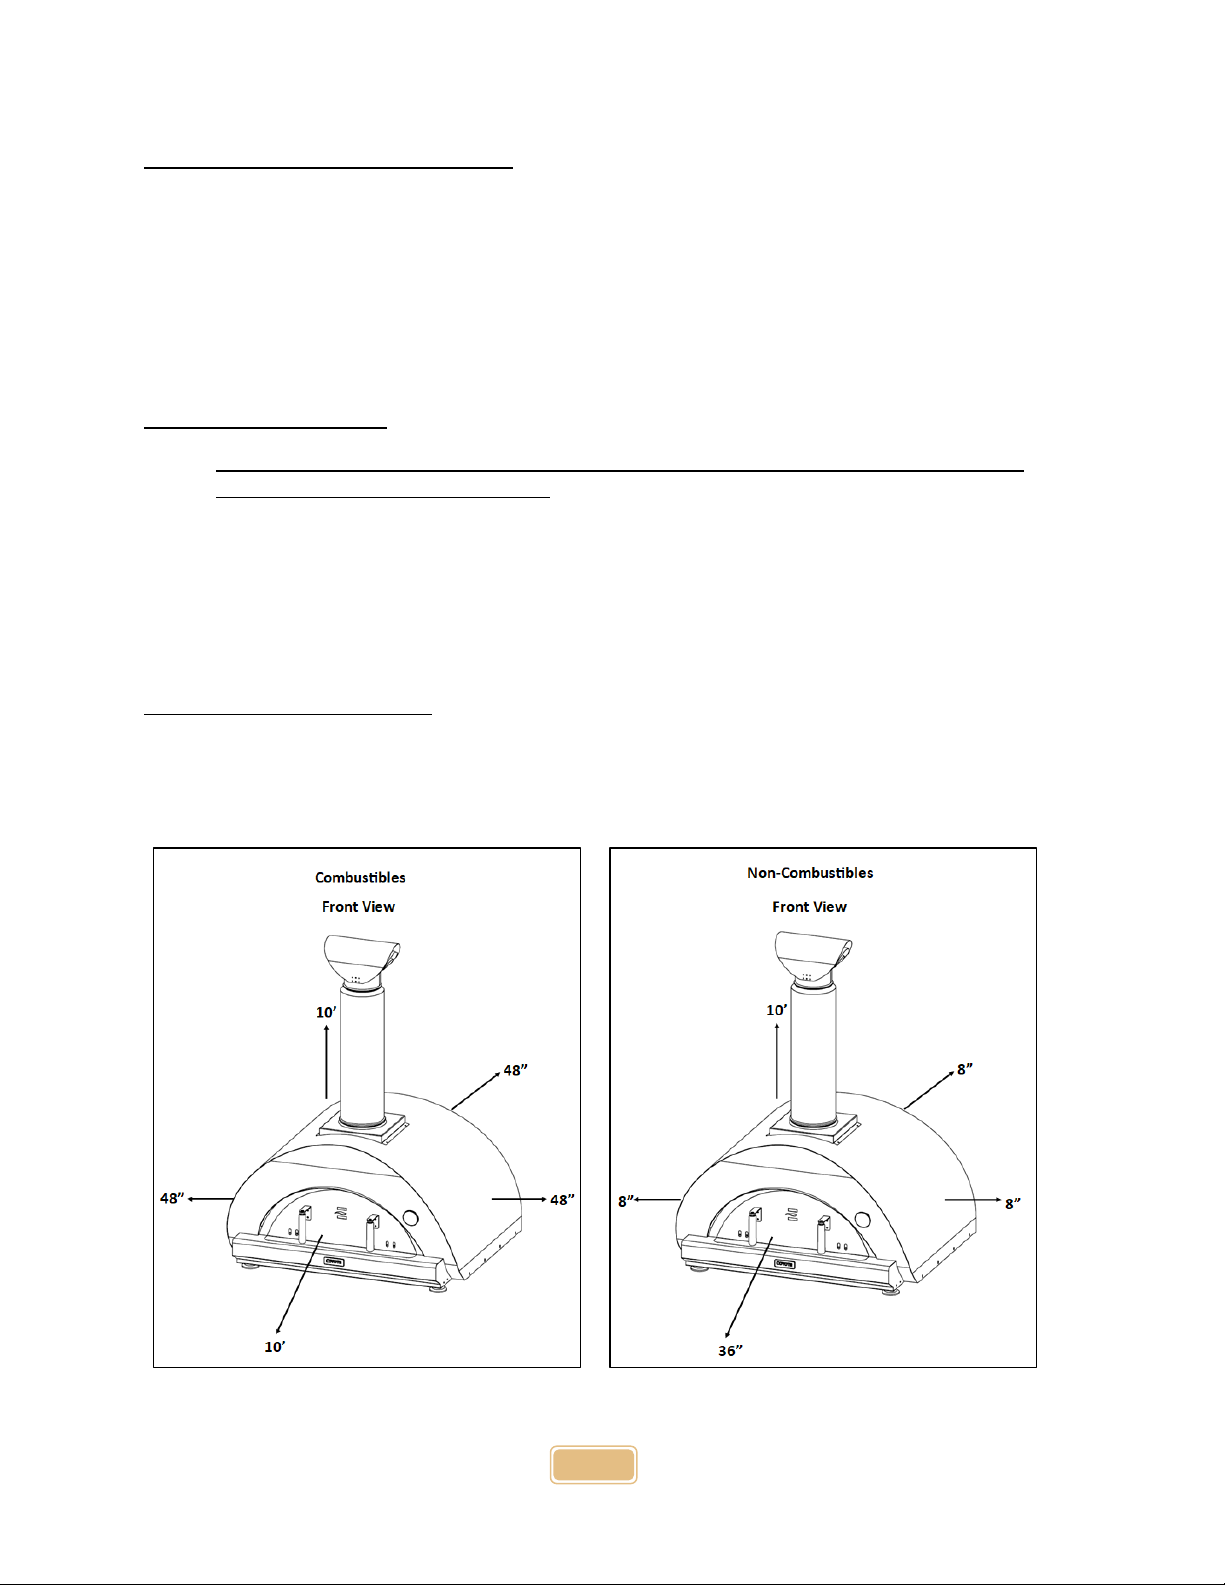
•Ensure nothing is within 10' of the chimney cap's top to block it.
•Check to see if your nearby surroundings have any elements that may impact the airflow or
draw such as wind patterns and nearby obstructions that may reduce your oven’s draw.
Clearance to Combustibles
•The minimum clearance to any combustible material must be at least 48” sides and rear,
and 10’ from the mouth of the oven.
•The oven should not be located under combustible material at any height.
•Combustible materials include, but are not limited to, wood or treated wood decks, patios,
and porches.
•Position the oven on a flat level surface and away from strong winds. Sparks can fly out of
the oven. Remove all flammable materials from around the oven.
Clearance to Non-Combustibles
•The minimum clearance from the oven to non-combustible materials is 8” from the
sides and rear, and 36” from the mouth of the oven.
•The minimum clearance from the chimney pipe to non-combustible materials is 20”.

7
PLEASE READ AND FOLLOW ALL SAFETY WARNINGS
AND INSTRUCTIONS IN THIS MANUAL
TO AVOID PERSONAL INJURY OR PROPERTY DAMAGE.
•Improper installation, adjustment, alteration, service, maintenance, or use can cause injury
or property damage. Read the installation, operating, and maintenance instructions
thoroughly before installing or servicing this equipment.
•Do not store, use gasoline, or other flammable vapors or liquids in the vicinity of this or any
other appliance. Also, always keep the area under and around this appliance free and clear
of all combustible materials.
•Do not use this wood-fired oven in any enclosed room unless properly vented and meeting
all local building codes and approvals.
General Safety Instructions
1. Before using the oven, make sure to remove all protective films.
2. Avoid using plastic dishes or containers in the oven, as the high temperatures may cause
them to melt and damage the oven.
3. Always use utensils that are designed to withstand high temperatures when cooking.
4. Always ensure that the oven is placed on a flat and even surface away from high winds.
5. Always keep children and pets away from the oven when it is being used.
6. Always use kiln dried natural hardwood.
7. Do not throw logs into the oven; use a turning peel to add more wood instead.
8. Never store, use, or place flammable liquids or objects in or near the oven.
9. Never leave the oven unattended as sparks can escape from chimney and oven mouth.
10. Never touch the external surface of the dome and chimney while in use.
11. Never move the oven while it is in use or still hot.
12. Never pour water on the bricks or use water to extinguish the flame.
General Safety Instructions

8
1. This pizza oven is designed for outdoor use only. Do not use it indoors.
2. Please adhere to the installation instructions in this manual and comply with the local fire
safety regulations.
3. Keep a safe distance from any combustible materials.
4. Keep children away from the oven while it is in use and is still hot.
5. Never use combustible liquid including but not limited to gasoline, kerosene, lighter fluid to
start or boost a fire. Keep all such liquids away from the oven while it is in use. Never use
unapproved fuel in your oven.
6. Never leave the oven unattended while it is in use or still hot.
7. Do not overfire the oven. If the flames spill out of the oven mouth, you are overfiring. Close
the door tightly to avoid a fire hazard.
8. Keep the oven adequately cleaned and maintained.
9. Remove ashes using a metal shovel. Never vacuum or throw away embers that are still
burning.
10. To safely dispose of ashes, use a metal shovel and transfer them into a metal container or
bucket. Leave the container outside for 2-3 days to ensure that all embers are completely
extinguished. After the ashes have cooled completely, dispose of them appropriately
according to local requirements.
11. Keep a wood-fired rated fire extinguisher in proximity to the oven.
12. Never extinguish the flame with water.
13. When using the oven, always wear heat-resistant oven gloves.
14. For safety reasons, it is recommended to keep the oven door closed for a minimum of 30
minutes after extinguishing a fire. Be cautious when opening the door, as the sudden oxygen
influx can reignite the flames quickly.
15. Before you light a fire, make sure the chimney is free of any blockages.
Fire Safety

9
•Before lighting the oven, ensure you have read and have adhered to all safety instructions in
the manual. If you are unsure, do not use the oven. Please call Customer Support at 855-
520-1559.
•When firing the oven for the first time, it is important to slowly bring the oven up to
temperature. This will help to drive out moisture in the bricks.
•Use only dried hardwood such as alder, apple, ash, hickory, maple, mesquite, pecan, or oak
for your oven. Oak is the most popular and widely available hardwood.
•Do not use any soft wood such as pine, fir, and cedar. Do not use painted or stained wood,
or any plywood or engineered wood. These types of wood have high sap or oil contents that
can create excess soot, coating the pizza oven and chimney flue with creosote.
•Do not overload the oven. Overloading is dangerous and can cause excessive smoke and
flames. There should never be flames coming out of the oven mouth or up from the
chimney. If this happened, close the oven door, and wait for the fire to die down.
•Check the temperature of the cooking floor with an infrared thermometer. When it has
reached the desired temperature, your oven is ready to bake pizza.
How to Light the Oven
1. Build a tower of 4-6 rows of dried and small kindling wood in the center of the oven floor.
2. Use a natural fire starter to get the fire going such as paper or kindling. Never
use gasoline, kerosene, lighter fluid, or similar flammable substances.
3. After the fire has started, add 2-3 pieces of larger logs on the top.
4. You may close the door but leave a 1-2” gap so that there is even oxygen going into the
oven.
5. Continue adding wood as needed. After 20-30 minutes of continuous fire, you should begin
to see orange flames from the logs on top of a pile of embers. The fire is well established
now.
6. When the oven reaches approximately 650°F on the cooking floor, you can move the
embers to the left side of oven using the supplied ash rake.
7. Add larger logs gradually. Avoid adding too many at a time so that you do not suffocate the
flames. Use only kiln dried logs with water content of less than 20%.
8. Sweep the cooking floor with the bush that comes with your pizza oven.
9. Check the cooking floor's temperature with an infrared thermometer before baking pizza.
Using The Oven

10
How to Manage the Temperature
•When you are using your oven, it is important to remember that it is insulated and
designed to store heat. However, some heat will be lost while you cook, and the door is
open. To maintain temperature control, it is recommended that you use medium-sized
pieces of wood that are 3-5 inches in diameter once the fire has burned well. This will
help you easily add more wood, when necessary, as larger pieces take longer to ignite
and can cause uneven heating.
•The thermometer in your Coyote Pizza Oven gives a general guide of ambient
temperature inside the oven. However, the temperature at the bottom and top of the
oven may differ from the thermometer.
•Use an infrared thermometer to check the cooking floor temperature. Read the
instructions of your infrared thermometer to get the correct readings.
•When it is cold or windy outside, heating and cooking times may take a bit longer. On
the other hand, if it is hot, cooking times might be shorter. Additionally, the size of the
dish or food being cooked can also affect cooking times.
•When cooking in a wood fired oven, it is best to start with high temperature and short
cooking time foods like pizza. As the oven cools down, you can move on to make
numerous other types of foods, including meats, vegetables, pasta, bread, and desserts.
How to Extinguish the Fire
1. When you are done using the pizza oven, close the door tightly and let the fire go out on
its own.
2. When the fire is out, and the oven has cooled down for 60 minutes or longer. You can
confirm the coals have cooled down and you can remove the ashes into a fire safe metal
ash can.
3. Never pour water in the oven. This will damage the oven and void your warranty.

11
The Duomo Pizza Oven by Coyote is a self-cleaning oven that allows for easy removal of any cheese
or toppings that may fall off a pizza or sauce from other dishes. To use this feature, simply move
some of the embers and fire with the included ash rake to the affected area and let it burn for a few
minutes. Then, push the fire back into place on the left side of the oven using the ash brush and
sweep the hearth as usual.
Once the oven has fully cooled down (usually the next day), it is safe to remove the cold ashes.
Always use a fire-resistant bin to hold the ashes. Before disposing of them, make sure the ashes are
completely cold.
Periodically, you can remove the firebricks and use an outdoor shop vac to vacuum the ashes from
the cooking floor.
Instructions for removing bricks from the oven:
•Place a towel on the oven shelf to avoid any potential scratches.
•Remove the two metal brick spacers from the left side of the oven.
•Gently slide the front left brick towards the left to create space, then carefully lift it from the
oven.
•Lift the remaining bricks from the oven without sliding them.
•Place the bricks securely to prevent any breaking or chipping.
To maintain stainless steel and painted surfaces, avoid using abrasive products. The best way to
clean them is to use a soft cloth and a solution of soap and water.
The chimney and cap can be washed with soapy water or power spray with a garden hose. Make
sure the chimney and cap are completely dried before reinstalling them back on the oven.
When your oven is not in use, make sure the door is tightly placed onto the oven mouth to prevent
water getting inside. If your oven is not used for an extended period, we recommend that you use a
Coyote approved cover which can be found at www.coyoteoutdoorliving.com.
Maintenance and Cleaning

12
Too Much Black Smoke
•Smoke is a byproduct of incomplete combustion. Make sure the wood is dry. Do not use
soft wood or birch with bark on.
•The bark of some varieties of wood can also release a lot of smoke and ash when burned.
If you are using the right type of hardwood but still experiencing excessive amount of
smoke, you may want to remove the bark from your wood.
•Make sure you have robust flames.
Flames Come Out of the Oven Mouth
•Avoid overloading the oven. Only add hardwood logs as needed to maintain the
temperature and keep the flames going.
•Place the oven door near the oven mouth and leave a gap for airflow.
Oven Not Burning Hot
•Make sure you are using hardwood and the logs are kiln dried with less than 20%
moisture content.
•Give the grill enough time to heat up. With the proper amount of hardwood, your
Coyote pizza over can reach 800°F in about 30 minutes.
Pizza Crust is Charred but Topping are not Cooked:
•A nicely cooked pizza requires heat from three sources: conductive heat from the
cooking floor, radiant heat from flames and convection heat from the dome. If the crust
is charred but toppings do not have leopard spots, it is an indication the oven needs
healthy flames. You can add a couple of small logs to quickly get the flames started and
go across the dome and over the pizza.
•On the other hand, if the toppings are charred but the crust is not fully cooked, it is an
indication that the floor has not reached the cooking temperature. It is recommended
that the cooking floor needs to be at least 650°F to make a pizza.
Troubleshooting

13
TO THE MAXIMUM EXTENT PERMITTED BY LAW, THIS LIMITED WARRANTY AND THE REMEDIES SET
FORTH BELOW ARE EXCLUSIVE AND IN LIEU OF ALL OTHER WARRANTIES, REMEDIES, AND
CONDITIONS, WHETHER ORAL OR WRITTEN, EXPRESS, OR IMPLIED. TO THE MAXIMUM EXTENT
PERMITTED BY LAW, COYOTE OUTDOOR LIVING, INC. ALSO SPECIFICALLY DISCLAIMS ANY AND ALL
IMPLIED WARRANTIES, INCLUDING, WITHOUT LIMITATION, WARRANTIES OF MERCHANTABILITY
AND FITNESS FOR A PARTICULAR PURPOSE.
Coyote Outdoor Living, Inc. issues this limited warranty to the original purchaser at the original site
of delivery with proof of purchase and specifically warrants that the Coyote Outdoor Living Duomo
Pizza Oven, when subject to normal residential use, will be free from defects in workmanship and
materials for a period of TWO YEARS. This limited warranty is not transferable and specifically
excludes any oven used in a commercial setting where anyone other than the original purchaser
(homeowner) would be using and maintaining the oven. This limited warranty specifically excludes
all issues that may arise from surface corrosion, scratches, and discoloration during regular use. This
limited warranty does NOT COVER LABOR OR LABOR RELATED CHARGES, and there will be shipping
and handling charges for the delivery of part(s).
This limited warranty does not cover any failures or operating difficulties due to accidents, abuse,
misuse, alteration, misapplication, vandalism, improper installation, maintenance, or service, or
damages caused by flashback fire or grease fire. This limited warranty does not cover scratches,
dents, corrosion, or discoloration caused by weather, heat, abrasive and chemical cleaners, pool, or
spa chemicals, and/or any tools used in the assembly or installation of this unit. This limited
warranty does not cover paint loss, surface rust, corrosion, or stainless-steel discoloration, which is
considered normal wear and tear. This limited warranty does not cover the cost of any
inconvenience, personal injury, or property damage due to improper use or product failure.
Deterioration or damage due to severe weather conditions such as hail, hurricanes, earthquakes,
tsunamis, tornadoes, terrorism, discoloration due to exposure to chemicals either directly or in the
atmosphere, Acts of God/forces of Nature are not covered by this limited warranty.
Coyote Outdoor Living, Inc.’s obligation under this limited warranty is limited solely to repair or
replacement, at our option, of the pertinent component during the warranty period, and the extent
of any liability of Coyote Outdoor Living, Inc. under this warranty is limited to repair or replacement.
This limited warranty does not cover normal wear of parts or damage resulting from any of the
following: negligent use or misuse of the product, use of an improper fuel supply, use contrary to
operating instructions, or alteration by any person other than a factory service center. The above
warranty periods are not extended by any repair or replacement.
Limited Warranty

14
Warranty Exceptions
Warranty on the Duomo Pizza Oven by Coyote is considered void in the following circumstances:
1. The oven was NOT installed properly or NOT used properly.
2. The oven was damaged or tampered with either voluntarily and/or involuntarily.
3. The oven, for whatever reasons, was physically altered and is no longer in the same
condition it was in when it left the factory.
4. Combustible material other than wood was used to light fires in the oven.
5. Damage to the oven from chemical products inside or outside of the oven.
6. If appropriate precautions have not been taken during fires.
7. The warranty, unless otherwise specified, refers only to household use.
8. The warranty does not cover normal wear and tear of the product.
9. The warranty does not cover micro veins, minor cracks or breaks on refractory bricks as
these are the intrinsic characteristics of the refractory material itself.
WARRANTY CLAIM PROCEDURE: If you require service or parts for your Coyote Oven, please
contact Coyote Outdoor Living Customer Support Team for direct factory assistance. Our hours of
operation are 8 am to 4:30 pm CST. The phone number is 855-520-1559, and the email address is
support@coyoteoutdoor.com. You may also fill out warranty claims online at
www.coyoteoutdoor.com. Please have your model number, serial number, and proof of purchase
available for any warranty claim.
15
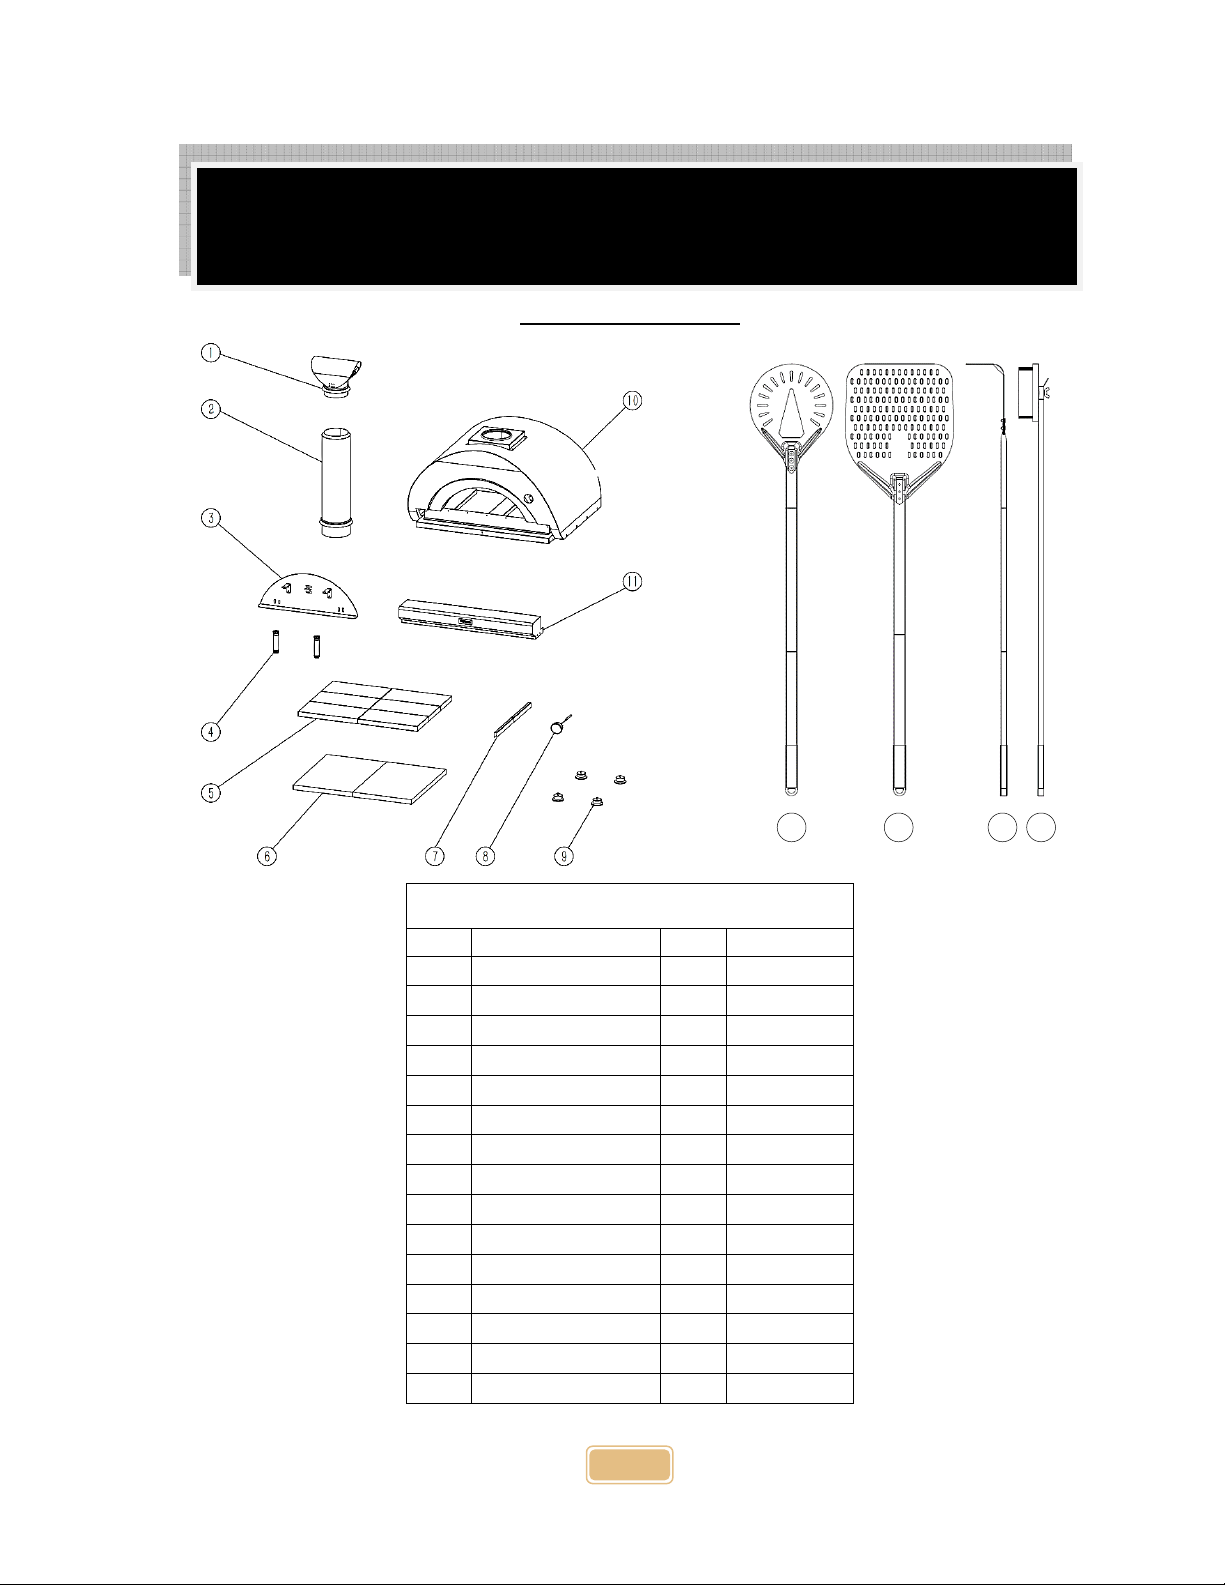
Exploded Parts List
C1PZ40W Parts Listing
No.
Description
Qty
Model
1
Chimney Cap
1
CPZ00001
2
Chimney Pipe
1
CPZ00002
3
Door
1
CPZ00003
4
Door Handle
2
CPZ00004
5
Bricks
6
CPZ00005
6
Insulation Boards
2
CPZ00006
7
Brick Spacer
2
CPZ00007
8
Thermometer
1
CPZ00008
9
Feet
4
CPZ00009
10
Dome
1
CPZ00010
11
Oven Shelf
1
CPZ00011
12
Turning Peel
1
CPZTPEEL
13
Peel
1
CPZPEEL
14
Ash Rake
1
CPZRAKE
15
Ash Brush
1
CPZBRUSH
Parts Listing
12
13
14
15
This manual suits for next models
2
Table of contents


