Camp Chef SIDEKICK 14 User manual

SIDEKICK 14
WARNINGS & INSTRUCTIONS
MODEL: PG14BB

2
WARNING
FOR OUTDOOR USE ONLY
DANGER
If you smell gas:
• Shut off gas to the appliance at the tank
• Extinguish any open flame.
• If odor continues, keep away from the
appliance and immediately call your fire
department.
Failure to follow these instructions could
result in fire or explosion which could cause
property damage, personal injury or death.
WARNING
If the information in this manual is not
followed exactly, a fire or explosion may
result causing property damage, personal
injury or loss of life.
WARNING
• To installer or person assembling this
appliance: Leave this manual with this
appliance for future reference.
• To consumer: Keep this manual with this
appliance for future reference.
This instruction manual contains important
information necessary for the proper
assembly and safe use of this product. Read
and follow all warnings and instructions
before assembling and using this appliance.
Do not discard this instruction manual.
WARNING
Take care the openings at side and rear of
the appliance are not obstructed, or that air
flow is restricted by placing items or other
appliances close to, or adjacent to openings.
Do not build this appliance into a cavity or
enclosure.
DANGER
• Never operate this appliance unattended.
• Never operate this appliance within 10 ft (3
m) of stored LP gas cylinder.
• Never operate this appliance within 25 ft
(7.5 m) of any flammable liquid.
• Never allow oil or grease to get hotter than
400°F (200°C). If the temperature exceeds
400°F (200°C), or if oil begins to smoke,
immediately turn burner or gas supply OFF.
• Heated liquids remain at scalding
temperatures long after the cooking process.
Never touch cooking appliance until liquids
have cooled to 115°F (45°C) or less.
• If a fire should occur, keep away from
appliance and immediately call your fire
department. Do not attempt to extinguish an
oil or grease fire with water.
Failure to follow these instructions could
result in fire, explosion or burn hazard which
could cause property damage, personal injury
or death.
WARNING
1. Do not store or use gasoline or other
liquids with flammable vapors in the
vicinity of this or any other appliance.
2. An LP cylinder not connected for use
shall not be stored in the vicinity of this or
any other appliance.
WARNING
This appliance is not for frying turkeys.

3
PARTS LIST
0221 PG14B
B
M6X15 BOLT (2)
M4X12 SUPPORT
SCREWS (4)
PG14-11 HARDWARE KIT
QTY 7 M6X15 SCREWS
QTY 4 M4X12 SCREWS
REGULATOR
PG14-10 (1)
T
ANK BKT (1)
PGSEAR-14
LP BURNER (1)
PG14-9
AIR VENT (1)
0826L
LP SPRING (1)
0980
BEZEL (1)
FTG600-27
POT GRATE (1)
PG14-1
IGNITER (1)
PG14-2
VALVE (1)
PG14-3
KNOB (1)
PG14-4
GREASE CUP (1)
PG14-5
(PART NOT TO
BE USED WHEN
USING THE BBQ
BOX, INCLUDED
FOR USE WITH
GRIDDLE)
MANIFOLD (1)
PG14-6
FRONT SUPPORT (1)
PG14-7
REAR SUPPORT (1)
PG14-8

4
1. Remove Qty (2) bolts from drum as shown.
PROPANE TANK
BRACKET
2. Install the propane tank bracket as shown
using existing hardware.
3. Remove side shelf from grill.
4. Install front and rear support brackets as
shown using the supplied hardware.
FRONT SUPPORT (1)
PG14-7
REAR SUPPORT (1)
PG14-8
LEVELING SCREWS (2)
M4 SCREW (4)
5. Install PG14 to pellet grill as shown using
the shelf hardware.
6. Level the PG14 using the leveling screw.
SCALE 0.100
LEVELING SCREWS (2)
M6 BOLT (4)
6. Install pot grate and included accessory.
POT GRATE (1)
PG14-1
Note: The grease cup that is included with
this product will only be needed when using a
griddle. It is not needed when using the other
accessories.
WARNING
Leak test must be performed before lighting
the grill. Refer to leak test instructions for
proper testing.
1. Do NOT leave this appliance unattended
while in use. The user must remain in the
immediate area of the product and have a
clear view of the product at all times during
operation.
2. Keep children and pets away from burner at
all times.
3. The use of alcohol, prescription or non-
prescription drugs may impair your ability
to properly assemble or safely operate this
appliance.
4. For OUTDOOR use only. Do NOT use in
a building, garage or any other enclosed
area. Do NOT use in or on recreational
vehicles or boats. NEVER use this
appliance as a heater.
5. Do not operate appliance under ANY
overhead construction. Keep a minimum
clearance of 3 feet (1 m) from the sides,
front and back of appliance to ANY
construction. Keep the area clear of all
combustible material and flammable liquids,
including wood, dry plants and grass, brush,
paper, and canvas.
6. Use ONLY on a level, stable non-
combustible surface like bricks, concrete
or dirt. Do NOT use this appliance on any
surface that will burn or melt like wood,
asphalt, vinyl, or plastic.
7. Keep the fuel supply hose away from any
heated surfaces.
8. To prevent accidental fires, before using
the appliance ensure that the hose is not
damaged and all joints and connections
are not leaking by turning on the cylinder
valve, leave the burner valve closed, and
apply a soapy solution to the joints and
connections. If a continuous hissing sound
is heard, or if the soapy solution bubbles,
there is a leak. Do not use the appliance if

5
there is a leak. Replace the faulty parts.
9. Extinguish all open flames before
connecting the gas supply to the appliance
and before checking for leaks.
10. When cooking with oil or grease, a
thermometer MUST be used.
11. NEVER allow oil or grease temperature
to get hotter than 400ºF (200ºC). If the
temperature exceeds 400ºF (200ºC) or
if oil begins to smoke, IMMEDIATELY turn
burner off.
12. When cooking with oil or grease, fire
extinguishing materials shall be readily
accessible. In the event of an oil or grease
fire do NOT attempt to extinguish with
water. Use a Type BC dry chemical fire
extinguisher or smother fire with dirt,
sand or baking soda.
13. NEVER overfill a cooking pot with oil,
grease or water. Follow instructions in this
manual for establishing proper oil, grease
or water levels.
14. When frying with oil or grease, all food
products MUST be completely thawed
and towel dried to remove excess water.
Failure to completely thaw and dry food
may cause oil or grease to overflow.
Follow instructions in this manual for
frying foods.
15. When frying, slowly submerse food
products into the oil or grease. Do NOT
drop.
16. DO NOT place an empty cooking vessel
on the appliance while in operation.
Use caution when placing anything in
the cooking vessel while burner is in
operation.
17. In the event of rain, hail, sleet or other
forms of precipitation, while cooking
with oil or grease, IMMEDIATELY turn
off burner(s) and gas supply, then cover
cooking vessel. Do NOT attempt to move
the appliance or the cooking vessel.
18. Avoid bumping or impact with the
appliance to prevent spillage or splashing
of hot cooking liquid.
19. Do NOT move the appliance when in use.
Allow unit to cool to 115°F (45°C) before
moving or storing.
20. This appliance will be hot during and after
use. Use insulated oven mitts or gloves for
protection from hot surfaces or splatter
from cooking liquids.
21. In case there is a fire, call the local fire
department or dial 911. Stay clear from
flames. Do not attempt to extinguish an
oil or grease fire with water.
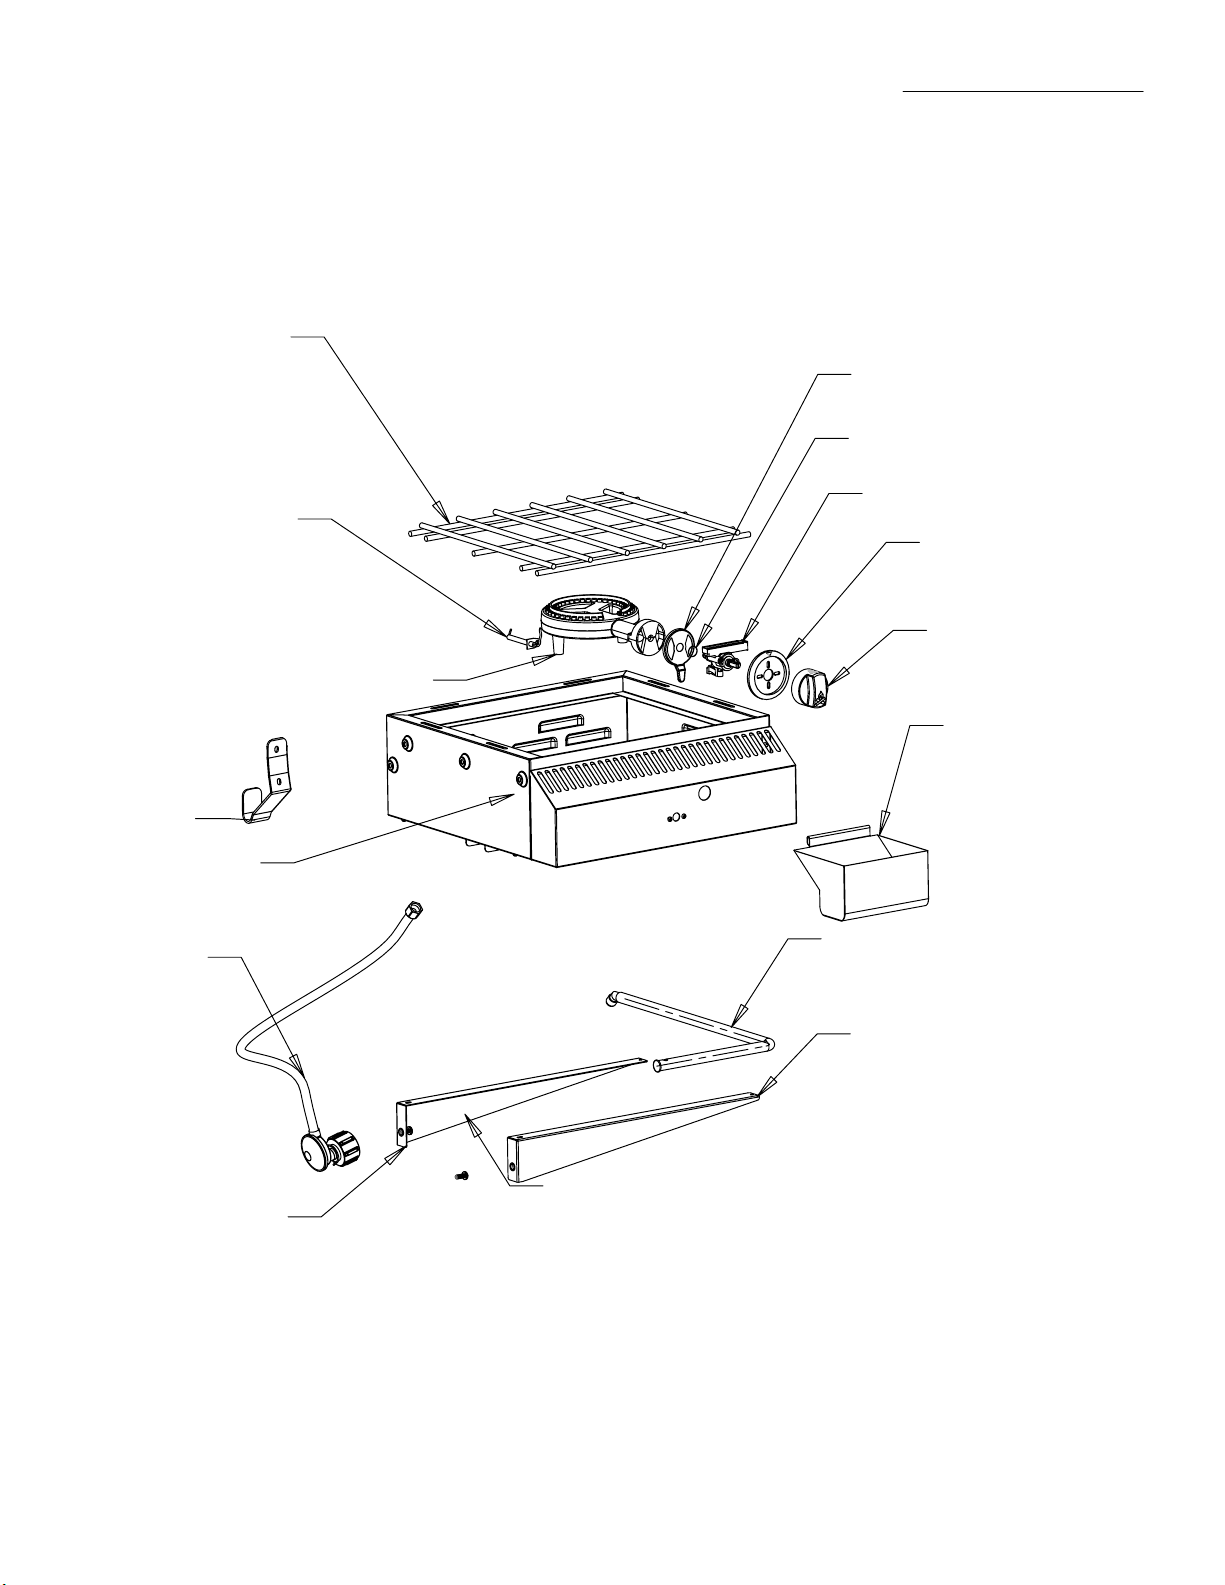
22. Use only accessories, such as
cooking vessels recommended by the
manufacturer, to allow safe and proper
performance of the product. Never use
a cooking vessel larger than the capacity
and diameter recommended by the
manufacturer. Maximum cooking vessel
size is 14" diameter and 12" height.
23. This product is not intended for
commercial use.
24. Always allow the appliance to cool before
covering the patio cover.
25. Always cover the appliance, with patio
cover (if supplied), when not in use.
26. In the event the appliance has been
exposed to water, tilt the appliance
forward and allow water to drain from the
burners before attempting to ignite.
• Use appliance only with LP (propane) gas
and the regulator/valve assembly supplied
with the appliance.
• Installation must conform with local codes,
or in their absence with National Fuel Gas
Code, NFPA 54/ANSI Z223.1. Handling and
storage of LP cylinders must conform to LP
Gas Code NFPA/ANSI 58. Appliance is not
for use in or on recreational vehicle and/or
boats.
• Do not modify this appliance. Modifications
will result in a safety hazard.
• Apartment
Dwellers: Check with
management to learn
the requirements and
fire codes for using an
LP Gas appliance at an
apartment. If allowed,
use outside on the
ground floor with a 10 ft/3 m clearance from
walls or rails. Do NOT use appliance on or
under any apartment, condominium balcony
or deck.
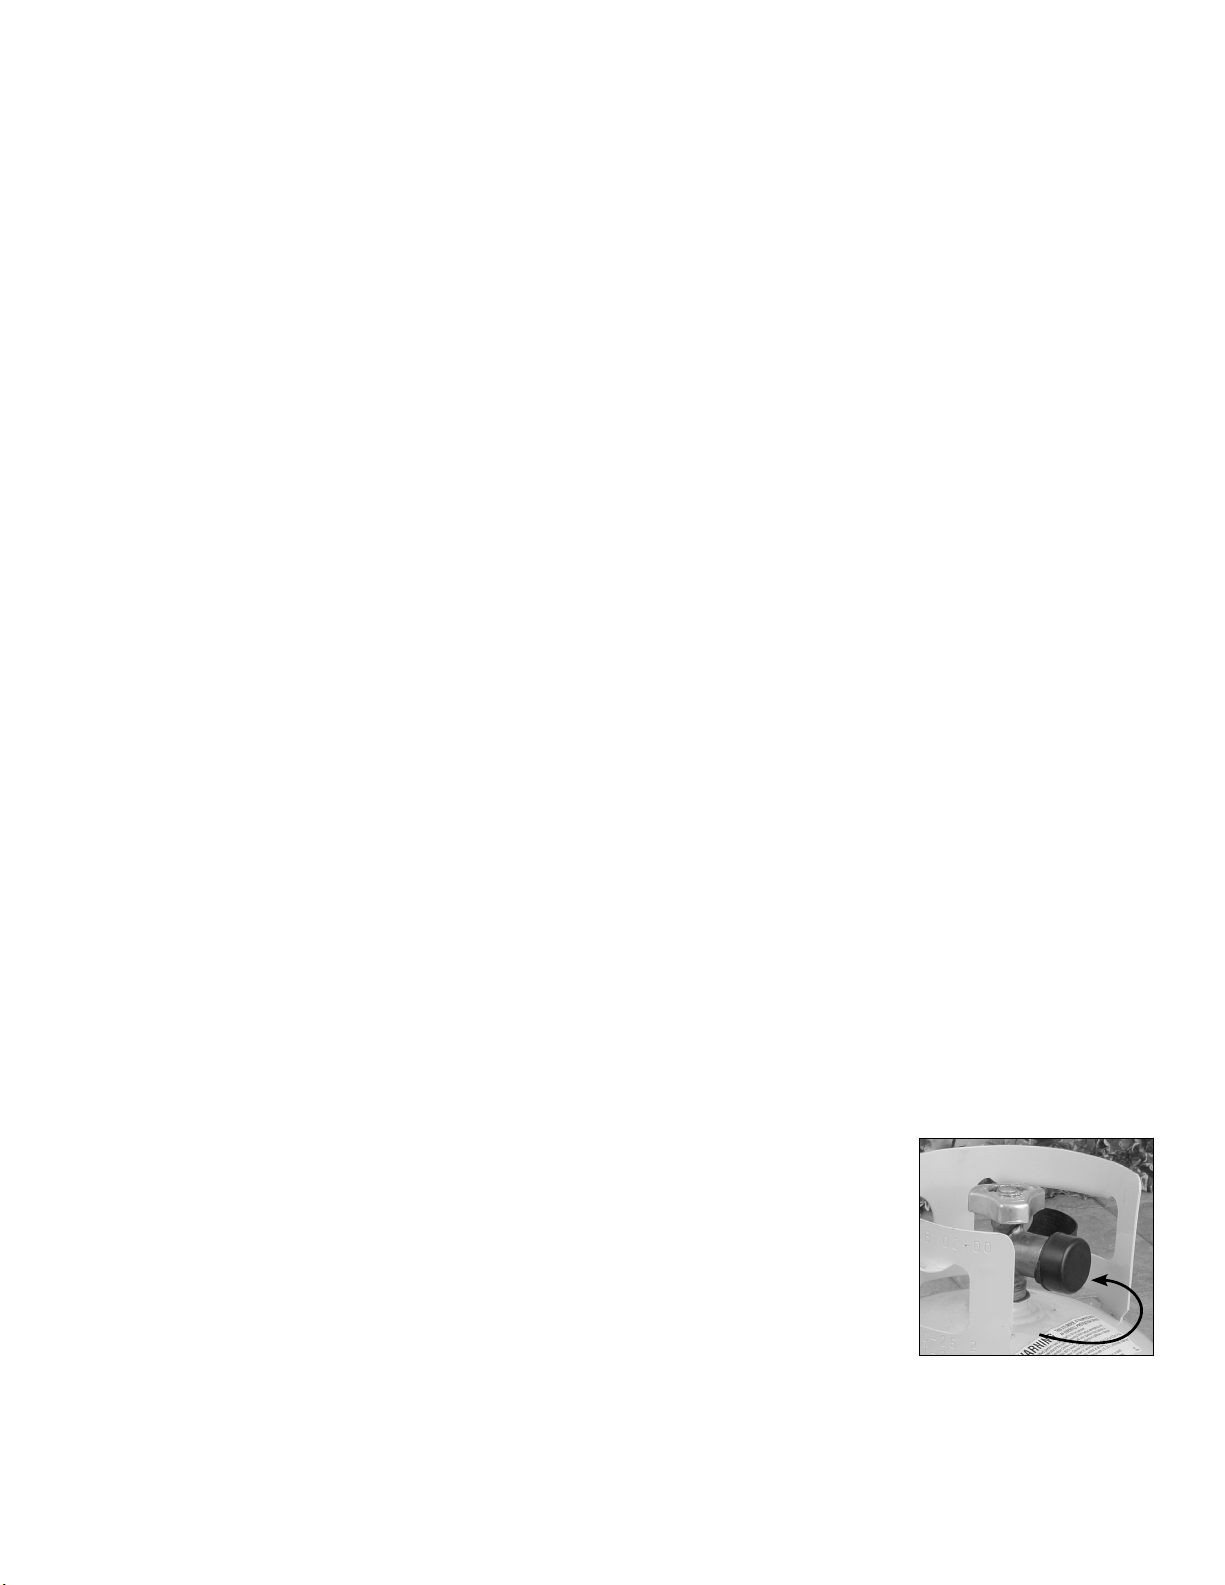
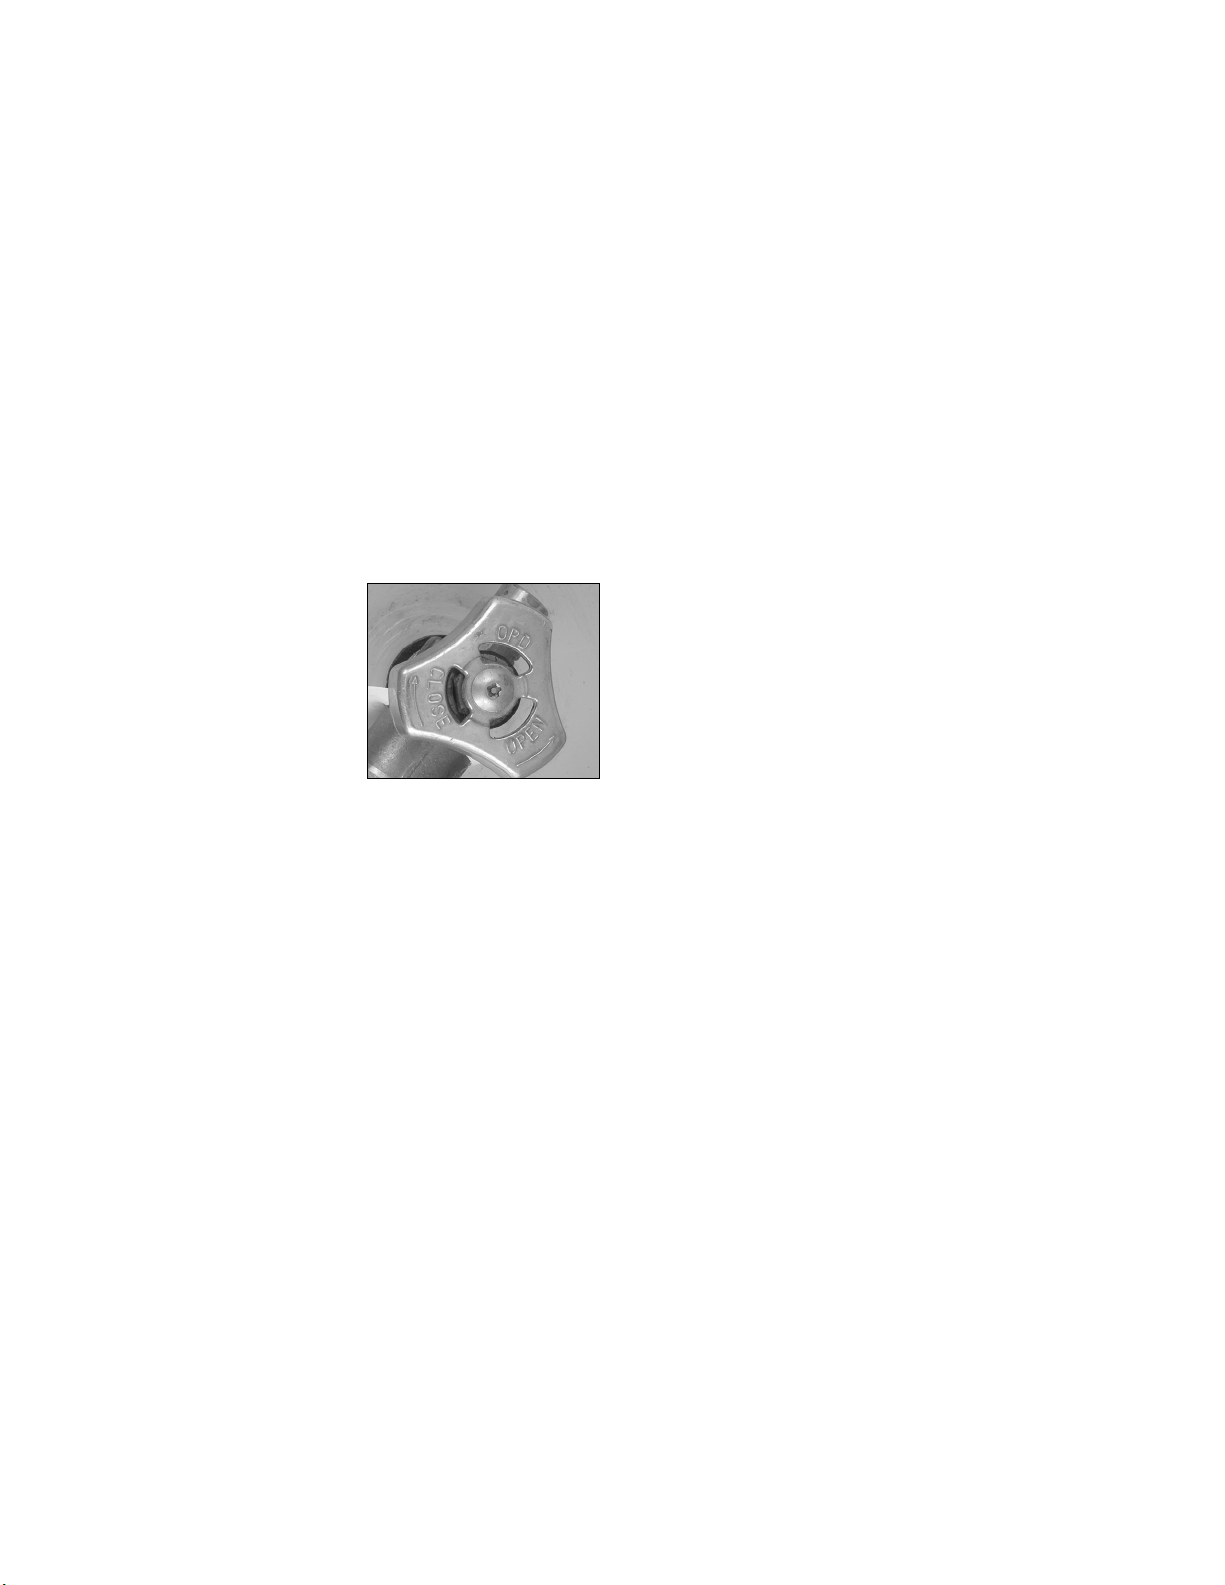
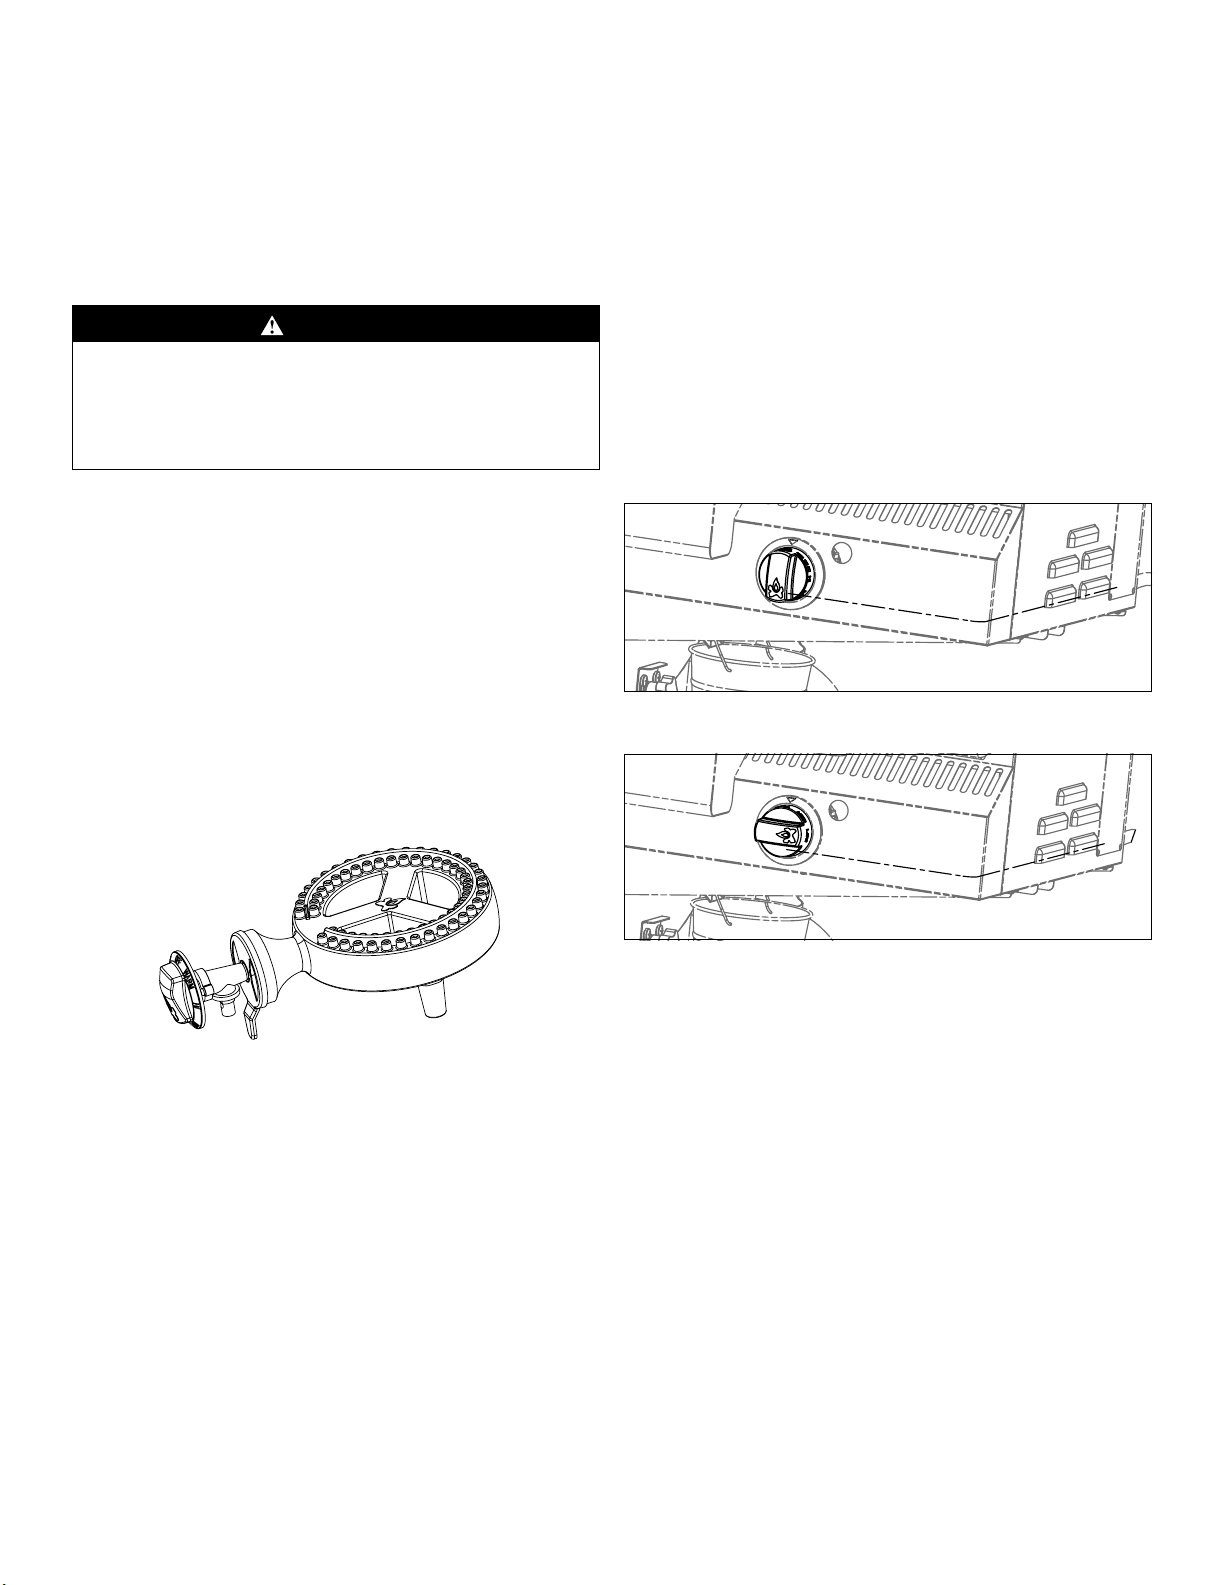
• Before opening LP tank valve, check the
Safety Cap

6
coupling nut for tightness. When appliance is
not in use, turn off control knob and LP tank
valve on supply cylinder.
• Never use LP tank if visibly rusted,
damaged, or out of date.
• If you notice grease or other hot material
dripping from appliance onto valve, hose
or regulator, turn off gas supply at once.
Determine the cause, correct, clean and
inspect valve, hose and regulator before
continuing. Perform a leak test.
• The regulator may make a humming or
whistling noise during operation. This will
not affect the safety or use of the appliance.
• Clean and inspect the hose before each
use of the appliance. If there is evidence
of abrasion, wear, cuts or leaks, the hose
must be replaced prior
to the appliance being
put into operation. See
product sheet for hose
& regulator information.
• Do not block holes
in bottom or sides of
appliance.
• Never operate appliance with LP tanks out
of correct position specified in Assembly
Instructions.
• Always close LP tank valve and remove
coupling nut before moving LP tank from
specified operating position.
• NEVER store a spare LP tank under or near
appliance or in enclosed areas. NEVER fill
the cylinder beyond 80% full. An overfilled
spare LP tank is hazardous due to possible
gas released from the safety relief valve.
Failure to follow these instructions exactly
could cause a fire resulting in death or
serious injury.
• If you see, smell, or hear escaping gas,
immediately get away from the LP tank/
appliance and call your fire department.
• All spare LP tanks must have safety caps
installed on the LP tank outlet.
LP Tank Removal, Transport and Storage
• Turn OFF all control knobs and LP tank
valve. Turn coupling nut counterclockwise
by hand only.Do not use tools to disconnect.
Place dust cap on cylinder valve outlet
whenever cylinder is not in use. Only install
the type of dust cap on the cylinder outlet
valve that is provided with the cylinder valve.
Other types of caps or plugs may result in
leakage of propane.
• A disconnected LP tank in storage or being
transported must have a safety cap installed
(as shown).
Do not store an LP tank in enclosed spaces
such as a carport garage, porch, covered
patio or other building. Never leave an LP
tank inside a vehicle, which may become
overheated by the sun.
• Do not store LP tanks in an area where
children play.
• When the appliance is not in use, the
gas must be turned off at the supply
cylinder. Storage of the appliance
indoors is permissible only if the cylinders
disconnected and removed from the
appliance.
• Supply cylinders must be stored outdoors
out of the reach of children, and shall not
be stored in a building, garage, or any other
enclosed area.
LP Tank
The LP tank used with your appliance must
meet the following requirements:
• The tank must be approximately 31.1 cm/12
in diameter x 46 cm/18.25 in tall with a
marked 20 lb/9.07 kg LPG capacity or 47.6
lb/21.6 kg water capacity as stated by the
tank manufacturer.
• Be constructed and marked in accordance
with specifications for LP tank of the U.S.
Department of Transportation (DOT) or the
National Standard of Canada, CAN/CSA-
B339, Cylinders, Spheres and Tubes for the
Transportation of Dangerous Goods.
• The propane cylinder used with this
appliance must include a collar to protect the
cylinder valve.
LP tank valve must have:
• Type 1 outlet compatible with regulator or
appliance.
• Safety relief valve.
OPD Hand Wheel

7
• UL listed Overfill Protection Device (OPD).
This OPD safety feature is identified by a
unique triangular hand wheel. Use only tanks
equipped with this type of valve.
LP tank must be arranged for vapor
withdrawal.
LP (Liquefied Petroleum Gas)
• LP gas is non-toxic, odorless and colorless
when produced. For Your Safety, LP gas
has been given an odor (similar to rotten
cabbage) so that it can be smelled.
• LP gas is highly flammable and may ignite
unexpectedly when mixed with air.
LP Tank Filling
• Use only licensed and experienced dealers.
• LP dealer must purge tanks before filling.
• Dealer should NEVER fill LP tank more than
80% of LP tank volume. Volume of propane
in tanks will vary by temperature.
• A frosty regulator indicates gas overfill.
Immediately close LP tank valve and call
local LP gas dealer for assistance.
• Do not release liquid propane (LP) gas
into the atmosphere. This is a hazardous
practice.
• To remove gas from LP tank, contact an
LP dealer or call a local fire department for
assistance. Check the telephone directory
under “Gas companies” for nearest certified
LP dealers.
LP Tank Exchange
• Many retailers that sell appliances offer you
the option of replacing your empty LP tanks
through an exchange service. Use only those
reputable exchange companies that inspect,
precision fill, test and certify their cylinders.
Exchange your tank only for an OPD safety
feature-equipped tank as described in the
“LP Tank” section of this manual.
• Always keep new and exchanged LP tanks
in upright position during use, transit or
storage.
• Leak test new and exchanged LP tanks
BEFORE connecting to appliance.
LP Tank Leak Test
WARNING
Appliance must be leak checked outdoors
in well-ventilated area, away from ignition
sources such as gas fired or electrical
appliances. During leak test, keep appliance
away from open flames or sparks.
For your Safety
• Leak test must be repeated each time LP
tank is exchanged or refilled.
• Do not smoke during leak test.
• Do not use an open flame to check for gas
leaks.
Use a clean paintbrush and 50/50 soap and
water solution. Use mild soap and water. Do
not use household cleaning agents. Damage
to gas train components can result. Brush
soapy solution onto all weld seams and entire
valve area.
WARNING
If “growing” bubbles appear, do not use
or move the LP tank. Contact an LP gas
supplier or your fire department.
Connecting Regulator To Appliance
Use an adjustable or 3/4” wrench to connect
the regulator hose to the stove. Tighten
securely with wrench. Do not use appliance
before checking for leaks. See section Leak
Te s tin g.

8
6. Turn the coupling nut clockwise to tighten
to a full solid stop. The regulator will seal
on the back-check feature in LP tank valve,
resulting in some resistance. An additional
one-half to three quarters turn is required
to complete connection. Tighten by hand
only – do not use tools.
NOTE: If you cannot complete connection,
disconnect regulator and repeat steps 5
and 6. If you are still unable to complete the
connection, do not use this regulator!
• Do not insert any foreign objects into the
valve outlet. You may damage the valve and
cause a leak. Leaking propane may result
in explosion, fire, severe personal injury, or
death.
• Never attempt to attach this appliance to the
self-contained LP gas system of a camper or
trailer or motor home.
WARNING
Appliance must be leak checked outdoors
in well-ventilated area, away from ignition
sources such as gas fired or electrical
appliances. During leak test, keep appliance
away from open flames or sparks.
NOTE: represents off.
Leak Testin g
1. Turn all control knobs to OFF.
2. Be sure regulator is tightly connected to LP
tank.
3. Slowly open LP tank valve by turning hand
wheel counter clockwise. If you hear a
rushing sound, turn gas off immediately.
There is a major leak at the connection.
Correct the leak before proceeding.
4. Brush 50/50 soap and water solution onto
indicated connections shown.
5. If “growing” bubbles appear, there is a
leak. Close LP tank valve immediately and
retighten connections. If leaks cannot
Installing The Lp Gas Cylinder Onto The Grill
1. Check that the cylinder valve is closed by
turning the knob clockwise.
2. Hang the cylinder from the tank hook.
3. Orient the cylinder such that the valve
opening faces the left side of the grill, and
so that the hose is not kinked or damaged.
DANGER
Keep the fuel supply hose away from any
heated surfaces.
4. Attach or detach regulator to the LP gas
cylinder only when cylinder is at rest in the
tank holder.
5. Hold regulator, insert nipple (B) into LP
tank valve. Hand tighten coupling nut,
holding regulator in a straight line (C) with
LP tank valve so as not to cross thread the
connection.
(C) Hold coupling
nut and regulator
as shown for proper
connection to LP
tank valve
(B) Nipple has to be
centered into the LP
tank valve

9
be stopped, do not try to repair. Call for
replacement parts. Order new parts by
giving the serial number, model number
and name of items needed to the Service
Center at 1.800.650.2433.
6. Always close LP tank valve after performing
tank leak test by turning hand wheel
clockwise.
WARNING
• Do not use appliance until leak checked.
• If you cannot stop a gas leak, immediately
close LP tank valve and call LP gas
supplier or your fire department!
Hose Check
• Before each use, check to see if hoses
are cut or worn. Replace damaged hose
assembly before using appliance. Use
only valve/hose/regulator specified by
manufacturer. See product sheet for hose &
regulator information.
Valve Check
Visually inspect the valve to burner assembly
to ensure the orifice is properly located in the
burner. As shown.
Low FLow Mode
This regulator is equipped with a Low-Flow
detection device for your safety.
Troubleshooting
To prevent your regulator and tank from going
into Low-Flow Safety Mode, follow these
simple guidelines:
1. TIGHTEN. Ensure that all control knobs on
the stove and tank are turned OFF. Use a
wrench to connect hose to stove. Connect
regulator to tank. Securely tighten.
2. SLOWLY OPEN. Twist open the knob on
your propane tank slowly. When opened
too quickly, the regulator will enter into
Safety Mode, which greatly reduces heat
output and gas flow to your stove.
Lighting Instructions
Follow the instructions exactly.
1. Check that the burner control knob and
the cylinder valve are turned to the “OFF”
position.
2. Turn on the fuel supply by rotating the
cylinder valve knob counter-clockwise to full
open.
3. DO NOT stand with head, body, or arms
over the grill when lighting.
Lighting The Main Burner
1. Make sure the control knob is in the “OFF”
position.
2. Push and turn the control knob to the
“HIGH” position.
3. If ignition does NOT occur in 5 seconds,
turn control knob to “OFF”, wait 5 minutes
to allow gas to dissipate and repeat lighting
procedure. If burner does not ignite, wait
5 minutes, see “Match Lighting the Main
Burners” section.
4. To turn off, turn the control knob clockwise
until it locks in the “OFF” position. This
does not turn off the gas flow from the
cylinder.
Note: If burner does not light or flame is too
low, you may have spider or other insect
blockage in burner. See “Burner Assembly/
Maintenance” under Proper Care and
Maintenance. Also refer to Low Flow section.
Match Lighting The Main Burners
1. Turn the burner control knob to “OFF”.

10
2. Use a long nose lighter and place through
lighting hole in the front of the grill to
approximately 1/2” (1 to 2 cm) from the
burner.
3. Turn on the control knob to the “HIGH”
position. The burner should light within 5
seconds.
4. If the burner does not light, turn the control
knob to “OFF” and wait 5 minutes for gas
to dissipate and repeat lighting procedure.
5. If the burner does not light within the first
few attempts of match lighting, there is
a problem with the gas supply. Turn off
the gas at the burner and cylinder. DO
NOT attempt to operate the grill until
the problem is found and corrected. See
“Trouble Shooting” section of this manual.
Turning LP Cooker Off
• Turn knob to OFF position.
• Turn LP tank OFF by turning hand-wheel
clockwise to a full stop.
Burner Flame Check
• Light burner; rotate knob from HIGH to
LOW. You should see a smaller flame in LOW
position than seen on HIGH. Always check
flame prior to each use. The air damper
mounted on the front of your burner helps to
control the amount of primary air that mixes
with the LP gas. A blue flame with little or
no yellow flame provides the best heat.
Adjust the air damper by turning it clockwise
or counterclockwise until the desired flame
is achieved. Curing of paints and parts will
produce an odor only on first use.
WARNING
All cleaning and maintenance should only be
done when the appliance is cool and with the
fuel supply turned off at the LP cylinder. DO
NOT clean any part in a self-cleaning oven.
The extreme heat will damage the finish.
Cleaning The Burner
NOTE: Spiders and small insects can spin
webs and build nests inside the burner. This
especially occurs in late summer and fall
before frost when spiders are most active.
These nests can obstruct gas flow and cause
a fire in and around the burner and orifice.
Such a fire can cause operator injury and
serious damage to the appliance. To help
prevent a blockage and ensure full heat
output, clean and inspect burner tube often
(once or twice a month). NOTE: Water or air
pressure may not clear a spider web.
Steps for cleaning the Burner:
1. Remove orifice/valve from burner.
2. Look inside the burner tube for nests,
webs, or mud.
3. To remove the above obstructions, use an
accessory flexible venturi brush or bend
a small hook on one end of a long flexible
wire or use an air hose.
4. Inspect and clean the burner if needed.
5. Reattach orifice/valve to burner.

11
Cleaning and Maintenance
Correct care and maintenance will keep your
appliance operating smoothly. Clean regularly
as determined by the amount of use. NOTE:
Clean the entire appliance each year and
tighten all hardware on a regular basis (1-2
times a year or more depending on usage).
Cleaning should be done where detergents
won’t harm patio, lawn, or the like.
Suggested Cleaning Materials
• Mild dish washing liquid detergent
• Wire brush
• Nylon cleaning pad
• Hot water
• Paper clip
• Soft brass bristled brush
Component Cleaning:
• BURNER: Wire brush loose corrosion from
burner exterior. Clean clogged gas port
holes with an opened paper clip. Replace
corroded or damaged burners that would
emit excess gas.
• COOKING SURFACES, POTS AND PANS:
Clean the cooking surface with soapy water
and a nylon cleaning pad.
• After appliance has cooled, wipe areas
where paint and finish have burned off to
minimize rusting.
Using a Thermometer
Prior to lighting, position thermometer clip
so that at least 1/2” of thermometer tip is
submerged in oil. Reposition thermometer
as necessary to cook. Continue to use
thermometer until burner is turned off.
If Frying:
• Follow instructions provided by the
appliance manufacturer.
• When cooking with oil or grease, a
thermometer must be used.
• Introduction of water from any source into
the cooking oil or grease may cause overflow
and severe burns from hot oil and water
splatter. When frying with oil and grease, all
food products MUST be completely thawed
and towel dried to remove water before
being immersed in the fryer.
• Be sure thermometer is in good working
condition. To check the thermometer, insert
it into a pot of boiling water and ensuring
that it registers approximately 212°F ±
20°F (100°C ± 10°C). If it does not function
properly, obtain a replacement thermometer
specified by the manufacturer before using
the appliance.
• When frying with oil or grease, do not use a
pot deeper than 6”(132mm)
• Do not over fill the pot with cooking liquid.
Never fill appliance more than half full of
cooking liquid or past the maximum fill line (a
permanent marking on fryer).
• If cooking liquid has spilled and ignited,
do not attempt to extinguish with water.
Immediately turn gas supply OFF at the
supply cylinder and:
1. Extinguish flames using a BC type fire
extinguisher as recommended by the
fryer manufacturer; or
2. Smother flames with dirt or sand.
3. In case there is a fire, call the local fire
department or dial 911.
4. To avoid accidental burns from burner
flame or hot cooking liquid, turn the
burner off before inserting or removing
food from the fryer.
• When removing food from the fryer, be
sure to avoid burns from hot cooking
liquid drippings.

12
LIMITED WARRANTY
Camp Chef No-Hassle Warranty
Here at Camp Chef we stand by our products and take pride in our
customer service. Because of this, your new Camp Chef product comes
with a No-Hassle Warranty. We warrant that our products will be free from
defects in all materials and workmanship (excluding paint and finish) for
the Warranty Coverage Period described below. This warranty is extended
only to the original consumer purchaser. During the Warranty Coverage
Period, we will (at our sole option) replace any defective part or product
covered by this warranty when provided with proof of purchase. The
replacement will be without charge.
Required Maintenance:
Clean your product after each use to maintain its finish and prolong its
lifespan. Wipe away all grease and ashes. Keep metal products free of
moisture, salts, acids and harsh fluctuations in temperature. Product
paint and other finishes are not covered by this warranty. The exterior
finish of the product will wear down over time.
Coverage Details:
Warranty does not cover normal wear of parts or damage caused by
misuse, abuse, overheating and alteration. No alterations are covered in
this warranty. Camp Chef is not responsible for any loss due to neglectful
operation. Furthermore, this warranty does not cover products damaged
or rendered defective due to accident, misuse, abuse, modification, water
damage, neglect, improper handling or storage, improper maintenance
or installation, incorporation of third party components or exposure to
weather, natural disasters such as earthquakes, hurricanes, tornadoes,
floods, lightning, fires, or failure to follow instructions for use.
ANY WARRANTIES IMPLIED BY LAW SHALL IN NO EVENT EXTEND BEYOND
DURATION OF THIS EXPRESS WARRANTY. Some States do not allow
limitations on how long an implied warranty lasts, so the above limitation
may not apply to you. REPAIR OR REPLACEMENT AS PROVIDED HEREIN IS
YOUR EXCLUSIVE REMEDY FOR ANY DEFECTIVE PRODUCT. IN NO EVENT
SHALL WE BE LIABLE FOR ANY SPECIAL, INCIDENTAL OR CONSEQUENTIAL
DAMAGES OF ANY KIND ARISING OUT OF THE PURCHASE OR USE OF
THIS PRODUCT, WHETHER BASED UPON CONTRACT, TORT, STATUTE OR
OTHERWISE. Some states do not allow the exclusion or limitation of
incidental or consequential damages, so the above limitation or exclusion
may not apply to you. This warranty gives you specific legal rights, and
you may also have other rights which vary from State to State.
Please keep all original sales receipts from the authorized dealer. Proof
of purchase is required to obtain warranty services. Any parts or products
returned without written authorization will be discarded without notice.
To obtain warranty services submit a warranty request at
or call (800) 650-2433. Our English speaking Product Specialists are happy
to help, Monday-Friday 7 AM – 5 PM MST.
Warranty applies to the United States and Canada.
WARRANTY COVERAGE PERIODS
Pellet Grills 3 years from purchase date
Cooking Systems 1 year from purchase date
Fire Pits 1 year from purchase date
Water Heaters 1 year from purchase date
All other items & accessories 90 days from purchase date
This manual suits for next models
1
Table of contents
Other Camp Chef Kitchen Appliance manuals

Camp Chef
Camp Chef 117654499 User manual

Camp Chef
Camp Chef SH140L User manual

Camp Chef
Camp Chef ITALIA ARTISAN PIZZA OVEN User manual

Camp Chef
Camp Chef PG24SSG User manual

Camp Chef
Camp Chef PZ30 User manual

Camp Chef
Camp Chef CCP User manual

Camp Chef
Camp Chef PZ90 User manual

Camp Chef
Camp Chef EX-60LW User manual

Camp Chef
Camp Chef PG24WWSB User manual

Camp Chef
Camp Chef JAVA 5 User manual