Cozy Cab A-11836 User manual
INSTALLATION INSTRUCTIONS
A-11836 Cab with Doors Kit
05-11069
12/27/2012
Vehicle set up instructions;
This cab is designed to be used on model year 2010 and newer, Multi-Pro 5800 Sprayer Vehicles
equipped with a ROPS. Replacement of standard front leaf springs with heavy duty leaf springs
(Purchased separately from The Toro Company, part number 99-0569), is required for use with
this cab. Contact your Toro Dealer to purchase (2) heavy duty leaf springs.
Preparation of machine;
1. Position vehicle on a clean level surface, stop engine, engage parking brake and remove key from
ignition switch.
2. Disconnect positive cable from battery.
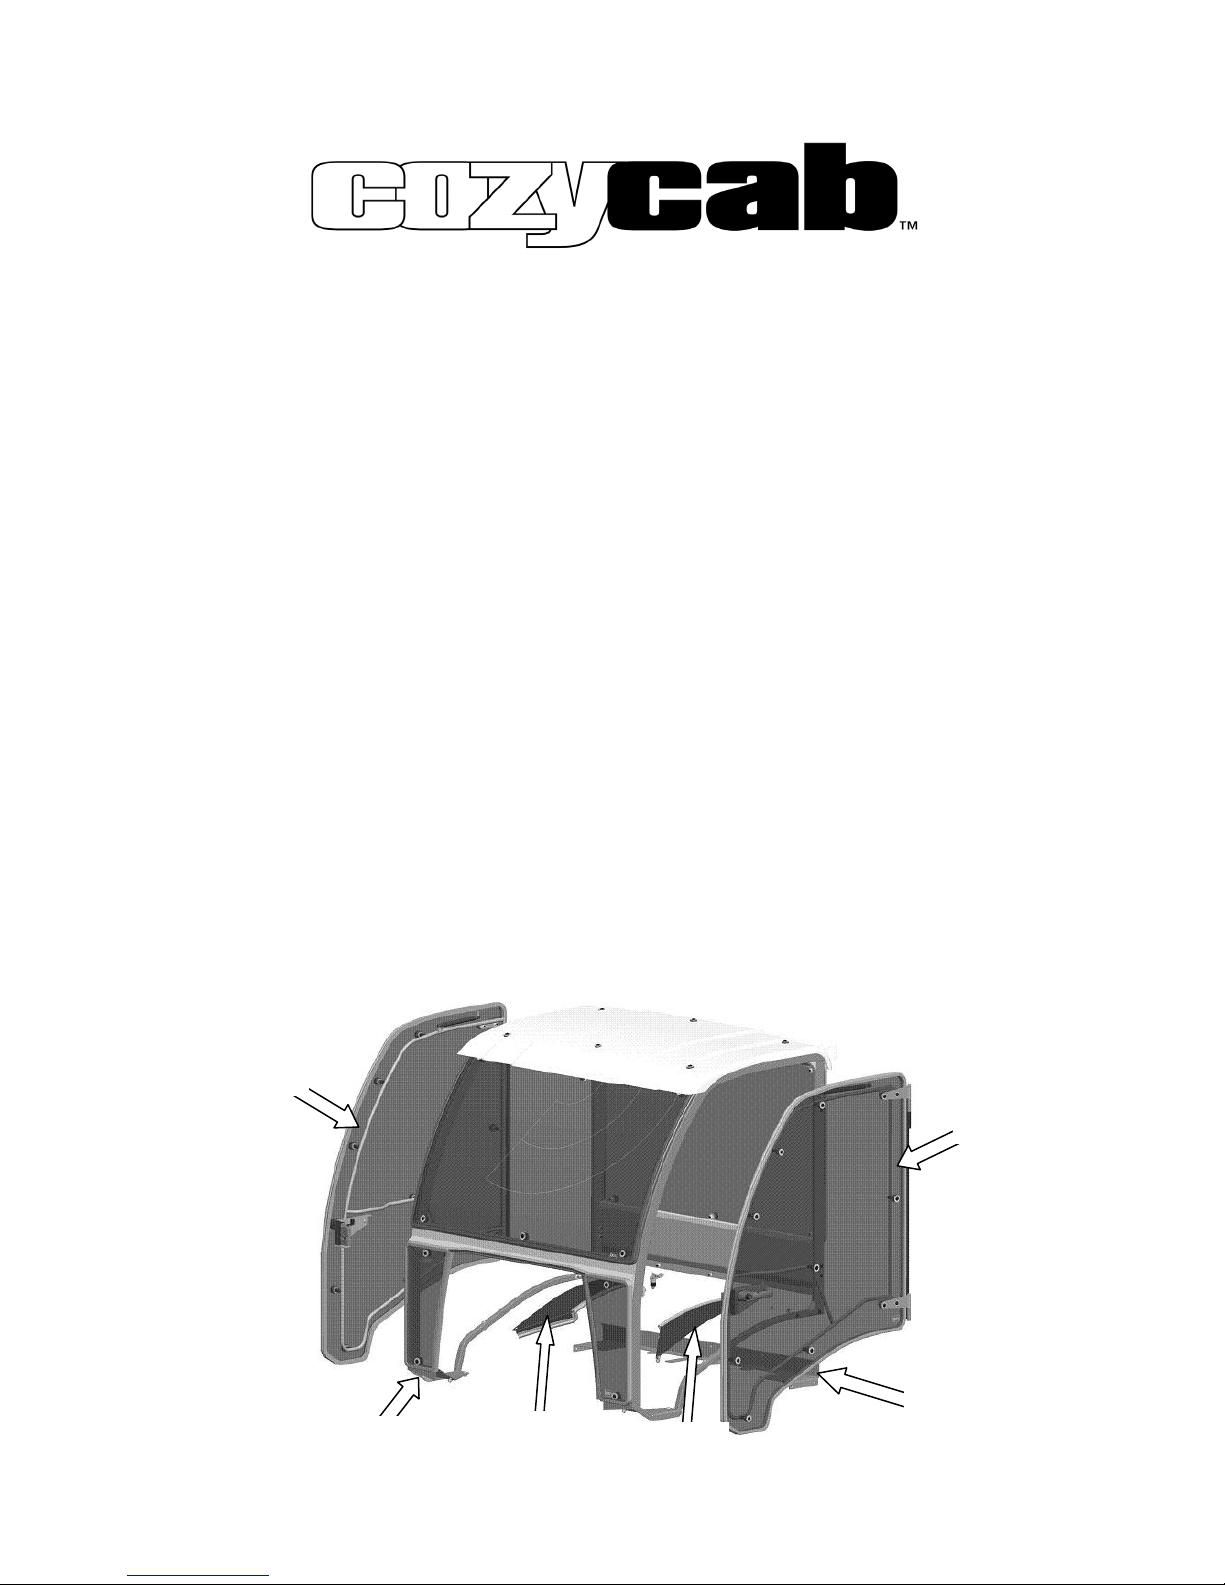
3. Remove crating from cab and open mounting kit box. Layout parts for identification. See Figures
1 and 2.
Parts list;
ITEM 1
Figure 1
ITEM 2
ITEM 6
ITEM 5
ITEM 3
ITEM QTY DESCRIPTION
CP PART
NUMBER
1 1 CAB SHELL ASSEMBLY 4-15538
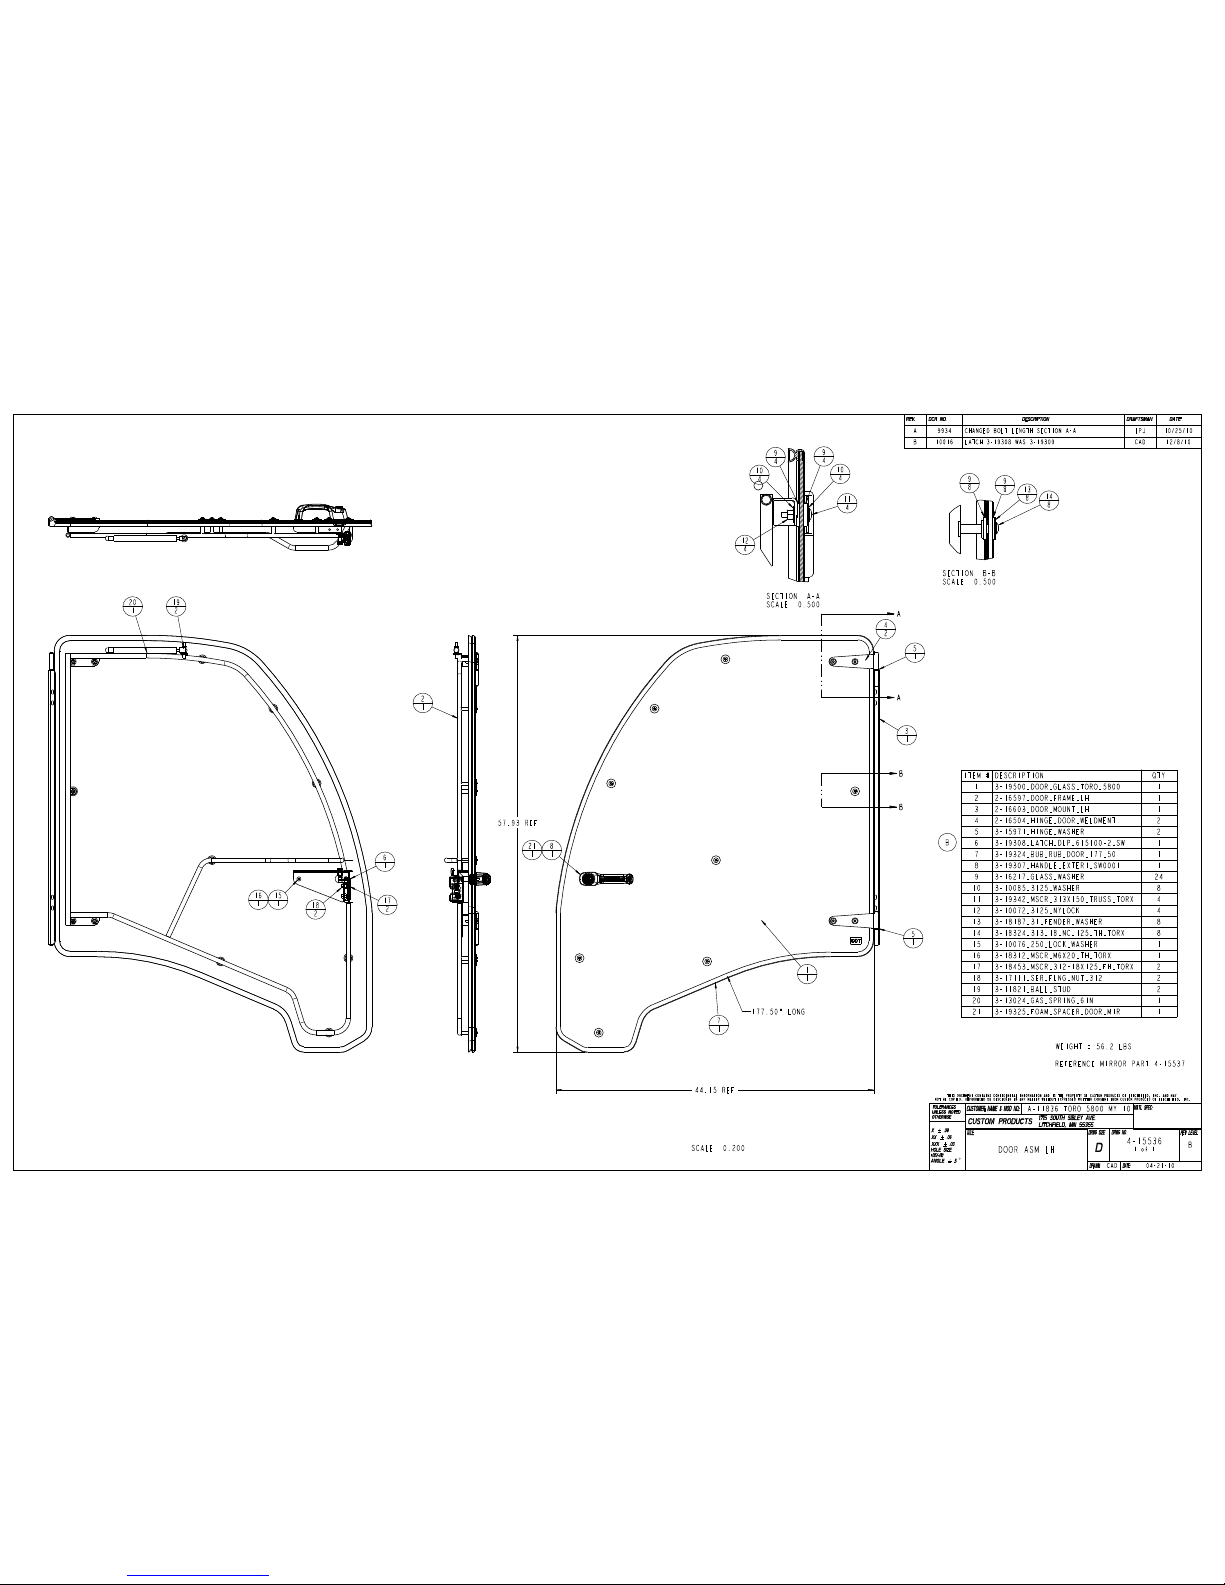
2 1 DOOR ASSEMBLY LH 4-15536
3 1 DOOR ASSEMBLY RH 4-15537
4 1 FENDER PANEL ASSEMBLY LH 4-15568
5 1 FENDER PANEL ASSEMBLY RH 4-15569
6 1 REAR MOUNT PANEL 1-47035
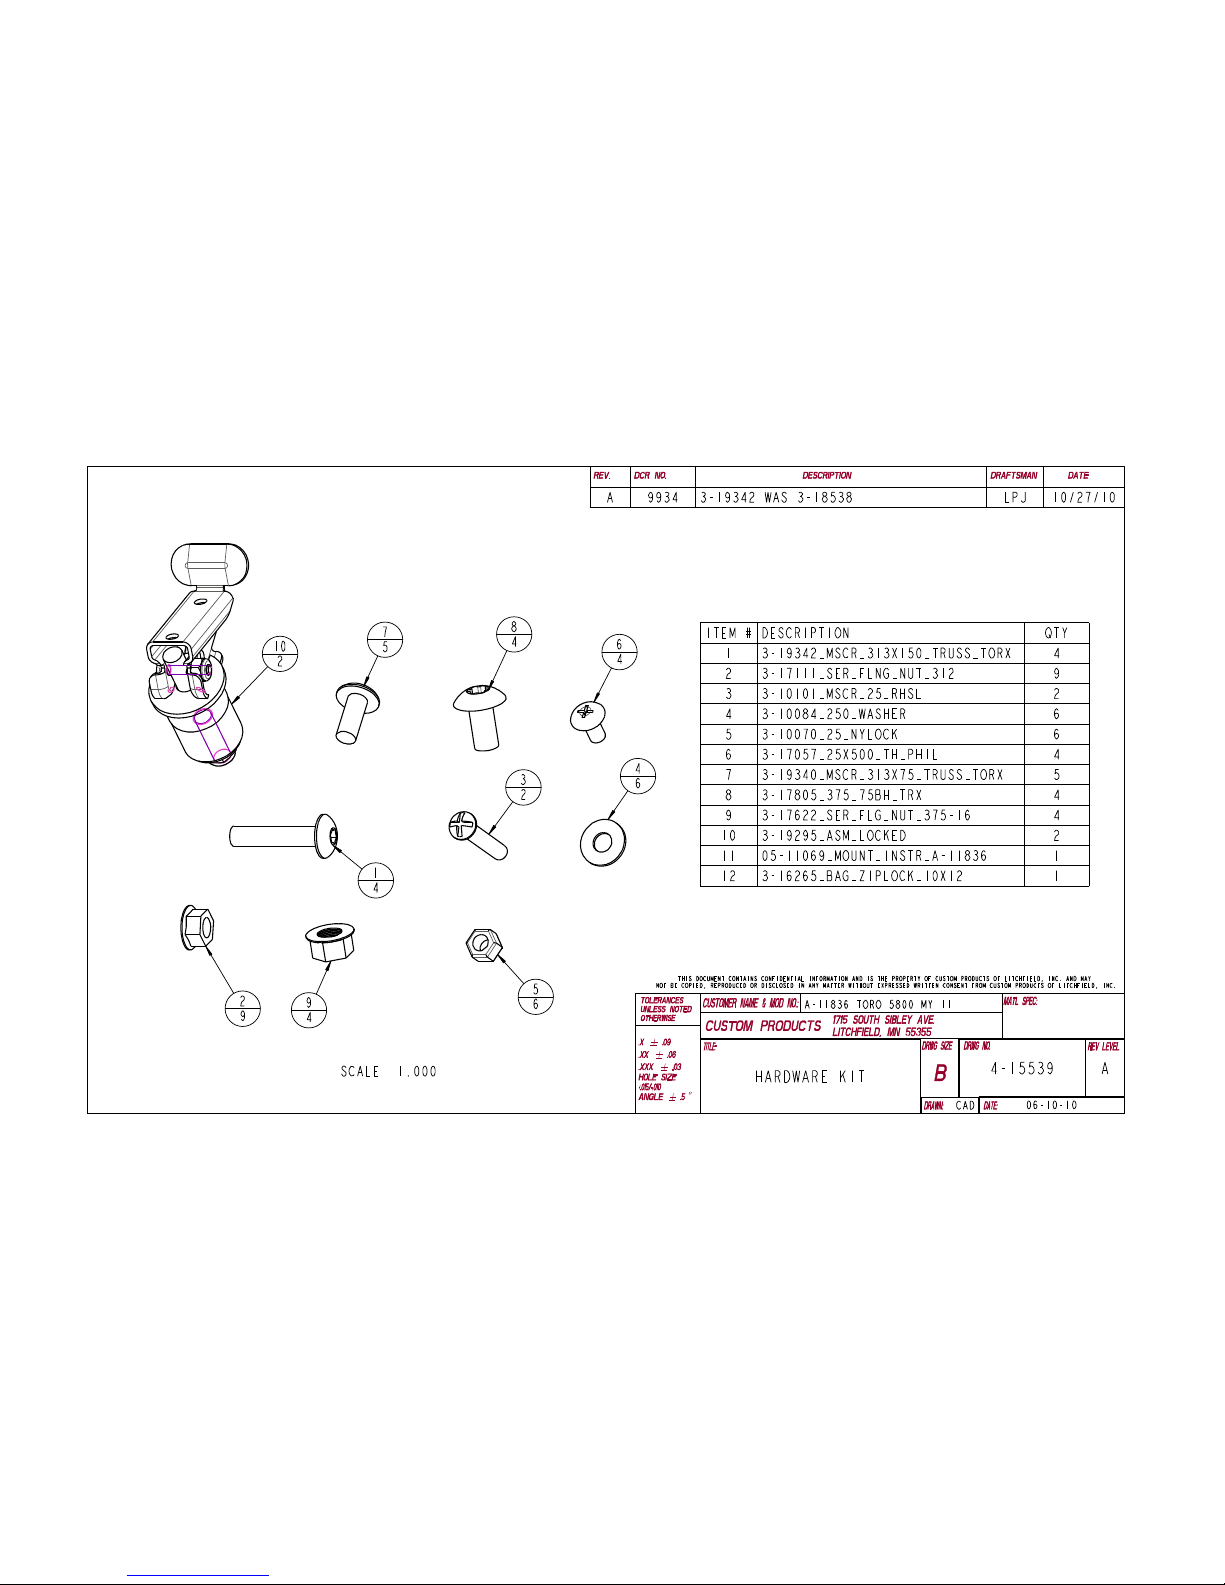
7 1 MOUNTING KIT CONSISTS OF; 4-15539
8 4 5/16" X 1.50" LONG, BUTTON HEAD SCREW 3-19342
9 9 5/16" FLANGE NUT 3-17111
10 2 1/4" X 1.50" LONG, ROUND HEAD SCREW 3-10101
11 4 1/4" FLAT WASHER 3-10084
12 4 1/4" NYLOCK NUT 3-10070
13 4 1/4" X 1/2" LONG, PHILLIPS TRUSS HEAD SCREW 3-17057
14 5 5/16" X 3/4" LONG, TRUSS HEAD SCREW 3-19340
15 4 3/8" X 3/4" LONG, TRUSS HEAD SCREW 3-17805
16 4 3/8" FLANGE NUT 3-17622
ITEM 4
Page 1 of 11

INSTALLATION INSTRUCTIONS
A-11836 Cab with Doors Kit
05-11069
12/27/2012
Installation of Rear Mount Plate;
4. Tip up both seats forward and remove seatbelt mount brackets.
5. Place rear mount panel (Item 6) onto seat deck and re-install seatbelt mount brackets reusing
hardware (Figure 3).
FIGURE 2
(Hardware Kit 4-15539)
ITEM 8
ITEM 10
ITEM 16
ITEM 9
ITEM 11
ITEM 14
ITEM 15
ITEM 13
ITEM 12
ITEM 17
Figure 3
Item 6
Rear Mount Panel
Seat Belt
Mount Bracket
Seat Deck
Page 2 of 11

INSTALLATION INSTRUCTIONS
A-11836 Cab with Doors Kit
05-11069
12/27/2012
Installation of Cab;
6. Open cab doors and disconnect gas spring. Remove doors from cab by pulling the door upward,
off the hinge pins. Carefully set doors aside.
7. Lift cab up using a strap and hoist. Remove shipping pallet from cab.
8. Place cab onto machine by aligning the rear mount plate holes with the rear cab tube connection
holes and the front of cab around the hood (Figure 4).
Figure 4
Step 10
Step 9
Rear
Mount
Panel
Page 3 of 11

INSTALLATION INSTRUCTIONS
A-11836 Cab with Doors Kit
05-11069
12/27/2012
9. Secure each rear-side frame of cab to rear mount plate using (Figure 4);
(4) 5/16” x 1.50” long button head screws (Item 8)
(4) 5/16” flange nuts (Item 9).
10. Secure rear of cab to rear mount plate using (Figure 4);
(5) 5/16” x ¾” long button head screws (Item 14)
(5) 5/16” flange nuts (Item 9).
11. Using a 3/8” drill bit, transfer-drill (4) 3/8” holes into the foot deck platform (Figure 5).
12. Secure the front of the cab to the foot deck using;
(4) 3/8” x ¾” long button head screws (Item 15)
(4) 3/8” nylock nuts (Item 16)
13. Install LH fender panel assembly (Item 4) to LH cab side frame (Figure 6). Secure using;
(1) ¼” x 1-1/2” button head screw (Item 10)
(2) ¼” flat washer (Item 11)
(2) ¼” nylock nut (Item 12)
(2) ¼” x ½” long, Phillips truss head bolt (Item 13)
14. Repeat step 13 for RH fender panel assembly onto RH cab side frame (Figure 7).
Figure 5
Steps
11 & 12
Figure 7
Figure 6
Items 11,
12 & 13
Item 10
Item 10
Items 11,
12 & 13
Page 4 of 11

INSTALLATION INSTRUCTIONS
A-11836 Cab with Doors Kit
05-11069
12/27/2012
15. Re-install doors and connect gas springs.
16. Open and close the doors. The striker stud can be adjusted for proper 2-stage rotary latch
engagement.
17. Layout hole location on each seat panel and drill a .375” diameter hole as shown in Figure 8.
Install locking compression plungers (Item 17) into seat panels as shown in Figure 9.
18. Raise and lower seats. When lowered, rubber part of plunger is to fit into 1” hole located in rear
mount panel. Fold lever to lock seat down, lift lever to tip seat up.
19. Additional foam seal and butyl tape is supplied with hardware kit and can be installed in various
areas as needed.
20. Make sure all installation hardware is fully tightened at this time. Reconnect battery.
21. Cab installation is now complete.
22. Proceed with replacing the vehicle’s standard front leaf springs with heavy duty front springs,
Toro P/N 99-0569 (Purchased separately from The Toro Company).
Optional kits are available for your Multi-Pro 5800 Sprayer Cab and are noted below;
A-11838 Wiper kit, radial coverage with park, switch, wiring and fuse
A-11839 Washer fluid tank with pump, wet arm, switch, wiring and fuse
A-11840 Interior mirror, full width 5 panel
A-11841 Air Conditioner kit, compressor, condenser, plenum, wire harnesses and controlsa
A-11845 Defroster fan kit with switch, wiring and fuse
99-0569 Heavy Duty Leaf Springs (Supplied by the Toro Company; (2) required per machine)
Sunshade and Front Window kits are also available for the Multi-Pro 5800 Sprayer;
A-11837 Sunshade roof and frame
A-11842 Front window for sunshade frame
For questions or comments, contact;
Figure 8 Figure 9
Plastic Bushing
Rubber Bushing
Page 5 of 11
Page 6 of 11

Page 7 of 11

Page 8 of 11
Page 9 of 11

Page 10 of 11

Page 11 of 11


