CPI CXB2 User manual

CXB2 Mexico
1
© CPI 2016 P/N# 253052002 http://www.cranepi.com
CXB2
CXB2
Note Validator Installation G
u
i
d
e
MEXICO
GENERAL INFORMATION
The CXB2 Note Validator is designed to fit into the
standard note validator opening provided by the
vending machine manufacturers. It mounts on
either the existing four mounting studs located in
the machine or on the mounting bracket provided
in various mounting kits.
Features of the CXB2 include:
• 20, 50, 100, 200 & 500 Peso note acceptance
• Fast note acceptance (1.7 seconds to stack)
• Four Direction note acceptance
• Re-programmable Flash Memory
• Easy access to the note path even when mounted
• Diagnostic LED (see top of unit)
• Multi-Drop Bus (MDB), Vending Interface (24V)
• Cassette - 300, 400, or 600 Notes
Revision R1

CXB2 Mexico
2
© CPI 2016 P/N# 253052002 http://www.cranepi.com
Major Parts Description
MDB Harness: OPT-HS-CXB-MDB2 Rev.D
Main Body Assembly
SM17.00.000
Vault Assembly BX17.00.000-10
(Cassette)
Lower Guide
Assembly
SM17.21.000
16 Pin
Connector
MDB
Connector
6 Pin Bezel
Connector

CXB2 Mexico
3
© CPI 2016 P/N# 253052002 http://www.cranepi.com
Off On
INSTALLATION INSTRUCTIONS
1. Remove power from the entire machine.
When you receive the product, the dip switches (ref figure 1) 1, 2, 6, 7 & 8 will be OFF; 3 & 4 will be
ON. This will automatically enable the options as follows:
•
Accept 20 & 50 Peso notes.
•
Four way accept.
• Ready to talk to host machine.
IMPORTANT NOTICE:
Changing any one of switches ON will override the
above options, and the Note Validator will operate
according to switch settings defined in the chart
below. (See Figure 2)
2. Set note validator switches to desired settings.
DIP SWITCHES (Mexico)
Switch
ON state
OFF state
Default
Setting
SW 1
20 PESO Disabled
20 PESO Enabled
OFF
SW 2
50 PESO Disabled
50 PESO Enabled
OFF
SW 3
100 PESO Disabled
100 PESO Enabled
ON
SW 4
200 PESO Disabled
200 PESO Enabled
ON
SW 5
500 PESO Disabled
500 PESO Enabled
ON
SW 6
Reserved
Reserved
OFF
SW 7
Two Ways
Four Ways
OFF
SW 8
Service Mode
To work with a “Host
Machine Controller”
OFF
Figure 2
Figure 1
8
7
6
5
4
3
2
1

CXB2 Mexico
4
© CPI 2016 P/N# 253052002 http://www.cranepi.com
INSTALLATION INSTRUCTIONS (CONTINUED)
3. Install the CXB2 onto the note validator mounting studs and through the mounting hole of the
machine. Secure using the appropriate hardware. See Figure 3.
Figure 3
4. Connect the CXB2 to the supplied interface harness. Install the (16) pin connector into the interface
slot. See Figure 4.
Caution: Do not force the plug into note validator. This may cause pins to bend or break.
MDB Harness: OPT-HS-CXB-MDB2 Rev.D
Figure 4
CXB2
Service Button
Diagnostic LED
1
2
Hex Nut #8-32
(4 pcs.)
(not included)
Lower Sensors
Module Latch
(2 pcs.)
Cassette Latch
Micro USB
Connection
To remove the cassette:
1. Lift the latch.
2. Lift up on the
cassette. Pull back.

CXB2 Mexico
5
© CPI 2016 P/N# 253052002 http://www.cranepi.com
10
8
6
4
2
9
7
5
3
1
15
13
11
16
14
12
INSTALLATION INSTRUCTIONS (CONTINUED)
5. Apply power to the vending machine.
• Observe the LED status indicator on the top of the CXB2 is ON and BLUE. This indicates
that the unit is ready to accept notes.
• If the light is OFF, check to ensure that power has been applied.
• If the light is RED or BLUE, refer to the label located on the back of the magazine or the
chart on page 8 for a description of diagnostic codes.
6. Check operation
• Insert a note and observe that it is accepted and stacked.
• Repeat for other enabled notes.
7. Remove the notes and check the status.
• Instructions for cassette removal are on the label at the back of the magazine.
• Once the magazine is installed, verify that the LED status indicator remains BLUE and
steady ON.
PINOUT
INFORMATION
FOR 16 PIN
C
O
NN
ECT
O
R
Mating connector:
Dual Row Crimp Connector Housing – Molex
#501646-1600 – 1 pcs.
Female Crimp Terminal - Molex #501647-1000 -16 pcs.
Part Number Description
Pin
Circuitry
1
34VDC(+)
2
34VDC(-)
3
N/C
4
MDB Master Receive
5
MDB Master Transmit
6
MDB Common
7
Auxiliary Channel 2 – RS-232 TXD
8
Auxiliary Channel 2 – RS-232 RXD
9
GND (Communication Ground)
10
+12V Output (for test purposes only)
11
+5V Input (to detect external connection)
12
Auxiliary Channel 1 – RS-232 TXD
13
Auxiliary Channel 1 – RS-232 RXD
14
GND (Communication Ground)
15
Select Line (Auxiliary Input)
16
GND (Communication Ground)

CXB2 Mexico
6
© CPI 2016 P/N# 253052002 http://www.cranepi.com
Example of Hardware Part Number: CXB2-1134R0
Programming:
• Insert the programming stick into the micro USB socket.
• Press the Service Button.
• The indicator LED will flash.
• When finished, the CXB2 will run and stack twice.
• When the LED is steady ON, remove the programming stick.
• Cycle the power.
CX
B
-
1
1
3
4
R
0
Product family name:
CX
B –
for Bill stacker
-
Electronic platform:
1 –
Standard MDB
Bill path width:
1 –
71mm;
2 –
73mm.
Drop Box capacity:
1 –
100 notes;
2 -
300 notes;
3 -
400 notes;
4 - 6
00 notes.
5 -
300 notes "cut" shape;
6 -
400 notes "cut" shape.
Sensors Set
4
= Optical Array
Bezels:
R -
Regular with running lights UP
L -
Regular with lighted note path UP;
G -
G series,
D
= Regular with running lights
Additional options or customizations.

CXB2 Mexico
7
© CPI 2016 P/N# 253052002 http://www.cranepi.com
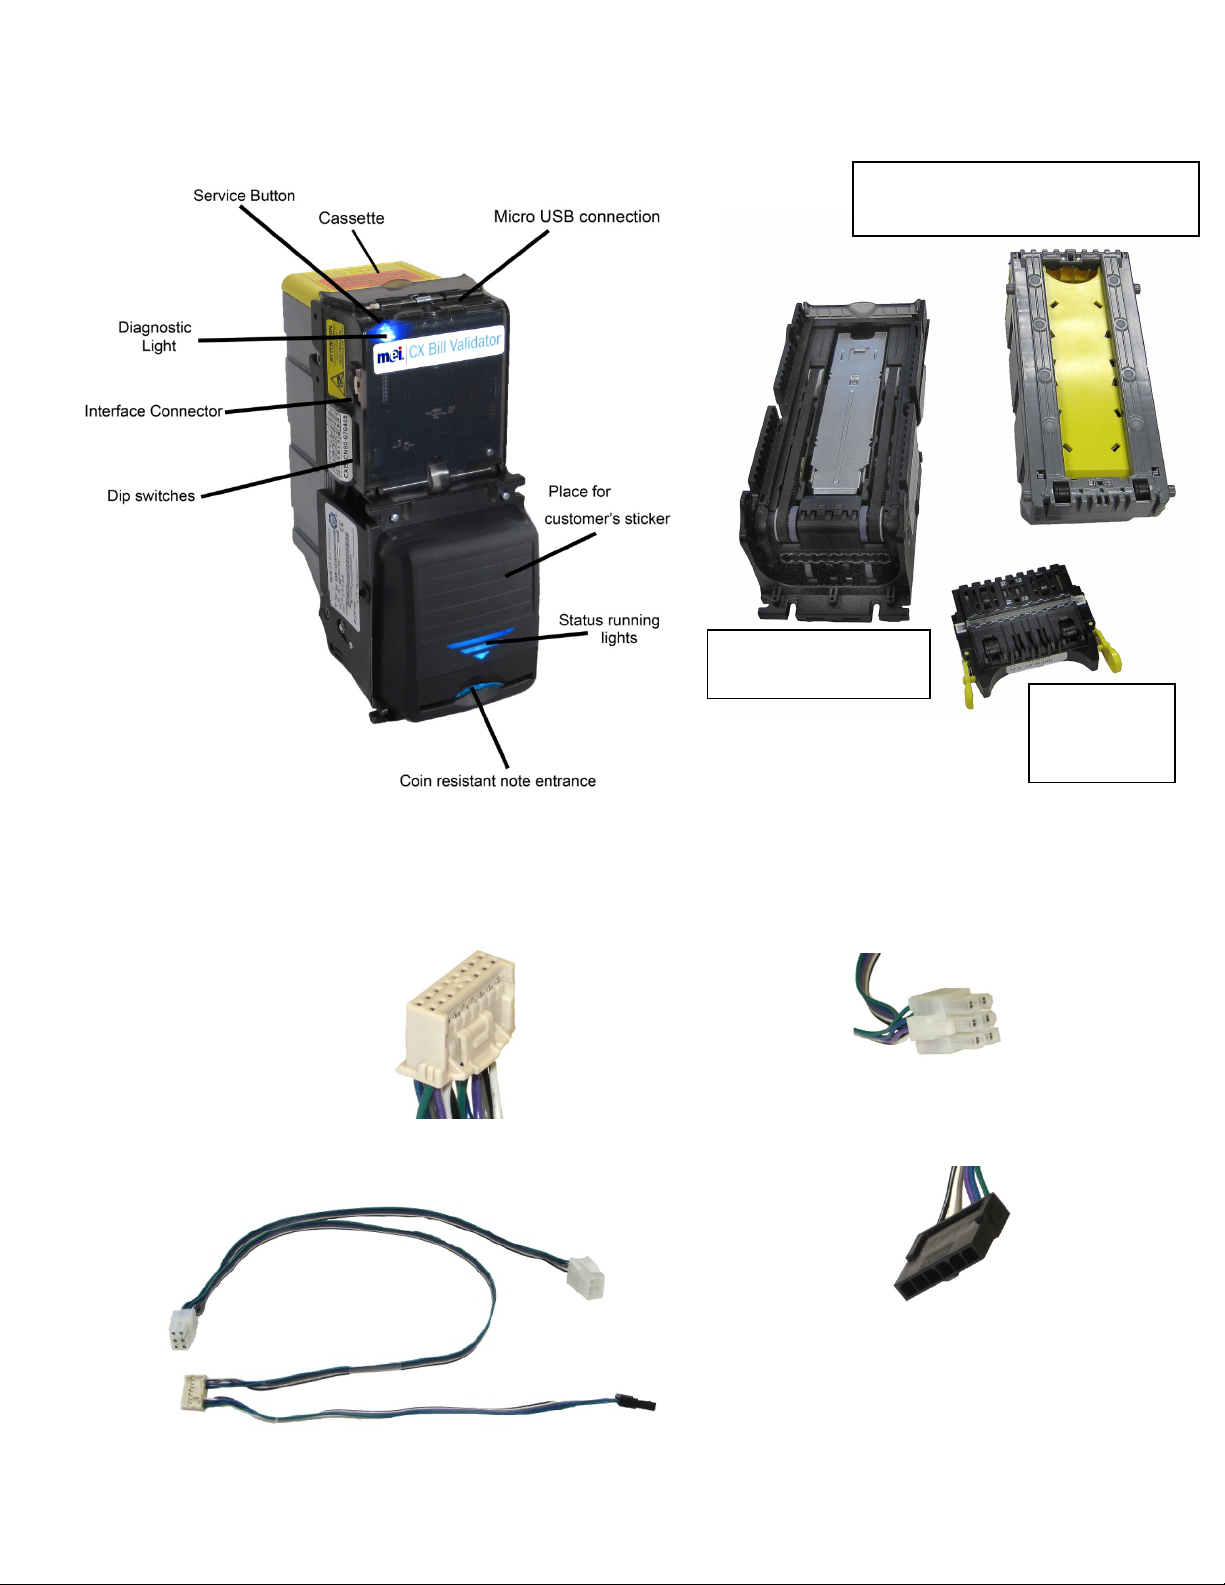
SERVICE BUTTON FUNCTIONS
BELT CLEANING MODE:
To start the belts; press Service Button twice (press/pause time is less than 1 sec.).
• Use a clean damp cloth. Gently press it against the moving belt to clean.
• To stop cleaning, press Service Button once; otherwise the belt motion will stop in 20 seconds
automatically.
DISPLAY QUANTITY OF UNCREDITED BILLS IN A NOTE CASSETTE:
• To check the quantity of accepted, BUT un-credited bills in a Note Cassette, press and hold the
Service Button for more than 3 seconds in Idling or Disable state.
• Count the number of short Blue flashes of the Diagnostic LED. This indicates the number of notes
that are in the cassette for which no credit was issued.
• This counter will be cleared if the Note Cassette is removed or the power is turned off.
SET BRIGHTNESS OF BEZEL BLUE RUNNING LIGHTS:
• Turn OFF power to the validator.
• Switch the unit to Service Mode (SW 8 is ON) and reapply power.
• Press the Service Button once (less than 1 sec.) to switch between two levels of brightness of the
bezel blue running lights.
• Switch power off when desired brightness is set, then switch the unit to Working Mode (SW 8 is
OFF) and reapply power.
CLEANING:
The CXB2 series will not need cleaning as often as magnetic sensing Note Validators. If
cleaning is required, use compressed air and a soft cloth moistened with mild, non-abrasive
detergent.
Refer to Repair Manual for more cleaning instructions.
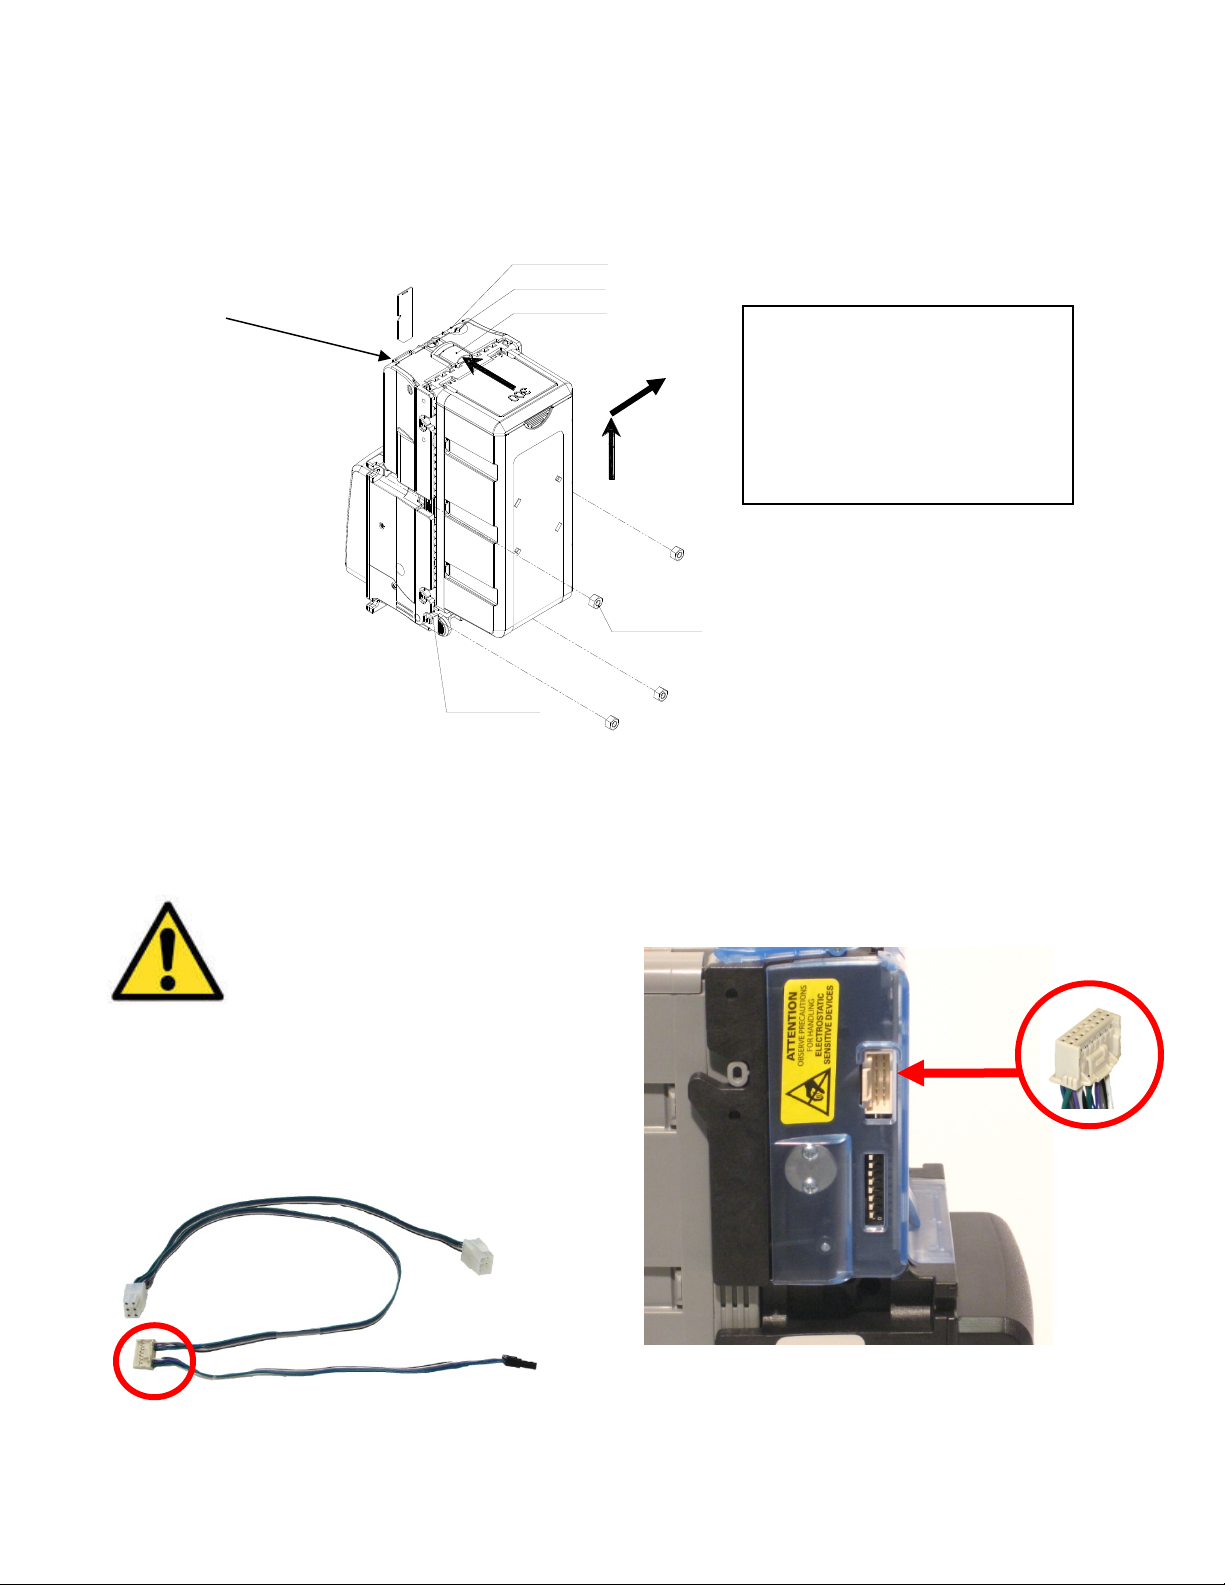
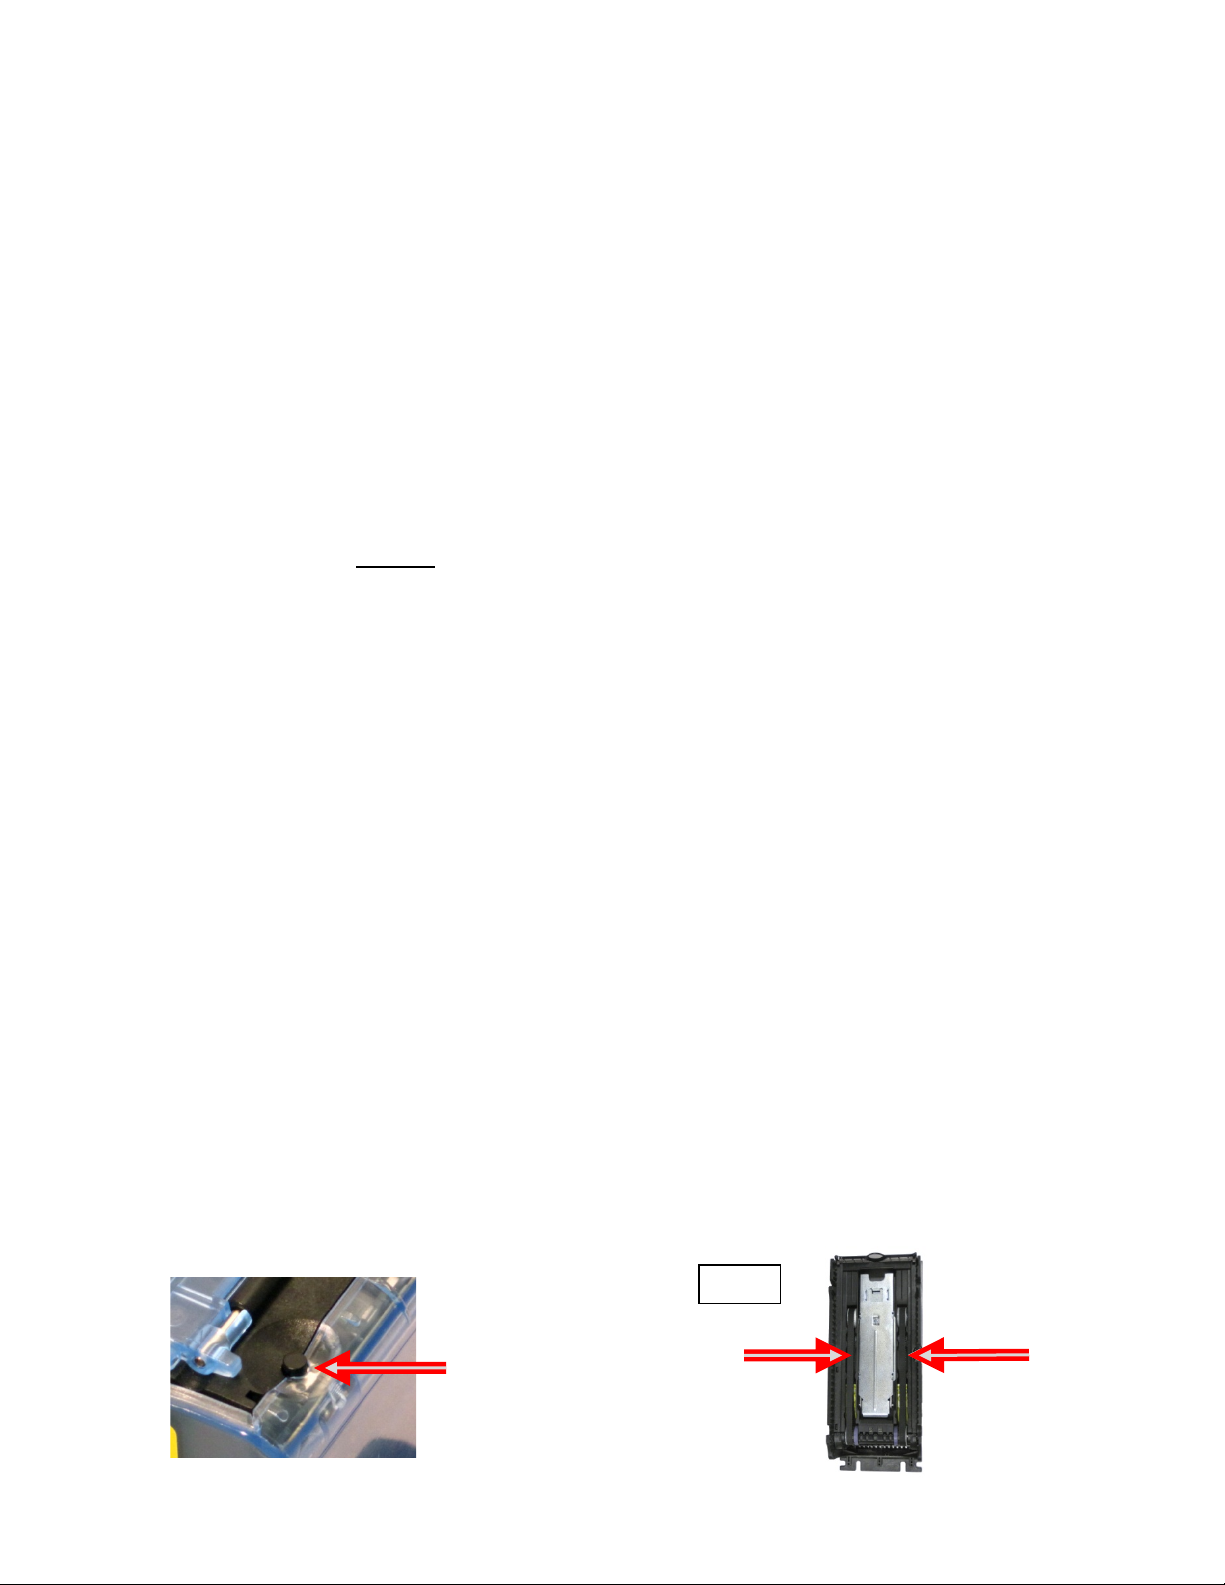
• Locate the service button on the top of the unit (refer to Figure 5). Depress the button
twice to enter belt cleaning mode.
• The belts will run for 20 seconds.
• Press a damp, soft, cloth moistened with mild, non-abrasive detergent against the belts to
clean. See Figure 6.
Figure 5 Figure 6
Belts

CXB2 Mexico
8
© CPI 2016 P/N# 253052002 http://www.cranepi.com
NOTE CASSETTE DECAL
Figure 7
| CX Bill Validator
Crane Payment Innovations
www.cranepi.com
A. To remove the cashbox:
1. Lift the black latch up and hold.
2. Pull Cashbox backwards, removing box tabs from slots.
B. To download firmware from a Flash Drive:
1. Insert prepared Flash Drive with Micro USB OTG Adapter to
Micro USB OTG connector.
2. Push service button (less than 1 sec).
3. Wait until blue Diagnostic LED stops flashing.
4. Disconnect Flash Drive.
C. To retrieve diagnostic: There are two ways to retrieve diagnostic
information.
1. Diagnostic LED: Observe blue Diagnostic LED. It will flash to
indicate the problem per the diagnostic table below.
2. Bezel LEDS: When the Bezel LEDS are solid red, insert a bill
in the entry slot. The Bezel LEDs will indicate the problem as
per the diagnostic table below.
# of Flashes
Diagnostic Description
1
Cash box is removed
3
Cash box is full
4
Check stacker/cash box
6
Clean sensors
7-9
Unit Failure, call for service
11
Clean note pathway, Sensor
assembly not seated
1 or 2 blue, on red
Call for service or download valid
software
Any other combination of flashes, please
consult the operation manual or call technical support.
For technical support:
www.cranepi.com/en/support/

CXB2 Mexico
9
© CPI 2016 P/N# 253052002 http://www.cranepi.com
CHECK LIST
If a problem occurs:
Please check the following:
Unit is dead (won’t power up).
1. Harness(es) maybe loose, not properly
connected, or have bent pins.
2. Check source voltage to ensure that
power is being supplied to the note
validator.
Steady ON Red (2 chevron bars) = (Comm
disabled from mech/VMC).
Note: Refer to the diagnostics chart on page 9
and to figure 7.
1. Must have product in the vending
machine. Check coin changer to ensure
the coin tubes have coins and the coin
changer is working properly. Check
vending machine controller (VMC) for
proper setup.
Steady ON Blue (1 chevron bar) = all
denominations disabled by the VMC.
1. Check vending machine controller
(VMC) for proper setup.

CXB2 Mexico
10
© CPI 2016 P/N# 253052002 http://www.cranepi.com
DIAGNOSTICS:
If all Bezel lights are in Solid Red, block the note path sensors by inserting a bill or piece of
cardboard into the note path and count the number of Diagnostic LED flashes. Then refer to the
diagnostic chart below:
Figure 8
MECHANICAL DIMENSIONS:
The CXB2 note validator is usually installed on a door or a panel. The panel or door must have a
rectangular cut-out and four threaded studs as per diagram below.
## of flashes
Event
1 red on black
Cassette is removed from note validator
2 red on black
Sensor board failure
3 red on black
Cassette is full
4 red on black
Failure of the Stacker mechanism
5 red on black
Failure of the Discrete bill path sensors
6 red on black
Failure of the Optical Array sensor
7 red on black
Failure of the Cross sensor
8 red on black
Failure of the Transport mechanism
9 red on black
Validation data module integrity error
10 red on black
Firmware modules incompatibility
11 red on black
Note pathway is not empty (bill is jammed)
12 red on black
Optical Array sensor is not calibrated
13 red on black
Internal 12V Power level is too low
1 blue on red
(boot)
Unable to write program memory
2 blue on red
(boot)
Firmware integrity error
3 blue on red
(boot)
Wrong USB flash drive or firmware update
file is not found
4 blue on red
(boot)
Firmware update file format error
5 blue on red
(boot)
USB OTG I/O error

CXB2 Mexico
11
© CPI 2016 P/N# 253052002 http://www.cranepi.com
Figure 9
Figure 10
cut-out area
4 threaded studs
#8-32
hight 0.5"
Location of
threaded studs

CXB2 Mexico
12
© CPI 2016 P/N# 253052002 http://www.cranepi.com

CXB2 Mexico
13
© CPI 2016 P/N# 253052002 http://www.cranepi.com
DISCLAIMER
The information contained here-in is the property of Crane Payment Innovations and is not to be
disclosed or used without the prior written permission of Crane Payment Innovations. This copyright
extends to all the media in which this information may be preserved including electronic, printout or
visual display.
Under no circumstances any part of this publication may be copied, transmitted, transcribed or
distributed in any form or by any means, or stored in a database or retrieval system, or translated into
any language (natural or computer) without the prior written permission of Crane Payment Innovations.
Crane Payment Innovations reserves the right to change the product specifications at any time. Also,
Crane Payment Innovations disclaims any liability for any direct or indirect losses arising out of use or
reliance on this information. This information is for guidance only.
For any inquiries please contact us at MEI Technical Support 1-800-345-8172.
http://www.cranepi.com
Table of contents
Other CPI Bank Note Validator manuals
Popular Bank Note Validator manuals by other brands

Innovate Technology
Innovate Technology NV10 Operation manual

CUMMINS ALLISON
CUMMINS ALLISON JetScan user guide

Innovative
Innovative NV9 Operation manual

Innovative
Innovative BV100 Operation manual

Innovative Technology
Innovative Technology CCE 4O USB quick guide

CashCode
CashCode AMZ-154 installation instructions