Cra-Z-Art shimmer'n Sparkle cra-Z-loom 17102 User manual
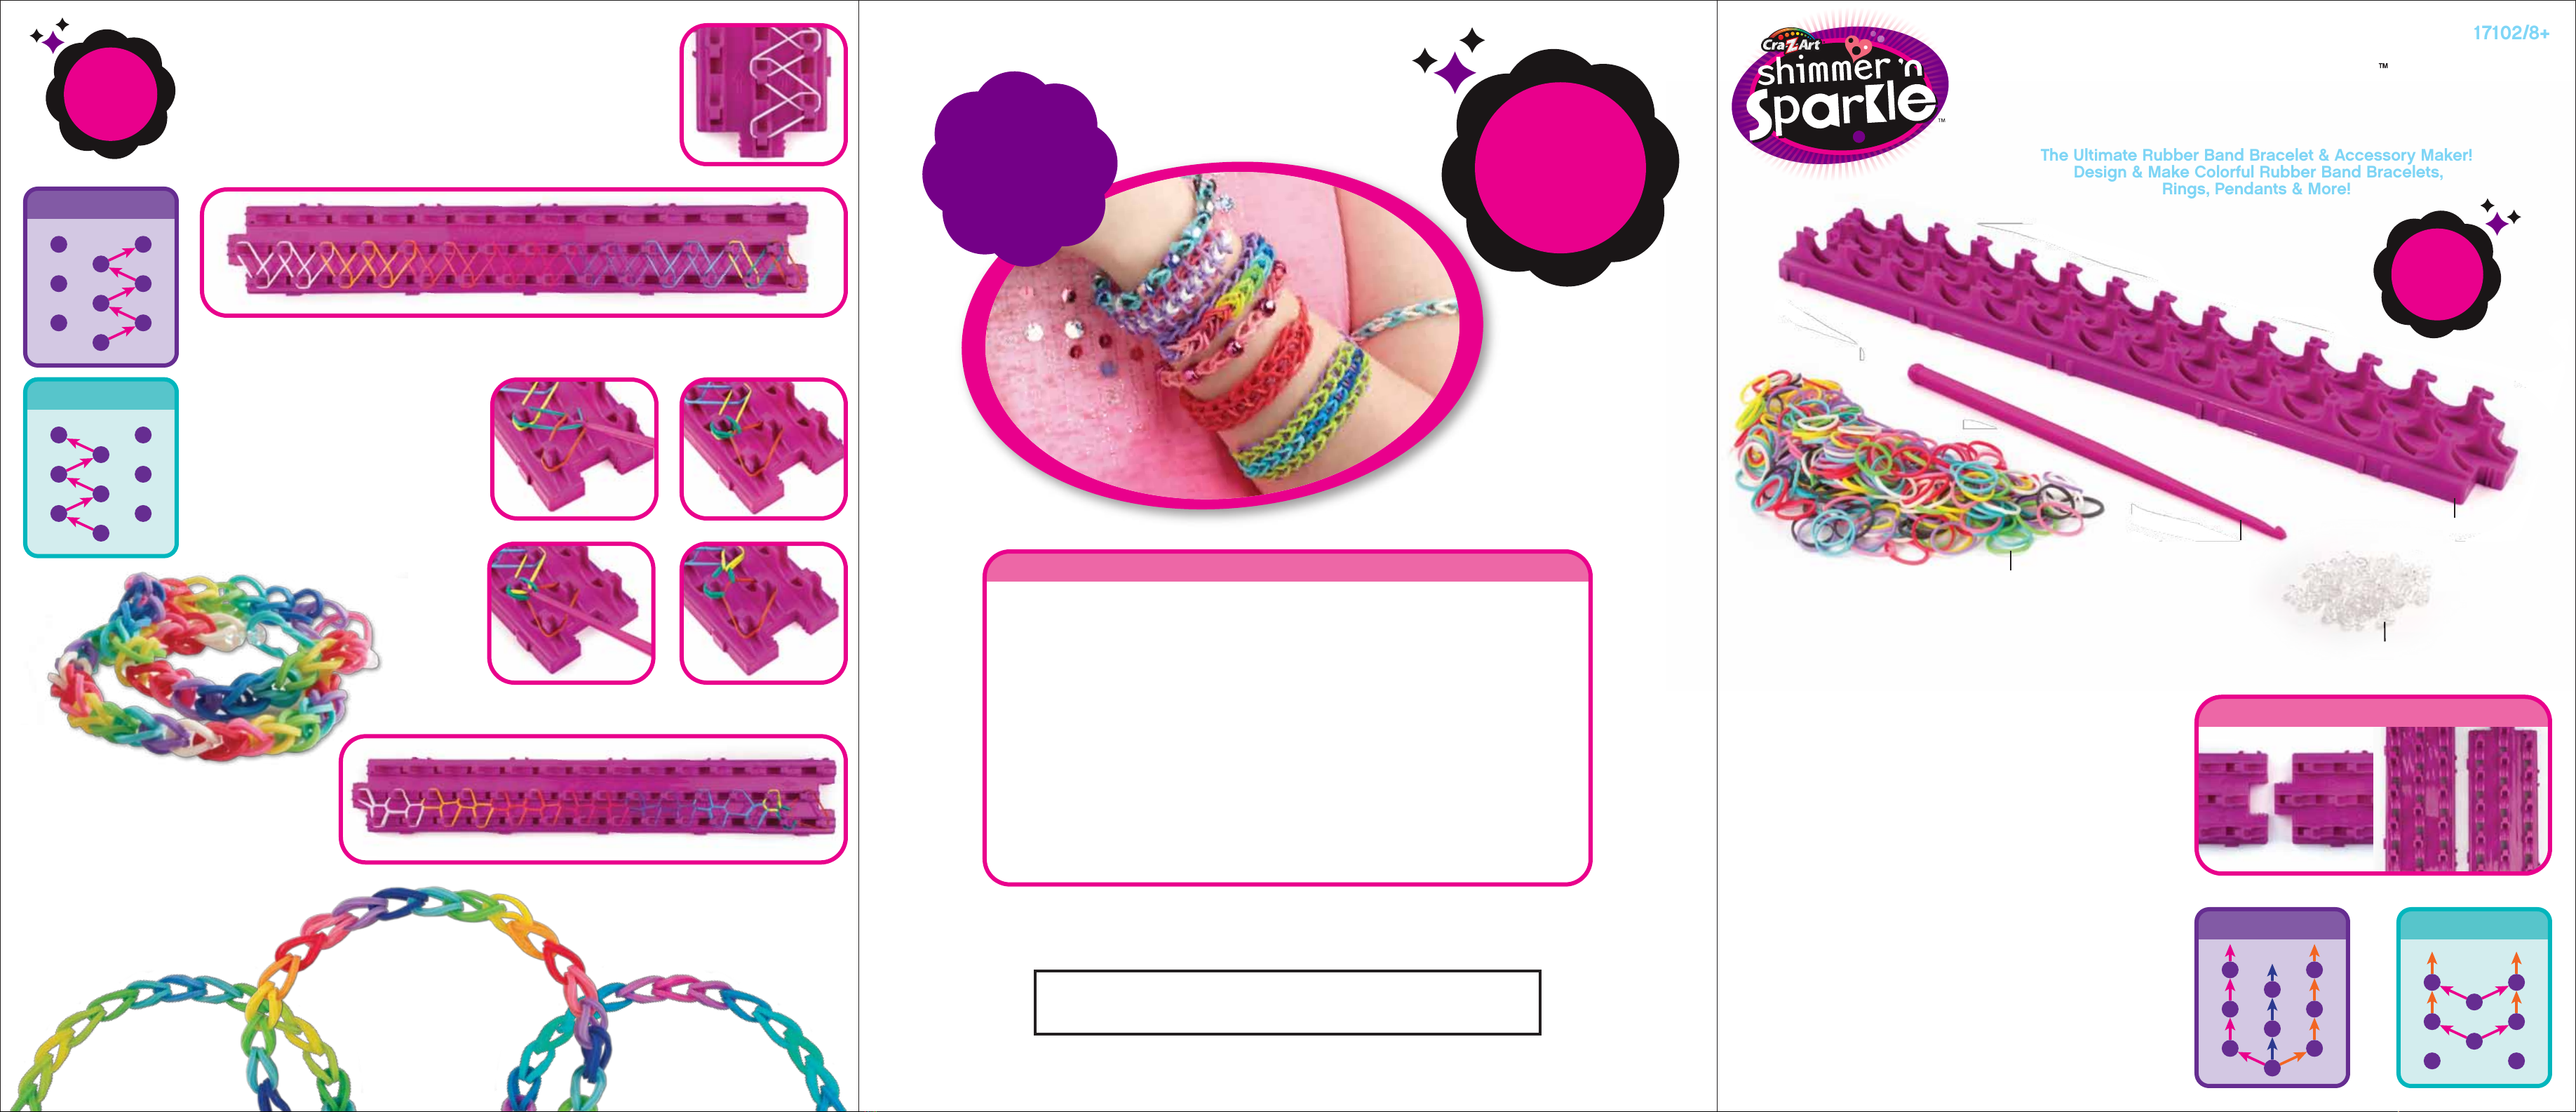
This set includes everything you need to create cool
rubber band jewelry:
Loom: 42 numbered Posts which you use to create your
rubber band designs. Directional arrows guide you in
PLACING and PICKING the Bands.
Two or more Looms can be connected end-to-end or
side- to-side to make a longer or wider pieces.
Bands: 600 latex-free bands are included in your set. Mix
and match colors to create jewelry that is uniquely yours!
Hook: Use it to Pick and Loop Bands between Posts on
the Loom.
S-Clips: Easily connect the ends of your creations
together.
The “PICK” Patterns and “PLACE” Patterns will help you
make the jewelry. The purple circles and white numbers
represent the Pins on the Loom. The colored arrows and
numbers show the order and direction to PLACE and/or
PICK the Bands. Experiment and have fun…soon you will
be creating your own patterns!
5. Continue picking and looping in this zig-zag
pattern until you’ve looped a Band onto Post 2.
Your Loom should look like figure 13.
6. Follow the instructions in the “Finishing It Off”
section to finish your Single Loop Bracelet.
1. Start with the Tab end of the Loom facing you and refer to
the Place Pattern. Place a Band on the Loom around
Posts 2 & 3. Next place a Band around Posts 3 & 5, then
Posts 5 & 6, and so on (figure 7). Follow this pattern all the
way along the Loom, ending at Post 42. Your loom should
look like figure 8.
2. Rotate the Loom so that the Notch end
faces you. Refer to the Pick Pattern.
3. Find the Band that connects Posts 39 & 41
(figure 9). Pick the end of that Band that is
around Post 41 and loop it over Post 39
(figure 10).
4. Find the Band that connects Posts 38 & 39
(figure 11). Pick the end of that Band that is
around Post 39 and loop it over Post 38
(figure 12). Note that the Band you need to
pick is below the other looped Bands.
Single Loop Bracelet Instructions
Getting Started
Single Loop Bracelet
PLACE PATTERN
Single Loop Bracelet
PICK PATTERN
PLACE PATTERN
PICK PATTERN
1
4
7
2
5
8
3
6
9
39
36
33
41
38
35
37
34
31
1
4
7
2
5
8
3
6
9
39
36
33
38
35
37
34
31
REPEAT
1
2
3
4
5
REPEAT
1
2
3
4
5
REPEAT
1a 2a
3a
3b
1b
1c
1d
2b
2c
2d
3c
REPEAT
2
4
6
1
5
8
3
7
•Use different combinations of colored Bands and follow the PLACE and
PICK Patterns to create your own unique jewelry!
•It’s easy to add beads & charms (not included). Simply string a bead
onto a finished bracelet or string a bead onto a Band before placing it
on the Cra-Z-Loom™.
•If your bracelet is too tight, add extra Bands to the bracelet before
connecting with the S-Clip.
•If your bracelet is too loose, make your bracelet shorter by not placing
Bands to the end of the Cra-Z-Loom™. Stop on Post 34 or 31 depending
upon the size you need.
•When your bracelet is finished, you may need to tug and tidy up the loops
of your bracelet.
•Create colorful bracelets to accessorize any outfit!
•Make enough bracelets to share with your friends!
CONNECT 2 LOOMS
Cra-Z-Loom™Tips & Tricks
figure 7
figure 8
figure 9 figure 10
figure 11 figure 12
figure 13
Loom
Hook
Latex-Free
Rubber Bands
S-Clips
Place,
Rotate &
Pick to
Create
Amazing
Jewelry!
28 Bands &
1 S-Clip
You
Will Need:
Make ’n
Wear,
Make ’n Share
Rubber Band
Jewelry!
Easy
to Add
Beads &
Charms!
(not included)
The Ultimate Rubber Band Bracelet & Accessory Maker!
Design & Make Colorful Rubber Band Bracelets,
Rings, Pendants & More!
The Ultimate Rubber Band Bracelet & Accessory Maker!
Design & Make Colorful Rubber Band Bracelets,
Rings, Pendants & More!
bracelet maker
cra-Z-loom
17102/8+
17102/8+
© 2013 Cra-Z-Art® All Rights Reserved. LaRose Industries, LLC, d/b/a Cra-Z-Art, Randolph, NJ 07869 USA Products and colors may vary from those shown. At
Cra-Z-Art® we guarantee our quality. If you are not completely satisfied with our product, please call 1-800-Cra-Z-Art or visit www.Cra-Z-Art.com.
Made in China. PLEASE RETAIN THIS INFORMATION FOR FUTURE REFERENCE. Patent Pending.
WARNING: This product is not for children 6 years or younger due to potential choking
hazards. Do not wear bracelets around neck. Always make sure wearable is loose enough so
it does not cut off circulation or cause irritation. Discontinue wearing if skin redness develops.

THESE BASIC STEPS ARE THE SAME NO MATTER WHICH BRACELET YOU’RE MAKING:
1. Making sure that the tab end is facing you, PLACE Bands around the Posts on the Loom, following the PLACE PATTERN for the bracelet
you’re making (figure 1).
2. ROTATE the Loom until the Notch end is facing you (figure 2); you will start PICKING the Bands from this end.
3. Following the PICK PATTERN for the bracelet you’re making, use the Hook to PICK up a Band through the “U” shaped channel of the Post
(figure 3). LOOP the Band onto another Post (figure 4). NOTE: It may help to use your fingers to hold down the other Bands while PICKING
and LOOPING.
4. Once PICKING and LOOPING is completed, refer to the “Finishing It Off” instructions below.
IMPORTANT TIPS:
1. Make sure that you PLACE the Bands on the Loom one at a time in the order shown in the PLACE PATTERN of your chosen bracelet.
2. The Cra-Z-Loom™ works best on a stable surface.
3. Two Cra-Z-Looms™ can be linked together end-to-end to make longer designs.
4. Connect the two ends of the
bracelet with an S-clip.
1. When you are done with your
bracelet, thread a single
Band through all of the bands
gathered around Post 2.
2. Slip one end of the single
Band through the other end,
and pull to tighten.
3. Gently lift and tug the
bracelet off of the Loom.
1. Start with the Tab end of the Loom facing you and refer to the Place Pattern. Place a Band on the Loom
around Posts 1 & 2. Next place a Band around Posts 1 & 4 (figure 14) , then Posts 4 & 7, and so on. Place
Bands all the way along the left side of the Loom, ending at Post 34 (figure 15).
2. Place a Band around Posts 2 & 3, then Posts 3 & 6, then Posts 6 & 9, and so on. Continue placing Bands all
the way along the right side of the Loom, ending at Post 36.
3. Place 2 Bands around Posts 2 & 5, making sure the Bands are not twisted together (figure 16). Next place 2
Bands around Posts 5 & 8, then 2 Bands around Posts 8 & 11, and so on. Place 2 bands around each pair of
Posts along the center of the Loom until you reach Post 38. Place a single Band around Posts 38 and 41.
Your loom should look like figure 17.
1. Start with the Tab end of the Loom facing you and refer to the Place Pattern.
Place a Band on the Loom around Posts 1 & 4. Next place a Band around
Posts 4 & 7, then Posts 7 & 10, and so on (figure 24). Place Bands all the way
along the left side of the Loom, ending at Post 40.
2. Place a Band around Posts 2 & 5, then Posts 5 & 8, then Posts 8 & 11, and so
on. Place Bands all the way along the center of the Loom, ending at Post 41.
3. Place a Band around Posts 3 & 6, then Posts 6 & 9, Posts 9 & 12, and so on.
Continue placing Bands all the way along the right side of the Loom, ending
at Post 42.
4. Place a Band around Posts 4, 5 & 6 (figure 25). Next place a Band around
Posts 7, 8 & 9. Continue placing Bands around groups of 3 Posts along the
Loom, ending with
Posts 40, 41 & 42.
Your loom should
look like figure 26.
5. Rotate the Loom so that the Notch end faces you. Refer to the Pick Pattern.
6. Find the Band that connects Posts 39 & 42. Pick the end of that Band that is around Post 42 and loop it
over Post 39 (figures 27 & 28).
7. Find the Band that connects Posts 36 & 39. Pick the end of that Band that is around Post 39 and loop it
over Post 36. Continue picking and looping in this pattern until you’ve looped the entire left side ending at
Post 3.
8. Find the Band that connects Posts 38 & 41. Pick the end of that Band that is around Post 41 and loop it
over Post 38 (figure 29).
9. Find the Band that connects Posts 35 & 38. Pick the end of that Band that is around Post 38 and loop it
over Post 35.
10. Continue picking and looping in this pattern until you’ve looped the entire center ending at Post 2.
11. Find the Band that connects Posts 37 & 40. Pick the end of that Band that is around Post 40 and loop it
over Post 37 (figure 30).
13. Pick all of the Bands on Post 3 and loop them
over Post 2 (figure 32 & 33). Pick all of the
Bands on Post 1 and loop them over Post 2
(figure 34).
14. Follow the instructions in the “Finishing It Off”
section to finish your Waterfall Bracelet.
9. Continue picking and looping in this pattern until
you’ve finished looping onto Posts 1 & 3. Then find
the Band that connects Posts 2 & 3. Pick the end
of that Band that is around Post 3 and loop it onto
Post 2. Repeat with the Band that connects Posts
1 & 4. Your Loom should look like figure 23.
10. Follow the instructions in the “Finishing It Off”
section to finish your Bridge-Style Bracelet.
4. Rotate the Loom so that the Notch end faces you. Refer to the
Pick Pattern.
5. Find the top Band that connects Posts 35 & 38. Pick the end of
that Band that is around Post 38 and loop it over Post 36
(figure 18).
6. Find the other Band that connects Posts 35 & 38. Pick the end
of that Band that is around Post 38 and loop it over Post 34
(figure 19).
7. Find the Band that connects Posts 33 & 36. Pick the end of that
Band that is around Post 36 and loop it over Post 33.
8. Find the Band that connects Posts 31 & 34. Pick the end of that
Band that is around Post 34 and loop it over Post 31.
5. You can make your bracelet longer by adding extra single Bands to either end as described in Steps 1 & 2. If your bracelet is too long,
simply place fewer Bands onto the Loom when you make your next Bracelet, stopping on Post 34 or 31.
12. Find the Band that connects Posts 34 & 37. Pick
the end of that Band that is around Post 37 and
loop it over Post 34. Continue picking and
looping in this pattern until you’ve looped the
entire right side ending at Post 1. Your Loom
should look like figure 31.
Get Started! - PLACE BANDS, ROTATE LOOM, PICK & LOOP
Finishing It Off
Bridge-Style Bracelet Instructions Waterfall Bracelet Instructions
Bridge Style Bracelet
PLACE PATTERN
Waterfall Bracelet
PLACE PATTERN
Waterfall Bracelet
PICK PATTERN
Bridge-Style Bracelet
PICK PATTERN
1
4
7
2
5
8
3
6
9
1
4
7
2
5
8
3
6
9
39
36
33
38
35
37
34
31 42
39
36
41
35
38
40
33 31
37
34
10
11
12
13
14
15
16
17
18
19
20
21
22
23
24
25
26
27
28
29
30
31
32
33
34
35
36
37
38
39
40
41
42
7
8
9
4
5
6
1
2
3
REPEAT
1a 2a
3a
3b
1b
1c
1d
2b
2c
2d
3c
REPEAT
2a
2b
4a
4b
1a
1b
1c
3a
3b
3c
2c
REPEAT
2
4
6
1
5
8
3
7
REPEAT
1a
1b
1c
2a
2b
2c
1d
3a
3b
3c
3d
PICK & LOOP BANDS
ROTATE LOOM
PLACE BANDS
figure 3 figure 4
figure 2
figure 14 figure 15 figure 16
figure 18figure 18 figure 19figure 19 figure 20figure 20 figure 21figure 21 figure 22figure 22
figure 23figure 23
figure 17
figure 25
figure 28figure 28figure 27figure 27 figure 29figure 29 figure 30figure 30
figure 33figure 33 figure 34figure 34figure 32figure 32
figure 31figure 31
figure 24
figure 26
TAB
END
NOTCH
END
figure 1
START PLACING BANDS ON THIS END START PICKING BANDS ON THIS END
50 Bands &
1 S-Clip
You
Will Need: 13 Bands for the
Background, 3 Sets
of 13 Colored
Bands, 1 Band for
Finishing
You
Will Need:
Other Cra-Z-Art Toy manuals


