Crane Creek Kayaks Styrigger User manual

1
STYRIGGER™
PRODUCT MANUAL
Thank you for choosing the Styrigger™ kayak and canoe stabilizer. A kayak or canoe equipped
with a Styrigger™ (safety outrigger) is an excellent choice for a beginner or someone that may
be a little unstable and want a kayak or canoe that is very forgiving when it comes to getting in
and out. Safety, confidence and reassurance are yours when using the Styrigger.

2
CANOE INSTALLATION INSTRUCTIONS:
Canoe Installation:
1. Decide where you will be fastening the Styrigger to the canoe. The handles should be just out of
the way when in the deployed position for the person in the back of the canoe while they are
paddling.
2. Loosen the knobs on the width bars and spread the frame so it extends at least one inch beyond
the outside of the canoe at the widest point where it will be fastened. (the further out the more
stability) Tighten the knobs on the width bars.
3. Put the bolts through the frame with the appropriate spacer next to the canoe in the four
corners.
4. Slide the clamping bracket with the lip up under the edge of the canoe and tighten the knobs.
3
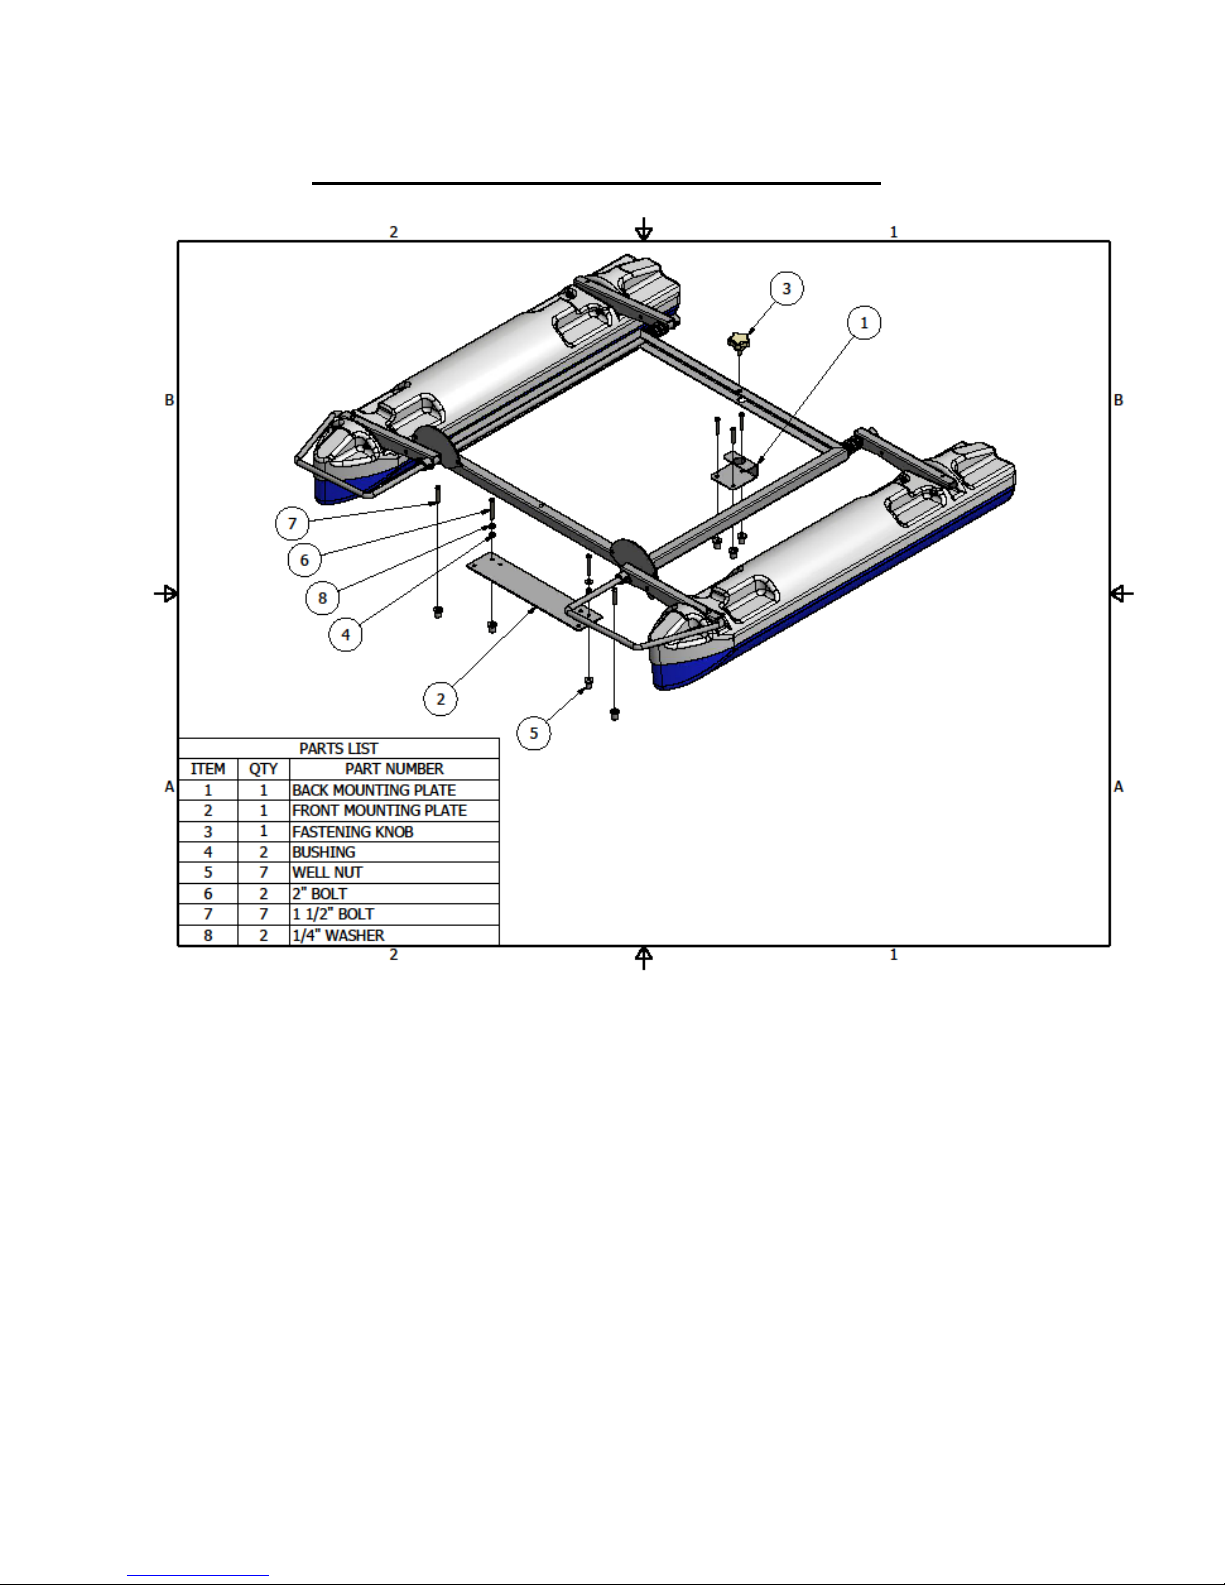
KAYAK INSTALLATION INSTRUCTIONS:
Tools Needed:
•Drill
•½” Drill Bit
•15/32 Allen wrench
•Marker
Regular Kayak Installation:
1. Place the Styrigger on the stern of the kayak so the handles are right behind the cockpit in the
center of the kayak. Determine which front mounting plates are needed for your kayak. Adjust
if needed.
2. Open the arms of the Styrigger to expose the mounting plates.
3. With the back mounting plate securely in place on the frame, mark the two front holes to mount
the back bracket first.

4
4. Loosen the fastening knob and remove the back mounting plate from the frame.
5. Mark the hole in the back of the back mounting plate.
6. Drill the three holes, place well nuts in the holes. Using the 1 ½” bolts secure the back mounting
plate. Do not over tighten the bolts.
7. Place the 1” bolts up from the bottom of the two desired holes in the back of the front
mounting bracket(s). Place the bushing and the ¼” washer on the bolt and finger tighten the
nut.
8. Slide the front mounting plate(s) onto the frame in the desired notches. Slide the frame into the
back mounting plate and tighten the fastening knob to insure proper alignment.
9. Mark the two holes in the front of the front mounting plate(s). Loosen the fastening knob and
remove the frame. Remove the 1” bolts from the front mounting plate. Mark the back holes on
the front mounting plate.
10. Drill the four holes, place well nuts in the holes. Using the 1 ½” bolts secure the front of the
front mounting plate(s). Do not over tighten the bolts.
11. Slide the ¼” washers and bushings onto the 2” bolts. Place the bolts from the top through the
back holes of the front mounting plate and secure the back of the front mounting plate. Do not
over tighten the bolts.
12. Set the Styrigger into position on the mounting plates, pull back on the frame and tighten the
fastening knob into the back mounting plate.
CARE AND MAINTENANCE
Drainage: The floats of the Styrigger are not water tight. There is a chance that the floats will take on
water. There is a small hole on the top of the back of the floats of the Styrigger. They prevent the floats
from expanding and breaking the seal in warmer weather. If you should get water in the floats, stand
the Styrigger on end so the water may drain from the holes.
Storage: When not using your Styrigger, store it inside, out of the elements. UV Protection - just like
your skin - you need to protect your Styrigger from UV sunlight and oxidation. It's a good idea to apply a
coat of spray-on UV protection at the beginning and end of the season after it is clean and dry. You can
find it at most sporting goods shops.
Transportation: When transporting your Styrigger, you can place it floats down or if preferred floats up
with a standard 2x4 placed next to the depth plate to protect it from getting bent.
Cleaning: To clean, wash with mild soap and water.

5
SAFETY WARNINGS
Paddlesports can be very dangerous and physically demanding. Failure to follow the instructions in this
manual or observe appropriate safety practices and standards while participating in paddlesports may
result in serious injury or death.
By purchasing the Styrigger product, the user acknowledges both an understanding and an assumption
of the risk involved in paddlesports.
Users should observe the following, non-exclusive, safety standards when using the Styrigger product:
•Obtain paddlesports instruction from a licensed or certified instructor
•Complete a certified first aid and rescue training course
•Always carry first aid and rescue equipment.
•Always wear U.S. Coast Guard approved personal floatation device.
•Always follow Federal, State and local laws, regulations, ordinances and rules relating to
kayaking, canoeing and paddlesports.
•Wear a helmet where appropriate.
•Dress appropriately for weather conditions; cold water and/or cold weather can result in
hypothermia or death.
•Check your equipment prior to each use for signs of wear or failure.
•Be aware of appropriate river levels, tidal changes, dangerous currents and weather changes.
Never use this product in severe weather conditions.
•Familiarize yourself with unfamiliar waters to determine whether there are any hazardous
conditions.
•Consult your physician prior to beginning your paddlesport training.
•DO NOT paddle alone.
•DO NOT paddle in flood conditions.
•DO NOT exceed your paddling ability; be honest with yourself.
•DO NOT stand up in your kayak or canoe. The Styrigger product does not guarantee that your
kayak or canoe will not capsize.
•DO NOT exceed the maximum weight capacity of your kayak or canoe.
•DO NOT consume alcohol, drugs or other controlled substances prior to or while using this
product.
•DO NOT alter or modify the Styrigger product. Alteration or modification may result in serious
damage or defects to the product, which may result in serious injury or death.
•DO NOT use the Styrigger product as a floatation device.
•DO NOT allow minors to use the Styrigger product without adult supervision

6
WARRANTY
Crane Creek Kayaks, LLC (“Crane Creek Kayaks”) warrants this device to be free from defects in
workmanship or material under normal use for one year from the date of purchase. Crane Creek Kayaks’
obligations under this limited warranty are limited to replacing, adjusting, or repairing the Styrigger
product if returned along with the proof of purchase. This warranty is void if the Styrigger product has
been tampered with, altered, modified, maliciously damaged, or physically abused.
The enforceability of this warranty is limited to the original consumer purchaser and is not transferable
to, or enforceable by, any subsequent owner. In the event of a defect, malfunction or other failure to
conform to this warranty, Crane Creek Kayaks, will, at its sole discretion, repair or replace the unit at no
charge. You are responsible for all shipping cost in connection with warranty service. This warranty
commences on the date of retail purchase and shall be effective for a period of one year.
THERE ARE NO EXPRESS WARRANTIES COVERING THE STYRIGGER PRODUCT OTHER THAN THOSE SET
FORTH IN THIS WARRANTY. ALL IMPLIED WARRANTIES ARE LIMITED TO THE PERIOD OF THIS WARRANTY
AND NO WARRANTIES, EXPRESS OR IMPLIED, EXTEND BEYOND THIS PERIOD. SOME STATES DO NOT
ALLOW LIMITATIONS ON HOW LONG AN IMPLIED WARRANTY LASTS, SO THE ABOVE LIMITATION MAY
NOT APPLY TO YOU.
Crane Creek Kayaks will in no event be liable for any consequential, incidental, indirect or special
damages (including, but not limited to, lost profits) arising out of or in connection with the use, misuse
or function of the Styrigger product. Some states do not allow exclusion of limitation of incidental or
consequential damages, so the above limitation or exclusion may not apply to you. This warranty gives
you specific legal rights, and you may also have other rights which vary from state to state.
If you feel the Styrigger product is not functioning properly please review this manual, particularly the
instructions. If you still feel warranty service is required, please contact Crane Creek Kayaks using the
contact information below:
Crane Creek Kayaks, LLC
171 Lincoln Street
Denver, Iowa 50622
Tel: (319) 939-1839
Website: http://www.cranecreekkayaks.com/

7
USING THE STYRIGGER
With the Kayak:
We are changing the rules on how kayaking is done. We are adding a big layer of safety on the
water with the addition of the Styrigger. Styrigger is trademarked and stands for safety outrigger.
A kayak equipped with the patented Styrigger is safer and easier to enter and exit. It also creates
a much more convenient way to enter the water because you can easily enter in situations that are
difficult with a traditional kayak. In many situations you would have the kayak in the water and
have to try to maintain balance while you try to slip into the cockpit. With a kayak equipped with
the Styrigger, you can place the rear of the kayak into the water with the floats extended in the
deep position. You then step into the kayak from the dry land and bounce back in your seat
sliding gently into the water. Now that you are safely in the water you can get situated and
comfortable with your surroundings. You can then reach behind yourself and easily fold the
floats of the Styrigger on top of the kayak or any other desired position. When entering from a
dock, you will want the Styrigger set in the deep position (this is the most stable).
If you should have a mishap while on the water and find yourself in the water, now you have to
get back in. Self-rescue in a kayak equipped with a Styrigger is not as challenging as is a
traditional kayak without the Styrigger. After making sure the Styrigger is locked in place, climb
back into the cockpit.
You don't necessarily have to rely on your reflects to keep you from going into the water, the
Styrigger while set in the position where it is out of the water will catch you before you reach the
tipping point.
When you get into the water, if you are not able to reach the Styrigger and adjust it to the desired
position you can easily have a friend make that adjustment for you.
While on the water if you want to fish or just want that “steady” feeling, place the Styrigger in a
deeper position.
Before exiting the kayak, remember to set the Styrigger in the deep position. Sometimes it is
more than an inconvenience when you tip over.
With the Canoe:
When entering the canoe, position the floats in the deep position. (this is the most stable). After
you are safely in the water you can get situated and comfortable with your surroundings. You
can then reach forward and easily fold the floats of the Styrigger on top of the canoe or any other
desired position.
While on the water if you want to fish or just want that “steady” feeling, place the Styrigger in a
deeper position.
Before exiting the canoe, remember to set the Styrigger in the deep position. Sometimes it is
more than an inconvenience when you tip over.

8
Changes to be made to charts-
On page 2
•Clean up outside of box
•Change the shape of the clamping brackets in diagram
•Change part number to part description
•Change 5” bolt to 4”bolt
On page 3
•Clean up outside of box
•Add picture of 2 small front mounting plates (in front of/on outside of front mounting plate)
•Label small front mounting plate 2-2
•Change part number to part description
•Add item / 2-2, qty / 2, description / small mounting plates
•Add item/ 9, qty/ 2, description/ 1” bolts
•Add item/ 10, qty/ 2, description/ nuts
Table of contents
Popular Boat manuals by other brands

STACER
STACER boat owner's manual

Yamaha
Yamaha HT-140980 quick start guide

grabner
grabner HAPPY CATHURRICANE owner's manual

Islander Yachts
Islander Yachts Islander 28 owner's manual

Corsiva Yachting
Corsiva Yachting Nordhval Sport Console 5 owner's manual

Sportsman
Sportsman Masters 2670E Owner's manual and quick reference guide


no stress yachting
no stress yachting BAVARIA 45 CRUISER instruction manual

Klepper
Klepper AERIUS 490 Assembly guide

Hunter Marine
Hunter Marine 45CC Operator's manual

Wellcraft
Wellcraft 195 BAY owner's manual

Yamaha
Yamaha WaveRunner FX SVHO 2017 Operator's manual

Dagger
Dagger Whitewater Series owner's manual