Create IRON UP STAND User manual

IRON UP STAND
STEAM IRON PLANCHA DE VAPOR VERTICAL
USER MANUAL


4
INDEX
ENGLISH
IMPORTANT SAFEGUARDS 6
CHARACTERISTICS 7
COMPONENTS 7
ACCESSORIES 8
INSTALLATION 8
PROTECTIVE GLOVES 8
TROUSERS BRUSH 8
ACCESSORY FOR SHIRT COLLARS 8
APPLICATION METHOD 10
CLEANING AND STORAGE 10
CLEANING METHODS 10
IRONING 10
TURN OFF 10
CONSIDERATIONS 11
COMMON PROBLEMS 13
ESPAÑOL
INSTRUCCIONES DE SEGURIDAD 14
CARACTERÍSTICAS 15
LISTADO DE PARTES 15
ACCESSORIOS 16
INSTALACIÓN 16
GUANTES PROTECTORES 16
CEPILLO PARA PANTALONES 16
ACCESORIO CUELLOS DE CAMISAS 16
MÉTODO DE APLICACIÓN 18
LIMPIEZA Y MANTENIMIENTO 18
MÉTODOS DE LIMPIEZA 18
PLANCHADO 18
APAGADO 18
CONSIDERACIONES 19
PROBLEMAS COMUNES 21
PORTUGÊS
Instruções de segurança 22
COMPONENTES DO PRODUCTO 23
CARACTERÍSTICAS 23
ACESSÓRIOS 24
LUVAS PROTECTORAS 24
ESCOVA PARA CALÇAS 24
MÉTODO DE APLICAÇÃ 24
ACESSÓRIO COLARINHO DE CAMISA 24
MÉTODO DE APLICAÇÃO 26
LIMPEZA E MANUTENÇÃO 26
MÉTODOS DE LIMPEZA 26
ENGOMAR 26
DESLIGADO 26
CONSIDERAÇÕES 27
PROBLEMAS COMUNES 29
FRANÇAIS
CONSIGNES DE SÉCURITÉ 30
CARACTÉRISTIQUES 31
ÉLÉMENTS DU PRODUIT 31
ÉLÉMENTS DU PRODUIT 32
MODE D’APPLICATION 32
GANTS DE PROTECTION 32
BROSSE POUR PANTALON 32
ACCESSOIRE COL CHEMISE 32
REPASSER 34
NETTOYAGE ET ENTRETIEN 34
MÉTHODES DE NETTOYAGE 34
REPASSER 34
ÉTEINT 34
CONSIDÉRATIONS 35
PROBLÈMES 37
IRON UP STAND

5
INDEX
ITALIANO
ISTRUZIONI DI SICUREZZA 38
CARATTERISTICHE 39
ELENCO DELLE PARTI 39
ACCESSORIO DEL PRODOTTO 40
GUANTI DI PROTEZIONE 40
SPAZZOLA PER PANTALONI 40
METODO DI APPLICAZIONE 40
ACCESSORIO COLLO CAMICIA 40
METODO DI APPLICAZIONE 42
PULIZIA E MANUTENZIONE 42
METODO DI PULIZIA 42
STIRATURA 42
STIRATURA 42
CONSIDERAZIONI 43
PROBLEMAS COMUNES 45
DEUTSCH
CONSIGNES DE SÉCURITÉ 46
PRODUKTEIGENSCHAFTEN 47
TEILELISTE 47
ZUBEHÖR 48
GEBRAUCHSANWEISUNG 48
SCHUTZHANDSCHUHE 48
BÜRSTE FÜR HOSEN 48
HEMDKRAGEN-ACCESSOIRE 48
REINIGUNG UND WARTUNG 50
REINIGUNGSVERFAHREN 50
BÜGELN 50
GEBRAUCHSANWEISUNG 50
AUSGESCHALTET 50
HINWEISE 51
HÄUFIGE PROBLEME 53
NEDERLANDS
BEVEILIGINGSINSTRUCTIES 54
ONDERDELEN LIJST 55
KENMERKEN 55
BESCHERMENDE HANDSCHOENEN 56
BROEKBORSTEL 56
ACCESSOIRES 56
INSTALLATIE 56
ACCESSOIRE MET OVERHEMDKRAAG 56
SCHOONMAAK EN ONDERHOUD 58
REINIGINGSMETHODEN 58
STRIJKEN 58
TOEPASSINGSMETHODE 58
UIT 58
OVERWEGINGEN 59
VEEL VOORKOMENDE PROBLEMEN 61
POLSKI
INSTRUKCJE BEZPIECZEŃSTWA 62
LISTA CZĘŚCI 63
CECHY 63
AKCESORIA 64
RĘKAWICE OCHRONNE 64
SZCZOTKA DO SPODNI 64
INSTALACJA 64
DODATKOWY KOŁNIERZ KOSZULI 64
CZYSZCZENIE I KONSERWACJA 66
METODY CZYSZCZENIA 66
PRASOWANIE 66
METODA APLIKACJI 66
POZA 66
ROZWAŻANIA 67
CZĘSTE PROBLEMY 69
IRON UP STAND

6ENGLISH
Thank you for choosing our product. Before using this device for the rst time, please read the
following operating and safety instructions carefully.
With this manual you can learn the functions of this device. Keep this manual for future refer-
ence or if you need to pass it on to a third party.
ENGLISH
IMPORTANT SAFEGUARDS
B
efore using this electrical appliance basic precautions should always be
followed:
•
E
nsure that the voltage indicated on the Technical Specication match-
es the mains voltage before plugging in the appliance.
•
T
he appliance must be earthed.
•
N
ever lift up, carry or unplug the appliance by pulling from the power
cord.
•
T
he steam is extremely hot and can burn. Please, handle with care.
•
Never put the iron into operation if it does not have water.
•
C
hildren should be supervised to ensure that they don’t play with the
appliance.
•
T
his appliance can be used by children and persons with reduced physi-
cal, sensory or mental capabilities or lack of experience and knowledge
if they have been given supervision or instruction concerning the use of
the appliance in a safe way and understand the hazards involved.
•
D
o not place the coffee maker on hot surfaces or next to open re, as it
can cause damage to the appliance.
•
R
emove the plug from the power outlet before cleaning or when idle.
Allow the appliance to cool down completely before removing and/or
attaching components, and before cleaning.
•
Do not pick up or operate the appliance if the power cord or plug is dam-
aged, or if the iron is malfunctioning or has been dropped or damaged in
any way. In case of damage, contact the after-sales service. A damaged
cord or plug must be replaced only by the manufacturer or a qualied
person to avoid injury.
•
D
o not use any accessories not recommended by the manufacturer, as it
may cause injury to persons or damage to the appliance.
•
P
lace the appliance on a at surface or table, do not hang the power
cord over the edge of the table or counter.
•
M
ake sure the power cord does not come into contact with the hot sur-
face of the appliance.
•
S
ome parts of the appliance get hot when in use, avoid direct contact.
•
Never immerse the power cord, plug or power base of the iron in water
or other liquids. In the event that the appliance falls into water, immedi-
ately unplug it from the mains and have it checked by an expert before
using it again. It can cause re, electric shock, injury or death.

7
ENGLISH
Tips: for better ironing experience and
protection of your clothes, it is advisable
to use pure water or distilled water.
CHARACTERISTICS
COMPONENTS
• All aluminum heater, fast heat conduction, continuous steam more uniform.
• Nozzle 9 hole stainless steel panel, smooth, no damage to clothing.
• 1.6l water tank, to meet the needs of long ironing.
• Lateral drainage design, convenient and fast scale removal.
• Dual dry ironing resistant design, more secure overall protection.
• Simple hook, convenient and fast, strong and durable.
• Round bar, firm and stable for a better experience.
1. Steam nozzle
2. Sprinkler rack
3. Steam hose
4. Telescopic rod
5. Adjustable lifting and shrink-
ing bar buckle
6. Switch knob
7. Water tank
8. Body
9. Power cord plug
10. Drainage valve button
1
2
3
4
5
6
7
8
9
10

8ENGLISH
Usage: for the customers who need the trouser line or axis, hold the upper part of the fa-
bric with your hand or a clamp when ironing, then hold the clothes or trousers with trousers
seam clamp, move up and down to press the fabric. Brush ironing with shower nozzle, it can
clean the hair and other things on clothes while ironing.
1. Open the package and take out the host and accessories.
2. Insert the thick end of the telescopic rod directly into the
socket of the telescopic rod of the body, and press the tele-
scopic rod in place.
Note: This product is not allowed to iron articial lea-
ther, silk fabric, low temperature plastic and other ma-
terials needing low temperatures.
Usage: if you need to iron the clothes with
your hands, please wear the heat resistant
gloves on your hands holding the clothes to
avoid hand burns.
Usage: This accessory is used to help you
when ironing shirt collars to keep their
shape perfectly.
TROUSERS BRUSH
PROTECTIVE GLOVES ACCESSORY FOR SHIRT COLLARS
Fiber
Cotton, hemp
Install the telescopic pole
ACCESSORIES
INSTALLATION

9
ENGLISH
Insert the connector at the lower end of the hook at the top of the
telescopic rod, and hold the extension rod to press the hook into
position. Place the household coat hanger in its place. The rack
can be rotated 360°.
Install the hook and place household hangers
Place nozzle in nozzle hook.
Note: Do not hang the steam hose on the hook to prevent the
steam nozzle from falling.
Falling can hurt people or damage steam sprinklers.
Nozzle placed
Installation: Let the groove of the pants seam clip on one corner
close to the nozzle bottom protruding installation piece, and
then follow this angle gently upward.
Remove: rst tilt the seam clamp, then gently pull down the
seam clamp to remove it.
Installation and removal of trouser seam clips
Remove the water tank from the main engine, unscrew the nut
at the bottom of the water tank and ll it with water, cover the
nut and tighten it, place the water tank in its original position
and ensure no deviation.
Water tank lling
Note: the water tank of this product can only be
lled with cold water. Please avoid injecting hot
water into the water tank .At the same time, do
not add perfume, vinegar, starch or other che-
micals in the cold water to avoid damaging the
product.
Tips: for a better ironing experience and protec-
tion of your clothes, you are advised to use pure
water or distilled water.
Loose the adjusting buckle of the telescopic pole, vstretch and
adjust the four telescopic poles to an appropriate height, and
then lock the adjusting buckle of the telescopic pole.
Adjust the height of the telescopic pole
a
Vertical view

10 ENGLISH
1. Insert the power cord plug into the live
socket.
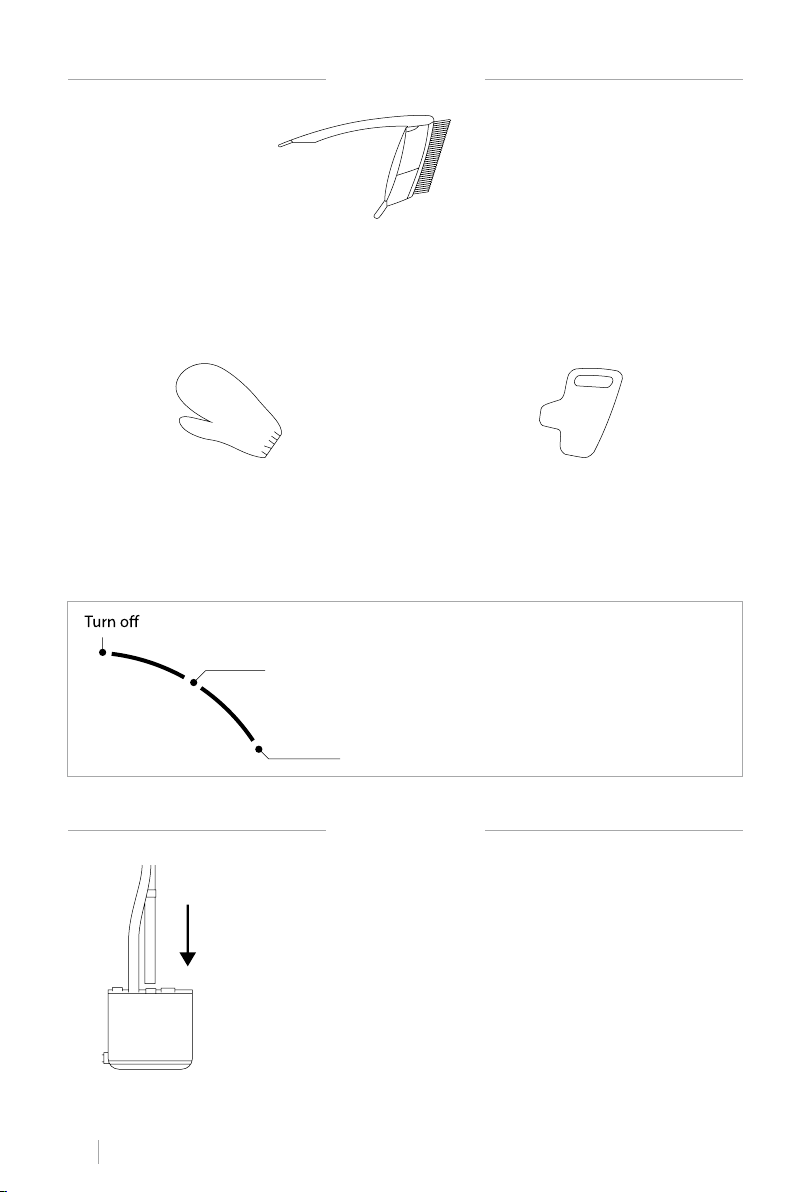
2. This iron has two steam adjustment
modes. You can choose the appropriate
steam mode according to the material
and thickness of your clothes.
3. The hook of this product can be used to
hang ordinary household clothes han-
gers. Clothes can be hung on the clothes
hangers. When you are not using the
garment steamer, put the steam nozzle
on the nozzle rack.
When you nish ironing, turn the switch
counter clockwise to the “off” to turn off
the power of the unit, and remove the plug
from the socket after conrming that the
power indicator light is off.
Tips: If you do not use the steam iron for
a long time, the remaining water in the
machine is liable to deteriorate and cause
bacteria, please cut off the power until the
water is cooled, and then unscrew the dra-
in valve to discharge the remaining water.
IRONING TURN OFF
1. Always unplug the power cord before cleaning and maintenance.
2. Do not rinse the machine with water directly, but wipe it with a soft cloth with a little
neutral detergent and then wipe it dry. Do not clean the machine with solvents such as
gasoline.
3. After cleaning and maintenance, it must be fully dry before power on or collection.
4. When it is not in use for a long time, please clean the product and remove the steam hose
from the hanger after it is dry. Then, fold the telescopic rod with hanger and remove it
from the host machine.
• Prepare 1000 g of pure water to be injected into the water
tank, and then add 2 g of detergent. After it is fully dissol-
ved, pour it into the water tank of the machine. The machine
has to be heated at the steam level for 20-30 minutes, then
unplug it and let it cool for 30 minutes.
• Place the machine on the sink or waste water bucket, turn
off the drain valve knob counter clockwise, (do not use sha-
rp objects to scrape the inner wall of heating body to re-
move dirt) until no residual water ows out from the drain,
tighten the drain valve knob, and place the machine back
in place.
• Pour the remaining solvent out of the tank and rinse.
CLEANING AND STORAGE
CLEANING METHODS
APPLICATION METHOD
• We recommend that you remove the scale once a month.

11
ENGLISH
Note: All contents of this section are related to safety, please be sure to comply with it. The
considerations in this section are solely for the proper use of the product.
The notes explain the hazards, the extent of the hazards and the possible accidents.
1. Do not use other parts without the permission of the manufacturer. If the machine breaks
down due to this reason, the warranty will automatically terminate.The manufacturer shall
not be liable for any loss of life or property.
2. Please check whether the product is damaged and whether the accessories are complete
after dismantling the package.
3. This product is not applicable to children and those without capacity.
4. In case of failure, the power plug should be pulled out immediately, and the defective pro-
duct should not be placed in the working state.
5. If the power cord is damaged, it must be replaced by the professional personnel of the
manufacturer, its maintenance department or similar department to avoid danger.
Prohibited sign
Any content bearing the logo must be prohibited, otherwise it may cause
damage to the product or endanger the personal safety of the user.
Warning sign
All contents bearing the mark must be handled in strict accordance with the
requirements, otherwise it may cause damage to the product or endanger the
personal safety of the user.
Notice sign
All the contents with the logo are the parts that users must pay attention to,
otherwise improper operation will cause product damage or other losses.
Do not place in water or ush with water.
Do not start the power and add water rst to
prevent dry burning.
This product is not allowed to be used outdoors
Durante el uso, no fuerce la manguera de vapor
para doblar o bloquear la salida de aire.
It is suggested that during the use of this product,
do not remove the clip of trousers to avoid burns.
In the process of using this product, please do not
touch the heating position or the nozzle to iron the
surface. When dumping the surplus water, please
cut off the power and wait for the water to cool
down to avoid scalding.
CONSIDERATIONS

12 ENGLISH
Users are not allowed to leave during the working
period of this product. Care should be taken when
using appliances to prevent the risk of steam
splashing. When lling liquid and cleaning, should
remove the power plug.
Do not inject hot water into the tank, so as not to
cause deformation of the tank.
Pay attention to the safety of plug, socket and
power supply. Do not drag or pull the plug.
This product is only used with grounding wire
socket.
Note: in order to avoid hazards arising from the
incorrect resetting of the thermal circuit breaker,
the appliance shall not be powered by an external
switching device, such as a timer, or connected to
a circuit that is regularly switched on or off by a
common component.
Do not put the product on the table, chair or other
unstable surface to avoid the risk of product
dumping.
This product is suitable for ordinary tap water. If
your local tap water is very hard, it is recommend-
ed to use bottled or bottled drinking water, or pure
water.
When the product just starts to work, there will be
a small amount of hot condensed water from the
steam hole, please pay attention to safety.
When using this product, please try your best to
keep the nozzle panel working along the vertical
direction, and reduce the downward horizontal
direction of the nozzle panel, so as to avoid con-
densation water droplets.

13
ENGLISH
Please check the following points before entrusting the maintenance department to make
repairs
COMMON PROBLEMS
In compliance with Directives: 2012/19/EU and 2015/863/EU on the restriction of the use of dangerous
substances in electric and electronic equipment as well as their waste disposal. The symbol with the
crossed dustbin shown on the package indicates that the product at the end of its service life shall be
collected as separate waste. Therefore, any products that have reached the end of their useful life must
be given to waste disposal centres specialising in separate collection of waste electrical and electronic
equipment, or given back to the retailer at the time of purchasing new similar equipment, on a one for one
basis. The adequate separate collection for the subsequent start-up of the equipment sent to be recycled,
treated and disposed of in an environmentally compatible way contributes to preventing possible nega-
tive effects on the environment and health and optimises the recycling and reuse of components making
up the apparatus. Abusive disposal of the product by the user involves application of the administrative
sanctions according to the laws.
PROBLEM POSSIBLE CAUSES SOLUTION
Not working at all,
the switch light is
not on
The power cord plug is not plugged
into
the power supply
The upper power switch is dama-
ged Thermal fuse damaged
Plug the power cord into a live socket Please
ask a professional to check it
No steam but the
switch light is on
There is no water in the tank
Thermal fuse damaged Thermostat
damage
Fill the tank with the right amount of water
Please ask a professional to check and
maintain
Please ask a professional to check and
maintain
Steam is too small The voltage is too low Scale clogs
up steam pipes
Please avoid using this product during peak
hours
Please refer to “scale removal method” in
the instruction manual for scale removal
Nozzle is leaking
Nozzle air hole downward or nozzle
below the water level of the tank
Nozzle broken
Please lift nozzle to water level of water
tank above or the nozzle along the vertical
direction of operation please professional
inspection and maintenance
Watertank leaking
The hole nut is not tightened or the
water tank is broken
Steam hose is not well vented or
blocked
Tighten the water injection hole nut or ask a
professional for maintenance
Avoid steam hose folding or professional
maintenance
The whole machine
Is leaking
Drain valve knob or sewage outlet
knob is not tightened
The tilt Angle is too large when the
machine is working or moving
Drain knob or drain knob or internal
pipe damage
Please tighten the drain valve knob or
sewage outlet knob.
Avoid excessive inclination Angle when the
machine is working or moving Please ask a
professional to check and maintain
Deformación
del depósito The tilt Angle is too large when the
machine is working or moving
Please replace the water tank (standard
water tank)
It is a normal phenomenon that a big amount of air ow generated by steam impinges on the nozzle,
and the sound of “puff” is occasionally heard at the nozzle. You can use the steam iron as usual.
The water in the boiler will produce the sound of “purr” due to boiling, which is a normal phenomenon.

14 ESPAÑOL
Gracias por elegir nuestro producto. Antes de utilizar este aparato por primera vez, lea aten-
tamente las siguientes instrucciones de funcionamiento y de seguridad.
Con este manual podrá aprender las funciones de este dispositivo. Guarde este manual para
poder consultarlo más adelante o en caso de que deba entregarlo a un tercero.
ESPAÑOL
INSTRUCCIONES DE SEGURIDAD
A
l utilizar cualquier aparato eléctrico, deben observarse siempre las si-
guientes precauciones básicas de seguridad.
•
A
segúrese de que el voltaje y la frecuencia del circuito corresponden a los
indicados en la etiqueta de clasicación del aparato.
•
E
l aparato debe estar conectado a una toma de tierra.
•
N
unca levante, transporte o desenchufe la cafetera tirando del cable
eléctrico.
•
E
l vapor sale ardiendo. Por favor, vaya con cuidado para no quemarse.
•
N
unca ponga la plancha en funcionamiento si no tiene agua.
•
L
os niños deben ser supervisados para asegurarse de que no juegan con
el aparato.
•
E
ste aparato puede ser utilizado tanto por niños como personas con ca-
pacidades físicas, sensoriales o mentales reducidas o con falta de expe-
riencia y conocimientos si han sido supervisados o instruidos en el uso del
aparato de una manera segura y comprenden los peligros que conlleva.
•
N
o deje que el cable cuelgue sobre el borde de una mesa o encimera. No
permita que entre en contacto con supercies calientes, evite la proximi-
dad a fuegos abiertos y todo tipo de calor y fuentes de ignición.
•
R
etire el enchufe de la toma de corriente antes de limpiarla o cuando esté
inactiva. Deje que el aparato se enfríe completamente antes de quitar y/o
jar los componentes y antes de limpiarlo.
•
N
o levante ni opere el electrodoméstico si el cable de alimentación o el
enchufe están dañados, o si la plancha está funcionando mal o se ha caído
o dañado de alguna manera. En caso de daños, póngase en contacto con
el servicio postventa. Un cable o enchufe dañado debe ser sustituido ex-
clusivamente por el fabricante o por una persona cualicada para evitar
lesiones.
•
U
tilice únicamente accesorios recomendados por el fabricante.
•
C
oloque el aparato sobre una supercie plana o mesa.
•
A
segúrese de que el cable de alimentación no entre en contacto con la
supercie caliente del aparato.

15
ESPAÑOL
1. Boquilla de vapor
2. Rejilla para el goteo
3. Manguera de vapor
4. Barra telescópica
5. Hebilla ajustable para estirar o
encoger la barra
6. Interruptor de encendido/
apagado
7. Depósito de agua
8. Base
9. Cable de alimentación
10. Botón de la válvula de drenaje
Consejos: Para una mejor experiencia y
para la protección de su ropa, es acon-
sejable que utilice agua pura o destilada
para llenar el depósito.
CARACTERÍSTICAS
LISTADO DE PARTES
• Calentador totalmente de aluminio, conducción del calor rápida y vapor contínuo más uni-
forme.
• Boquilla con panel de 9 agujeros de acero inoxidable, suave, no daña la ropa.
• Depósito de agua de 1,6 l para cumplir las necesidades de un planchado prolongado.
• Diseño de drenaje lateral, cómodo y rápido de vaciar.
• Diseño dual de planchado seco, mayor protección total.
• Gancho simple, cómodo y rápido, fuerte y resistente.
• Barra firme y estable para una mejor experiencia.
1
2
3
4
5
6
7
8
9
10
•
A
lgunas partes del aparato se calientan durante su uso, evite el contacto
directo.
•
N
unca sumerja el cable, el enchufe o la base de alimentación de la plan-
cha en agua u otros líquidos. En caso de que el aparato caiga en agua, des-
enchúfelo inmediatamente de la red eléctrica y pídale a un experto que lo
revise antes de volver a utilizarlo. Puede provocar incendios, descargas
eléctricas, lesiones o la muerte.

16 ESPAÑOL
Uso: para los usuarios que necesiten marcar la línea o eje de los pantalones. Sostenga la
parte superior de la mano o con la pinza cuando vaya a plancharla. Sujete el pantalón o la
prenda que vaya a planchar y mueva la plancha para marcar la raya en la prenda. Planche
con el cepillo y con la boquilla para limpiar el pelo u otros materiales que puedan pegarse
a la tela mientras plancha.
1. Abra el embalaje y saque la base y los accesorios.
2. Inserte el extremo más grueso de la barra telescópica direc-
tamente en el acoplamiento de la base y presione para ajus-
tarla en su lugar.
Nota: Este producto no ha sido diseñado para plan-
char cuero articial, telas de seda, derivados del
plástico que necesiten bajas temperaturas o cualquier
otra bra que necesite bajas temperaturas.
Uso: si necesita tocar las prendas mientras
plancha, póngase un guante resistente al
calor en la mano con la que sujete la ropa
para evitar quemaduras.
Uso: Este accesorio se utiliza para ayudar-
le en el planchado de los cuellos de camisa
para que mantengan su forma perfecta-
mente.
CEPILLO PARA PANTALONES
GUANTES PROTECTORES ACCESORIO CUELLOS DE CAMISAS
Fiber
Cotton, hemp
Instale la barra telescópica
ACCESSORIOS
INSTALACIÓN

17
ESPAÑOL
Inserte el conector en el extremo inferior del gancho en la parte
superior de la barra telescópica y sostenga la barra de exten-
sión para presionar el gancho en su posición. El perchero se co-
loca en la posición que se muestra en la imagen de la izquierda.
Puede girarse 360 °.
Instalación del gancho y colocación del perchero
Coloque la boquilla en el gancho adecuado.
Nota: No cuelgue la manguera de vapor en el gancho para evitar
que se caiga la boquilla.
Las caídas pueden herir a alguien o dañar los rociadores de va-
por.
Posición de la boquilla
Instalación: Incline la pinza de planchado del pantalón, deje
la ranura en una esquina cerca de la pieza de instalación que
sobresale en la parte inferior de la boquilla, y luego siga este
ángulo hacia arriba suavemente.
Desinstalación: En primer lugar, incline la pinza y tire suave-
mente hacia abajo para quitarla.
Installation and removal of trouser seam clips
Retire el depósito de agua de la base del aparato, desenrosque
la tuerca en la parte inferior del depósito y llénelo de agua. En-
rosque de nuevo la tuerca y apriétela. Coloque el depósito de
agua en su posición original y asegúrese de ajustarlo.
Llenado del deposito de agua
Nota: el depósito de agua de este aparato solo
debe llenarse con agua fría. Evite utilizar agua
caliente para llenar el depósito. Del mismo modo,
no añada colonias, vinagre, almidón o cualquier
otro producto químico en el agua fría para evitar
dañar el producto.
Consejos: Para conseguir una experiencia de
planchado óptima y proteger su ropa, se acon-
seja utilizar agua pura o destilada para llenar el
depósito.
Aoje la hebilla de ajuste de la barra telescópica, estire y ajuste
las cuatro barras telescópicas a una altura adecuada, y luego
bloquee la hebilla de ajuste de la barra telescópica.
Ajuste de la altura de la barra telescópica
a
Vertical view

18 ESPAÑOL
1. Conecte el cable de alimentación a la
toma de corriente.
2. Esta plancha cuenta con dos modos de
ajuste del vapor. Puede elegir el modo de
vapor adecuado de acuerdo con el mate-
rial y el grosor de sus prendas.
3. El gancho del producto puede utilizar-
se para colgar perchas domésticas por
lo que puede colgar la ropa en perchas.
Mientras no esté planchando, ponga la
boquilla sobre la rejilla.
Cuando termine de planchar, gire el inte-
rruptor hacia la izquierda hasta la posición
de apagado para apagar la unidad y retire
el enchufe de la toma de corriente después
de conrmar que la luz indicadora de en-
cendido está apagada.
Consejos: Si no usa la plancha de vapor
durante mucho tiempo, el agua restante
en la máquina puede deteriorarse y desa-
rrollar bacterias. Corte la corriente hasta
que el agua se enfríe y luego desenrosque
la válvula de drenaje para descargar el
agua restante.
PLANCHADO APAGADO
1. Desenchufe siempre el cable antes de realizar tareas de limpieza y mantenimiento.
2. No enjuague la máquina con agua directamente, límpiela con un paño suave con un poco
de detergente neutro y luego séquela. No limpie la máquina con disolventes como la ga-
solina.
3. Después de la limpieza y el mantenimiento, todo debe estar completamente seco antes del
encendido o el almacenaje.
4. Cuando no esté en uso durante mucho tiempo, limpie el producto y retire la manguera de
vapor de la percha cuando esté seca. Luego, recoja la barra telescópica con el perchero y
retírela de la base.
LIMPIEZA Y MANTENIMIENTO
MÉTODOS DE LIMPIEZA
MÉTODO DE APLICACIÓN
• Prepare 1000 g de agua pura y viértalas en el depósito.
Añada 2 g de detergente. Después de que esté completa-
mente disuelto, coloque el depósito de agua en la base. La
máquina se calienta hasta producir vapor durante 20-30
minutos, desenchúfela y se enfriará en unos 30 minutos.
• Coloque la máquina en el fregadero o en el balde de aguas
residuales, abra la válvula de drenaje girándola hacia la iz-
quierda (no use objetos alados para raspar la pared inte-
rior del cuerpo calefactor para eliminar la suciedad) hasta
que no salga agua residual del drenaje.
• Cierre la válvula de drenaje y vuelva a colocar la máquina
en su lugar.
• Vierta el solvente restante del depósito y enjuague.
• Recomendamos que elimine los residuos una vez al mes.

19
ESPAÑOL
Nota: todo el contenido de esta sección están relacionado con la seguridad, asegúrese de
cumplirlo. Las consideraciones en esta sección son únicamente para el uso adecuado del
producto.
Las notas explican los peligros, el alcance de los peligros y los posibles accidentes.
1. No use otras piezas sin el permiso del fabricante. Si la máquina se rompe por este motivo,
la garantía nalizará automáticamente.
2. El fabricante no será responsable de ningún accidente o pérdida de bienes.
3. Compruebe si el producto está dañado y si los accesorios están completos después de
desmontar el paquete.
4. Este producto no puede ser utilizado por niños o personas sin capacidad.
5. En caso de fallo, el cable de alimentación debe retirarse de inmediato, y el producto defec-
tuoso no debe ponerse en funcionamiento. Si el cable de alimentación está dañado, debe
ser reemplazado por el personal profesional del fabricante, su departamento de manteni-
miento o un departamento similar para evitar peligros.
Signo de prohibición
Se debe prohibir cualquier acción que lleve este logotipo, de lo contrario
puede causar daños al producto o poner en peligro la seguridad personal del
usuario.
Señal de advertencia
Todas las acciones que lleven esta señal deben manipularse estrictamente
de acuerdo con los requisitos; de lo contrario, pueden dañar el producto o
poner en peligro la seguridad personal del usuario.
Señal de aviso
Todos los contenidos con el logotipo son partes a las que los usuarios deben
prestar atención, de lo contrario, un funcionamiento incorrecto causará daños
al producto u otras pérdidas.
No sumergir ni enjuagar con agua.
No encienda la energía y añada agua primero para
evitar quemaduras en seco.
No se permite el uso de este producto en exteriores.
Durante el uso, no fuerce la manguera de vapor
para doblar o bloquear la salida de aire.
Se sugiere que durante el uso de este producto no
quite el clip de planchado del pantalón para evitar
quemaduras.
En el proceso de uso de este producto, no toque
la posición de calentamiento ni la boquilla para
planchar la supercie. Cuando descargue el exce-
so de agua, corte la energía y espere a que el agua
se enfríe para evitar quemaduras.
CONSIDERACIONES

20 ESPAÑOL
Los usuarios no deben dejar el aparato sin super-
visión durante el período de planchado. Se debe
tener cuidado al usar electrodomésticos para
evitar el riesgo de salpicaduras de vapor. Al llenar
el líquido y limpiarlo, debe desenchufar el cable de
alimentación.
No añada agua caliente en el depósito, para no
causar deformación.
Preste atención a la seguridad del enchufe y la
fuente de alimentación. No arrastre ni tire del
cable.
Este producto solo se usa con toma de tierra.
Nota: para evitar los riesgos derivados del reinicio
incorrecto del disyuntor térmico, el aparato
no debe alimentarseo por un dispositivo de
conmutación externo, como un temporizador,
ni conectarlo a un circuito que se conecta o de-
sconecta regularmente.
No coloque el producto sobre una mesa, silla u
otra supercie inestable para evitar el riesgo de
vertido del producto.
Este producto es adecuado para agua del grifo Si
el agua del grifo es muy dura, se recomienda usar
agua embotellada o agua pura.
Cuando el producto acabe de empezar a funcionar,
habrá una pequeña cantidad de agua condensada
caliente desde el oricio de vapor, preste atención
a la seguridad.
Cuando utilice este producto, haga todo lo posible
para que el panel de la boquilla funcione en
dirección vertical y reduzca la dirección horizontal
hacia abajo del panel de la boquilla, para evitar las
gotas de agua de condensación.
This manual suits for next models
1
Table of contents
Languages:
Other Create Iron manuals